Reinforcement Learning Environment Tutorial (Python 3)
In this tutorial, we will create a Reinforcement Learning environment similar to OpenAI Gym Pendulum-v0. We will use a Vortex Studio model of the inverted pendulum, which is a part connected to a reference frame (static part) using a Hinge constraint. This Environment will be compatible with a Keras DDPG (Deep Deterministic Policy Gradient) Agent. The training algorithm is already coded, so we need to create an Environment (env class) that interfaces the AI Agent with the Vortex simulation.
Name | Location |
|---|---|
| Reinforcement Learning Environment | <Vortex Studio Installation Folder>\tutorials\Python\Vortex\Python\Vortex\PyLearningEnvironment |
Looking at the file structure
Before we begin, let's look at the files available in PyLearningEnvironment folder. If you can't find it in your installation folder, download the attached zip package and extract it to your working folder.
Vortex Resources Folder
This folder contains Setup.vxc. It's a barebones application setup with an Engine module and a Debugger Window.
In "Pendulum", you will find also the Pendulum Mechanism, Assembly, Graphics Gallery and embedded scripts. Open Pendulum.vxmechanism with the Vortex Editor. You will notice there are two VHL Interfaces, "RL Interface" and "Settings".
In "Settings", you'll be able to modify the pendulum mass and color.
"RL Interface" will be used to send and receive data to and from the DDPG Agent. It outputs observations cos, sin and speed (ω), which are derived from the rotational position and speed of the pendulum (see image below). It inputs torque (τ) , which is the added torque on the hinge, and the only output from the DDPG Agent. episode and reward are there solely for the HUD.
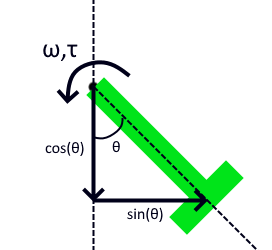
In this example, we are rewarding the Agent for maximizing -cos (standing upwards) and minimizing abs(sin) and speed (to prevent the Agent from spinning really fast). This reward is updated each time the algorithm extract observations, and the total reward is then updated to our RL Interface VHL. In the Vortex mechanism, this is only used to display on the HUD.
An Episode is a run of the simulation, stopped either by a timeout or by a critical event (like a collision)
models.py
Script that contains the actor and critic models. These models use Tensorflow Keras libraries, more details can be found here.
train_ddpg.py
This python script contains the main loop that trains the model. This code is heavily inspired by the example provided by Keras for a DDPG algorithm. You can refer to it here. You'll notice that this script imports the env class from environment, which is the Vortex Studio Gym-like environment we're going to be building.
If you want to find out more about Reinforcement Learning, we highly recommend the machine learning tutorials by Sentdex.
run_ddpg.py
This script lets you load a saved model and run it, without any training or noise.
environment.py
The gym environment script that will create a Vortex Studio Application and load the Pendulum and calculate the reward. For now, this script file is empty and will be the main focus of this tutorial.
environment_solution.py
This file contains the solution for this tutorial. You can simply rename it to environment.py and skip this tutorial to get the solution. But what's the fun in that?
Setting up the Python 3 Interpreter.
Install a Python 3.8.6 64-bit distribution.
Note
This tutorial is only compatbile with Python 3.8. We have made a similar example using the Python 2.7 interpreter. You can download the assets here : https://github.com/masoudhassani/inverted_pendulum
- Add this Environment Variable to your System variables:
PYTHONPATH="C:\CM Labs\Vortex Studio <version>\bin"
Where <version> is your installed version (ex. 2020b).Make sure you have Vortex Studio installed in the same drive as your Python interpreter. We've found that Python doesn't seem to include Vortex library if they're not installed in the same drive.
- Install the following packages to your interpreter:
- Gym
- Tensorflow
- Numpy
Matplotlib
You might need to upgrade pip in order to install Tensorflow. Refer to https://www.tensorflow.org/install for details on installation.
- Open Vortex Resources/Setup.vxc.
- Select Setup in the Explorer to access its properties.
In the Python 3 section of its Parameters, change the Interpreter Directory to your Python 3 interpreter folder. By default, Python installs in "C:/Users/<user>/AppData/Local/Programs/Python/Python38".
Note
We need to do this step because the Pendulum Mechanism uses Python 3 scripts. When running a Vortex application with Python, the interpreter of the main application has to be the same as the one used by scripts in the content.
Defining the env class, its constructor and destructor
- Open environment.py
Add imports.
import Vortex
import vxatp3
import numpy as np
We import vxatp3, which is the Vortex Automated Test Platform library. It's a toolset designed to allow automated testing of Vortex, which is very useful in the case of Reinforcement Learning, where you have to load and reload the same environment over and over. This library is included when installing Vortex to you Python 3.8 Interpreter.
Next, we'll create the env class and init function. At this step, we'll define the setup file and the mechanism to be loaded. We'll also create the Vortex Application and create a 3D display.
class env():

    def __init__(self):

        # VxMechanism variable for the mechanism to be loaded.
        self.vxmechanism = None
        self.mechanism = None
        self.interface = None

        # Define the setup and mechanism file paths
        self.setup_file = 'Resources/Setup.vxc'
        self.content_file = 'Resources/Pendulum/Pendulum.vxmechanism'

        # Create the Vortex Application
        self.application = vxatp3.VxATPConfig.createApplication(self, 'Pendulum App', self.setup_file)

        # Create a display window
        self.display = Vortex.VxExtensionFactory.create(Vortex.DisplayICD.kExtensionFactoryKey)
        self.display.getInput(Vortex.DisplayICD.kPlacementMode).setValue("Windowed")
        self.display.setName('3D Display')
        self.display.getInput(Vortex.DisplayICD.kPlacement).setValue(Vortex.VxVector4(50, 50, 1280, 720))
Note
The 3D Display could've been added to the Setup file, but we create it here to have it stored in the variable self.display. That way, we'll be able to add/remove it from the application at will, whether or not we want to render the simulation. You may have noticed that the Graphics Module is present in the Setup file, because we don't need to remove the module when we're not rendering the simulation.
Still in the __init__ function, we need to define the observations and actions spaces. This code defines the shape and expected ranges of actions and observations. It is very similar than what can be found in Pendulum-v0. You might notice that the torque output from the model is [-1, 1] N.m, which is very low compared to what it takes to even move the pendulum. This is because Neural Networks work better when their outputs vary between -1 and 1, so this value will be multiplied later in the code.
        # Initialize Action and Observation Spaces for the NN
        self.max_speed = 8.0
        self.max_torque = 1.0

        high = np.array([1., 1., self.max_speed])
        self.action_space = np.array([-self.max_torque, self.max_torque, (1,)])
        self.observation_space = np.array([-high, high])
Finally we define a simple destructor method to handle the cleanup of the Vortex application.
    def __del__(self):
        # It is always a good idea to destroy the VxApplication when we are done with it.
        self.application = None
Defining reset()
The reset function is called before each episode. The first time this function is called, we want to load the mechanism and save the first keyframe. Each subsequent time this function is called, we want to reload this first keyframe. This allows to reset the simulation without having to constantly reload the content, making the process much more efficient.
Let's create the function and initialize the reward and step count.
    def reset(self):

        # Initialize Reward and Step Count
        self.current_step = 0
        self.reward = 0
The first reset, when the mechanism is not yet loaded, we're going to load the mechanism and populate the variables vxmechanism, mechanism and interface with their corresponding object in the Vortex simulation. This has to be done while the application is in kModeEditing (not simulating).
        # The first time we load the mechanism
        if self.vxmechanism is None:
            #Switch to Editing Mode
            vxatp3.VxATPUtils.requestApplicationModeChangeAndWait(self.application, Vortex.kModeEditing)

            # Load mechanism file and get the mechanism interface
            self.vxmechanism = self.application.getSimulationFileManager().loadObject(self.content_file)
            self.mechanism = Vortex.MechanismInterface(self.vxmechanism)

            # Get the RL Interface VHL
            self.interface = self.mechanism.findExtensionByName('RL Interface')
Then we'll save the first frame as a Key Frame. For more information about Key Frames refer to Using Keyframes to restore the initial positions. Key Frames can only be saved/loaded in kModeSimulating.
            # Switch to Simulation Mode
            vxatp3.VxATPUtils.requestApplicationModeChangeAndWait(self.application, Vortex.kModeSimulating)

            # Initialize first key frame
            self.application.update()
            self.keyFrameList = self.application.getContext().getKeyFrameManager().createKeyFrameList("KeyFrameList", False)
            self.application.update()

            self.keyFrameList.saveKeyFrame()
            self.waitForNbKeyFrames(1, self.application, self.keyFrameList)
            self.key_frames_array = self.keyFrameList.getKeyFrames()
Note
You'll notice that self.waitForNbKeyFrames is not defined. This function makes sure that the keyframe was properly saved before we continue with the simulation. We'll add it further into the code.
- On the subsequent calls of reset(), we'll simply reload the Key Frame saved in the first reset() call. Again, making sure we're in Simulating Mode.
        # Other times we reset the environment
        else:
			# Switch to Simulation Mode
            vxatp3.VxATPUtils.requestApplicationModeChangeAndWait(self.application, Vortex.kModeSimulating)

            # Load first key frame
            self.keyFrameList.restore(self.key_frames_array[0])
            self.application.update()
This function also needs to return observations. Note that _get_obs() will be added afterwards.
return self._get_obs()
Let's now define waitForNbKeyFrames(). This code is documented in Using Keyframes to restore the initial positions.
    def waitForNbKeyFrames(self,expectedNbKeyFrames, application, keyFrameList):
        maxNbIter = 100
        nbIter = 0
        while len(keyFrameList.getKeyFrames()) != expectedNbKeyFrames and nbIter < maxNbIter:
            if not application.update():
                break
            ++nbIter
Defining step()
The step function is called at each step of the simulation from the perspective of the Agent. It will pass the chosen action value of the Agent to the Interface, run a certain number of sub-steps, then gather observations. Based on those observations, it will also calculate a reward.
The step() function only expect the "action" variable, which is a numpy array with only one element in our case. We need to apply this action to the 'torque' input of the interface. Once that's done, we can update() the Vortex simulation a certain number of sub steps. We can then gather observations by calling _get_obs().
    def step(self, action): #takes a numpy array as input

        # Apply actions
        self.interface.getInputContainer()['torque'].value = action[0] * MAX_TORQUE

        # Step the simulation
        for i in range(SUB_STEPS):
            self.application.update()

        # Observations
        obs = self._get_obs()
In the Pendulum case, the only reason we want to reset the simulation is after a number of time (MAX_STEPS) has passed. In other cases, the done flag can be set to True if a key event happens, like an ultimate goal or failure (like a car collision).
        # Done flag
        if self.current_step >= MAX_STEPS:
            done = True
        else:
            done = False
Calculate the reward function from the observations. In this case, we increase the reward for height (-cos) and decrease the reward for horizontal position (sin) and speed.
        # Reward Function
        # Rewarding the cos (vertical) component
        reward = - obs[0] * VERTICAL_REWARD
        # Penalizing sin (horizontal) position
        reward += - abs(obs[1]) * HORIZONTAL_PENALTY
        # Penalizing speed (We want the Pendulum to be stable)
        reward += - abs(obs[2]) * SPEED_PENALTY
Iterate the step counter and return obs, reward, done, info (we have no info, so it's an empty tuple).
        self.current_step += 1

        return obs, reward, done, {}
At the start of the script, add those parameters used in the step() function :
#Environment Parameters
MAX_TORQUE = 1500
SUB_STEPS = 5
MAX_STEPS = 200
SPEED_PENALTY = 0.1
VERTICAL_REWARD = 1
HORIZONTAL_PENALTY = 0.7
Defining _get_obs()
This function simply returns a numpy array of the outputs of the mechanism interface.
    def _get_obs(self):

        #Extract values from RL_Interface
        cos = self.interface.getOutputContainer()['cos'].value
        sin = self.interface.getOutputContainer()['sin'].value
        speed = self.interface.getOutputContainer()['speed'].value

        return np.array([cos, sin, speed])
Defining render()
The render() function we use here is a bit different than the same function found in Gym's Pendulum-V0. It receives the variable active which defines whether or not the simulation will be rendered in this episode.
To activate or deactivate rendering, we'll simply add or remove the display we created in the __init__() function.
First, get the list of current displays present in the application. Normally, list should only have 0 or 1 element.
    def render(self,  active=True):

        #Find current list of displays
        current_displays = self.application.findExtensionsByName('3D Display')
When active is True, add a display and activate Vsync. When active is False, remove any display present and remove sync.
        #If active, add a display and activate Vsync
        if active and len(current_displays) == 0:
            self.application.add(self.display)
            self.application.setSyncMode(Vortex.kSyncSoftwareAndVSync)

        #If not, remove the current display and deactivate Vsync
        elif not active:
            if len(current_displays) == 1:
                self.application.remove(current_displays[0])
            self.application.setSyncMode(Vortex.kSyncNone)
Training and running the model
- To train the model, launch train_ddpg.py. When it's done, this will save the actor and critic checkpoints in a folder called "models"
- To run a trained model, edit run_ddpg.py. Change the LOAD_MODEL_ACTOR path to one of the saved actor models. Be careful not to put a critic model!