ROS Tutorial: Vortex and ROS2 co-simulation using Python
Introduction
Doing co-simulation between a Vortex application and a ROS2 ecosystem can be done easily from embedded python scripts. For example, one can write scripts that publish and/or subscribe some topics over a ROS2 set of nodes.
This tutorial will walk you through the steps to write such a script and how to set up a scene where a mechanism will be controlled from an external ROS2 node. The end result of this tutorial are shown in the animation below.
Prerequisites
- The user should know ROS2 at beginner level.
- Optionally, knows how to install and compile a ROS2 package.
- You may have to install colcon. To do so, type the following in a command window:
pip install -U colcon-common-extensions
- You may have to install colcon. To do so, type the following in a command window:
- The user should be familiar with the following Vortex concepts:
- Vortex Editor workflow and its Connections Editor
- Vortex Python3
- Scene, mechanism and vehicle system
Requirements
ROS2 Foxy Fitzroy must be installed on the system (Windows only).
- The starting page for ROS2 Foxy installation is: ROS2 Foxy Fitzroy Installation Instructions
- The additional DDS Implementation (Optional) can be skipped
- The tutorial runs on a pre-build version: release-foxy-20201211
In some cases, it seems that QT binaries have to located. In such cases the environment variable need to be set like: QT_QPA_PLATFORM_PLUGIN_PATH=<ROS2InallationPath>\bin\platforms
- The starting page for ROS2 Foxy installation is: ROS2 Foxy Fitzroy Installation Instructions
Info
See here for official information from ROS that can be helpful during the ROS2 setup process.
The environment variable PYTHONPATH must include the site-packages folder of the ROS2 installation. For example:
PYTHONPATH=F:\ROS2\ros2_foxy\Lib\site-packages
Make sure that the ROS2 dlls are in the path. For example:
PATH=F:\ROS2\ros2_foxy\bin;%PATH%
Changing the setup file
To be able to load rclpy modules in vortex embedded python scripts, it is necessary to use an external python 3 interpreter. To do so, open the setup.vxc file related to the vortex application that you are using and choose the interpreter of your choice.
The supported Python 3 release in Vortex Studio 2021a is version 3.8.
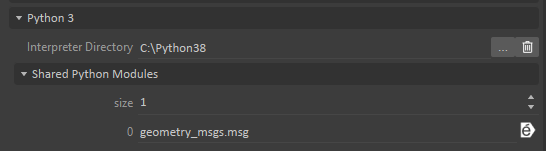
Also, depending on the specific rclpy module(s) that a script needs during runtime, it's possible that some modules would have to be added to the Shared Python Modules list.
For example, to do so in the Vortex Editor, open the editor.vxc file. In the Explorer panel, select Setup and finally, choose a python 3 interpreter and add some specific ROS2 module if required, as shown in the next image. For more details on using embedded python script in Vortex, see Python 3 Scripting
Creating the scene
To easily understand the workflow, lets use a simple co-simulation example where a vehicle will be simulated in the Vortex Editor and where the throttle and the steering will be controlled by an external ROS2 node.
So, lets start with creating a new Scene and add to it a vehicle. Choose one of the wheeled vehicle from the Vortex Samples Folder. Optionally, add some light properties to the scene.
Add a python script to the scene
In this section, we show how to add to the scene a simple python script that will implement a ROS2 subscriber.
Please, take notes that the ROS2 web site contains a ton of examples and tutorials to do these sort of topic subscription/publication.
Step one: Create a python 3 script:
In the Vortex Editor, create a python 3 script. As usually, set the path to the implementation of the script file.
Add to the scripts two outputs of type double with name:
- Throttle
- Steering
Step two: Importing modules
Open the script file in a text editor and make sure that the necessary python modules from vortex and from ROS2 are imported. In the given example, the topic will be of type float.
import Vortex

import rclpy
from rclpy.node import Node
from std_msgs.msg import Float64

import sys
Step three: Create a ROS node and a subscriber:
This step is common in ROS2 python scripting, please, refer to ROS2 rclpy documentation and tutorials for more details.
# create a ROS node
class VortexRosSubscribingNode(Node):

    def __init__(self, nodeName):
        super().__init__(nodeName)

    pass

# create a subscriber and register it to the given node
class Subscriber():

    def __init__(self, node):
        self.subscriber_1 = node.create_subscription(Float64, '/throttle', self.listener_callback_1, 10)
        self.subscriber_2 = node.create_subscription(Float64, '/steering', self.listener_callback_2, 10)
        self.subscriber_1  # prevent unused variable warning
        self.subscriber_2  # prevent unused variable warning
        self.throttle = 0.0
		self.steering = 0.0
        pass

    def listener_callback_1(self, msg):
        self.throttle = msg.data
        pass

    def listener_callback_2(self, msg):
        self.steering = msg.data
        pass
Step four: Handle the simulation loop:
The next step is common to vortex scripting. Here the relevant methods that have to be implement are: on_simulation_start(), on_simulation_stop() and pre_step()
# called once by the vortex dynamics module when the simulation is started
def on_simulation_start(extension):
    rclpy.init(args=sys.argv)
    extension.node = VortexRosSubscribingNode("vortex_subscriber")
    extension.subscriber = Subscriber(extension.node)
    pass
# called once by the vortex dynamics module when the simulation is stopped
def on_simulation_stop(extension):
    extension.node.destroy_node()
    rclpy.shutdown()
    pass
# called every simulation steps by the vortex dynamics module during simulation
def pre_step(extension):
    rclpy.spin_once(extension.node, executor=None, timeout_sec=0.0)  # timeout == 0.0  so that spin_once do not wait for a task to be ready

    # make sure that this script has two output fields of type float and
    # use the connection editor of the Vortex Editor to feed the subscribed value to a vortex property.
    if extension.getOutput("Throttle") is not None:
        extension.getOutput("Throttle").value = extension.subscriber.throttle

    if extension.getOutput("Steering") is not None:
        extension.getOutput("Steering").value = extension.subscriber.steering

    pass
The python code for the subscriber script can be found here: ROSSubscriber.py
Finalize the vortex simulation
Now that the vortex scene contains a vehicle and a script that subscribes topics, the last step is to use the Connections Editor to connect the outputs of the script to the inputs of the vehicle standard interface.
For example:
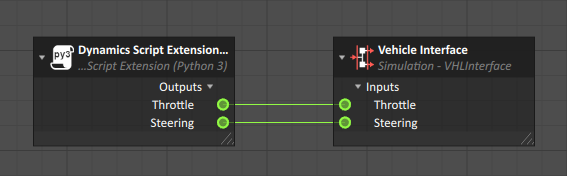
What is happening here is that, during simulation, the script subscribes to ROS two topics of type Float64 (see step three above) and write the value to its output fields (see step four, third code block). The connection sets the value of these outputs to the Vehicle Interface Throttle and Steering.
Running the simulation
After having follow the above steps, the scene doesn't contain a terrain. Optionally, add a terrain to the scene, otherwise, right click in the 3D View and choose Grid... then select the Use Grid option.
Notice that, at this point of this tutorial, there is no ROS2 node that publishes the topics that are subscribed by the script. The next section explains one way to publish the steering and throttle topics. But before going there, it's a good idea to quickly assess if the simulation works as expected.
To do so, run the simulation in the Vortex Editor and, from a command shell where ROS2 has been successfully sourced, run the following commands:
| command | result |
|---|---|
| ros2 node list | /vortex_subscriber |
| ros2 topic list | /parameter_events |
| ros2 topic info /steering | Type: std_msgs/msg/Float64 |
| ros2 topic pub /steering std_msgs/Float64 "data: 1" | The front wheels are fully turned on right |
The last piece of the puzzle
For convenience, here is a python script that can be used to create a ROS2 package. The code is set to publish throttle and steering values based on key strikes. Feel free to create a ROS2 package from it.
The user should be familiar in building ROS2 packages.
- You may have to install colcon. To do so, type the following in a command window:
pip install -U colcon-common-extensions
import sys

import geometry_msgs.msg
import rclpy
from std_msgs.msg import Float64

if sys.platform == 'win32':
    import msvcrt
else:
    import termios
    import tty

throttle_bindings = {'w': 0.5, 's': -0.5}
steering_bindings = {'a': -0.5, 'd': 0.5}
exit_keys = ['c', 'q']


def getKey(settings):
    if sys.platform == 'win32':
        # getwch() returns a string on Windows
        key = msvcrt.getwch()
    else:
        tty.setraw(sys.stdin.fileno())
        # sys.stdin.read() returns a string on Linux
        key = sys.stdin.read(1)
        termios.tcsetattr(sys.stdin, termios.TCSADRAIN, settings)
    return key


def get_platform_configuration():
    if sys.platform == 'win32':
        return None
    return termios.tcgetattr(sys.stdin)


def restore_terminal_settings(old_settings):
    if sys.platform == 'win32':
        return
    termios.tcsetattr(sys.stdin, termios.TCSADRAIN, old_settings)


def main():
    settings = get_platform_configuration()
    rclpy.init()
    node = rclpy.create_node('driving_car')
    logger = node.get_logger()
    pub_throttle = node.create_publisher(Float64, '/throttle', 10)
    pub_steering = node.create_publisher(Float64, '/steering', 10)
    current_throttle = Float64(data=0.0)
    current_steering = Float64(data=0.0)
    logger.info("Car control node running")

    try:
        while True:
            key = getKey(settings)

            if key in exit_keys:
                break

            if key in throttle_bindings.keys():
                current_throttle.data = max(min(current_throttle.data + throttle_bindings[key], 1.0), 0.0)
            if key in steering_bindings.keys():
                current_steering.data = max(min(current_steering.data + steering_bindings[key], 1.0), -1.0)
            logger.info("Throttle = %.3f, Steering = %.3f" % (current_throttle.data, current_steering.data))
            pub_throttle.publish(current_throttle)
            pub_steering.publish(current_steering)
    except Exception as e:
        print(e)
    finally:
        node.destroy_node()
        rclpy.shutdown()
        restore_terminal_settings(settings)


if __name__ == '__main__':
    main()
An archive containing the script above along with the necessary files to create the driving car package is provided here: driving_car.zip
Here is a reminder on how to proceed to compile this ROS2 package:
- unzip driving_car.zip in an empty folder
- from that folder, open a command prompt, (make sure to source ROS2) and type the following:
- colcon build --packages-select driving_car
To run the package:
- Source the package
- call install/setup.bat
- Run the package
- ros2 run driving_car driving
- strike keyboard keys a, d, w or s to drive the car
- strike c or q to stop the process
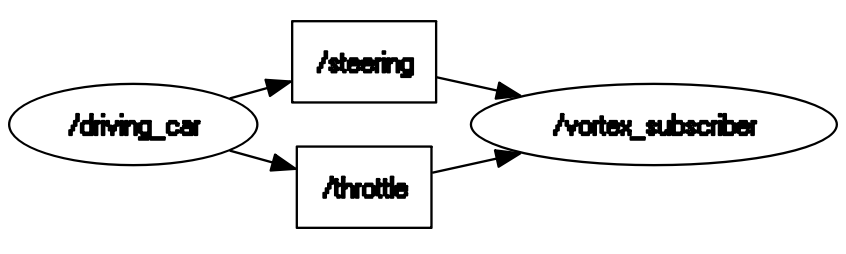
The following picture shows a view of the Node Graph of the simulation (visualize using rqt_graph) with the driving_car process (that is created by the script above), running side-by-side with the simulation in the Vortex Editor.