Vehicle Presets Tutorial 5 : Adding Tire Ruts
In this tutorial, we're going to learn how to simulate tire ruts with our tire models.
Prerequisites
This module assumes that Vehicle Presets Tutorial 3 : Adding Tire Models to a Wheeled Vehicle is completed.
Enabling the Soil Hardening Feature
- Open the LAV Tutorial mechanism you worked on in the previous modules.
- Click on the Mud Tire Type created in Module 3. Under Parameters > Pressure Sinkage, set Enable Soil Hardening to True.
Setting up the Earthworks Zone
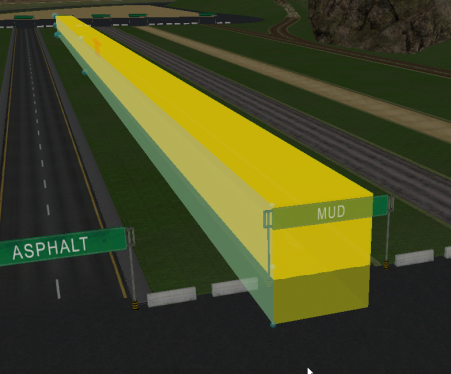
- Open the LAV Test Track scene created in Vehicle Presets Tutorial 3 : Adding Tire Models to a Wheeled Vehicle.
From the Earthwork Systems section of the Toolbox, insert an Earthwork Zone.
Note
Adding an Earthwork Zone will also add a folder called Earthwork Systems that contains extensions related to the soil. Soil Dust and Soil Particles will not be useful for this tutorial, so we can delete those extensions.Select the Dynamics component of the Earthwork Zone extension.
Using the Move (Ctrl+2) and Resize (Ctrl+4) tools, fit the Zone over the mud track of the terrain. Make sure that the shape covers the whole surface.
Under Parameters, enable Diggable.
Change the Material to Mud.
Modify the Cell Size to 0.100 m.
Setting up the Graphics
- From the Graphics section of the Toolbox, insert Galleries From Files.... Click on Browse... and select Loam.vxgraphicgallery under the path "<Demo Scenes\Equipment\Excavator\Graphic".
- Select the Graphics component of the Earthwork Zone. Assign the Loam_Soil material from the Loam graphic gallery to the Materiall property.

- Under Parameters, set Minimum Height Deformation to 0.020 m.
- Set CellOverlapNumber to 2.
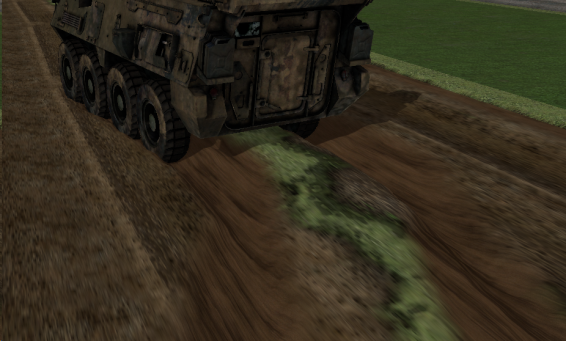
- Using the gamepad, drive the LAV onto the Mud track that is now a deformable terrain. Make sure that ruts form behind wheels.