Network Tutorial 3 : UDP Communication with Altair Activate®
In this tutorial, you will learn how to exchange information with an Altair Activate® model using the Vortex UDP extensions.
Communication between multiple simulation software can be very useful in order to integrate models coming from different platforms. In Vortex® Studio, this is made possible by using the UDP communication protocol to exchange information between the Vortex simulation and other software running on a local or remote network.
The example used in this tutorial is a simplified cruise control of a sports car. When activated, the cruise control automatically regulates the throttle of the engine in order to keep the speed of the car constant to the current value. The cruise control program is an Altair Activate® model and will be ran on the same machine as Vortex®.
For more information about the UDP extensions, consult the Network Extensions documentation.
Configuring UDP Extensions in the Sports Car Mechanism
In this section, we will add "Receive" and "Send" UDP extensions to the car mechanism allowing information to be exchanged with the Activate program.
Open the sports car vehicle workshop mechanism found in your Vortex Demo Scenes folder: (../Equipment/Vehicle_Sports_Car/Dynamic/Sports Car_Workshop.vxmechanism).
Note
This car has all of the parts, constraints, collision geometry, car model and, driving controls already defined. Only the cruise control program needs to be added.In the Network section of the Toolbox, insert a UDP Receive object in the Vehicles folder (by drag-and-drop) in the Explorer. Repeat this step with a UDP Send object.


In the Network section of the Toolbox, insert a UDP Receive in the Vehicles folder (by drag-and-drop) in the Explorer.
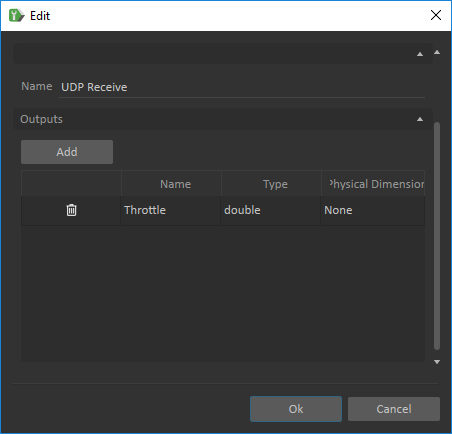
From the Explorer, right-click on the UDP Receive object and select Edit from the drop down menu.
Add an output and change its name to Throttle. Make sure it type is set to Double and Physical Dimension to None, then click on "Ok".
In the Parameters section of the UDP Receive Properties, change the Local port value to 20103.
Info
The port number 20103 was used for simplicity, since the default remote port used by Vortex is 20102. Any known unused port can be used. Lists of known TCP/UDP ports can be found online.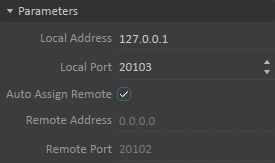
From the Explorer, right-click on the newly added UDP Send object and select Edit from the drop down menu.
Add three inputs with the following properties :
Name
Type
Physical Dimension
Current Speed
Double
None
Current Throttle
Double
None
Cruise Control Active
Double
None
Warning
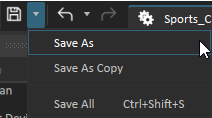
Following the order is important because it will have to match the order in which the data is packed in the cruise control program.Save the mechanism in your working directory.
Establishing Connections
In this section, we connect the inputs and output from the UDP communication to variables from the components in the mechanism.
- From the Basicssection in the Toolbox, insert a Connection Container. Rename it Cruise Control Connections.
- Open the Connections Editor by double-clicking on it.

Locate the following objects in the Explorer and insert the listed input or output from their Properties in the connection container:
Path > Object
Input/Output (Section)
Vehicles > UDP Receive
Throttle (Outputs)
Vehicles > UDP Send
Current Speed; Current Throttle; Cruise Control Active (Inputs)
Roles > Joystick
ToggleButton4 (Outputs)
Vehicles > Car FWD > Dynamic Component
Input Throttle (Inputs > Throttle Logic); Speed (Outputs > Chassis)
Vehicles > Vehicle Controller
Throttle (Outputs)
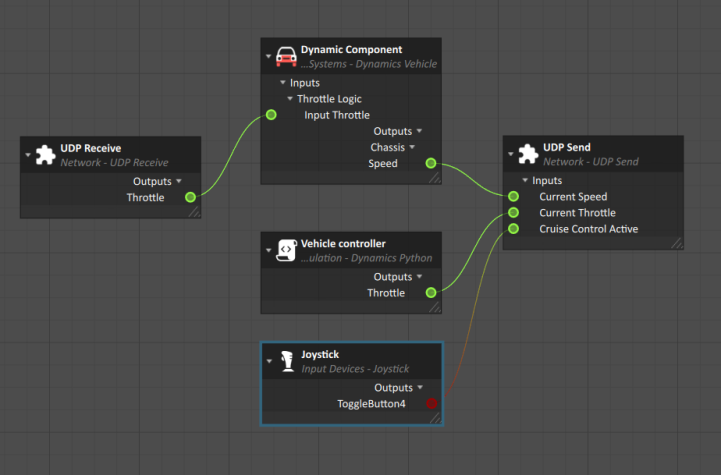
Link the inputs and outputs together as shown in the picture:
Save the mechanism.
Setting up the Cruise Control Activate Model
In this section, we configure the UDP communication in the Activate cruise control model.
Note
In Altair Activate, open the Cruise Control workshop model downloaded here :
Info
This model was made using Altair Activate 2020 build 6029. It's using a tunable PID to control the speed of the vehicle. The 3 Gains on the left are there to keep the existing connections intact.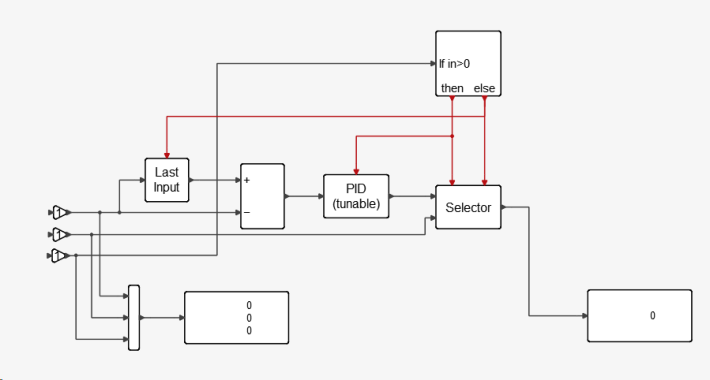
- From the Communicate palette, insert a udp server block.
Set the following properties to these values, then click OK.
Property
Value
Port number
20102
Timeout
16 msec
Packet size
-1
- Insert a Deserialize block.
Set the following properties to these values, then click OK.
Property
Value
Number of outputs
3
Output ports > Data Type (all)
'double'
Byte alignment
1
Endianness
'host' (little Endian)
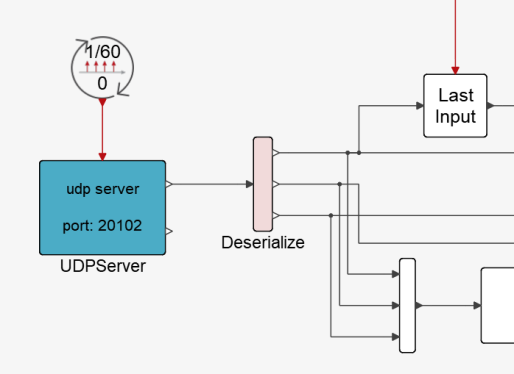
- From Activate > ActivationOperations, insert a SampleClock block.
- Set the Sample period to 1/60. This corresponds to the framerate of the Vortex simulation (60 Hz).
- Connect the components as shown below :
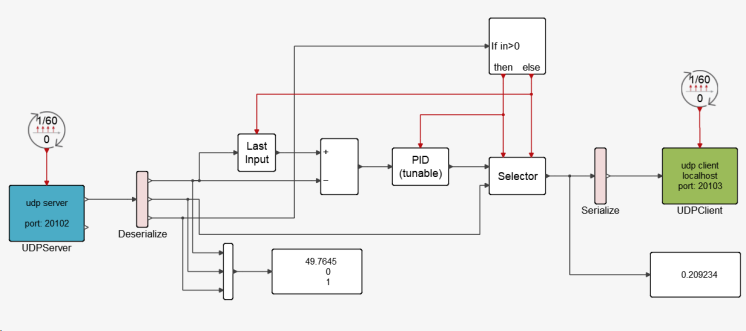
- From the Communicate palette, insert a udp client block.
Set the following properties to these values, then click OK.
Property
Value
Server IP
'localhost'
Port number
20103
Insert a Serialize block.
Set the following properties to these values, then click OK.
Property
Value
Number of inputs
1
Byte alignment
1
Endianness
'host' (little Endian)
Copy the SampleBlock and connect the components as shown below :
Save the model.
Note
You can find the solution of the Activate model here:
Testing the Cruise Control
In this section, we add the sports car mechanism to an empty scene and test the cruise control program.
Note
- Open the Sports Car Workshop scene found in your Vortex Demo Scenes folder: (../Scenario/SportsCar Scene/Sports Car_Workshop.vxscene).
- From the Basics section of the Toolbox, add a Mechanisms From Files
- If your Sports Car Mechanism is open on another tab, choose it from the list of Opened Resources. If not, click on Browse and locate it.

- Move the mechanism on the road or in a location where it is going to be easy to maneuver.
- In Activate, Run the simulation.
- Test (F7) the scene in Vortex.
- Drive the car in Vortex. Pressing the Y button will activate or deactivate the cruise control. Notice that when the cruise control is activated, the speed of the car is stable even if using the throttle joystick. Deactivating the cruise control lets you regain control of the car's acceleration.