Vortex Studio SDK - Customizing Vortex
- DEVOPS
This chapter aims at developers who want to extend Vortex with more functionality or communicate from Vortex to and from an external system.
About Plugins
Vortex plugins allow developers to add more functionality to Vortex. Functionality is added by Extensions and Modules.
Extensions add features to content: They are mostly data containers with an implementation known by a module.
Modules control an aspect of the simulation. They consume the extensions' data and provide behaviour.
When an extension is used by a module, it is said that the extension is managed by that Module and is considered active.
Extensions and Modules are packaged in plugins. Vortex Studio provides multiples plugins and the Vortex Studio SDK allows users to create their own and extend Vortex.
Making a plugin
Technically speaking, plugins are actually dynamics libraries with a 'vxp' extension publishing specific interfaces to allow the plugin manager to gather information and instantiate modules and extensions.
Tutorials
Vortex Studio provides some tutorials showing how to create a plugin. It is strongly recommended to use them as a starting point.
Vortex uses CMAKE to generate the project solution and comes with a pre-generated Microsoft Visual Studio solution.
See code tutorials C++ Tutorial 1: Plugins and Devices for examples.
The code tutorial are located in <your CM-Labs installation folder>/tutorial
Vortex Studio will load these .vxp and will invoke the following methods, which must be implemented:
#ifdef _MSC_VER
#define SYMBOL __declspec(dllexport)
#else
#define SYMBOL
#endif

extern "C" SYMBOL bool GetPluginInfo(VxPluginSystem::VxPluginInfo & pluginInfo)
{
    pluginInfo.setDisplayName("My Plugin Name");
    pluginInfo.setVendor("My Vendor Name");
    pluginInfo.setDescription("A description of my plugin");
    return true;
}

extern "C" SYMBOL bool InitializePlugin(VxPluginSystem::VxPluginManager & pluginManager, int /*unused*/, char ** /*unused*/, std::string * /*unused*/)
{
    return VxSim::VxExtensionFactory::registerType<MyExtension>(MyExtension::kFactoryKey, pluginManager.getCurrentVXP());
}

extern "C" SYMBOL bool UninitializePlugin(VxPluginSystem::VxPluginManager & pluginManager, std::string * /*unused*/)
{
    return VxSim::VxExtensionFactory::unregisterType(MyExtension::kFactoryKey);
}
GetPluginInfo- Used by the plugin manager to collect information on the plugin so that it can be displayed e.g. in a selection page of the Editor.
InitializePlugin- Called by the plugin manager to give the opportunity to the plugin to register its modules and extensions to the extension factory.
UninitializePlugin- Called by the plugin manager when unloading the plugin. Extensions and modules should be unregistered from the extension factory.
Good Practices
These methods code should be in a dedicated cpp file, e.g. plugin.cpp, inside the project of your plugin.
Each implementation of a module or an extension should have its own cpp and header files.
Vortex Studio versions are not binary compatible. When upgrading Vortex Studio to a newer version, custom plugins MUST be recompiled.
Extensions and Modules
Extensions are first-class objects of Vortex. In Vortex Studio, everything you see in the Editor is an extension: scenes, parts, graphics galleries, graphic nodes and materials, source and listeners, Python scripts, etc.
Objects added to the Setup are also extensions; modules are also extensions. The setup itself is an extension.
Knowing how to create extensions is essential for extending Vortex. An extension is a C++ class that implements the IExtension interface and some other interfaces depending on the target functionality.
An extension is defined by its factory key and the interface it implements. Its data are called fields.
Factory Key
Each object is characterized by a factory key. A factory key uniquely defines a type of extension with a universally unique identifier (UUID).
The UUID is simply a 128-bit value that shall never change once the extension is used in content: it will be used when any content is persisted.
Several tools can be used to generate a UUID (e.g. Visual Studio).
The factory key also has additional members that help to define the extension with human-readable information.
/// Information that allow access to a plugin through the VxExtensionFactory
///
class VxFactoryKey
{
public:
    /// UUID for this key
    ///
    VxUuid uuid;
    /// Category name
    ///
    std::string categoryName;
    /// Feature name
    ///
    std::string featureName;
    /// VXP, or DLL, file name if applicable without the extension
    ///
    std::string vxpName;
};
- uuid: Unique identifier of the extension
- Category Name: Category for the extension. Used for display in the editor as the category. However, all modules are bundled under modules no matter the category
- Feature Name: Type of the extensions. This name appears in the editor in the toolbox
- vxpname: Name of the vxp having this extension. When the factory creates an extension, it will look up this name and try to find the file having this name plus the extension ".vxp".
The factory key can be created locally when registering the extension in the plugin. However, the key is also useful when creating or filtering from outside of the plugin so the SDK often published the key in a header.
The example below is the factory key of the dynamics module (called Engine). The module can be loaded from the plugin VxDynamicsPlugin.vxp located in <your CM-Labs installation folder>/plugins

/// Factory Key for the VxDynamicsModule
///
const VxSim::VxFactoryKey kFactoryKey(VxSim::VxUuid("{3a6c7474-6a01-5f06-ac36-c3a0d7cad4bf}"), "Dynamics", "Engine", "VxDynamicsPlugin");
Extension Interface
There are three major types of extensions. Any extension must derive from one and only one of these interfaces:
VxSim::IExtension: an extension that adds features to content (mechanism, scene) or to the application.VxSim::IObject: an object that has the same features as IExtension, but can also have child extensions (useful to create more complex systems for content).VxSim::ISimulatorModule: a module manages certain types of extensions and calls their methods at the appropriate moment during the application update. Modules can only be added to aVxApplicationorApplicationConfig.
The interface will be called at the appropriate moment by Vortex to achieve the desired functionality.
IExtension Interface
IExtension is the most basic interface for extensions. It is necessary to support basic functionalities of Vortex Toolkit such as serialization, network, and keyframes.
It should generally be used when implementing simple extensions. The extension's data is contained in VxSim::VxExtension that can be obtained with getProxy().
IExtension has a single constructor:
IExtension::IExtension(VxSim::VxExtension* proxy, int version = 0);
It must be used by all extensions. The proxy will be provided by VxExtensionFactory but the version needs to be provided by the actual implementation. Versioning will be used when loading and saving the extension.
The constructor of an extension always has the following basic form:
const int kCurrentVersion = 20210315;

class MyExtension : public VxSim::IExtension
{
	public:
		MyExtension(VxSim::VxExtension* proxy)
			: VxSim::IExtension(proxy, kCurrentVersion)
		{
		}
};
Good Practices
Application Context
An extension has access to some information about the application, notably the application mode, the current frame, and additional services. See Vortex Studio SDK Advanced - Integrating the Application
Active and Inactive extension
When a module has accepted to manages an extension, the extension itself will be notified with the callback IExtension::onActive().
This method is a good point to initialize your extension, create internal data and register your observers.
An active extension will have its observers called and will be processed by its module. An inactive extension will not be invoked. For example, a dynamics extension is active on the master node and inactive on the slave node. Its data is only processed on the master.
When a module is done with an extension, the extension itself will be notified with the callback IExtension::onInactive(). This method is a good point to clean up your extension, generally undoing what was done in onActive().
Good Practices
Typically, IExtension::onActive() and IExtension::onInactive() are symmetric in behavior, one undoing what the other did.
Each method will be called the same number of times. It is not impossible that an extension becomes active, then inactive during loading, as some features can remove or disable extensions from the content loaded.
See below, onExtensionAdded and onExtensionRemoved for the module equivalent.
IObject Interface
IObject is an extended version of IExtension. In addition to all the functionalities of IExtension, it adds support for sub-extensions. It is generally used when implementing complex extension systems.
The object's data is contained in VxSim::VxObject that can be obtained via the getProxy() method.
IObject has a single constructor, that is similar to the constructor of IExtension.
IObject::IObject(VxSim::VxObject* proxy, int version = 0);
It must be used by all objects. The proxy will be provided by the VxExtensionFactory but the version needs to be provided by the actual implementation. Versioning will be used when loading and saving the object.
The constructor of an object always have this basic form:
const int kCurrentVersion = 20210315;

class MyObject : public VxSim::IObject
{
    public: MyObject (VxSim::VxObject* proxy)
        : VxSim::IObject(proxy, kCurrentVersion)
    {
    }
};
Additional Interfaces for Extensions
In addition to IExtension or IObject, an extension usually implements one or several interfaces. The choice of the interface depends on the desired functionality. The following is a list of useful interfaces with the modules that manages them.
Functionalities
| Functionality | Interface Name | Managed by | Notes |
|---|---|---|---|
| Object with a position | VxSim::IMobile | This interface represents an object that can be transformed with a position/orientation/scale. | |
| Dynamics | VxSim::IDynamics | Dynamics Engine Module | IDynamics is the interface for all the extensions that need to be synchronized with the dynamics engine. |
| VxDynamics::ICollidable | Dynamics Engine Module | ICollidable adds the collision groups, which allows setting up collision rules with the extension. | |
| Profiling | VxSim::Monitoring::IProfilingDataCollector | VxApplication | Collector of profiling data. The extension will be called with all the profiling data |
| Devices | VxSim::IJoystick | SDL Joystick Module | Receive the raw gamepad/joystick device events. Use of ControlPreset is preferred over doing a custom IJoystick extension. |
| VxSim::IDevice | VxApplication | Defines a device that can be used in a Control Preset. | |
| VxSim::IKeyboard | Graphics Module | Receive the raw key event. | |
| VxSim::IMouse | Graphics Module | Receive the raw mouse event. | |
| Graphics | VxGraphics::IGraphic | Graphics Module | IGraphic is a generic interface to implement a custom graphic feature. IGraphic is a ILocalExtension, IMechanismAddOn, ISceneAddOn and a IRoleFeature |
| VxGraphics::IAccessory | Graphics Module | This interface provides display functionality meant for User Interfaces. IAccessory are not meant to be visible during the simulation, but are useful while editing and building the simulation objects. | |
| Metrics | VxSim::IMetricsCollector | Metrics Module | For any extension that wishes to collect metric data, metric module will send collected metric every frame. |
Behaviour Modifiers
| Functionality | Interface Name | Notes |
|---|---|---|
Network | VxSim::ILocalExtension | In a network simulation, the outputs of an extension that implements ILocalExtension will not be transferred to other computers. The data will be transferred locally with connections, but not through the network. If an extension is managed on several computer in the network, this interface will prevent issues with the network. |
| Role & Seat | VxSim::IRoleFeature | Only the extensions that implement IRoleFeature can be added to a role. |
| Content Management | VxDynamics::IAssemblyAddOn | Indicates that the extension or object can be added to an Assembly. Assembly will not accept the extension otherwise, contrary to a Mechanism of a scene. |
| VxDynamics::IMechanismAddOn | By default, Scene and Mechanism only accept IExtension, but not IObject. An extension that is an IObject can be added to a Mechanism when it implements IMechanismAddOn. | |
| VxContent::ISceneAddOn | ISceneAddOn has the same effect on Scene, as IMechanismAddOn for Mechanism. |
ISimulatorModule interface
An ISimulatorModule is a special kind of extension that can only be added to VxApplication (with VxApplication::insertModule) or to ApplicationConfig.
When implemented, it will be contained in a VxSim::VxSimulatorModule that is returned with getProxy().
A module will manage its extensions and execute at each update either code based on their data or callbacks on their implementation.
If you develop an extension already based on a predefined interface, e.g. IDynamics, a module will be already available and you won't need to develop your own.
If you develop an extension based on a new interface, e.g. your own device, you will need to also code a module to manage the extensions of that type.
ISimulatorModule has two constructors, that are similar to the constructor of IExtension.
ISimulatorModule::ISimulatorModule(VxSim::VxSimulatorModule* proxy, int version = 0);
ISimulatorModule::ISimulatorModule(VxSim::VxSimulatorModule *proxy, int preUpdatePriority, int updatePriority, int postUpdatePriority, int version = 0);
The proxy will be provided by the VxExtensionFactory but the version needs to be provided by the actual implementation. Versioning will be used when loading and saving the module.
The priorities can also be given to the constructor; they control the order in which the VxApplication calls onPreUdpate(), onUpdate() and onPostUpdate() on all its modules.
The constructor of a module usually has this basic form:
const int kCurrentVersion = 20210315;

class MyModule: public VxSim::ISimulatorModule
{
    public: MyObject (VxSim::VxSimulatorModule * proxy)
        : VxSim::ISimulatorModule(proxy, kCurrentVersion)
    {
    }
};
Extension Management Support
The VxApplication notifies all ISimulatorModule of all extensions that are added to it through the VxSim::ISimulatorModule::onExtensionAdded() method. It is there that each ISimulatorModule decides if it will manage the new extension or not.
Typically a module validates if it will accept the extension and call VxSim::ISimulatorModule::_addManagedExtension(). When an extension is added to a module, the extension's callback VxSim::IExtension:::OnActive() will be called.
Likewise, when an extension is removed from the application, it will call the VxSim::ISimulatorModule::onExtensionRemoved() method. If the module accepted the extension when it was added, it must call VxSim::ISimulatorModule::_removeManagedExtension().
When an extension is removed from a module, the extension's callback VxSim::IExtension:::OnInactive() will be called.
When ISimulatorModule receives an extension that it will manage, it is mandatory to notify the application by calling _addManagedExtension(). Otherwise, the extension may not work as expected.
Likewise, if a managed extension is received in onExtensionRemoved(), the method _removeManagedExtension() must be called.
If _addManagedExtension() and _onRemovedExtension() are not called, the observers on the extension will not work.
Each method will be called the same number of times. It is not impossible that an extension will be added, then removed during loading, as some features can remove or disable extensions from the content loaded.
Example
The module MyModule needs to manage all MyExtension instances that are put in the content.
const int kCurrentVersion = 20210315;

class MyModule : public VxSim::ISimulatorModule
{
    void _prepareExtension(VxSim::VxSmartInterface<MyExtension> my);
    void _cleanupExtension(VxSim::VxSmartInterface<MyExtension> my);

public:
    MyModule(VxSim::VxSimulatorModule* proxy)
        : VxSim::ISimulatorModule(proxy, kCurrentVersion )
    {
    }

    virtual void onExtensionAdded(VxSim::VxExtension* extension)
    {
        VxSim::VxSmartInterface<MyExtension> my = extension;

        if (my.valid())
        {
            _addManagedExtension(extension);
            _prepareExtension(my);
        }
    }

    virtual void onExtensionRemoved(VxSim::VxExtension* extension)
    {
        VxSim::VxSmartInterface<MyExtension> my = extension;
        if (my.valid())
        {
            _cleanupExtension(my);
            _removeManagedExtension(extension);
        }
    }
};
Simulation Management Support
Several methods can be overridden to implement an ISimulatorModule-specific functionality.
Initialization and cleanup
virtual void VxSim::ISimulatorModule::onAddToApplication(VxApplication* application);
virtual void VxSim::ISimulatorModule::onRemoveFromApplication(VxApplication* application);
onAddToApplication() is called just after the ISimulatorModule is added to the VxApplication.
This is the right moment to perform any initialization required by the module: starting a thread, connecting to a network socket, loading some internal data, etc. This is usually done very early in the application start-up, but will not be done when building an ApplicationConfig. Any initialization that was done must be undone in onRemoveFromApplication.
Updates
virtual void VxSim::ISimulatorModule::onPreUpdate(VxSim::eApplicationMode mode);
virtual void VxSim::ISimulatorModule::onUpdate(VxSim::eApplicationMode mode);
virtual void VxSim::ISimulatorModule::onPostUpdate(VxSim::eApplicationMode mode);
void VxSim::ISimulatorModule::_sortManagedExtensions();
Those methods are the heartbeat of the simulation. They are called in the VxApplication::update() loop. This is where you want to do the work that the module is designed to do. onPreUdpate is called before the dynamics, onPostUpdate is called after the dynamics but before the graphics. onUpdate is called in between the two. Generally, onUpdate is not used. All those methods receive the current application mode of the VxApplication.
_sortManagedExtensions() will make sure that the managed extensions are sorted according to their dependency as given by the connection layout.
When the module is managing several extensions that are likely to be interconnected, it is necessary to call _sortManagedExtensions() to process the extension in the right order. The dependencies between extension are exclusively deduced from the connections between extensions, i.e., if extension A's output is connected to extension B's input, extension A will be before extension B when it is sorted.
class MyExtension : public VxSim::IExtension
{
   [...]

    void doOneStep();
};

class MyModule : public VxSim::ISimulatorModule
{
    [...]

    virtual void onPreUpdate(VxSim::eApplicationMode mode)
    {
         if ( mode == VxSim::kModeSimulating )
         {
             // make sure that the extension are sorted according to the connection graph layout
             // if already sorted, no time is spent here _sortManagedExtensions();
             auto& extensions = getProxy()->getManagedExtensions();
             for (auto it = extensions.begin(); it != extensions.end(); ++it)
             {
                 VxSim::VxSmartInterface<MyExtension> my = *it;
                 my->doOneStep();
             }
         }
    }
};
Application Mode
virtual void VxSim::ISimulatorModule::onApplicationModeChange(VxSim::eApplicationMode previous, VxSim::eApplicationMode current);
onApplicationModeChange is called whenever the mode of the VxApplication is changing. It will be called right before the mode actually changes.
Use this callback to do any special processing necessary when transitioning from one mode to another.
Good Practices
This method is useful when some special initialization is necessary when going in simulation.
It is the responsibility of the module to notify the extension of a mode change if the extension requires the information. The extension can only know the current mode from the context.
Helper Functions
ISimulatorModule has a few helper functions:
- getProxy() gives access to the main Vortex Toolkit object that carries the data and implementation of the ISimulatorModule.
- getApplication() gives access to the VxApplication that contains the module.
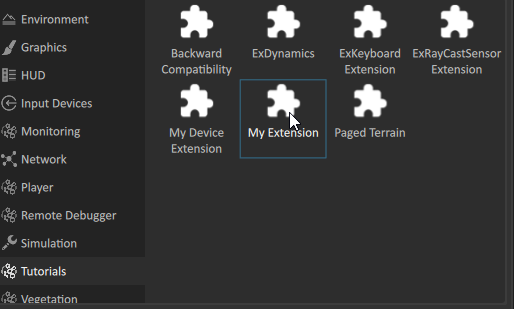
Deploying Your Plugin
Your vxp file can reside anywhere on your file system. Typically, Vortex searches for vxp in its plugins folder and dll in its bin folder.
In order to add search locations, the Vortex Editor options, and your application setup file (including the player for example), must be edited to find and load your plugin.
You can put your library files alongside your plugin file, Vortex will find them.
Vortex Studio Editor
- Launch the Vortex Studio Editor.
- Go to Options.
- Go to the setup section.
- Add your Plugin paths using the widget.
- Save, you will be prompted to restart the editor.
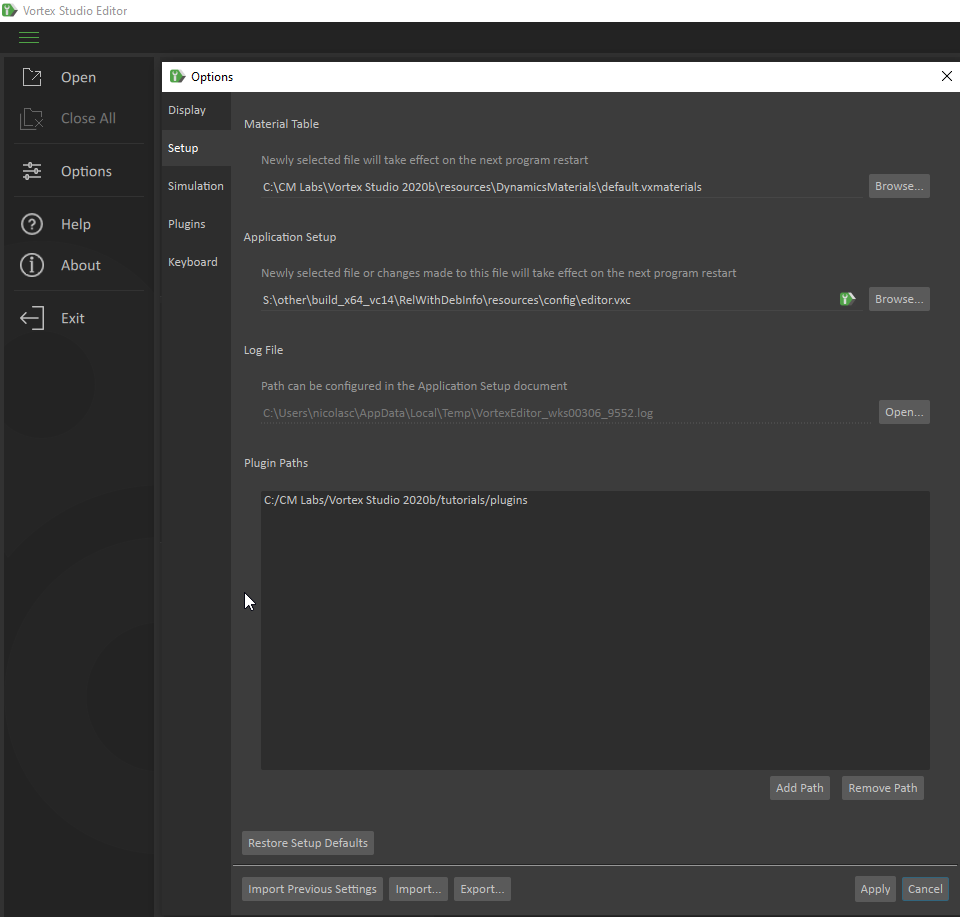
- Note the editor.vxc does not need to be modified.
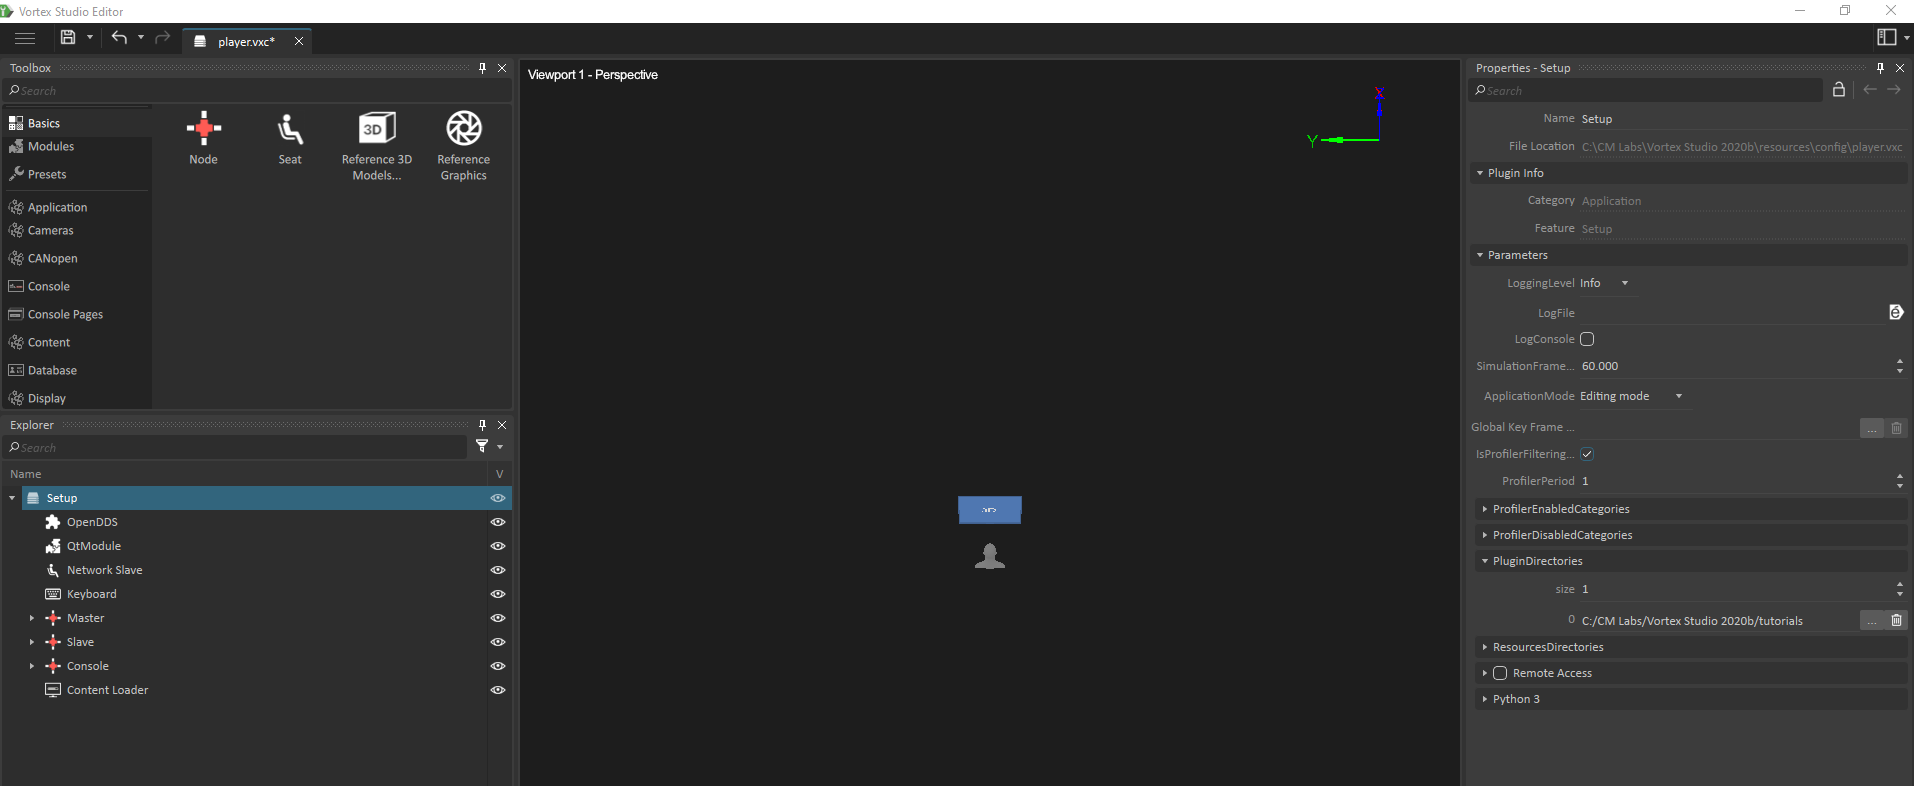
Simulator Application
- Launch the Vortex Studio Editor.
- Open your setup file.
- In the Explorer, select the root of your setup file.
- In the Property view, expand the PluginDirectories field.
- Use the widget to increase the size.
- Click on the ... button and select your folder.
- Save your setup file.
Extension Data
Inputs, Outputs and Parameters
The extension data is stored in VxData::Field<T> of the appropriate type. The use of fields gives us a high level of standardization, which simplifies Vortex Toolkit and improves overall performance.
There are three major field containers in every extension: inputs, outputs and parameters.
- Inputs: data that is fed to the extension. It can change anytime in the simulation.
- Outputs: data produced by the extension. Outputs of one extension can be connected to inputs of another extension.
- Parameters: constant data in the simulation. It can be changed while editing the object, but not during the simulation.
All inputs, outputs and parameters in an extension are automatically serialized. They are written to file when saving, and put back in the extension when loaded.
Good Practices
The decision to put a value as a parameter or an input has profound impact on the use of the extension.
An input can be changed anytime during simulation and editing; the extension must be ready to react to a change at any time.
A parameter should only change in while editing. Changing a parameter can trigger extensive recalculations that may not be suitable while simulating.
Because a module is not part of the content, it should only have parameters and there is not dataflow mechanism to transmit outputs to inputs.
An extension should not modify its own inputs or parameters. Inputs and parameters are the API from which the extension is controlled.
When the extension needs to deliver some results, it should have an output.
Declaring data
The header file for an extension with three fields (one input, one output, and one parameter) would look like the following:
class MyExtension : public VxSim::IExtension, public VxSim::IDynamics
{
    public:
        MyExtension(VxSim::VxExtension* proxy);

        // declaration of the fields
        VxData::Field<bool> inputEnable;
        VxData::Field<VxMath::Vector3> outputScaleFactor;
        VxData::Field<VxDynamics::Part*> parameterTargetPart;
};
Good Practices
The fields are part of the API of your extension.
The fields are inherently public since they can always be accessed from the VxExtension. It is usually simpler to make them public, instead of creating getters/setters.
Set the physical dimensions of the values and a description of the field. When it is done, the units will be displayed in the Editor and the description as a tooltip on the field.
The constructor must declare the name for the fields, whether they are inputs, outputs or parameters and optionally a default value.
MyExtension::MyExtension(VxSim::VxExtension* proxy)
    : VxSim::IDynamics(proxy)
    , VxSim::IExtension(proxy, kCurrentVersion)
    , inputEnable(false, "Enable", &proxy->getInputContainer())
    , outputScaleFactor(Math::Vector3(1,1,1), "Scale", &proxy->getOutputContainer())
    , parameterTargetPart(nullptr, "Target", &proxy->getParameterContainer())
{
    outputScaleFactor.setPhysicalDimension(Vx::VxPhysicalDimension::kScale);
    outputScaleFactor.setDescription("The scaling factor that was applied to the target part.");
}
Field<T>
Field Types
Field<T> represents a data value that has a type (from the template parameter), a name (from the constructor), and a value.
| Numerical | VxData::Field<int> | |
| VxData::Field<unsigned int> | ||
| VxData::Field<short> | ||
| VxData::Field<unsigned short> | ||
| VxData::Field<double> | same as VxData::Field<Vx::VxReal> | |
| VxData::Field<bool> | ||
| Compound Values | VxData::Field<Math::Vector2> | |
| VxData::Field<Math::Vector3> | same as VxData::Field<Vx::VxVector3> | |
| VxData::Field<Math::Vector4> | ||
| VxData::Field<Math::Matrix44> | ||
| VxData::Field<Vx::VxTransform > | ||
| VxData::Field<VxMath::Quaternion> | same as VxData::Field<Vx::VxQuaternion> | |
| VxData::Field<Vx::VxColor> | ||
| String | VxData::Field<std::string> | |
| VxData::Field<Vx::VxFilename> | Contains the path to a file or directory. | |
| Object | VxData::Field<VxSim::VxExtension*> | Contains a reference to a VxSim::VxExtension |
| VxData::Field<Vx::VxMaterial*> | Contains a reference to a Vx::VxMaterial | |
| VxData::Field<VxDynamics::Part*> | Contains a reference to a VxDynamics::Part | |
| VxData::Field<VxDynamics::Assembly*> | Contains a reference to a VxDynamics::Assembly | |
| VxData::Field<VxDynamics::Attachment*> | Contains a reference to a VxDynamics::Attachment | |
| VxData::Field<VxDynamics::AttachmentPoint*> | Contains a reference to a VxDynamics::AttachmentPoint | |
| VxData::Field<VxDynamics::CollisionGeometry*> | Contains a reference to a VxDynamics::CollisionGeometry | |
| VxData::Field<VxDynamics::Mechanism*> | Contains a reference to a VxDynamics::Mechanism | |
| VxData::Field<VxGraphics::Node*> | Contains a reference to a VxGraphics::Node | |
| VxData::Field<VxGraphics::Mesh*> | Contains a reference to a VxGraphics::Mesh | |
| VxData::Field<VxGraphics::Material*> | Contains a reference to a VxGraphics::Material | |
| VxData::Field<VxGraphics::Texture*> | Contains a reference to a VxGraphics::Texture | |
| VxData::Field<Interface Type> | Contains a reference to an Interface Type | |
| Other | VxData::Field<VxEnum> | Generic Enumeration |
| VxData::Field<enum type> | Specific Enumeration |
Using Field<T> in an extension
Using Field<T> is as simple as using a variable of type T.
To avoid any ambiguity, Field<T> also has the method getValue() and setValue().
class MyExtension : public VxSim::IExtension, public VxSim::IDynamics
{
    public:
        MyExtension(VxSim::VxExtension* proxy);

        // declaration of the fields
        VxData::Field<double> inputScale;
        VxData::Field<Math::Vector3> outputScaleFactor;
        VxData::Field<VxDynamics::Part*> parameterTargetPart;

        [...]

    private:
        void _handleScale(double s);
        inline void _processInput()
        {
            // Field<double> is used just like a double
            if ( inputScale > 0 )
            {
                _handleScale( inputScale );
            }
            else if ( inputScale > 0 )
            {
                _handleScale( -inputScale.getValue() );
            }
        }

        inline void _processOutput
        {
            // Fields with compound values like VxData::Field<Math::Vector3> are used in the same way
            Math::Vector3 v(inputScale, inputScale, inputScale);
            outputScaleFactor = v;
         }

         inline void _processParameter()
         {
             // VxData::Field<VxDynamics::Part*> can be used like a VxDynamics::Part*
             VxDynamics::Part* p = parameterTargetPart;
             if ( parameterTargetPart != nullptr )
             {
                 parameterTargetPart->resetInertia();
              }
          }
};
Additional information
See Vortex Studio SDK Advanced - Fields And Extensions for more information about using fields, and IExtension callbacks.
See code tutorials C++ Tutorial 1: Plugins and Devices for extensions and module implementation examples. The code tutorial are located in <your CM-Labs installation folder>/tutorial
Vx::VxSmartPtr and VxSim::VxSmartInterface
Vortex objects are reference-counted via a special smart pointer class, VxSmartPtr<T>. When you need to keep an VxExtension alive, you should keep it in a VxSmartPtr<T>. Vortex internal's system uses those smart pointer to keep extensions alive.
In some rare case, a developer might want to keep a pointer on a VxExtension without increasing the reference count. In this case, a VxWeakPtr<T> should be used. A weak pointer will become invalid when the reference extension is destroyed.
Unless a developer needs to do generic things on extensions, using VxSmartInterface<T> should be favored. A VxSmartInterface<T> is both a VxSmartPtr to the extension and a pointer to the implementation.
When a developer needs to query, test or use a specific interface, the safest, simplest way is to use a VxSmartInterface<T> object. A VxExtension can contain any kind of implementation: extension or module. VxSmartInterface<T> can be used to query for a specific type of interface, if the interface is found, the extension will be referenced (thus will never be deleted) as long as the VxSmartInterface<T> has it. VxSmartInterface<T> can be initialized with a VxExtension*, a VxSmartPtr<VxExtension>, or with any kind of VxSmartInterace<U>. VxSmartInterface<T> also contains its VxExtension via function getExtension().
void doSomethingWithAIMobile(VxSim::VxExtension* extension)
{
	VxSim::VxSmartInterface<VxSim::IMobile> imobile = extension;
	if ( imobile.valid() )  // check if the IMobile interface was found in the extension
	{
		// by using a VxSmartInterface, we are garanteed that extension will not be deleted during the call to _getTheNewPosition()
		imobile->inputLocalTransform = _getTheNewPosition();

		// check if there is also the IGraphic interface (in addition to IMobile)
		VxSim::VxSmartInterface<VxGraphics::IGraphic> graphicAndMobile = imobile;
		if ( graphicAndMobile.valid() )
		{
			_doSomethingSpecial(graphicAndMobile);
		}
	}
}
VxWeakInterface<T> is very similar but it does NOT increase the ref-count of the VxExtension. There are very few cases where VxWeakInterface<T>should be used instead of a VxSmartInterface<T>.
The most important exception is when a class needs a member and does NOT want to keep it alive. Basically, you would only use VxWeakInterface<T>, if you would use a VxWeakPtr<VxExtension>.