Integrating Vortex Studio using the C++ SDK - Creating an Application
The ApplicationConfig
An ApplicationConfig is a document (.vxc) which allows you to setup or configure a Vortex application without doing it all manually in code.
It can be passed to an application which will parse it (like the SimApp) and automatically configure itself based on the file's content. Through it you can set some global parameters for the application (such as the default log level, the simulation
frame rate, the starting application mode, etc...) but most importantly you can specify which modules and extensions will need to be created along with the application and on which node.
In the Vortex Studio Editor what the SDK calls an ApplicationConfig is refered to as an Application Setup.
Both terms represent the same concept but to avoid any confusion this guide will use the SDK terminology.
Content of the ApplicationConfig
An ApplicationConfig can contain the following elements:
- Nodes
- Modules
- Extensions
- Parameters
- Seats
Nodes
A node in a simulator represents, at the OS level, a process which will do some tasks as part of your simulation.
A simulator can be composed of a single node (what we call standalone or desktop) or multiple nodes. In the case of multiple nodes, they may or may not even be on the same physical machine.
Whether they are or not, all nodes will use the Vortex network layer to communicate and exchange data between them.
From the perspective of the ApplicationConfig, a node is simply an ApplicationConfig inside another one. It inherits the elements of the parent ApplicationConfig while also defining new or overriding elements of its own. A node in an ApplicationConfig can thus add modules and extensions only to itself and redefine some of the parameters (such as profiler settings or whether the node is free running or not).
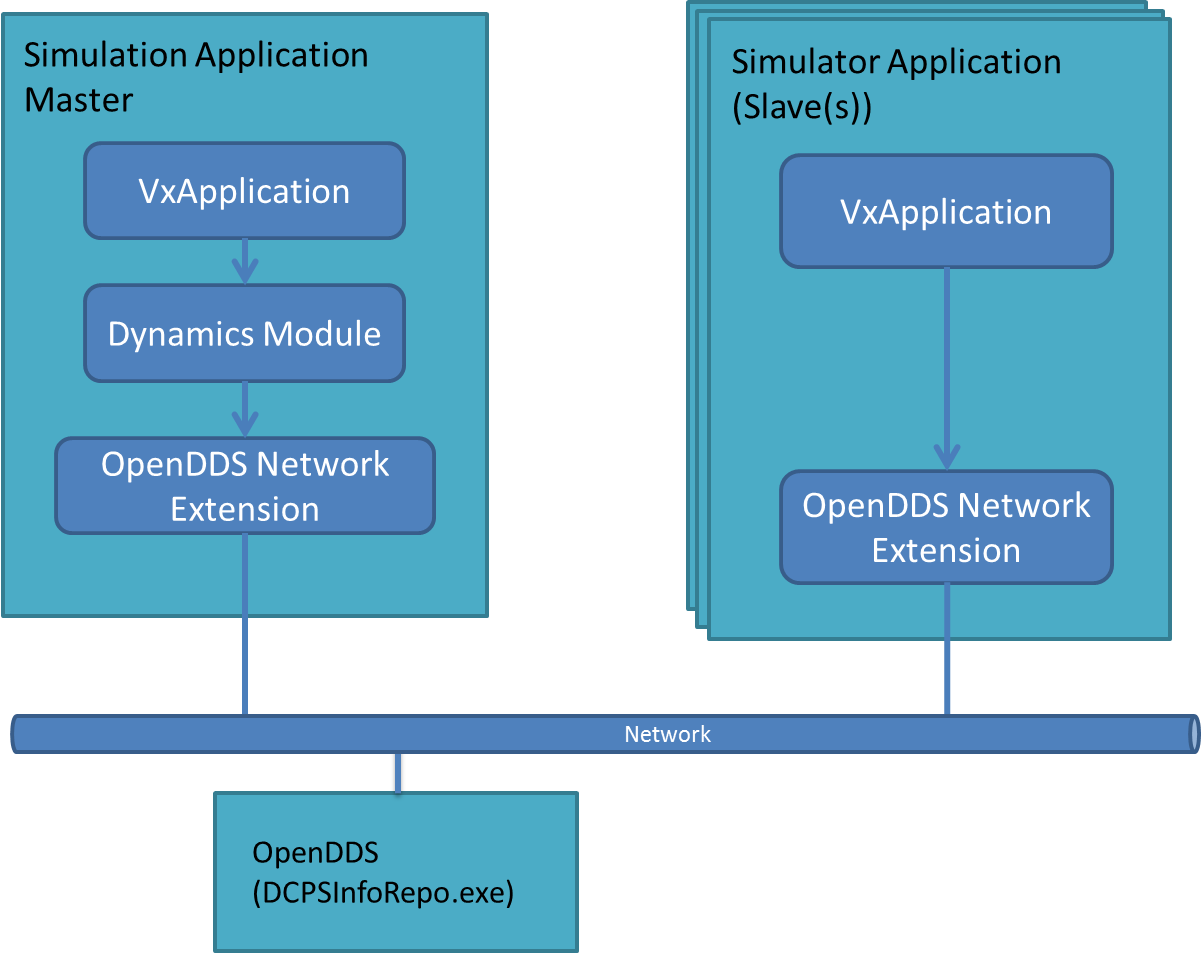
Every Vortex simulator needs a master process. In standalone, since there is only one non-networked process, it is fairly straightforward.
In a network setup, it is a bit more complicated since it is the master node which coordinates the exchange of data with the other nodes, called slaves, and instruct them on what to do.
In most cases the master will contain the dynamics module; while a slave node never will. If one of your node contains the dynamics module it will be designated as the master by the application.
A node can also be explicitly set as a master or a slave by settings its parameter "CommunicationModel" to Master or slave.
The master node's config (or the config of the application in standalone) almost always contain the DynamicsEngine module. In a multi-node simulator you must add the NetworkOpenDDS extension to your ApplicationConfig to allow nodes to communicate between each other.
Users of past version of the SDK might remember having to add the VxSim::VxSlaveModule to their slave nodes' config. As of Vortex Studio 2017, this is no longer necessary as all that functionality has been integrated directly into the VxApplication.
Modules
As explained in Vortex Studio 2019a SDK - Integrating the Application, modules are a core part of a Vortex application. Modules are not part of the content like the other extensions and objects are. Modules are directly added to the application, either manually through VxSim::VxApplication::insertModule() or by adding them to an ApplicationConfig which is then applied to the VxApplication.
Extensions
A common workflow is to add extensions to an application by embedding them in a content object and loading the object in the application. Though useful in many cases, if you find yourself adding over and over again extensions to your content which are not directly related to it (for example an extension handling a user interface or network communication), it is a clear sign that the extension probably belong inside an ApplicationConfig instead. Extensions that are fundamental to your simulator application whatever content is loaded are good candidates for this.
The ApplicationConfig of a distributed simulator must contains a network configuration extension at the root level.
Parameters
A Vortex application exposes some high levels parameters which can be customized from the ApplicationConfig (e.g. frame rate, default log level, etc...). Some of them are global to the whole application while others can be overridden by each nodes.
Please refer to the Vortex Studio Technical Documentation for more details on all the parameters exposed through the ApplicationConfig class.
Seats
The closest analogy to represent a seat is the seat you are sitting on at the simulator. The operator seat on the motion platform, the instructor's chair in another room, all are examples of seats which differ from one another mainly through the hardware that is attached to the seat (screens, motion platform, controllers, etc...). When a role is applied to a seat only the modules of the seat will manage the extensions of the role, otherwise the extensions will be ignored by the application.
A role is the counterpart to the seat. It represents an actor in the simulation and contains extensions that are only added to the simulation when it is applied to a seat.
Let's take for example the development of a tank simulator. The simulator includes room for one student in the operator seat and an instructor in the instructor seat. Inside the simulation however there are at least three different roles. One for the instructor (which may be physically inside the simulation as a Vortex Human), one for the tank driver and another for the tank gunner. The instructor seat as a standard desktop with mouse and keyboard, perfect to navigate the scene and evaluate what the student does. The operator seat as a motion platform, a steering wheel, pedals and two joysticks. The driver and gunner roles can alternately be applied to the operator seat which contains all the modules to handle the hardware. However, the gunner role does not contain the extension for the steering wheel and the pedals and inversely the driver role does not contain the joystick extensions. Also both roles may not use the same displays to reflect a different field of view. On the other side, the instructor seat does not have all the hardware modules of the operator and the instructor extensions may include an extension for using a mouse.
In summary, roles are added to your content directly but seats are part of your ApplicationConfig since they go with the simulator whichever content is loaded on top of it.
Creating an ApplicationConfig
The easiest way to create an ApplicationConfig document is through the Vortex Studio Editor. In the editor you can easily use presets to quickly develop your ApplicationConfig with all the needed components.
Still, the SDK provides the VxSim::ApplicationConfig class to access those functionalities programmatically.
The main ApplicationConfig object of an application can contain sub-configs for each node of the application.
VxSim::VxSmartInterface<VxSim::ApplicationConfig> config = VxSim::VxExtensionFactory::create(VxSim::ApplicationConfigICD::kFactoryKey);
VxSim::VxSmartInterface<VxSim::ApplicationConfig> configNodeA = VxSim::VxExtensionFactory::create(VxSim::ApplicationConfigICD::kFactoryKey);
VxSim::VxSmartInterface<VxSim::ApplicationConfig> configNodeB = VxSim::VxExtensionFactory::create(VxSim::ApplicationConfigICD::kFactoryKey);

// Add the nodes to the main config.
config->addNode(configNodeA);
config->addNode(configNodeB);
Presets
The class VxSim::ApplicationConfigPreset holds a global list of common ApplicationConfig objects that you can use as a base for your own custom one. A preset adds or modify elements of an existing VxSim::ApplicationConfig object.
VxSim::VxSmartInterface<VxSim::ApplicationConfig> config = VxSim::VxExtensionFactory::create(VxSim::ApplicationConfigICD::kFactoryKey);
std::vector<std::string> availablePresets = VxSim::ApplicationConfigPreset::getAvailablePresets();

...

// Applying a preset to our config object.
VxSim::ApplicationConfigPreset::applyPreset("Master with dynamics", config);
Here's a list of presets that comes with your Vortex Studio installation.
- ApplicationParameters
- Master with dynamics
- Slave with 1 window
- Slave with 2 windows
- Slave with no graphics
- Standalone
Using an ApplicationConfig with Your Application
An ApplicationConfig's main use is to configure a generic application. The application could contain widely different modules and extension based on the content of its ApplicationConfig.
Once such example is the SimApp application that comes with Vortex Studio. If you launch it with the --config <vxcFile> command line option, it will load and parse the ApplicationConfig given as an argument, modifying the application with the information of the setup document.
Only one ApplicationConfig can be applied on a VxApplication; when it is applied to a VxApplication, the application is wiped of its modules and extensions before applying a new one.
When developing your own application you can use the class VxSim::ApplicationConfigSerializer to load an ApplicationConfig saved to a file and configure your VxApplication with it.
VxSim::VxApplication* application = new VxSim::VxApplication;
VxSim::ApplicationConfigSerializer serializer;
if (serializer.load("c:\MyVortexApplication\config\standalone.vxc"))
{
	// Get and the main config.
	VxSim::VxSmartInterface<VxSim::ApplicationConfig> config = serializer.getApplicationConfig();

	// Get and apply the "slave" sub-config.
	auto slaveConfig = config->getNode("slave");
	slaveConfig->apply(application);
}
Deploying Your Application
A simple desktop application may be trivial to deploy; create a shortcut that launches the Vortex standard application (also known as SimApp.exe) with the right setup document and parameters (or your own application) and you're done. For something more complex like a distributed simulator, including multiples nodes possibly across the network, deployment is more complex.
Deploying using the Vortex Director
Vortex Studio comes with the Vortex Director, an application that simplify simulator design. The director is able to launch a distributed simulator in a convenient way.
Starting the Vortex Service
Make sure the VortexService.exe application is running on each computer that will be involved in the distributed simulator. The Director uses the Service to communicate.Creating a setup
Use the Vortex Studio Editor to create your Setup file. The file must contain a network configuration extension at the root level. The extension is only available in the Vortex Editor. It's default values will work with the director.Setup Deployment
You must deploy the setup on each node of your simulator. If more than one node are on the same system, you need only one copy of the config for that system. They need to have the same file path.
Creating a simulator
Use the Vortex Director to create their simulator topology, associating hardware-based nodes (a process on a networked computer) with your Setup's node. See the Vortex Director documentation for details.Launching a simulator
The Vortex Director is also a simulator launcher, it will manage the network configuration of a simulator and will run a network broker to ensure nodes' communication. See the Vortex Director documentation for details.
Deploying your own application using the Vortex Director
A simulation node is usually a Vortex Standard application. If you chose to launch your own application using the Vortex Director, you need to specify which nodes will use your application. When the Vortex Director launches your application, it will always send a list of command line arguments to help you setup your Vortex Application.
Vortex Command line Arguments
The arguments' values must be properly set for the Vortex application object to be properly initialized. The same list of arguments is used for the Vortex standard application.
The custom application is launched along with the arguments in the Vortex director the same way it is used using the command line.
The following is an example of the command line arguments that are used for the Vortex standard application when the player.vxsimulator is launched with the Vortex Director:
SimApp.exe --config "C:\CMlabs\Simulators\distributed.vxc" --confignode engine --simulatorname custom --simAppsCount 3 --networkbroker 239.255.44.22:54750 --simulationID 1
Initializing Vortex with the arguments
The VxApplication interface can be easily initialized by your application as follows:
|
The arguments
The following explain what each argument does.
--config <.vxc file>
The absolute path to Vortex application setup file (.vxc). The Vortex application object will parse the file and configure itself based on the file's content. For more information, see Setup user guide.
The config object is loaded with a VxObjectSerializer.
--confignode <node name>
The node name that is defined in the Vortex application setup file. The node's content is applied to the Vortex application object. Ii not present, only the root node will be used.
The node is fetched from the loaded configuration. After the all the other parameters are set to the application, the config node is applied to the application.
--simulatorname <name>
The name of the simulator. It is given to the SimulatorMonitor via setSimulatorName().
--simAppsCount <count>
The total number of simulation applications to expect in the simulator. This is important and is used to make sure the master application waits for all applications to be ready before starting any operation.
It is given to the SimulatorMonitor via setApplicationCount()
--networkbroker <IP:Port>
Address and port used by the running applications on each node, to locate each other on the network. The argument has the format: <IP address:Port number> (e.g. 239.255.44.22:54750)
The port number must be in the range (49152, 65535)
If the argument is not specified, the default address and port values are <127.0.0.1:31110>
The argument's value can also be specified via the network extension in the setup file (.vxc). Refer to Network Configuration Extension section of this document for more details.
Before applying the loaded config, the object is parsed to extract the Network extension there should be only 1) and overrides the address, port and simulationId with the one provided.
--simulationID <id>
The unique id used to identify the network simulation to which this application belongs. The id must be in the range (1, 65535).
The specified value is used to populate the address and port for the communication channels: Event, Kinematic and Time Synchronization channels.
If the argument is not specified, the default id is 1.
The argument's value can also be specified via the network extension in the setup file (.vxc). Refer to Network Configuration Extension section of this document for more details.
Before applying the loaded config, the object is parsed to extract the Network extension (there should be only 1) and overrides the address, port and simulationId with the one provided.
--datapath <path>
The absolute path to the data provider path of the Vortex application on disk. Setting it makes this running application the Data Provider of the Simulator. For more information, see Director User Guide under Simulator Data Store Path
It is set after the config is applied to the application.
Deploying manually
If you are developing your own application (not using simapp.exe) for a simulator node, or need to use your own custom deployment, there are some guidelines that must be followed.
OpenDDS and the DCPSInfoRepo
To transfer data and events across a networked simulator, Vortex uses the OpenDDS library. OpenDDS is an open-source implementation of Data Distribution Service for real-time distributed systems.
OpenDDS uses a centralized method of discovering peers. If you are not using the VortexDirector to launch you distributed simulator, it is necessary to run an instance of OpenDDS DCPSInfoRepo server on the network, so that nodes in the distributed simulator can locate each other. Launch the executable located in your Vortex Studio installation folder (e.g. C:\CM Labs\Vortex Studio 2019a\bin\DCPSInfoRepo.exe) before launching your application.
Creating a setup
Use the Vortex Editor to create your Setup file. The file must contain a network configuration extension at the root level. The extension is only available in the Vortex Editor. It's default value will work with the director.
Network Configuration Extension
In your application, OpenDDS is represented by the NetworkConfiguration extension which is added at the root of the ApplicationConfig.
The Vortex Studio Director will override some of the parameters of this extension so that you don't need to manage it manually. If you are deploying without the Director you will need to properly setup the network communication.
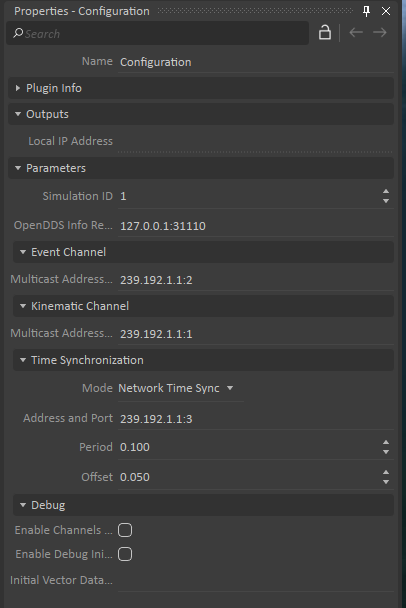
The extension exposes several configurable parameters as described in Network Configuration ICD.
Multicast Addresses
All nodes of a given distributed simulator must have the same multicast address and SimulationID. Only the ports should differ for the different channels.
Different distributed simulators must have different multicast addresses and SimulationID.
If different distributed simulators share multicast addresses, your simulators may talk with each other, leading to undefined results.
In order to avoid this issue, there are several options:
- Using the Vortex Director (recommanded).
- Making sure that each ApplicationConfig of a given simulator, have different multicast addresses and simulationID.
- Use the command line option --simulationID of simapp.exe.
Consult these following tips when using that extension
- Simulation ID: unique ID that enables multiple simulator applications to share the same network. Must be between 1 and 65535. All nodes of the same simulator should share the same simulation ID and each simulator should have a different simulation ID.
- This parameter can be overridden using command line option --simulationID of simapp.exe. Doing so also overrides the last 2 numbers of the multicast Addresses of the channels and time synchronization.
OpenDDS Info Repository Address And Port :IPv4 address and port (format address:port) of the system hosting the DCPSInfoRepo program.- This parameter can be overridden using command line option --networkbroker of simapp.exe
- Event Channel
- Multicast Address and port: Should be in the form of 239.192.x.x:2. Typically event channel uses port 2. The last 2 numbers and port will be overidden when simapp.exe --simulationID command line option is used. The address must match the Kinematic Channel Multicast Address and Time synchronisation Address.
- Kinematic Channel
- Multicast Address and port: Should be in the form of 239.192.x.x:1. Typically kinematic (or data) channel uses port 1. The last 2 numbers and port will be overidden when simapp.exe --simulationID command line option is used. The address must match the Event Channel Multicast Address and Time synchronisation address.
- Time synchonization
- Mode
:Default is Network time sync- Network Time Sync: Synchronization is managed by Vortex.
- No Time Sync: There is no synchronization, The slaves will be updated with the latest data package received.
- External Time Sync: Time is managed by an External Source. In this case, the integrator must managed time and ensure VxApplication::setSimulationTime() is called every step.
- Address and port: Should be in the form of 239.192.x.x:3. Typically time synchronization uses port 3. The last 2 numbers and port will be overidden when simapp.exe --simulationID command line option is used. The address must match the Event Channel Multicast Address and T the Kinematic Channel Multicast Address.
- Period:Period (in seconds) at which the slaves are synchronized, the default value is 0.1 seconds.
- Offset: Offset between time on master and time on slaves (in seconds), the default value is 0.05 seconds.
- Mode
Setup Deployment
You must deploy the ApplicationConfig on each node of your simulator. If more than one node are on the same system, you need only one copy of the config for that system.
Launching Your Application and Applying the Correct Setup
Start your master application and than start each of your slave nodes' application. Once done, load and apply the config on each of them and than apply the sub-config specific to each node separately. If using simapp.exe process as a simulator node, use the following command line options:
- --config to specify the file path to the setup file
- --confignode to specify the node name for that process.
Validate Simulator Communication at Startup
It is strongly recommended to validate that all the processes in your simulator are able to communicate with each others before doing any operations. By default, the VortexDirector will make sure all SimApps are able to communicate with each others when it launches a simulator. When deploying a simulator manually, some manual steps must be achieved to ensure this.
Specify the Total Number of Processes in the Simulator
Each "SimApp.exe" process should receive as command line argument the total number of expected processes in the simulator being launched. The syntax is the following:
SimApp.exe --simAppsCount <count>
Please note that the total number of processes includes both "SimApp.exe" processes and any custom processes creating their own VxApplication.
Concerning custom processes creating their own VxApplication, they can specify the total number of expected processes in the simulator by using the application context and the SimulatorMonitor. Here is an example:
Vx::VxSmartPtr<VxApplication> application = new VxApplication;
VxSim::ApplicationContext context = application->getContext();
VxSim::SimulatorMonitor* simulatorMonitor = context.getSimulatorMonitor();

simulatorMonitor->setApplicationCount(5); // We expect 5 VxApplications in the simulator
Please note that "setApplicationCount()" MUST be called before the first application update, otherwise it will throw an exception.
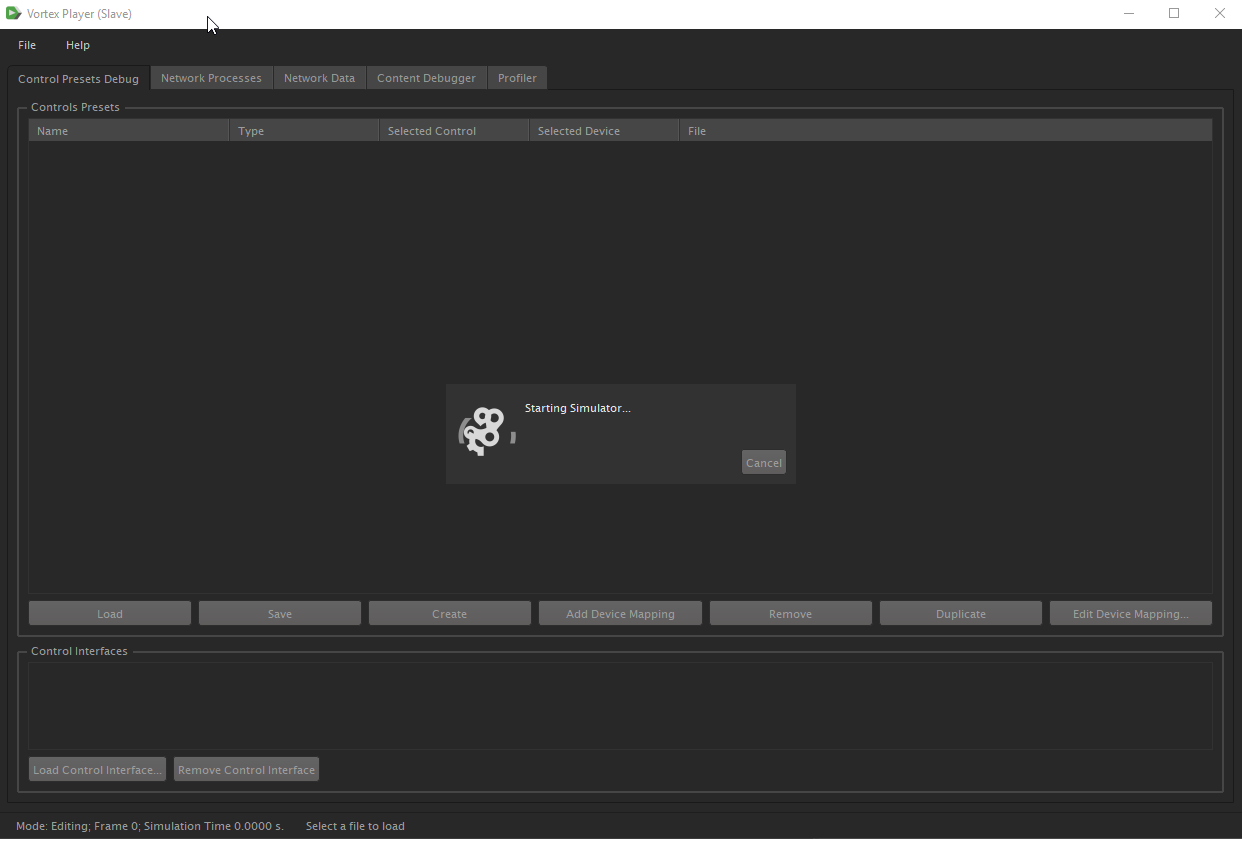
Wait for All Processes to be Ready
Now that each VxApplication in the simulation knows how many processes to expect, each process must wait for all processes to be ready before doing any operation.
By default, a SimApp having a "Player Window" extension will show at startup a popup window with a spinning gear until all processes in the simulator are ready. Here is a screenshot of what it looks like:
In a custom application creating its own VxApplication, it is the application's responsibility to wait for all processes to be ready in the simulator before doing any operation. Here is an example of how an application can do this:
Vx::VxSmartPtr<VxSim::VxApplication> application = new VxSim::VxApplication;

// Load a Setup document and apply it to the VxApplication
VxSim::ApplicationConfigSerializer serializer;
serializer.load("..\\resources\\config\\test.vxc");
serializer.getApplicationConfig()->apply(application.get());

application->getContext().getSimulatorMonitor()->setApplicationCount(5); // We expect 5 VxApplications in the simulator

while (!application->getContext().getSimulatorMonitor()->areAllApplicationsReady())
{
    Vx::LogWarn("Waiting for simulator to be ready.");
    application->update();
}

Vx::LogWarn("Simulator is ready.");


// Start doing standard operations
Loading content on a deployed simulator
Content is created using the Vortex Studio Editor, but also in code, c++ or python (see section Vortex Studio SDK, - Creating Content). It is possible to load multiples content files and move the object if needed;
Most Dynamics Objects can be moved using the IMobile interface. It is preferable to set the application mode to Editing while loading content and moving some part of it around.
The content you will load must be present on each node of the simulator at the same path. For example if your application wants to load the scene C:\My Simulator\Assets\Scene\Excavator.vxscene it needs to be present (and all of its sub-objects) with the exact same path on each node.
Before starting the application, content must be loaded into it so that the application will simulate something.
Loading and unloading using the Simulation File manager
The most convenient way of loading content is to use the VxSimulationFileManager provided by the VxApplication.
Content should be loaded while the simulator is in Editing mode. Some features, such as configuration, cannot be modified while simulating.
The VxSimulationFileManager object will load the content into the application and ensure everything is properly dispatched to the simulator.
Function VxSimulationFileManager::loadObject() is your entry point and takes the following parameters
fileName: The file name of the content file, usually a scene or a mechanism.objectName(optional): The name of the object. If none or empty is given, the object will keep the name which it was saved.worldTransform(optional): The position of the object in the world, will be at 0,0,0 if not set. This parameter has no effect on non-IMobileobjects.
The simulation file manager can also be used to remove content, using VxSimulationFileManager::unloadObject()
...
Vx::VxSmartPtr<VxApplication> application = new VxApplication;
...
// Setup the application
...
// Get he file manager to load content
Vx::VxSmartPtr<VxSim::VxSimulationFileManager> fileManager = application ->getSimulationFileManager();


// Load the file, the object returned is the root object, in this case, a scene. The Reference should be kept to inspect the content during the simulation
VxSim::VxSmartInterface<VxContent::Scene> scene = fileManager->loadObject("../Resources/assets/ExVHLIntegration/Design/ExVHLIntegration.vxscene");
if (!scene.valid())
{
	Vx::LogError("Couldn't load the scene in ../Resources/assets/ExVHLIntegration/Design/ExVHLIntegration.vxscene.\n");
}
...
run the Simulator
...
// Cleanup
fileManager->unloadObject(scene.getObject());
Getting the global loading status
When running on a multi-nodes simulator, file management should be handled from a single node. The simulation file manager will distribute commands to load content on all nodes. The content is not actually distributed across the network, each node will load the files from their own disk, thus the content files' path must be the same on every computer.
While content is being loaded, the node performing file management should monitor the loading status and ensure it is consistent across all nodes before performing anything else, such as setting the application mode.
Function VxSimulationFileManager::loadObject() is blocking, meaning the function will not return until the object is loaded. When you get the object back, it means the object is loaded locally, but not necessarily on the whole simulator. In order to know when object are loaded, there are 2 ways to proceed.
- Periodically call VxSimulationFileManager::getLoadingStatus() between VxApplication::update()
- Register a VxSimulationFileManager::Listener with function VxSimulationFileManager::registerListener(). This interface will call the listener functions when the loading status of a file changes. When you are done, unregister the listener.
While waiting, it is important to continue running the application as the simulator communication relies on VxApplication::update() to update its status.
Once the status is kLoaded for all content files, the simulator is ready to proceed.
See VxSimulationFileManager::eLoadingStatus for status detail.