Collision Geometry Holes
Basic Concepts
Holes are special collision geometries that can be combined with regular collision geometries in order to create a hole inside the latter. Three shapes of holes are available: Spherical, Cylindrical and Box holes.
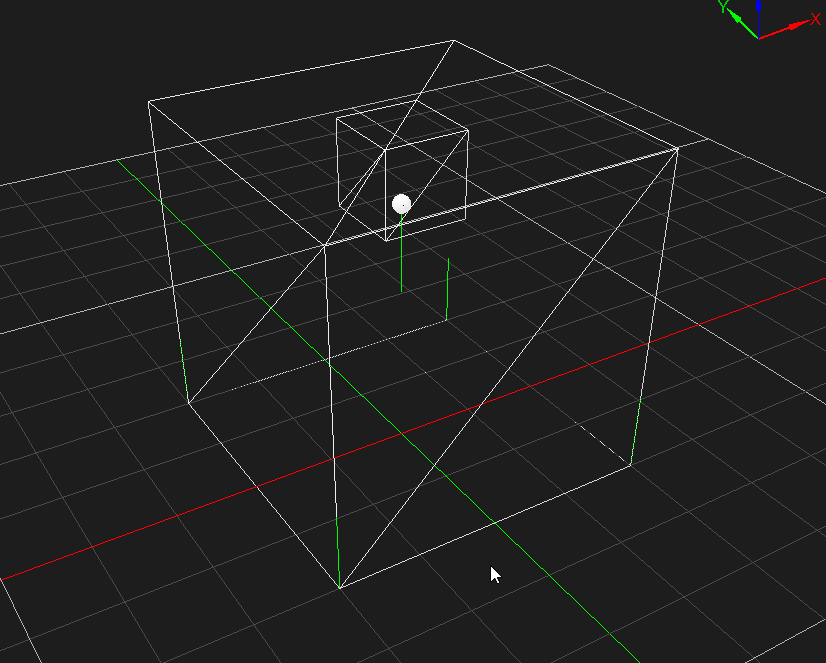
Here is an example of a box hole in a box, containing a small sphere with the contact display on :
Creating Holes
Holes can be created either via the Vortex Editor or in Python code. Both ways are described in the following sections.
Creating Holes using the Vortex Editor
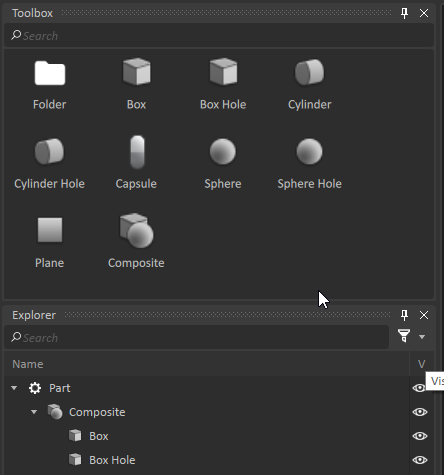
To create a hole, instantiate the shape of hole you want and place it under a composite collision geometry along with any other collision geometries that will contain the hole. Holes can only be added to parts, as is the case for regular collision geometries.
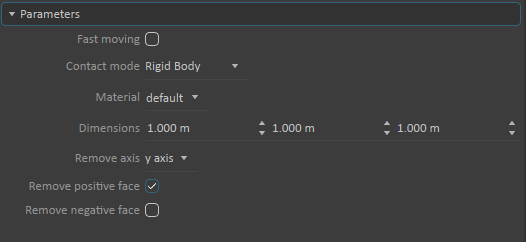
In the case of Cylinder Holes and Box Holes, you get additional parameters to remove faces from the hole, positive and negative Z for Cylinder Holes and all 6 directions for Box Holes. Only faces along a single axis can be removed at any time. The axis can be specified by choosing the 'Remove axis' option. The two parameters, 'Remove positive face' and 'Remove negative face' can be selected to remove the faces in the positive and negative directions respectively, along the specified axis in the local frame of the hole.
Removing the face of hole, allows opening up the collision geometry in which the hole is contained. For example, creation of a hollow tube is possible this way with an ordinary solid Cylinder geometry containing a Cylinder Hole geometry. This can be achieved by opening the hole's top and bottom faces and making sure that the top and bottom faces of the hole coincide with the top and bottom faces of the cylinder.
To this end, a new action on Composite Collision Geometries that contain a hole was added, called "Snap Holes To Surface". It can be accessed by right-clicking on the composite collision geometry:
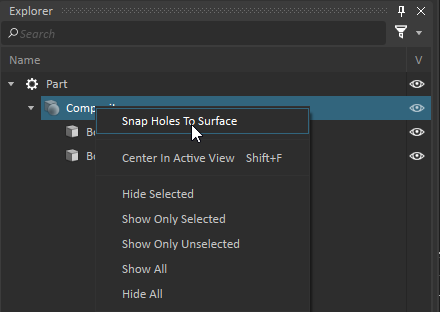
This action will move the holes in the composite geometry to match the closest, flat surfaces of any other solid geometry which is in the composite. Performing this action ensures the best results with holes for the case in which hole faces are removed. In accordance with the example of the cylindrical tube above, this action would move the faces of the Cylinder Hole to coincide with the closest faces of the solid Cylinder geometry.
Creating Holes in Python
Holes can be created programmatically in Python the same way any other extension is created : by using the extension factory. There is also a helper function on the hole itself, called create(), that does this for you. Note that the restrictions explained above also hold for holes created in code; they must be under a composite geometry
Here's a Python code snippet showing how to create a hollow box using the Box and BoxHole geometries:
composite = CompositeCollisionGeometry.create()

box = Box.create()
box.parameterDimension.value = VxVector3(4,4,4)
box.inputLocalTransform.value = createTranslation(0,0,2)
composite.addCollisionGeometry(box)

boxHole = BoxHole.create()
boxHole.parameterDimension.value = VxVector3(1,1,1)
boxHole.inputLocalTransform.value = createTranslation(0,0,4)
composite.addCollisionGeometry(boxHole)
composite.snapHolesToSurfaces()

partWithHole = Part.create()
partWithHole.inputLocalTransform.value = createTranslation(0,0,0)
partWithHole.inputControlType.value = Part.kControlStatic
partWithHole.addCollisionGeometry(composite)
First the composite collision geometry itself is created, then added to this, is a box collision geometry, and a boxhole collision geometry. The snapHolesToSurfaces() function is called to ensure that the face of the boxhole overlaps the face of the containing box collision geometry. Lastly, a part is created that has this composite collision geometry.
Limitations with Holes
There are a few notable limitations when it comes to holes. These limitations are listed below. Any violation of these limitations is unsupported and may result in unexpected behaviour.
| Limitation | Notes |
|---|---|
| Hole geometries may not touch or overlap one another | None |
| Faces can only be removed along a single axis of the hole geometry, e.g. removing faces along the x-axis, means faces along the y- and z-axes should not also be removed. | Do not use multiple holes inside a collision geometry to workaround this limitation, as this would require holes to overlap, which is another limitation. |
| Hole geometries should not touch or overlap faces of the containing collision geometry that aren't removed | It is most reliable to create holes which are of precisely the size required, this ensures the best performance. |
| A hole geometry must be contained entirely within, or overlapping the edges of (apart from the exceptions above), the collision geometries it affects. | If hole geometries extend outside the collision geometry, resize the hole to be the appropriate depth, and use the snap holes to surfaces feature (accessed through the context menu of the part, or via the SnapHolesToSurfaces() function), to place hole faces up against the face of the containing collision geometry. |
| Holes should not touch or overlap curved faces of the containing collision geometry | As it is the flat faces of hole objects which can become holes in a collision geometry, trying to work around this limitation would require some of the hole geometry to extend outside the collision geometry, which is another limitation. |