C++ Tutorial 1: Plugins
This module explains how users can write their own plugins for Vortex Studio to add custom objects that can be used to build mechanisms or scenes.
Requirements
Participants must have some basic C/C++ training before taking this training module. To be able to compile and run code, participants must have Visual Studio 2015 (VC14), Visual Studio 2017 (VC15), or Virtual Studio 2019 (VC16) installed.
Introduction
When using the Vortex Studio Editor, all of the objects that are used to create scenes and mechanisms are actually C++ plugins that CM Labs has created and delivered with the software. Using the Vortex Studio C++ API, users can add their own extensions to Vortex Studio and therefore their own custom functionality in the Editor and in applications deployed in the Player. All Vortex Studio plugins follow a standard structure dictated by Vortex Studio and use a mix of Vortex Studio specific functions and methods, along with standard C++, to implement their functionality. For example, in the case of default extensions like our Joystick input device extension, the plugin makes calls to DirectX and DirectInput functions to read data from a USB control device and make that data available to users.
Possibilities are endless when adding new functionality through extensions:
- Communications Interfaces: If a standard communication protocol like UDP does not suit your environment, a custom C++ plugin could communicate back and forth with other applications using communication protocols such as Serial or Corba.
- Hardware Interfaces: This type of plugin would allow you to have Vortex exchange data with hardware using its custom C++ API. This can include integrating a motion platform, joysticks, pedals, or another kind of hardware that is not supported by Vortex Studio out of the box. Data can be received from the hardware or sent back.
- Custom simulation models: If the models that come out the box with Vortex Studio lack functionality for your use case, plugins can be used to program those models manually. This is especially useful when using the integrated Python interpreter is too slow for the application.
- Additional graphical capabilities: Our Vortex Simulators offer a number of specialized graphical overlays that were developed as internal C++ plugins for Vortex Studio. Specialized graphical layers can be implemented by users using plugins.
Creating custom C++ plugins for Vortex Studio requires a copy of Microsoft Visual Studio.
A good starting point for the development of a C++ plugin for Vortex Studio is the code tutorial that can be found in the C:\CM Labs\Vortex Studio <version>\tutorials\ExUserExtension directory. By default, this extension implements very simple functionality to gather some information from a part and print it to the Vortex Editor debug log, but it could easily be modified to implement any type of functionality. To get more information about the creation of extensions, it is recommended to read Vortex SDK: Customizing Vortex
Copying a sample and compiling it
Copy the C:\CM Labs\Vortex Studio <version>\tutorials\ExUserExtension folder to a new location, outside of the Vortex Studio 2020 file structure.
Info
The tag <version> refers to the current installed version of Vortex Studio (ex.: 2020a). This applies anywhere <version> is mentioned in this tutorial.- Double-click on the ExUserExtension.vcxproj to open it in Visual Studio. If you have multiple versions of the compiler installed, you may need to select the version to use. Vortex Studio is compatible with Visual Studio 2015, 2017, and 2019.
- Set the Solution Configuration to Release.

- In the Solution Explorer, right-click on the ExUserExtension Project and select Properties.
- In the General section, change the Output Directory from ..\plugins to plugins. The sample project is configured to create the plugin file one directory above this project. This is likely not desirable.
- Still in the General section, select a valid Target Platform Version based on the SDK(s) installed on your system.
- In the C/C++ section, click in the Additional Include Directories field, click on the Drop-down Arrow on the right side and select the <Edit...> menu.
- Change ..\..\include to C:\CM Labs\Vortex Studio <version>\include and click OK.
- In the Linker section, click in the Additional Library Directories, click on the Drop-down Arrow on the right side and select the <Edit...> menu.
- Remove all four entries and add a single one, pointing to C:\CM Labs\Vortex Studio <version>\lib, and click OK.
- Go to the Linker | Debugging section and change the Generate Program Database File field from ../plugins/ExUserExtension.vxp.pdb to plugins/ExUserExtension.vxp.pdb
- Go to the Linker | Advanced tab and change the Import Library field from ../plugins/ExUserExtension.vxp.lib to plugins/ExUserExtension.vxp.lib
- Save the project and solution.
- Right-click on the project and Build it. The result will be a file called ExUserExtension.vxp located in the plugins sub-directory from the location of your project.
VXP files are really just renamed DLL files that contain the code of your plugin.
Deploying the plugin
Your vxp file can reside anywhere on your file system.
Typically, Vortex searches for vxp in its plugins folder and dll in its bin folder.
In order to add search locations, the Vortex Editor options, and your application setup file (including the player for example), must be edited to find and load your plugin.
You can put your library files alongside your plugin file, Vortex will find them.
Vortex Studio Editor
- Launch the Vortex Studio Editor
- Go to Options
- Go to the setup section
- Add your Plugin paths using the widget e.g. "C:\CM Labs\Vortex Studio <version>\tutorials\plugins"
- Save, you will be prompted to restart the editor
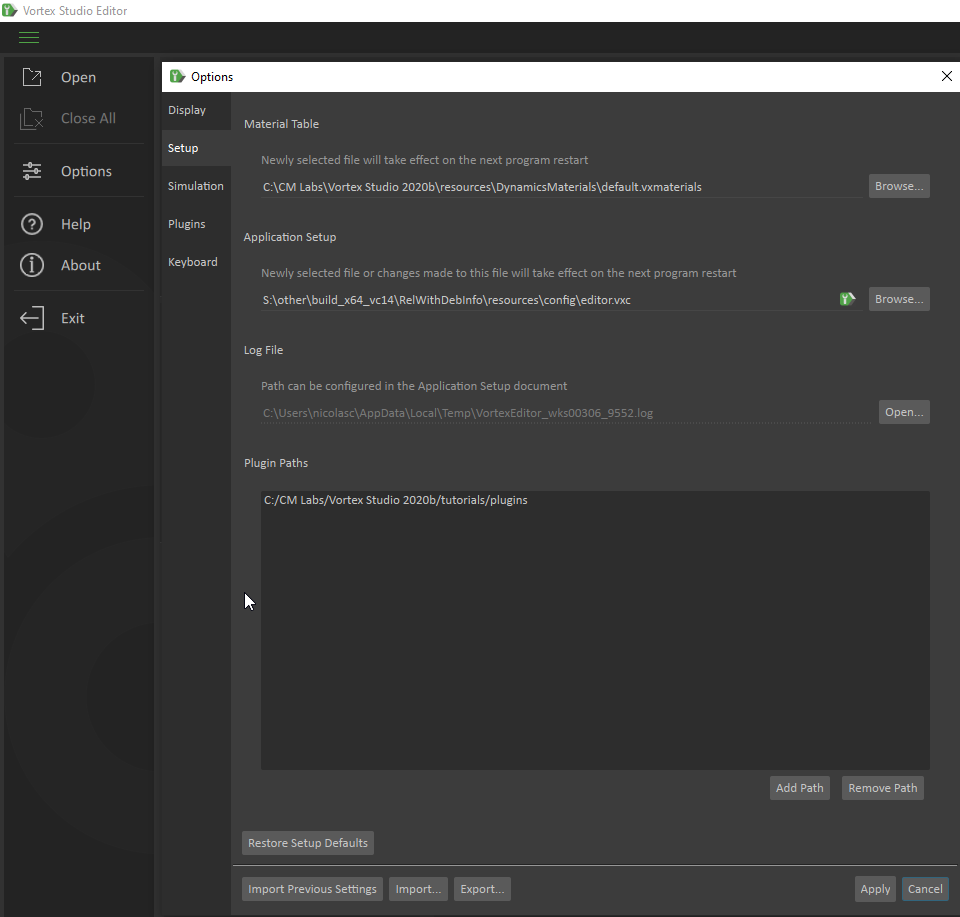
- Note the editor.vxc does not need to be modified.
Simulator Application
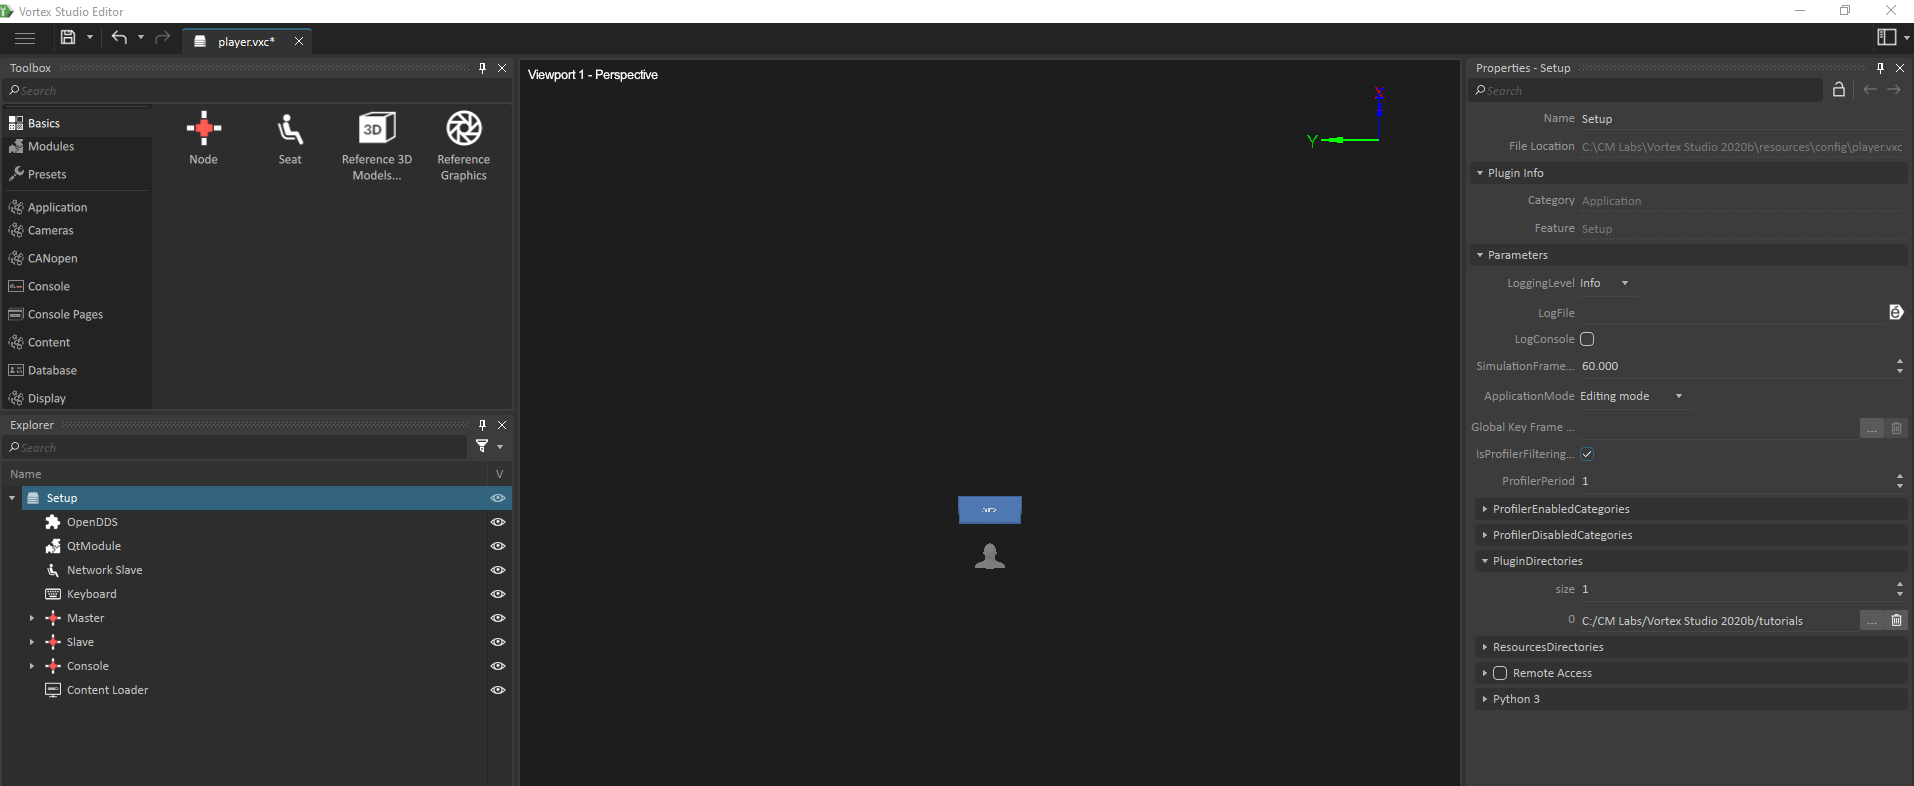
- Launch the Vortex Studio Editor
- Open your setup file
- In the Explorer, select the root of your setup file
- In the Property view, expand the PluginDirectories field
- Use the widget to increase the size
- Click on the ... button and select your folder e.g. "C:\CM Labs\Vortex Studio <version>\tutorials\plugins"
- Save your setup file
Alternate method
After compilation, the VXP file can also be copied to the C:\CM Labs\Vortex Studio <version>\plugins of your Vortex Studio installation. You can also automate this step by editing the Properties of your Visual Studio project once again, going to the Build Events | Post-Build Events, and entering the following text in the Command Line field: copy /Y $(OutDir)$(TargetName)$(TargetExt) "C:\CM Labs\Vortex Studio <version>\plugins". It should be noted that if the editor is running, you will not be able to copy new builds of your plugin to the plugins folder since the file will be in use by Windows.
Using a new module and extension in Vortex Studio
- Make sure the new plugin file is available in the search paths of Vortex Studio.
- Start the Vortex Studio Editor.
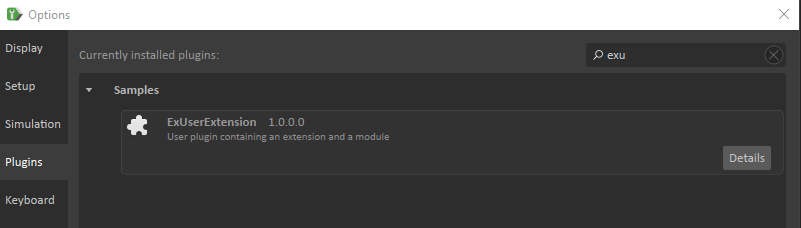
- Click on the Options menu in the left sidebar and select the Plugins section.
- Type "exu" in the Search box at the top right of the window, then expand the Samples section to see the extension we created. If you don't see your plugin listed in this list, it means that it failed to load correctly in the editor. This can happen if the plugin has dependencies on external DLLs and they are not found in the system path.
- Since the ExUserExtension plugin contains both a module and an extension, the module needs to be added to the editor configuration file to be active in the editor. Open the C:\CM Labs\Vortex Studio <version>\resources\config\editor.vxc file in the Vortex Studio Editor.
- Start typing "MyM" in the Toolbox search bar to narrow down the list of entries to a single one, containing MyModule.

- Double-click on the custom module to add it to the list of active modules in the editor.
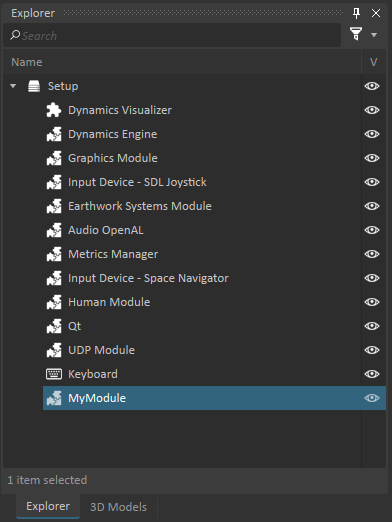
- Notice that when the module is selected, the properties related to this module are shown in the Properties window.
- Save the editor.vxc file, then close and restart the Vortex Studio Editor for the change to take effect.
- Open an existing mechanism.
- Search for My Extension in the Toolbox and add the resulting extension in the selected mechanism.
- Assign one of the parts of your mechanism to the Part field of the new extension.
- Save the mechanism.
- Open a scene that contains this mechanism and Run it.
- Stop the simulation after running for a few seconds.
- Open a Windows Explorer window and enter %temp% in the address bar. This will show you the contents of your system's temp directory.
- Sort files by modified time and look for a file called VortexEditor_computername_99999.log, where the computer name is the name of your computer, and 99999 is the process ID of the editor. You will likely have multiple copies of this file.
- Open the latest editor log and scroll to the bottom of the log. You will see a bunch of log entries that include the words INFO - My Extension. This is the output that was generated by our plugin.
Plugin code exploration
At a high-level, the code for the ExUserExtension plugin examples contains 3 main sets of files:
- A top-level plugin definition
- A module definition
- An extension definition
Vortex Studio plugins fall into two main categories. Plugins that introduce extensions and plugins that contain modules and extensions. Modules are essentially controllers that manage the execution of extensions in a Vortex Studio application. They especially make sense in situations where code only needs to be executed once (e.g. initializing a CANbus interface), then all extensions can access the objects defined in the module. Modules are also useful to be able to easily activate or deactivate functionality in a Vortex Studio deployed application without needing to modify any of the application contents.
Plugin.cpp
The top-level plugin definition happens in Plugin.cpp. In this file, we define a top-level C function that Vortex Studio will use to get information about the plugin's contents. Notice that all of this information appeared in the Vortex Studio Editor interface in exercise 2.
extern "C" SYMBOL bool GetPluginInfo(VxPluginSystem::VxPluginInfo & pluginInfo)
{
    pluginInfo.setDisplayName("ExUserExtension");
    pluginInfo.setVersion(Vx::VxVersion("1.0.0"));
    pluginInfo.setVendor("CM Labs Simulations Inc.");
    pluginInfo.setDescription("User plugin containing an extension and a module");

    return true;
}
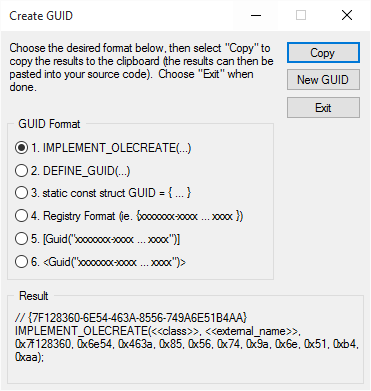
The next section of this file contains two very important elements, the Module Key and the Extension Key. The first parameter of these two keys must be unique within all Vortex Studio plugins. To do this, we use GUID. These long alphanumeric codes are always going to be unique, as they are usually forged from some information that is specific to the computer used to generate it, along with factors like time and day.
const VxSim::VxFactoryKey kMyModuleKey(VxSim::VxUuid("{736A3C45-9B79-4405-8D7F-6196BCCC91FD}"), "Tutorials", "MyModule");
const VxSim::VxFactoryKey kMyExtensionKey(VxSim::VxUuid("{2782B388-7BE8-4757-BA75-BBC904405682}"), "Tutorials", "MyExtension");
Visual Studio has a built-in tool to generate GUIDs (Tools | Create GUID). If you use it, you should select format #4 in the list that is proposed.
The other parameters after the GUIDs indicate the section of the Toolbox that the extension will appear in, the module category, and the C++ class name for both of them.
The remainder of the Plugin.cpp file defines two C-style functions that will be used to initialize and uninitialize the plugin. This code does not require any user modification, except perhaps to rename the classes to something different than MyModule and MyExtension when copying this code as the start of a new plugin.
MyModule.h
Moving along to the module definition, MyModule.h defines the MyModule class, derived from a Vortex Studio class called VxSim::ISimulatorModule. This class has a number of methods that we will be defining in our implementation. Towards the end of the header file, you will notice a public class data member called parameterEnableExtensions. This element will be used in the module cpp file to define the properties that the Module will have to be configured in the Setup document editor. The fact that the data type of the field is boolean indicates that a check box should be displayed in this module's property sheet in the editor.
public:
        // Field used as parameter to enable/disable the call to UserExtensions
        VxData::Field<bool> parameterEnableExtensions;
MyModule.cpp
The first section of MyModule.cpp contains the class constructor for the module. As part of the constructor, you will see the parameterEnableExtensions public data member mentioned before. That member has three parameters. The first one indicates its default value for this field when this module gets instantiated in the editor. The second parameter will be the user interface label in the editor. Finally, the third element indicates if the element will be an input property, an output property or a parameter for the module, where getParameterContainer indicates that this specific example is a parameter.
MyModule::MyModule( VxSim::VxSimulatorModule *proxy )
    : VxSim::ISimulatorModule(proxy)
    , parameterEnableExtensions(true, "Enable Extensions", &proxy->getParameterContainer())
{
}
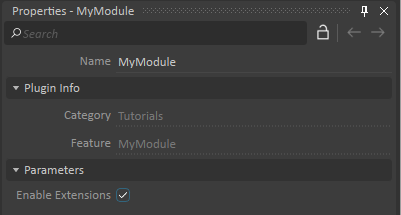
Once the code has been compiled and the plugin is placed in the right directory, the resulting module will appear as follows in the setup document editor.
While most other methods in MyModule.cpp are left empty, there are three important methods that are defined here. First, we have the onExtensionAdded and onExtensionRemoved methods. These are called extensions that are managed by this module are added to the simulation as part of the loaded content. The methods will receive a pointer to the extension and store it to manage them during the simulation. This code will usually not be modified when you create your own extension, except class names.
// Implements code when the this user extension is added to the Frameworks application.
// It adds the extension to the list of owned extensions if the type is MyExtension.
void MyModule::onExtensionAdded(VxSim::VxExtension* extension)
{
    // add only extension of MyExtension interface
    VxSim::VxSmartInterface<MyExtension> myExt = extension;
    if (myExt.valid())
    {
        // adds the extension to the list of managed extensions
        _addManagedExtension(extension);

        // call the function that notifies the extension to prepare itself
        myExt->onAddedToMyModule();
    }
}

// Implements code when this user extension is removed from the Frameworks application.
// It removes the extension from the list of owned extensions if the type is MyExtension.
void MyModule::onExtensionRemoved(VxSim::VxExtension* extension)
{
    // remove only extension of MyExtension interface
    VxSim::VxSmartInterface<MyExtension> myExt = extension;
    if (myExt.valid())
    {
        // call the function that notifies the extension to clean up itself
        myExt->onRemovedFromMyModule();

        // removes the extension from the list of managed extensions
        _removeManagedExtension(extension);
    }
}
Last but not least is the onPostUpdate method, which gets called every iteration as the simulation runs. This method first checks to see if the simulation is running and if the module has been configured to enable the extensions that it manages. If both of these conditions are true, it will process all extensions that it manages, get a pointer to that extension, then call the updatePosition method for this extension, and print information if configured to do so in the Vortex Studio application log.
// Called after modules Update().
// Call all MyExtension updatePosition if enabled
void MyModule::onPostUpdate(VxSim::eApplicationMode mode)
{
    // update extensions only if enabled
    if ( mode == VxSim::kModeSimulating && parameterEnableExtensions)
    {
        // the list is sorted according to the connections dependencies
        // if already sorted, it is very very fast
        _sortManagedExtensions();

        // get the list of module extensions
        const auto& extensions = getProxy()->getManagedExtensions();
        for (auto it = extensions.begin(); it != extensions.end(); ++it)
        {
            // get the MyExtension interface (should be valid since the module put it in the list)
            VxSim::VxSmartInterface<MyExtension> myExt = *it;
            myExt->updatePosition();

            if ( myExt->inputEnablePrint && getApplication()->getFrame() % myExt->parameterPartInfo.frameDelay == 0 )
            {
                Vx::LogInfo("%s: %g\n", myExt->getName().c_str(), myExt->outputDelta.getValue());
            }
        }
    }
}
MyExtension.h
Similar to the module definition, the extension header file mainly contains the definition of the extension class, along with the list of parameters that the extension will make available to users. In this case, we see some variety in the data types for these elements. While the boolean will be displayed as a check box, the double will be shown as a numeric data entry field and the PartInfo element will allow users to select a part as we have done in many of the previous tutorials in this class. The PartInfo type is actually also defined in this header file.
public:

        // Field used as input to enable/disable print of the position
        VxData::Field<bool> inputEnablePrint;

        // Field used as output to expose the delta position
        VxData::Field<double> outputDelta;

        // Parameter for the part
        PartInfo parameterPartInfo;
This constructor of the extension is a little more complicated than the module, as it has more properties. That being said, the same order as before holds true, with the three arguments to each property indicating the default value of that field, the label of that field, and the section of the property sheet where it belongs.
MyExtension::MyExtension( VxSim::VxExtension *proxy )
    : VxSim::IExtension(proxy)
    , inputEnablePrint(true, "Enable Print", &proxy->getInputContainer())
    , parameterPartInfo("Part Information", &proxy->getParameterContainer())
    , outputDelta(0.0, "Height variation", &proxy->getOutputContainer())
    , mCurrentPosition(0.0, 0.0, 0.0)
{
    // if the part change, we need to reset the current position
    parameterPartInfo.part.addObserver([this](VxDynamics::Part* p)
    {
        // of course, here we have p == parameterPart.getValue()
        if ( p != nullptr )
        {
            mCurrentPosition = VxMath::Transformation::getTranslation(p->outputWorldTransform);
        }
        outputDelta = 0;
    });

}
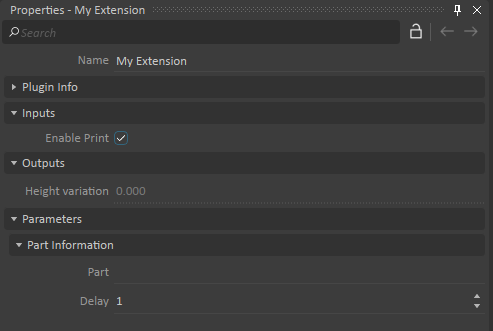
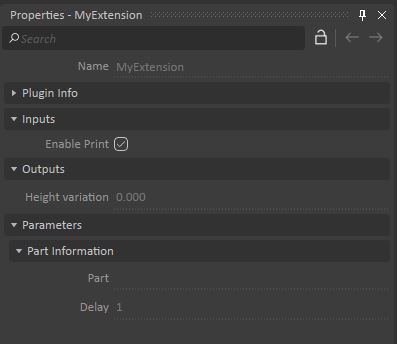
The following image shows the object's properties when instantiated in a mechanism.
The constructor also does something interesting where it registers a callback function to be executed anytime there is a change in the part of interest (parameterPartInfo.part.addObserver). When that function is executed, the code will retrieve the part's new world transform.
The last part of interest in this code is the updatePosition method, which as we saw before gets called every iteration by the module that is managing this extension.
void MyExtension::updatePosition()
{
    if (parameterPartInfo.part!= nullptr)
    {
        Vx::VxVector3 newPosition = VxMath::Transformation::getTranslation(parameterPartInfo.part->getWorldTransform());
        outputDelta = newPosition.z() - mCurrentPosition.z();
        mCurrentPosition = newPosition;
    }
}
Notes on plugins
The technique shown in this example code can be used to create lots of different plugins. For communication plugins, you may want to place initialization code to open ports or perform other similar tasks in the module so that they are done once for all extensions that are placed in the content created with Vortex Studio.