Maritime Tutorial 1 : Working With Water
In this training pack, we will go over key concepts and guidelines to get you started with nautical simulations in Vortex® Studio.
This module focuses on the basics of using Vortex Studio to create an offshore simulation application. This module covers how to add an ocean to a scene and how to add an existing mechanism to the ocean scene.
Prerequisites
You need to have Vortex® Studio and the Vortex Studio Demo Scenes installed to be able to follow all steps in this tutorial.
Creating a Scene With an Ocean
- Start the Vortex Studio Editor.
Click on the Scene document type in the New Document section of the welcome screen to create a new scene.
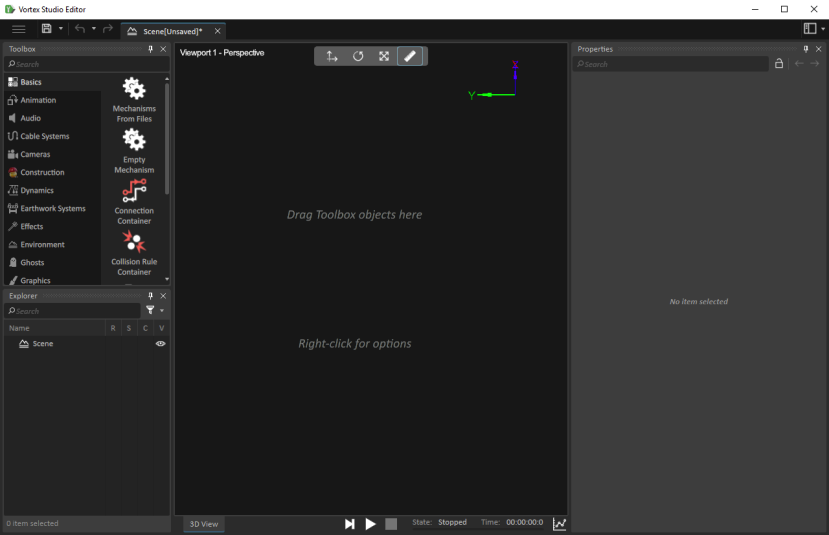
This will open the scene editor. By default, a new scene does not have any contents. This is why it displays messages indicating that you can drag Toolbox objects in the scene or right-click the workspace to configure scene options.
- Click on the Marine section of the Toolbox to see objects related to the creation of maritime environments.
- Double-click on Ocean to add an ocean to your empty scene.
It will take a few seconds for the screen to refresh and the ocean to appear. Once it does appear, the ocean will be very dark, as our scene does not contain any lighting.
- Click on the Environment section of the Toolbox and double-click on SkyDome. This adds a sky, as well as default lighting to the scene.
- Click on the middle mouse button and pan around the 3D view to tilt the camera and see the sky.
- Use the mouse wheel to zoom in and out of the scene.
- To increase the realism of the ocean's lighting, click on the Lights section of the Toolbox and double-click on Ambient.
- Set the Intensity of the Ambient light to 0.5
Go to the Graphics section of the Toolbox and double-click on Adaptive Feature.
This object allows users to configure the visual quality of shadows, mirrors ocean reflections and other graphically intense features in Vortex Studio.
Click on the Run button, which looks like a "Play" icon located under the 3D view. This will start the simulation, and you will see the waves moving.
It should be noted that water is infinitely created in all directions when you use the Ocean. If you lose track of your position, press "P" to reset the camera to be near the origin (0,0,0).Press the Stop button to stop the simulation.
Select the top-level Scene node in the Explorer.
Press the F2 key to rename the node to "MarineScene".
Press the Save icon in the top-left of the Vortex Studio interface to save your scene to disk. Create a new folder for your work files. The default name of the saved scene will be MarineScene.vxscene, based on the name of the updated scene name.
It is always a good practice to save your work regularly. After you have initially saved a file and given it a name, you can use the standard Ctrl-S key combination to save the file that you are currently editing. You can also use Ctrl-Shift-S to save all open files.
Adjusting Ocean Parameters
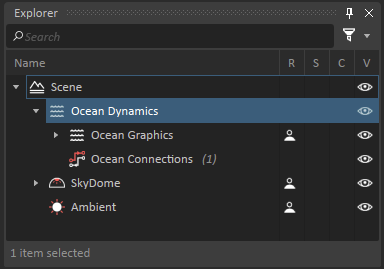
- To edit an item that was previously created, you need to select it in the Explorer window, located in the bottom-left corner of the Vortex Studio interface by default.
- Click on Ocean Dynamics in the Explorer window.
- Expand the Ocean section, located under Inputs.
- Increase or decrease the Sea Scale to see the effect on the waves. You can restart the simulation and change these properties while it is running since they are Inputs. The default sea scale type in Vortex Studio is set to Douglas Scale, but that can be modified using the Sea Scale Type drop-down list, right above the Sea Scale field.
- You can also change some of the environment parameters such as time of day by selecting the SkyDome node in the Explorer. Click on SkyDome and set the Hour Input property to 20. This will change the time to 20:00 and the scene lighting will be adjusted accordingly. As with the sea scale, the time of day is an input parameter and can therefore be modified during the execution of the simulation.
- Save your scene.
- Click on the Simulation Section of the Toolbox and double-click on the Material Table item.
Click the Browse (...) icon next to the Material File Name in the new item's property sheet and navigate to the ...\Vortex Studio Content <VERSION>\Demo Scenes\Scenario\OffShore Scene, then select the Offshore.vxmaterials file and click on Open.
The material table contains a list of all materials that will be available in the simulation. Materials are used to determine friction and penetration between rigid bodies as the simulation is executed. The Offshore.vxmaterials file is a sample material table that is provided with the Vortex Studio samples. Users can edit the material table or create their own.- Save your scene.
- Click on the top-left button in Vortex Studio Editor interface (the button with 3 horizontal bars) to go to the Home Page.
- Click on Options, then click on the Setup tab.
- Click on the Browse... button for the Material Table section and select the Offshore.vxmaterialsfile so that it becomes the default material table no matter which file you open, once you have restarted the Editor.
- Click Save in the Options dialog.
Adding an Existing Mechanism to the Scene
Any mechanical system that is simulated in Vortex Studio is stored in a type of file called a Mechanism. This will contain many objects, and will also contain some other files such as Assemblies and Parts. Before we learn how to create new mechanisms, we will first learn how to add a mechanism to our existing scene.
- Go to the Basics section of the Toolbox and double-click on Mechanisms From Files. The "Add Mechanisms" dialog contains two main sections: The Opened Resources section would list any mechanism that is currently opened in the editor, while the Browse button below allows you to browse your computer to find existing content.
- Click on Browse button to open a Windows file selection dialog.
Navigate to the ...\Vortex Studio Content <VERSION>\Demo Scenes\Equipment\Normand_Kraken\Dynamic\Design directory and select the NormandKraken.vxmechanism file, then click on Open.
After inserting the mechanism, you will see that it will appear above the water by default. When inserting a mechanism, the origin of the mechanism (the 0,0,0 coordinate) is positioned at the origin of the scene (the 0,0,0 coordinate of the scene)
- Click on the Normand Kraken node in the Explorer to select it.
- Click the directional movement button at the top of the 3D view to activate the object movement mode. This will make a movement control appear at the origin of the ship model.
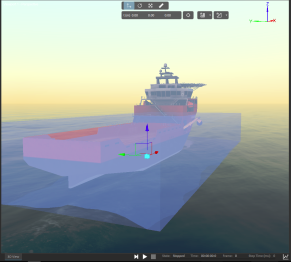
- Click the blue arrow at the top of directional movement control and slide the mouse down to lower the vessel into the water.
Press the Run button to start the simulation.
You will see that the ship floats and will start rocking with the waves, based on the current sea state. This occurs since this mechanism already defined the ship's buoyancy and drag parameters. We will learn how to set these parameters as we create our own vessel in the next section. You will also see that the ship automatically starts moving forward. We will stop it in next steps.
- Stop the simulation.
- Expand the Normand Kraken object in the Explorer.
- Select the Vessel Interface node that was made visible in previous step.
- Change the current RPM Input from -1,500.00 to 0.0.
Run the simulation again to see that the vessel no longer moves forward automatically.
Once again, the RPM property of the vessel is an Input. This means that it can be changed during the simulation to change the speed of the Vessel.
- Stop the simulation.
- Select the Normand Kraken mechanism in the Explorer window and press the Delete keyboard key to remove it from the scene.
- Save your scene.