Maritime Tutorial 5 : Adding Heave Compensation
In this training pack, we will go over key concepts and guidelines to get you started with nautical simulations in Vortex® Studio.
This module focuses on using Vortex Studio a Python script coupled with the GSPID Controller object to implement a heave compensation system.
Prerequisites
You need to have Vortex® Studio and the Vortex Studio Demo Scenes installed to be able to follow all steps in this tutorial. Working knowledge of Python or coding languages in general will facilitate the understanding of this module as well.
Adding a GSPID Controller
- Start the Vortex Studio Editor. Open OffshoreCrane.vxmechanism. This is the mechanism you created in Marine Module 3: Building an Offshore Crane
Double-click on GSPID Controller from the Dynamics section of the Toolbox to add it to the scene.
- Rename the GSPID to "Heave Compensation Controller".
Modifying the Control Script
- Right-click on the ControlScript script and click on Edit.
Add the following inputs:
Name Type Physical Dimension >PID Value >Double >None >Activate Heave Comp >Boolean >None >Hook Position >Vector 3 >Length (m) Add the following outputs:
Name Type Physical Dimension Hook Desired Position Double None Hook Current Position Double None Data types being used in this script: Boolean: Data type which may only have one or two values (ie. True or False, 1 or 0). Double: A double-precision floating point data type. Mathematical operations can be used on this data type. (ex. 1227.39, 5.19e^-10). Vector: Data which is a fixed-length collection of values of a certain type (ex. [0,5,3.25]).
In the Code section of the script, replace the code with the following:
from VxSim import *


def on_add_to_universe(self, universe):
    self.heaveCompToggle = False
    self.activateHeaveComp = False


def pre_step(self):
    # Toggle Heave Compensation
    if self.inputs.Activate_Heave_Comp.value and not self.heaveCompToggle:
        self.heaveCompToggle = True
        self.activateHeaveComp = not self.activateHeaveComp
    elif not self.inputs.Activate_Heave_Comp.value:
        self.heaveCompToggle = False

    self.outputs.Arm_Actuator_Velocity.value = self.inputs.Arm_Actuator.value * 0.2
    self.outputs.Elbow_Actuator_Velocity.value = self.inputs.Elbow_Actuator.value * 0.2

    if (self.inputs.Hoist_Up.value):
        drumVelocity = -0.2
    elif (self.inputs.Hoist_Down.value):
        drumVelocity = 0.2
    else:
        drumVelocity = 0.0

    self.outputs.Hook_Current_Position.value = self.inputs.Hook_Position.value.z

    if not self.activateHeaveComp:

        self.outputs.Drum_Velocity.value = drumVelocity
        self.outputs.Hook_Desired_Position.value = self.outputs.Hook_Current_Position.value

    elif self.activateHeaveComp:

        self.outputs.Hook_Desired_Position.value += 0.1*drumVelocity
        self.outputs.Drum_Velocity.value = self.inputs.PID_Value.value

    self.outputs.Turret_Slew_Velocity.value = self.inputs.Turret_Slew.value * 0.2
- Click on Apply.
- Save the mechanism.
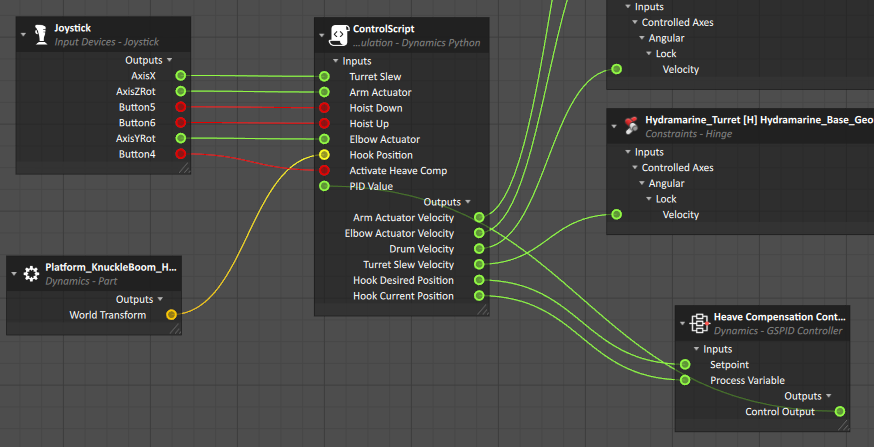
Connecting the PID's Inputs and Outputs
- Access the Connection Container by double-clicking on it.
- From the ControlScript script, drag-and-drop the recently added Inputs and Outputs.
- From the Heave Compensation Controller, drag-and-drop Setpoint, Process Variable and Control Output.
- From the Joystick, drag-and-drop the Y button (Button4) to the Connection Container.
- Drag-and-drop the World Transform of the Platform_KnuckleBoom_Hook part of the Hook assembly into the Connection Container.
- Make the connections as shown:
Testing and Adjusting the PID's Parameters
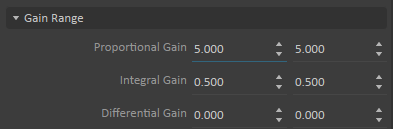
- Access the Properties of the Heave Compensation Controller PID.
- From the Gain Range section, set the gain ranges of the PID to these values :
- Save the mechanism.
- Open MarineScene.vxscene
- Open a Plotter Window by clicking on the Plotter button.

- Drag-and-drop Current Value and Desired Value inputs from the Heave Compensation Controller script into the plotter window.
- Start the simulation and activate the heave compensation by clicking on the Y button on the gamepad.
- Modify the PID parameters in order to fine tune the response of the module's depth.