Scene Tutorial 1: Adding Human Characters to Scenes
In this tutorial, we will go over key concepts and guidelines to get you started with simulations in Vortex® Studio.
This module focuses on using Vortex Studio to add controllable and animated human characters to existing scenes.
Vortex Studio has built-in support for two types of human characters, and they are both found in the Human section of the Toolbox. The Human object will render a 3D human in a scene. That human can either be standing still, or be following an animation path. The Controllable Human on the other hand can be controlled with a gamepad and allows users to see the world from a character's perspective.
Prerequisites
You need to have Vortex® Studio, the Vortex Studio Demo Scenes and the Vortex Human Library installed to be able to follow all steps in this tutorial.
Adding a Controllable Human to a Scene
Note: Your gamepad should be configured in "X" mode to properly control the human character.
- Open the MobileCrane Weight Hook Pipe Scene from the Vortex Studio Samples (located by default in ...\Vortex Studio Content <VERSION>\Demo Scenes\Scenario\MobileCrane Scene)
- Press the P keyboard key to shift the camera to perspective view.
- Use the middle mouse button to adjust the camera view, focusing on the open work site pit.
- Go to the Human section of the Toolbox and double-click on Controllable Human. After a few moments, a 3D human character will appear in mid-air above the work site.
- Select the Controllable Human object in the Explorer, then activate Move mode and place the human character on the ground.
- Rename the Perspective camera node of the Controllable Human to Human View.
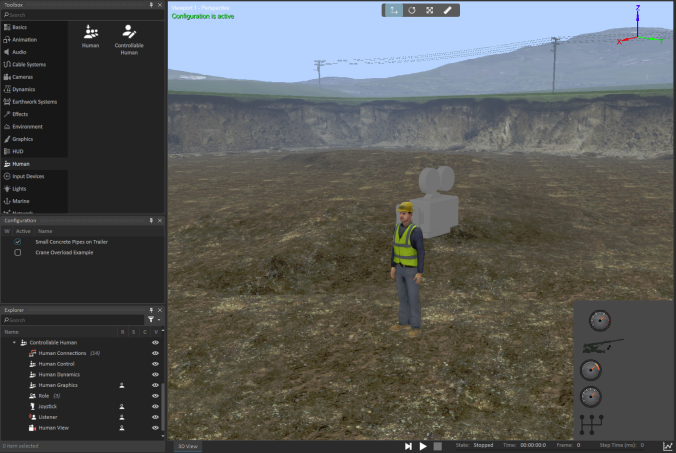
- Select the Human Dynamics node under Controllable Human in the Explorer and set the Feet Material to Wheel.
- Press the C key until the 3D view shows the human's viewpoint. You will see the label Camera - Human View in the top-left corner of the 3D view.
- Right-click on the Role node under the Controllable Human and select Activate to make this role the active role in the editor.
- Run the simulation. You will be able to control the human and walk around the work site using the gamepad.
- Save the scene under a different name in your work directory to keep a copy.
- Look in the parameters section of the top-level human node to change the appearance of the 3D character.
Adding a Human Character on a Path
We will now look at adding a human character that follows a path set by some waypoints in the environment.
- Open the MobileCrane Weight Hook Pipe Scene from the Vortex Studio Samples (located by default in ...\Vortex Studio Content <VERSION>\Demo Scenes\Scenario\MobileCrane Scene) if it is not already opened.
- Go to the Animation section of the Toolbox and double-click on Reference Point.
- Click the Move control and move the reference point to the ground in the work site.
- Use the Ctrl+D key combination to make 3 copies of the reference point.
- Position each copy around the work site to make a loose rectangle on the ground
- Go to the Animation section of the Toolbox and double-click on Animation Path to create a new object in the scene.
- Select the Animation Path in the Explorer window.
- Click 5 times on the + button under the Waypoints section to create new entries in the animation path.
- Assign your 4 reference points to each of the first four entries of the Waypoints configuration. Once you have 3 points selected, you will see a path drawn in the scene.
- Assign the first of your reference points as the fifth waypoint entry. This creates a loop in the animation path.
- Check the Loop Animation property under the animation path's Parameters section.
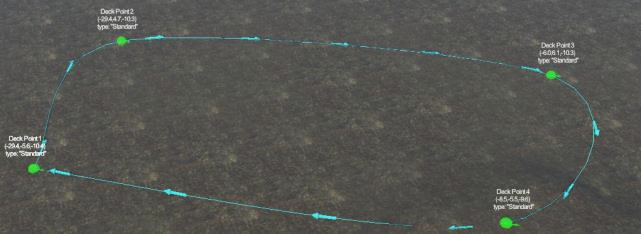
- Set the Input Speed of the Animation Path to 1.7 m/s.
- Go to the Human section of the Toolbox and double-click on Human.
- Create a Connection Container in the scene from the Toolbox Basics section.
- Select the Animation Path object and drag-and-drop its Output Transform property to the connections editor.
- Select the top-level Human node in the Explorer and drag-and-drop its Parent Transform property to the connections editor.
- Draw a connection between the two elements to connect them together.

- Select the Human Control node of the Human character and set the Desired Human Action to Walk.
- Save the scene.
- Run the simulation and you will see the human character casually walk along the prescribed path.
- Adjust the position of the waypoints to get a natural character motion even if the ground is uneven. You may need to add extra reference points as waypoints in the animation path to depending in the changes in ground elevation.