Scene Tutorial 3: Creating a Head-Up Display (HUD)
This module focuses on using Vortex® Studio to add a Heads-Up Display (HUD) to an existing scene, to keep track of given metrics in the viewport.
Prerequisites
You need to have Vortex® Studio and the Vortex Studio Demo Scenes installed to be able to follow all steps in this tutorial.
Setting the Scene

- Open the existing offshore demo scene, found in the default directory C\Vortex Studio Content <version>\Demo Scenes\Scenario\OffShore Scene\NormandKraken.vxscene
- Save the scene as a copy with a different name to avoid overwriting this demo scene.
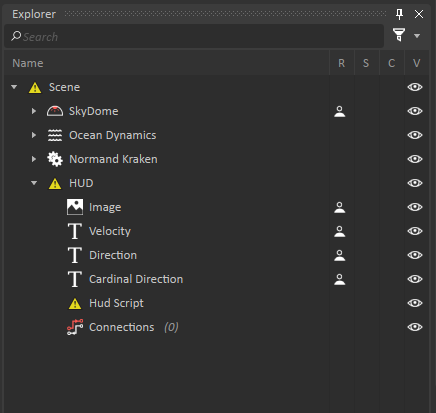
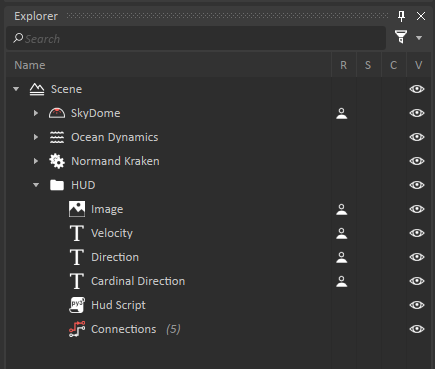
- In the Toolbox, under Basics add a folder to the Explorer, and rename it to "HUD".
- Go to the HUD section of the Toolbox, then drag-and-drop an Image and three Text extensions to the newly created HUD folder.
- Rename the three Text extensions to "Velocity", "Direction", and "Cardinal Direction", respectively.
- In the Toolbox, under Scripting, drag-and-drop a Dynamics Script to the HUD folder.
- Right click on it and select Edit, a window will appear to define the parameters of the script.
- Add two items to the Inputs section.
- Change the names of the inputs to "Velocity" and "Direction" and change the type of Velocity to "Double" and the type of Direction to "Matrix 4x4".
- Add three Outputs. Name them "VelocityString", "DirectionString" and "CardinalDirection" . Change the types of each variable to "String".
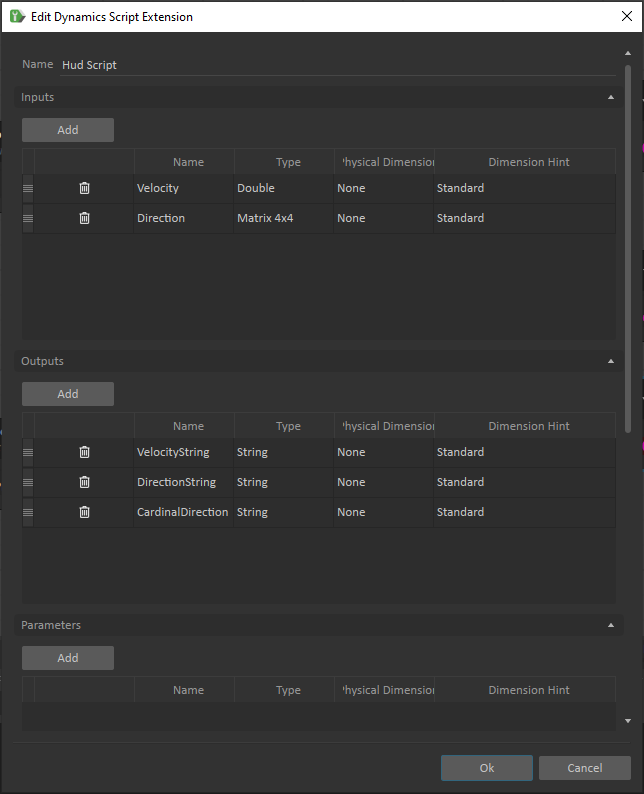
Rename the Script to "HUD Script"
This script will convert the numerical output of values in the simulation to "strings", a type of text data which is compatible with the Text extension. The Text extension cannot take in numbers and output them directly to text in the HUD.
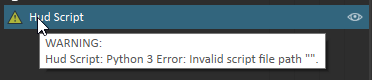
A warning is displayed because the script path is not defined, this will be addressed later.
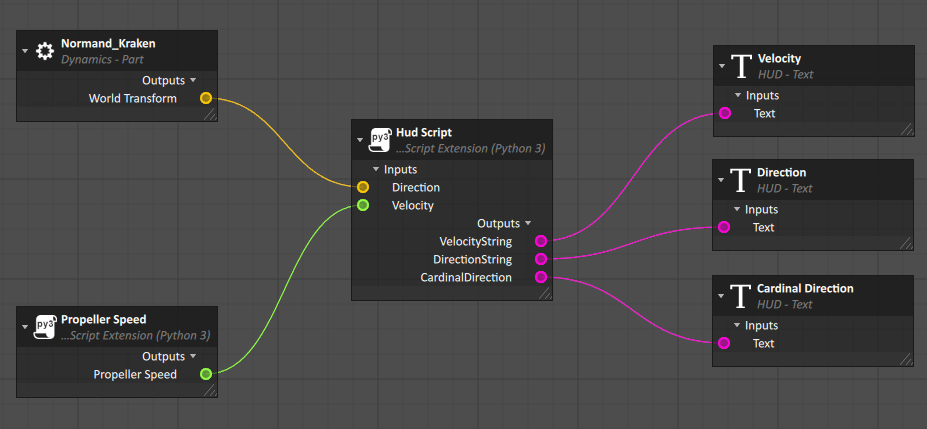
- Add a Connection Container to the HUD folder.
- Under the Normand Kraken mechanism, under Assemblies>Ship Hull>Parts, click on Normand_Kraken in the Explorer.
- In the Properties, under the Outputs tab, drag over World Transform to the Connection Container.
- Back in the Explorer, expand the Ship Graphics Effects folder found under the Normand Kraken mechanism and select the Propeller Speed dynamics script, then drag the Propeller Speed output property to the Connection Container.
- Select the HUD Script, drag over all inputs and outputs to the Connection Container.
- Select each Text extension made and drag over their respective Text parameters to the Connection Container.
- Establish connections between all elements as shown in the connection diagram below.
- Save the scene.
Scripting a HUD in Python
- Open Notepad, Notepad++ or your preferable Integrated Development Environment (IDE) to write code.
- We will create a script using the Python language to convert our vectors and doubles into strings that the Text extension can use to display data about the vessel.
Copy and paste the following code to your text editor / IDE and save it as a file with a .py extension in the same location as your scene file.
import Vortex
import math

def on_simulation_start(extension):
    #Defining the inputs and outputs of the script.
    extension.Velocity = extension.inputs.Velocity
    extension.Direction = extension.inputs.Direction

    extension.VelocityString = extension.outputs.VelocityString
    extension.DirectionString = extension.outputs.DirectionString
    extension.CardinalDirection = extension.outputs.CardinalDirection

def pre_step(extension):
    #Converting the velocity to a string using the built-in str function.
    extension.VelocityString.value = str(100*extension.Velocity.value)
    #Defining what will appear as text, and trimming off the last 10 digits from the Velocity since they are not significant.
    extension.VelocityString.value = "Prop. Speed: " + extension.VelocityString.value[:6] + " %"

    # Get Rotation VxVector3 from Matrix44. Essentially convert the matrix to a vector and take only the values that are relevant to this HUD.
    m=extension.Direction.value
    r = Vortex.getRotation(m)
    #Fetching the third value from the direction matrix which is the rotation around the Z-axis, which is the axis that defines the direction the boat is heading in.
    rot = (r[2]*360/6.28)
    #Defining the cardinal directions
    if (-180<rot<-90):
        extension.CardinalDirection.value = "N"
    if (-90<rot<0):
        extension.CardinalDirection.value = "E"
    if (0<rot<90):
        extension.CardinalDirection.value = "S"
    if (90<rot<180):
        extension.CardinalDirection.value = "W"
    #Defining the output to the HUD text
    extension.DirectionString.value = "Direction: " + str(rot)[:6] + " deg"
    extension.CardinalDirection.value = "Compass: " + extension.CardinalDirection.value
In the properties of HUD Script, select the newly saved .py file as the "Script Path" by clicking on the three dots to the right of the interface.
Notice that the warning is gone from the dynamics script object in the Explorer.
Creating the HUD Visuals
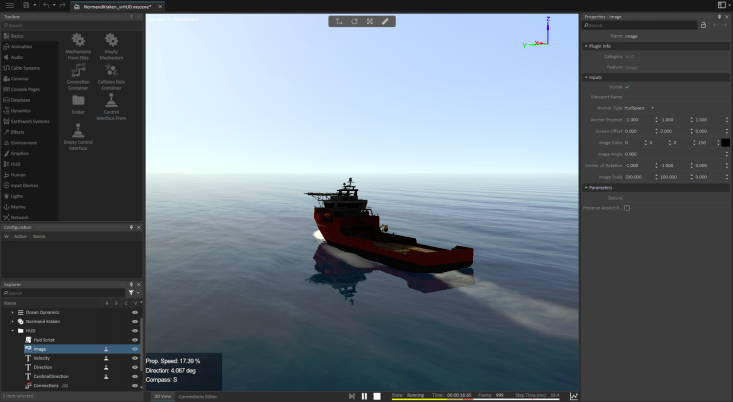
- In the Properties of the Image extension, change the Image Color to black by double clicking on the colored box to the right of the interface and selecting the black color box in the pop-up menu.
- Change the Image Scale to 200, 100, 0.
- Set the Anchor Position of the Velocity Text to -1, -0.85, 0
- Set the Anchor Position of the Direction Text to -1, -0.9, 0
- Set the Anchor Position of the Cardinal Direction Text to -1, -0.95, 0
- Set the Text Area Length for all Text objects to 200
- Save your work.
- Start the simulation. Observe as the values in the bottom left corner update in real time as the ships picks up speed.