Vortex Studio SDK - Device Mapping
- DEVOPS
Introduction
Devices
A device is usually a piece of hardware that is typically used to control an equipment. It can be a gamepad, a flightstick, a wheel, pedals or another custom hardware. Like everything in Vortex, such hardware communicates with the software through ISimulatorModules and IExtensions.
Vortex SDK provides gamepad support; the joystick module can be added to the Application Setup and the joysticks extensions are in the content, usually with the mechanism. The device extension's fields are then connected to what they are supposed to control in the mechanism, typically to a VHL Interface. A user can also make their own device modules and extensions and integrate them in their simulator in the way described above.
What is new in Vortex 2017b
In previous versions of Vortex, when a user wanted to upgrade its simulator with a new set of devices, change the calibration of the devices or simply change the device mapping in any way; the user needed to have access to the content, change the mechanism's device extensions or the connections from/to it. Then the content needs to be redistributed to every nodes of the simulator.
In 2017b, the concept of devices has been extracted from the content. This means that devices can now be configured without having to modify the content files.
The previous solution of devices in content is still supported.
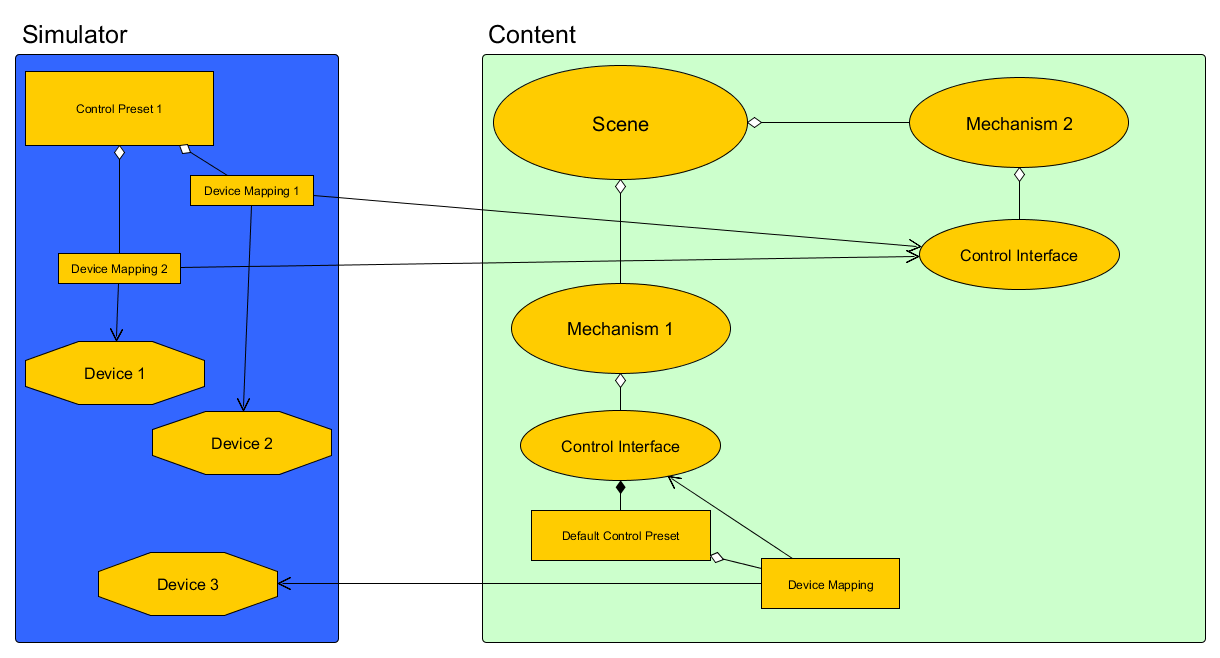
Device Classes
There are 3 main classes that handle devices: ControlInterface, IDevice and ControlPreset. A ControlInterface is put in the content, it contains the inputs and the outputs that interact with the IDevices. The ControlPreset describe how a control interface is connected to an IDevice. An IDevice is an interface on top of the actual hardware device extension. It allows the extension to be recognized as a valid device for inclusion in a ControlPreset. Presets are used by the simulator, thus external to the content, but a ControlInterface can embed a default ControlPreset.
ControlInterface
A control interface is a content object, meant to be added to a piece of equipment, a dynamics Mechanism, to expose its functionality.
A control interface is a document in itself and can be reused across different mechanism, should that make sense. It is a container of inputs that are meant to be controlled by a device and outputs meant to be sent back to a device.
It is used in two different contexts.
1. Definition
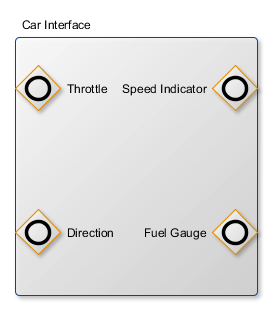
In the definition, it lists an equipment's inputs and outputs using a special kind of field called proxy. The proxies in the definition do not point to anything; they are meant to be associated with an actual Mechanism's fields in the instance.
For example, a Car interface document would have inputs such as Throttle and Direction, and outputs such as speed and fuel gauge.
2. Instance
When added to a mechanism, the control interface is instantiated into it.
The proxies are then linked to the actual fields that manages the mechanism (e.g. throttle, direction, speed and fuel). The link between a proxy and a field is a concept very similar to a VHL Interface.
The fields don't need to belong to the same extension. The links are the real destination of the device's outputs and inputs.
The example below shows the car control interface in the mechanism, the links are represented by the dashed lines.
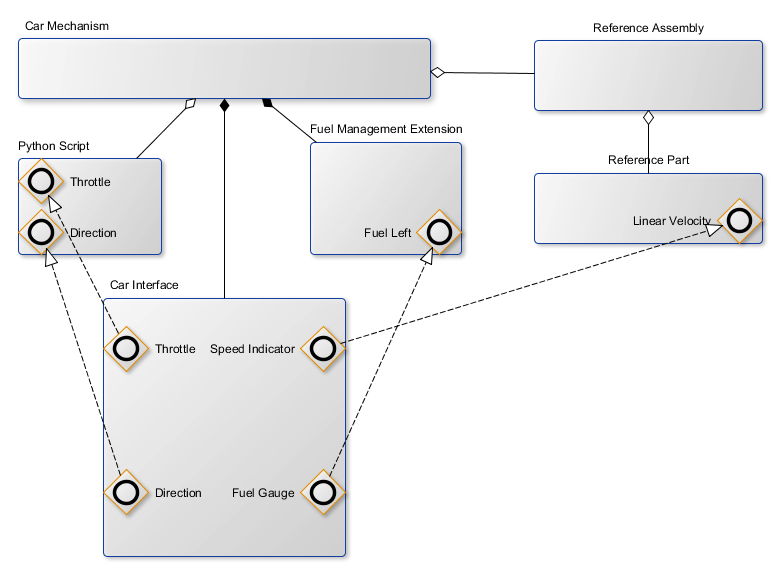
A ControlInterface can be added to a role and there can be multiples Control Interface within a single mechanism.
A ControlInterface can hold a default control preset (see below). This preset is meant to be used with the associated control interface.
IDevice
IDevice is an interface that is implemented by an extension to indicates that the extension is a device. A device is identified by a device ID, which contains a type, a name and an identifier to uniquely identify a device on a simulator.
For example, a gamepad is a device with outputs such as axes and buttons; and inputs like lights toggle and force feedback.
ControlPreset and DeviceMapping
A control preset represents a control scheme for a control interface. It is a container of DeviceMapping.
A DeviceMapping is an object that connects a ControlInterface to an IDevice.
In a DeviceMapping, you will have a list of fields that are meant to be connected together. Connection between 2 fields can be customized by adding a modifier and a transfer function.
Modifier
A modifier is an optional device field that function as a toggle. It indicates that the value between the device and the control interface will only be transferred if the modifier's value is true.
Transfer Function
A transfer function is a value manipulator that will take the value of the device/control interface and change it according to the function before passing it to the control interface/device. That available transfer functions are:
- Piecewise Linear:
- This transfer function allows to apply two different linear functions to a source value.
- The functions are described by the following parameters:
Source rest value. The value when the device is at rest.
Source deadband range. The range, centered on source rest value, where the value will be treated as source rest value.
Source minimum value. Minimum value for a source. Any value lower than the source minimum will be set to the minimum value.
Source maximum value. Maximum value for a source. Any value greater than the source maximum will be set to the maximum value.
Destination value for source rest value. Value outputted when source value is at rest or in the deadband range.
Destination value for source minimum value. Value outputted when source value is at minimum.
Destination value for source maximum value. Value outputted when source value is at maximum.
- Values between Source minimum value and the lower bound of the source deadband range is interpolated between Destination value for source rest value and Destination value for source minimum value.
- Values between the higher bound of the source deadband range and Source maximum value and is interpolated between Destination value for source rest value and Destination value for source maximum value.
- To Bool:
- Transform a numeric value to a true/false value. The function returns false when the input is considered at rest.
- The function is defined by the following parameters:
- Source rest value: The value when the device is at rest.
- Source deadband range: The range, centered on source rest value, where the value will be treated as source rest value.
- Inverted: Reverse the true/false logic.
- From Bool:
- Transform a true/false value into a numeric value.
- The function is defined by the following parameters:
- True Value: Value outputted when the input is true, typically 1.0.
- False Value: Value outputted when the input is false, typically 0.0.
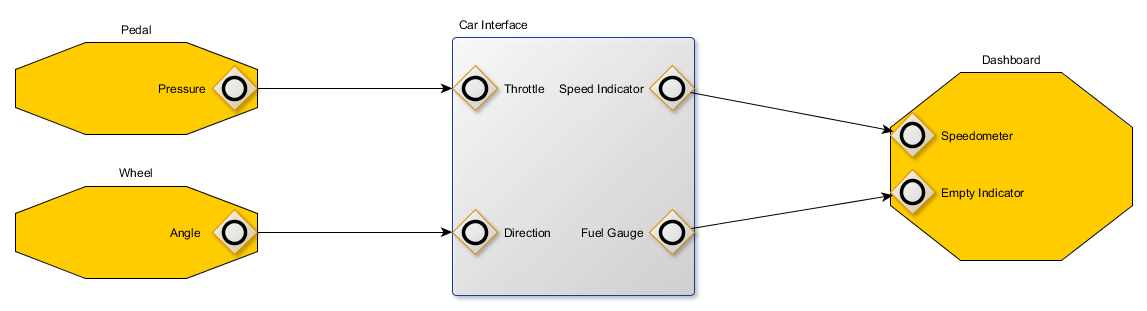
For example, here is a Control Preset that maps the Car Interface to 3 Devices, a wheel, a pedal and a dashboard.
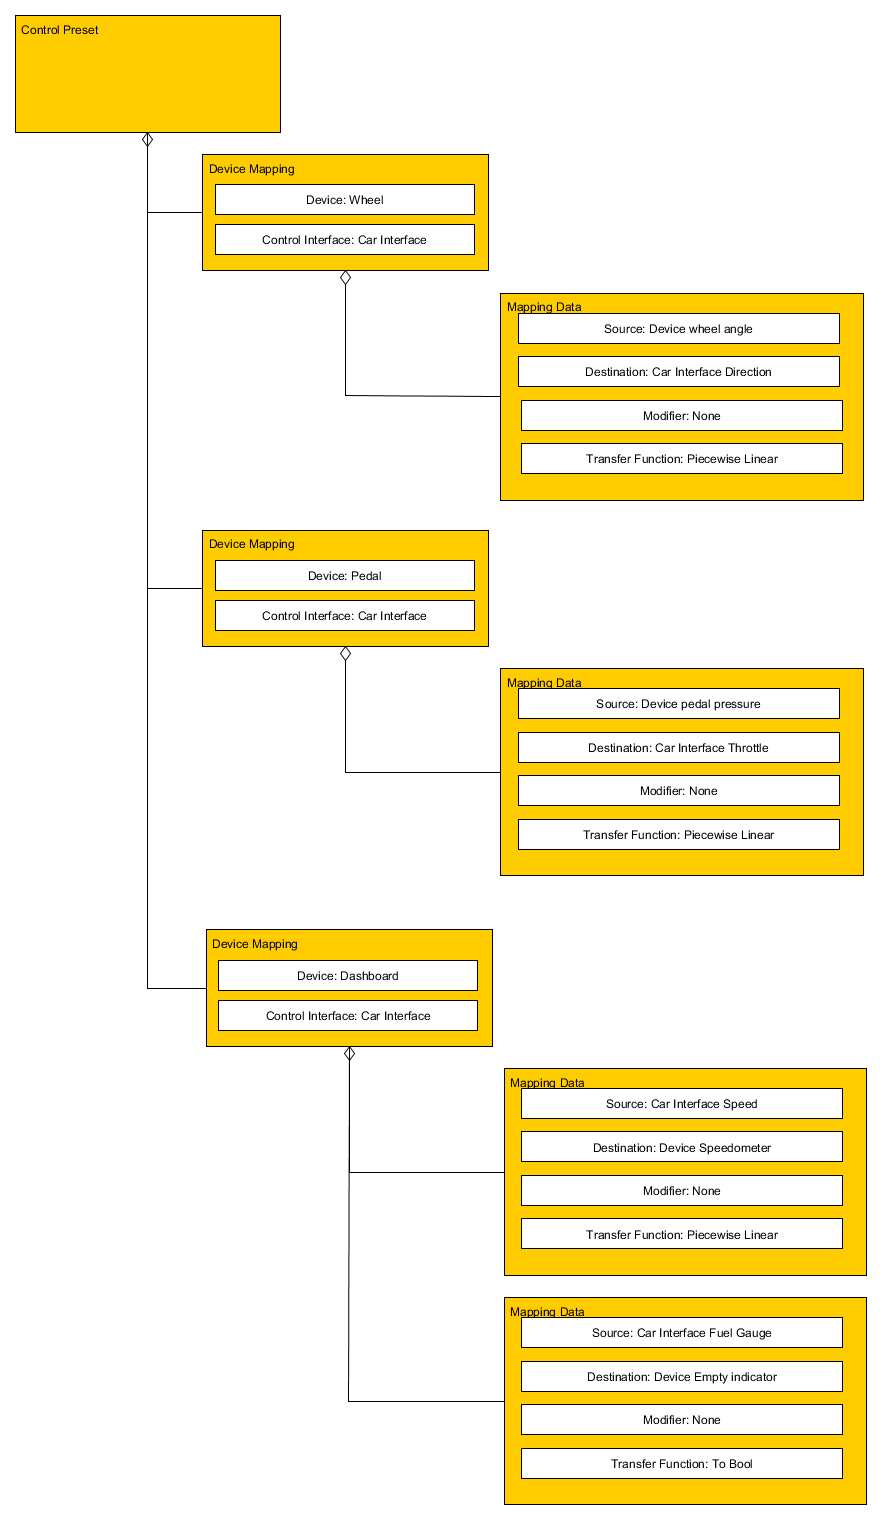
That control preset will generate the following mapping in the simulation:
Mapping Devices
Adding ControlInterface to Content
Before you can map your devices, you need to make your ControlInterface. Control interfaces are created using the Vortex Studio Editor, following the definition and instance pattern.
First the definition is created in the Controls tab and you can define the inputs and the outputs.
Then, in the mechanism tab, an instance to the control interface is added to the mechanism and the interface's fields are linked to the mechanism's fields.
If the control interface is tied to an operator's role, the control interface should be put in the role as well.
Adding Devices to the Simulator
Devices no longer need to be placed in the content. However, they still need to be added to an application. In order to do so, several things need to be done:
- The device extension needs to implement the IDevice interface.
- Each device must have a unique DeviceID.
- The module managing the devices still needs be on the node that handles the hardware. This is indicated in the Setup file.
- Each devices need to be added to the application.
- The module can generate the IDevice extensions.
- Alternatively, that can be achieve by putting them in the application setup.
- In order to work, the device extension needs to be present on every node, even if the module is not.
- To add a device to the simulator, use function
IDevice::addDevice. - To remove a device from the simulator, use function
IDevice::removeDevice.
- To add a device to the simulator, use function
Using Vortex Joystick Module
The Vortex joystick module detects plugged in USB devices and will add them to the application. The module simply needs to be added to the application setup. If the module is going to be present on multiple machines, the module parameter "Use Hostname In DeviceID" needs to be set to true to avoid DeviceID clash.
Creating your own Devices.
The tutorial MyDevicePlugin shows how to make a module that generates its own devices.
The extension is IDevice:
...
class MyDeviceExtension : public IExtension, public IDevice
...
The module generates the extension, sets its deviceID and adds it to the simulator:
...
	mAutoGeneratedDevice = VxSim::VxSmartInterface<MyDeviceExtension>::create();
    if (mAutoGeneratedDevice.valid())
    {
        // This is the name we will give to our device in Vortex.
        mAutoGeneratedDevice->setName("My tutorial device");

        // name, type and identifier will be used to uniquely identify this device in vortex.  These values should not change in order
        // for the control mappings to remain valid.
        mAutoGeneratedDevice->parameterDeviceID.name = "MyDevice";
        mAutoGeneratedDevice->parameterDeviceID.type = "Tutorial";
        mAutoGeneratedDevice->parameterDeviceID.identifier = "1"; // Should be unique for this name/type.

        // Add the device to the application, it will be added to the list of managed device in onExtensionAdded().
        IDevice::addDevice(application, mAutoGeneratedDevice);
    }
...
Describing Mapping with Control Preset
Once you have your simulator properly configured, it is time to map the device to a control interface using a ControlPreset.
There are two ways to make a Control Preset:
In the Vortex Studio Editor:
It is possible to create a default control preset but it will be embedded inside the content. This means that modifying the default control preset involves changing the content.
One the default control preset's use is that it provides a mapping that is functional in the editor (i.e. for testing the mechanism).
In the Vortex Studio Player:
A complete simulator is usually composed of multiples computers. Each computers runs one or more nodes and devices are managed by different nodes.
It may be complicated to have access to the hardware, which is why the Vortex Studio Player provides a UI page to create control presets (TODO: Link to the Vortex Studio Player User guide for the Control Preset Page).
The page allows creation of control preset, by Control Interface. It is possible to create more than one, should you need different control scheme or different devices.
Once you have made your Control Preset, one of them should be tagged as the preferred control preset, so that subsequent load of that control interface is mapped to the preferred control preset.
Preferred control preset are associated per instance of a mechanism by name. So if you have a scene with multiples instance of the same mechanism, they each have their own preferred control preset. Each control interface can only have one preferred preset.
Control Preset association to Control Interface in a simulator
When a simulator is set up, it is necessary to set up a Data Store (TODO: Link to the Vortex Studio Player (Director) User guide).
The Data store is on the node where the simulator data files will be saved. The control presets made by the player page and the association to their control interfaces is also saved in that location.
When a simulator is started, the preferred presets association and the saved preset will be loaded and the devices will be added by their respective modules and/or the application setups.
When content is loaded, each control interfaces found in the content will be mapped to the available devices in the following way:
- if there is a preferred control preset associated to the control interface.
- If the control interface is not associated to a preferred preset, the simulator will use the default control preset.
If a preset is selected, each device mapping in it will be mapped to the device described in the mapping, if such a device is found. The device ID must match exactly what was saved.
If the automatic selection is not to your liking, they can be reedited using the Vortex Studio Player page and saved again. It is possible to select another preset at that point; the preferred or default mapping will be ignored until that content is loaded again.
Managing Control Presets
Contrary to content which resides on every simulator node, control presets are managed from one node at a time and the information is transmitted to the other node.
This means ControlPreset, DeviceMapping and ControlInterface API can only be used to read information, not to modify it. In order to make changes to Control Presets in code, the ControlPresetsManager must be used.
The ControlPresetsManager is an asynchronous API that will inform all the node of a simulator of changes to the control presets. The manager can be obtained from the ApplicationContext (which can be obtained from an IExtension or directly from the VxApplication).
The following examples shows how to manage control presets from a UI component. Access to the VxApplication and the content from a UI page is shown in Vortex Studio 2017a SDK - Adding User Controls. Since the control preset manager is asynchronous, the UI component cannot expect that a call will be processed on the next application update.
Creating a preferred control preset
...
mApplication is the VxApplication
mMechanism is the mechanism with the control interface we want to map
...
using namespace VxSim;
auto controlPresetsManager = mApplication->getContext()->getControlPresetsManager();

// find the control interface
VxSmartInterface<VxContent::ControlInterface> myControlInterface = mMechanism->findExtensionsByType<VxContent::ControlInterface>()[0];

// find the device
VxSmartInterface<MyDeviceExtension> myDevice = controlPresetsManager->getAvailableDevices()[0];


// After a load, the myControlInterface is mapped to the default control preset, so we must unmap it first.
for (auto mapping = myControlInterface->getDefaultControlPreset()->getDeviceMappings().begin(); mapping != myControlInterface->getDefaultControlPreset()->getDeviceMappings().end(); ++mapping)
{
	controlPresetManager->map(*mapping, nullptr, nullptr); // set the control interface and device to null unmaps this mapping
}

// create a new Control Preset
controlPresetsManager->createControlPreset("MyControlPreset");

...
//wait for updates
...
auto presets = controlPresetsManager->getControlPresets();
VxSmartInterface<ControlPreset> myControlPreset = *(std::find_if(presets.begin(), presets.end(), [](const VxSmartInterface<ControlPreset>& p) { return p->getName() == "MyControlPreset"; }));

// add a device mapping between the control interface and the device
success = controlPresetsManager->addDeviceMapping(myControlPreset, "MyDeviceMapping", myControlInterface, myDevice, true);

...
//wait for updates
...
VxSmartInterface<DeviceMapping> myDeviceMapping = myControlPreset->getDeviceMappings()[0];

// Insert a mapping between a field of the device and the control interface.
success = controlPresetsManager->addMappingData(myDeviceMapping, &myDevice.outputFromDevice, controlInterface->getInput("Speed"), nullptr, nullptr);
...
//wait for updates
...
// Save my control preset to the Data store
controlPresetsManager->saveControlPresetToDataStore(myControlPreset);

// Make this preset my preferred preset
controlPresetsManager->setPreferredControlPreset(myControlInterface, myControlPreset));
Using a control preset that is not the preferred
...
mApplication is the VxApplication
mMechanism is the mechanism with the control interface we want to map
...
using namespace VxSim;
auto controlPresetsManager = mApplication->getContext()->getControlPresetsManager();

// find the control interface
VxSmartInterface<VxContent::ControlInterface> myControlInterface = mMechanism->findExtensionsByType<VxContent::ControlInterface>()[0];

// find the device
VxSmartInterface<MyDeviceExtension> myDevice = controlPresetsManager->getAvailableDevices()[0];

// Once content is loaded, myControlInterface is mapped to myDevice as defined by the preferred Control Preset. But the user want to use another preset that was made and saved.

// Get the preferred preset
VxSmartInterface<ControlPreset> preferredControlPreset = controlPresetManager->getPreferredControlPreset(myControlInterface);

// Unmap it
for (auto mapping = preferredControlPreset->getDeviceMappings().begin(); mapping != preferredControlPreset->getDeviceMappings().end(); ++mapping)
{
	controlPresetManager->map(*mapping, nullptr, nullptr); // set the control interface and device to null unmaps this mapping
}


// Get the other preset
VxSmartInterface<ControlPreset> myOtherControlPreset = *(std::find_if(presets.begin(), presets.end(), [](const VxSmartInterface<ControlPreset>& p) { return p->getName() == "MyOtherControlPreset"; }));

for (auto mapping = myOtherControlPreset->getDeviceMappings().begin(); mapping != myOtherControlPreset->getDeviceMappings().end(); ++mapping)
{
	controlPresetManager->map(*mappingit, myControlInterface, myDevice);
}

// After a few update, the myControlInterface will be mapped to myDevice according to the mapping it myOtherControlPreset
// When that content will be reloaded, the mapping will go back to myControlPreset, unless myOtherControlPreset is made the preferred.
See ControlPresetsManager.h for the full API.