Simulator Setup User Guide
- DEVOPS
Setup document
 A setup document (VXC extension) allows you to set up or configure a Vortex application without doing it all manually in code.
It can be passed to an application which will parse it (like the SimApp) and automatically configure itself based on the file's content.
Through the setup document, you can set some global parameters for the application (such as the default log level, the simulation frame rate, the starting application mode) but most importantly you can specify which modules and extensions will need to be created along with the application and on which node. Specifying multiple nodes in a setup document allows a single document to contain the configuration of multiple type of nodes required for a simulator.
Content of the Setup
A setup document can contain the following elements:
Nodes
A node in a simulator represents, at the OS level, a process which will perform some tasks as part of your simulation. A simulator can be composed of a single node (what we call standalone or desktop) or multiple nodes. In the case of multiple nodes, they may or may not even be on the same physical machine. Whether they are or not, all nodes will use the Vortex network layer to communicate and exchange data between them.
Every Vortex simulator needs a master process. In standalone mode, since there is only one non-networked process, it is fairly straightforward. In a network setup, it is a bit more complicated since it is the master node that coordinates the exchange of data with the other nodes, called slaves, and instructs them on what to do. In most cases the master will contain the dynamics module, while a slave node never will. If one of your nodes contains the dynamics module, it will be designated as the master by the application. A node can also be explicitly set as a master or a slave by settings its parameter "CommunicationModel" to master or slave.
Users of past versions of the SDK might remember having to add the VxSim::VxSlaveModule to their slave nodes' configuration. As of Vortex Studio 2017, this is no longer necessary as all that functionality has been integrated directly into the VxApplication.
To define setup nodes, it is important to understand the interactions between the different modules and extensions of the setup document, as well as the hardware configuration of the target computer.
The specific association between a node and a target computer is done when defining a simulator in the Vortex Player(Director) application: see Vortex Studio Director for more information.
Modules
As explained in Vortex Studio SDK: Making a Vortex Application, modules are a core part of a Vortex application. Modules are not part of the content like the other extensions and objects are. Modules are directly added to the application, either manually through VxSim::VxApplication::insertModule() or by adding them to an ApplicationConfig which is then applied to the VxApplication.
For a list of modules provided by Vortex Studio, see Vortex Studio Application Extensions and Modules.
Extensions
A common workflow is to add extensions to an application by embedding them in a content object and loading the object in the application. Though useful in many cases, if you find yourself re-adding extensions to your content which are not directly related to it (for example an extension handling a user interface or network communication), it is a clear sign that the extension probably belongs inside an ApplicationConfig instead. Extensions that are fundamental to your simulator application regardless of loaded content are good candidates for this.
For a list of modules provided by Vortex Studio, see Vortex Studio Application Extensions and Modules.
Parameters
A Vortex application exposes some high-level parameters that can be customized from the Application Setup. Some of these parameters are global while others can be overridden by each node.
Simulation
Frame rate and Sync Mode
Desired Simulation frame rate and the synchronization mode to reach it.
See Synchronization Modes for more information about each mode
Application Mode
Starting application mode. Should be set to editing. In some situations, simulating can be used.
See Application Modes for more information about each mode.
Communication Model
Automatic will determine the Master node by the presence of the dynamics module, all the other nodes will be slaves. This can also be set explicitly.
Logging
Log level
The log level can be set per node to the following values, be severity:
- Off - nothing will be logged
- Fatal
- Error
- Warn
- Info
- Debug
- Trace
- All - everything will be logged
Log File Prefix
Generates a log file named <prefix>_<hostname>_<process id>. When the value is empty, the prefix is the name of the application and the file is located in the %temp% folder.
Profiling
The Vortex Studio Player manipulates these settings as needed but the setup can be used to define the initial state.
See The Profiler Tab for some examples.
Plugin Path
Add additional folders for custom plugin files (vxp) that contain modules and extensions made by a third party. This allows Vortex to find them when loading your simulator Application.
See Customizing Vortex for information about custom plugins.
Remote Access
Enables remote access so that the Remote Debugger can connect to your Application.
See Remote Debugger User Guide for information about the Remote debugger.
Python 3
The python 3 options must be set via the application context.
See Integrating Vortex Studio using Python 3 for more details.
Seats
A seat is a configuration of a group of modules and nodes that are meant to be assigned a specific role during the simulation. See Defining Seats in a Setup for more details.
Application Setup Using a setup document
When a setup document is applied to an application, the setup will first add its global modules, then extensions of the global section (first level), as well as its parameters to the application. Then the node-specific modules, extensions, and parameters are applied. When a parameter is present at both the node and the global level, the node will prevail.
Editing the setup document in the Vortex Studio Editor
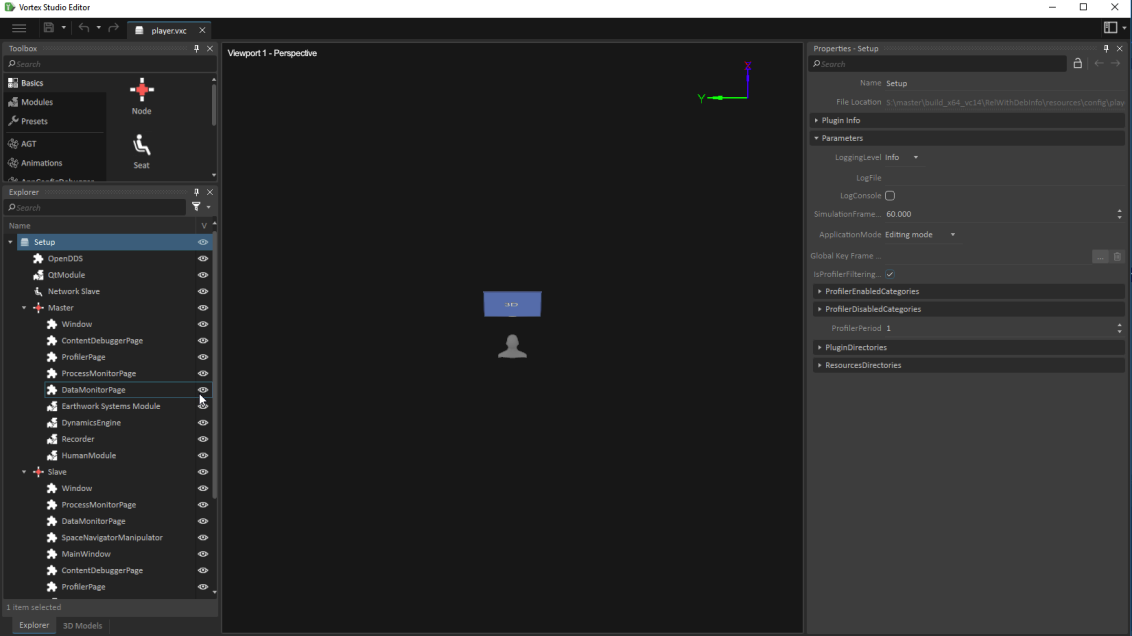
An example of a setup document for a simulator is the Vortex Player own setup document. It is located in the Vortex Studio installation directory: resources\config\player.vxc. When opening this document in the editor, you can see that the root object is the global setup object. Through the explorer panel, we can navigate the structure of the setup document. For instance, the setup global parameters can be change by highlighting the Setup object at the root and then in the Properties panel, change any parameter. Nodes, will have similar parameters as the Setup object, however they are specific to this node.
Under Setup, any Extensions, Modules and parameters properties can be modified this way, they will globally apply to any setup node. There is as well the possibility to define different seats at this level. Seats will refer to modules from nodes that are part of this seat.
On the 2nd level, each nodes has its own Extension, Modules and parameters. A node is a specific configuration for a SimApp in the simulation.
Setup Preset Templates
To simplify the creation of a simulator setup, the Editor includes preset templates of nodes, located in the Toolbox under Presets. To use a specific preset in your setup document, drag the preset into the Explorer panel over the Setup.
The standalone application preset template is meant to be used in standalone (single node) setup, however other nodes can be combined by adding one node engine (master) and one or more slave nodes.
The available presets are the following:
Standalone application
A single node (global) setup where the node has both a dynamics engine and a graphics with a single display. Joystick, recorder, metrics and audio are also included as well support for Earthworks and Human. There is also a seat defined with the Joystick, Graphics and Audio.Master with dynamics
A node with a dynamics engine to be used in a distributed setup. The NetworkOpenDDS extension is added to the global setup, if it's not already present as well as other support modules used in a distributed setup.Slave with 1 window
A node with the graphics module as well as one display setup. For the engine, other distributed network support extensions and modules are added to the global setup if not already present. Joystick, audio and metrics support are included.Slave with 2 windows
A node with the graphics module as well as two display setups. For the engine, other distributed network support extensions and modules are added to the global setup if not already present. Joystick, audio and metrics support are included.Slave with no graphics
A template for a slave node meant for purposes other than graphics. For instance, it could be the base template for a dedicated slave meant to run a user module if your simulator includes one or a console (UI) application.
Defining Seats in a Setup
The closest analogy to represent a seat is the seat you are sitting on in the simulator. The operator's seat on the motion platform and the instructor's chair in another room are examples of seats which differ from one another mainly through the hardware that is attached to the seat (screens, motion platform, controllers, etc.). When a role is applied to a seat, only the modules of the seat will manage the extensions of the role, otherwise the extensions will be ignored by the application.
A role is the counterpart to the seat. It represents an actor in the simulation and contains extensions that are only added to the simulation when it is applied to a seat.
For example, consider the development of a tank simulator. The simulator includes room for one student in the operator seat and an instructor in the instructor seat. Inside the simulation however there are at least three different roles: one for the instructor (which may be physically inside the simulation as a Vortex Human), one for the tank driver, and another for the tank gunner. The instructor seat has a standard desktop with mouse and keyboard, perfect to navigate the scene and evaluate what the student does. The operator seat has a motion platform, a steering wheel, pedals and two joysticks. The driver and gunner roles can alternately be applied to the operator seat which contains all the modules to handle the hardware. However, the gunner role does not contain the extension for the steering wheel and the pedals, and inversely the driver role does not contain the joystick extensions. Also both roles may not use the same displays to reflect a different field of view. On the other side, the instructor seat does not have all the hardware modules of the operator and the instructor extensions may include an extension for using a mouse.
To summarize, roles are added to your content directly but seats are part of your setup document since they go with the simulator regardless of the content loaded on top of it.
The concepts of seat and role are important (especially in a multi-node setup) as they provide a way to assign a set of devices employed by a user on a seat to a different role without the need to configure each extension separately.
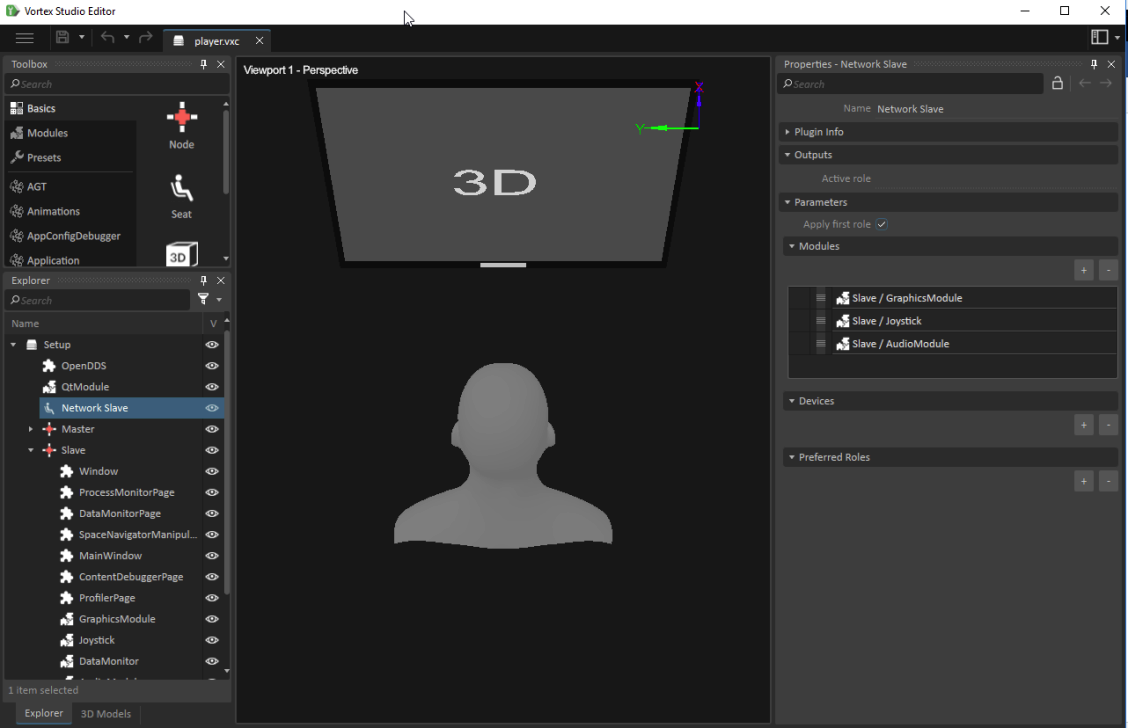
Preferred Roles
A seat module does not receive a role until one is assigned to it. The role-seat assignment is performed either by specifying the preferred roles directly on the seat (see 3236904860 below), using the Vortex Studio Player Roles and Seats tab, or programming it (see VxSeat).
Creating a Seat
To create a seat:
- From the Vortex Studio Home page, click Open. Open the setup document
player.vxc; the default location isC:/CM Labs/Vortex Studio X.x/resources/configwhereX.xis the version number. - Select Basics in the Toolbox.
- Double-click Seat to add a seat to the Explorer panel. Give it an appropriate name via its Properties panel.
- Select Modules from the Toolbox, and double-click modules that you want to add to seats in order to include them in the Explorer panel.
- Select the seat in the Explorer panel.
- In its Properties panel, under Modules, click the + button.
- Drag the desired module from the Explorer panel into the newly added row.
- Repeat this process to add more modules if necessary.
- Select a seat in the Explorer panel.
- In its Properties panel, under Devices, click the + button.
- Drag the desired device from the Explorer panel into the newly added row.
- Repeat this process to add more devices if necessary. (See Tandem Simulators.)
- In the seat parameters, you can select to automatically apply the first role loaded (Apply First Role checkbox) in the seat or set a list of "preferred roles" in order of preference. Those two options are mutually exclusive: if Apply First Role is set, the Preferred Roles list is ignored. If none of this selection logic is applicable, then a seat can be assigned to a role later by code or using the Vortex Studio Player role and seat interface.
- If you do want to create a list of preferred roles, press the + button in the Preferred Roles section of the Properties panel to create a list of the roles expected to be in the content of the simulator. The name of each role should be <role owner name>.<role name> (e.g., Tank.Gunner, Tank.Driver, Scene.Instructor).
- Save the file.
Loading Content at Start Up
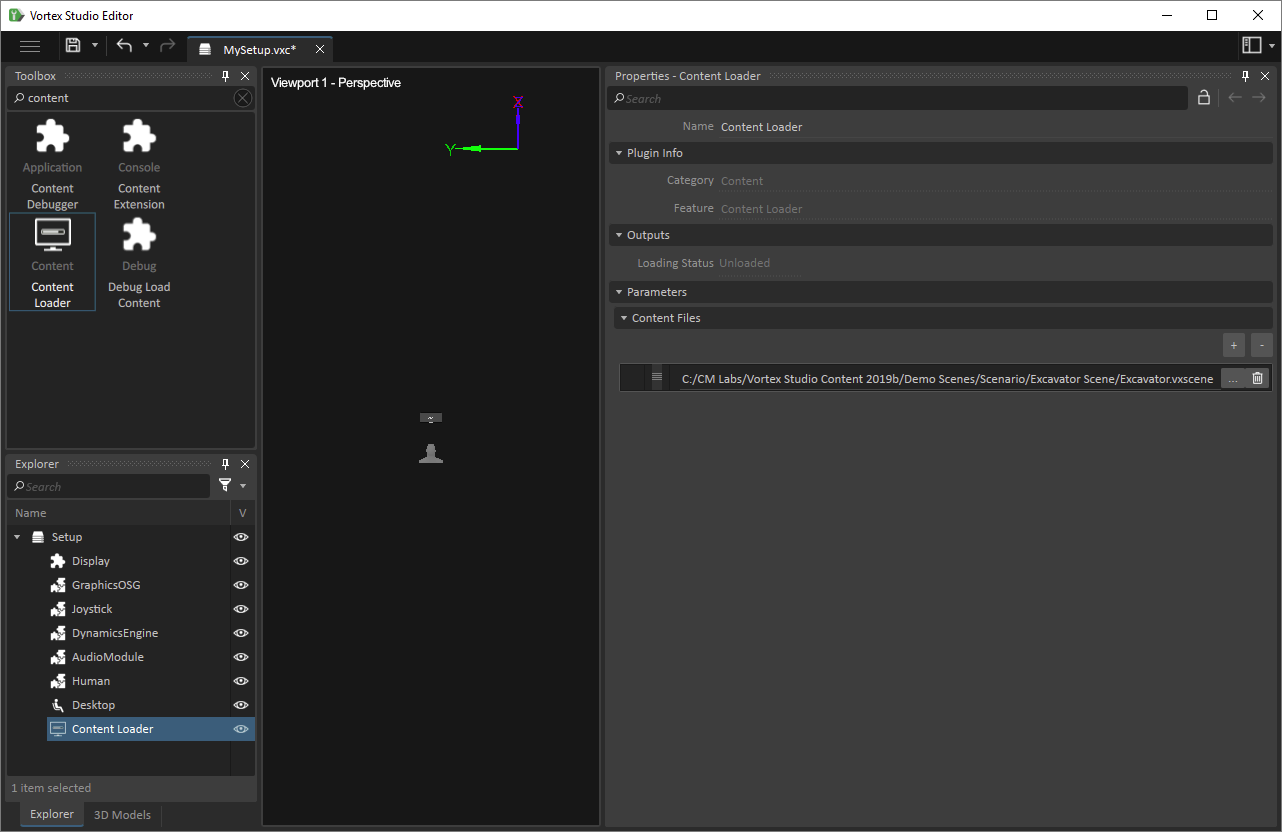
An easy way to make your simulator automatically load content at start up without any additional programming or user interface is to use the Content Loader extension.
The Content Loader extension is added directly to your Setup document at the root level (not in a node). With it you can load any Vortex assembly, mechanism or scene document in any combination
To add the Content Loader extension to your setup document in the Vortex Editor, simply follow this procedure:
- Open Vortex Studio Editor.
- Open your setup document (.vxc).
- In the Toolbox, scroll down to the Content category and select it.
- Double-click on the Content Loader extension. It should be automatically added to the root of your Setup document.
- In the Explorer select your newly added Content Loader extension.
- In the Properties view for the extension, look for the parameter named Content Files. If needed, expand the Parameters and Content Files section if they are collapsed.
- To add a file to be loaded, press the + button under Content Files and enter the path to your Vortex content file or click the ... button to select it through a dialog.
- Save your Setup document.
More than one file can be loaded at start up. Just add as many files as required to the Content Files parameter by repeating step 7 from the instructions above.
Setup Documents Usage in Director
An setup document is associated with a target computer when creating a simulator in the Director. A simulator can only refer to a single setup document, therefore all nodes of a simulator must be in the same document. Further information about the Director and simulator documents is available in the Vortex Studio Director.
Seats and Roles
Vortex® simulators comes in many different forms, ranging from an application running on a PC to complex, multiple touchscreen hardware configurations. However, each simulator retains the same basic concept of seats, roles and nodes.
These concepts are essential in understanding how hardware resources (e.g., CPU, displays, motion platforms) and software components (e.g., extensions, modules) are used as building blocks of the complete simulator, as configured in the Application Setup (.vxc) file.
To understand what roles and seats do, one must also understand modules and extensions:
- Extensions process information (inputs/outputs/parameters). For example, a joystick extension is required to each joystick that is connected to the simulator.
- Modules manage information received from extensions. The user does not have to handle the communication between modules and extensions. However, the correct modules need to be added to the setup document in order to be used by the simulation. For example, the joystick module manages all the joystick extensions and makes sure there are no conflicts.
A simple simulator could consist of a single computer running one simulation application. Most desktop or laptop computers with a compatible graphics card can easily run Vortex Studio Editor. For example, a simple setup document need only include the following minimum requirements:
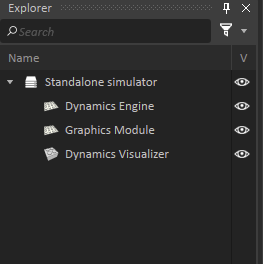
The case above consists of one node, requiring only one computer to perform all its tasks: the computation of dynamics data (handled by the Dynamics Engine module), and the display of the simulation (handled by the Graphics module which communicates with the graphics card of the computer, allowing the user to visualize the simulation).
However, most simulators are actually more complex than the example above, and a single computer does not have the necessary hardware and software resources to ensure that simulation performances are satisfactory. In these cases, the information is processed and shared through a network of different computers running synchronized Vortex simulation applications (called nodes), each having a specific job to perform.
The concepts of seat and role are especially important in a distributed simulation scenario, as they provide a way to switch a set of devices used by a user on a seat, a set of hardware nodes, to a different role without the need to configure each extension separately.
The setup document defines the seats and nodes. Roles can be defined in content documents and the setup document:
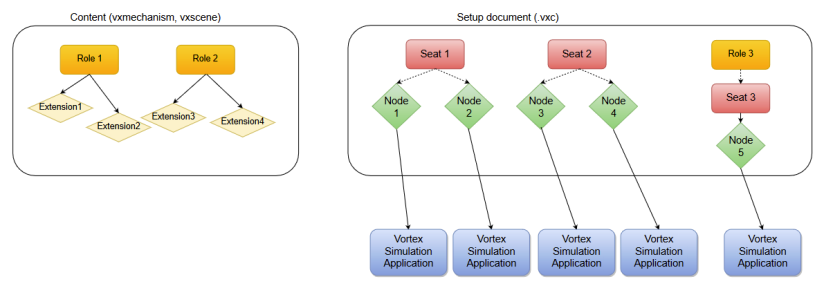
Nodes are then assigned to various computers on the network using the Vortex Studio Director, where the simulator can then be launched.
Roles
A role represents the viewpoint which can operate a specific equipment, avatar, camera or complete specific tasks using a seat. A simulator can be used simultaneously by several people, each interacting and playing a role. These roles are usually defined in the content (mechanism or scene):
- A construction site may have a crane operator, a signaler and two different excavators working in tandem.
- An armored tank crew would consist of the driver, the gunner, and others, all inside the same vehicle.
- An instructor, having a console and controls, will interact with students during the simulation.
The purpose of a role is to ensure that the extensions are used only by the person to which they are intended, e.g., the driving controls of excavator #1 will not conflict with excavator #2, or the crane operator will not hear the same ambient noise as the signaler on the ground. This is why the role needs to control certain extensions. When a role controls an extension, it is not managed by other roles.
Examples of a role include: excavator operator, crane operator, ROV operator, Humvee driver, signaler avatar, slinger avatar, instructor avatar, operator avatar.
To add a role:
- Select Simulation in the Toolbox.
- Double-click Role to add one.
- In the role's Properties panel, enter a name for the role.
- To add an extension to the role, click Add Extension; then click an extension in the Explorer view, followed by the
button.
Seats
A seat represents a software node or multiple software nodes that are coupled together along with hardware devices to provide a simulation experience to one user.
A seat refers to a physical location on the simulator, e.g., the operator's chair and its associated hardware. A seat can only contain modules that exist in the current Application Setup (.vxc) file.
The concept of seats allows the use of different controls on one or more specific nodes, thus allowing the assignment of different roles to a specific seat, while keeping the same communication with the hardware. For example, a motion platform is controlled by its module, which needs to be added to the seat. The motion platform will always be present physically, whatever the role applied to the seat.
To create a seat:
- From the Vortex Studio Home page, click Open. Open the setup document
player.vxc; the default location isC:/CM Labs/Vortex Studio X.x/resources/configwhereX.xis the version number. - Select Basics in the Toolbox.
- Double-click Seat to add a seat to the Explorer panel. Give it an appropriate name via its Properties panel.
- Select Modules from the Toolbox, and double-click modules that you want to add to seats in order to include them in the Explorer panel.
- Select the seat in the Explorer panel.
- In its Properties panel, under Modules, click the + button.
- Drag the desired module from the Explorer panel into the newly added row.
- Repeat this process to add more modules if necessary.
- Select a seat in the Explorer panel.
- In its Properties panel, under Devices, click the + button.
- Drag the desired device from the Explorer panel into the newly added row.
- Repeat this process to add more devices if necessary. (See Tandem Simulators.)
- In the seat parameters, you can select to automatically apply the first role loaded (Apply First Role checkbox) in the seat or set a list of "preferred roles" in order of preference. Those two options are mutually exclusive: if Apply First Role is set, the Preferred Roles list is ignored. If none of this selection logic is applicable, then a seat can be assigned to a role later by code or using the Vortex Studio Player role and seat interface.
- If you do want to create a list of preferred roles, press the + button in the Preferred Roles section of the Properties panel to create a list of the roles expected to be in the content of the simulator. The name of each role should be <role owner name>.<role name> (e.g., Tank.Gunner, Tank.Driver, Scene.Instructor).
- Save the file.
In the Player, you will see the new seat ("Viewer") and the default "Desktop" seat. You can now select a role to the seats.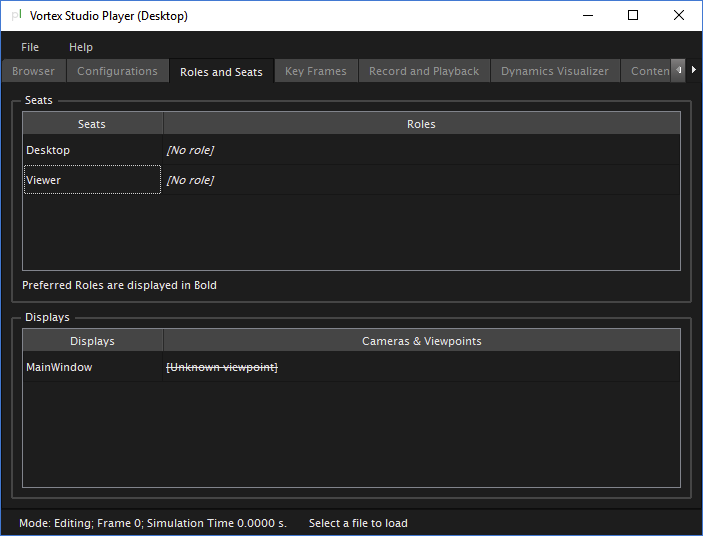
Using Roles in the Vortex Studio Editor
The Vortex Studio Editor works differently than a simulator in regards to Roles.
The Vortex Studio Editor has its own seat that works differently than on a simulator as defined in a setup document,
Contrary to a simulator, when no roles are activated, all the extensions related to roles are available simultaneously. This way of running allows users to properly edit content without having to worry about activating the proper role.
This leads to some side-effects like having multiples HUD presents or controls affecting multiples mechanisms.
To test a role, it is still possible to activate them. Once activated, the other roles will be deactivated and only the content associated with the active role will be available, as it is on a simulator.
You can activate a single role to simulate the same behavior on a simulator.
Locating Roles
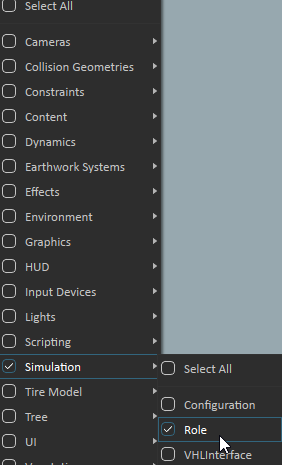
Filter the explorer view to only show roles, click on the funnel icon, and select Simulation → Role
Activating a role
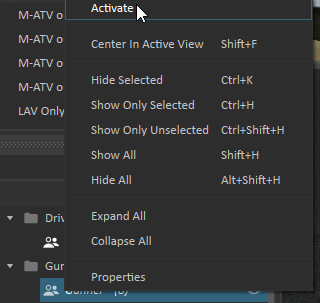
- Locate the role you want to activate.
- Right-click on the desired role and select Activate
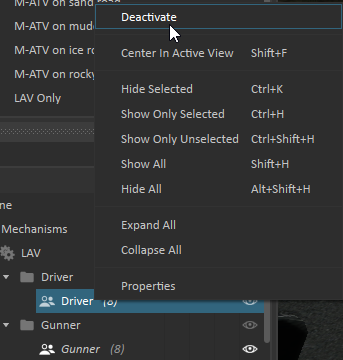
Deactivating a role
- Locate the active role you want to deactivate.
- Right-click on the desired role and select Deactivate
When no role is active, the Vortex Studio Editor returns to its default behavior i.e. making it as if all the roles were activated at once.