Simulink Integration Tutorial
- DEVOPS
In this tutorial, you will learn how to exchange information with a Simulink model program using the Vortex Simulink Block extension.
Communication between multiple simulation software can be very useful in order to integrate models coming from different platforms. In Vortex® Studio, this is made possible by using the Simulink Block extension to exchange information between the Vortex simulation and Simulink.
The example used in this tutorial is a simplified cruise control of a sports car. When activated, the cruise control automatically regulates the throttle of the engine in order to keep the speed of the car constant to the current value. The cruise control program is a Matlab Simulink model and will be ran on the same machine as Vortex Studio®
For more information consult Integrating with Simulink
Configuring Vortex Studio and Simulink
- Follow the Configuration section of this page :
Making a Co-Simulation Between Vortex and Simulink
Configuring the Simulink Block in the Sports Car Mechanism
In this section, we will add a Simulink Block to the car mechanism allowing information to be exchanged with the Simulink program.
Open the sports car vehicle workshop mechanism found in your Vortex Demo Scenes folder: (../Equipment/Vehicle_Sports_Car/Dynamic/Sports Car_Workshop.vxmechanism).
This car has all of the parts, constraints, collision geometry, car model and, driving controls already defined. Only the cruise control program needs to be added.
- In the Co-Simulation section of the Toolbox, insert a Simulink Block object in the Vechicles folder (by drag-and-drop) in the Explorer.
- From the Explorer, right-click on the Simulink Block object and select Edit from the drop down menu.
- Add an output and change its name to Throttle. Make sure it type is set to Double and Physical Dimension to None, then click on "Ok".
Add three inputs with the following properties.
Name Type Physical Dimension Current Speed Double None Current Throttle Double None Cruise Control Active Double None 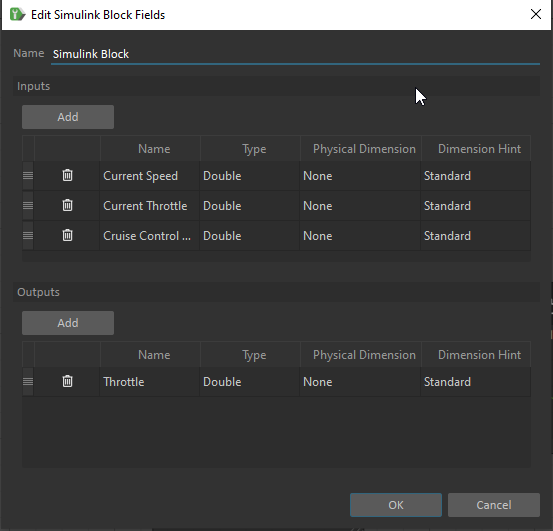
The Simulink Block doesn't support boolean data. The "Cruise Control Active" will be converted into a boolean in the Simulink model.
- In the Simulink Block properties, Change the parameter Model Base Name to "Cruise Control".
- Right-click on the Simulink Block and select Export Configuration.
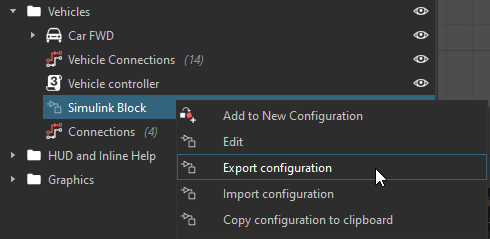
- Save the JSON file in the Simulink folder of the sports car vehicle (../Equipment/Vehicle_Sports_Car/Cruise Control/Simulink). Name it Cruise Control Config.json
- Save the mechanism.
Establishing Connections
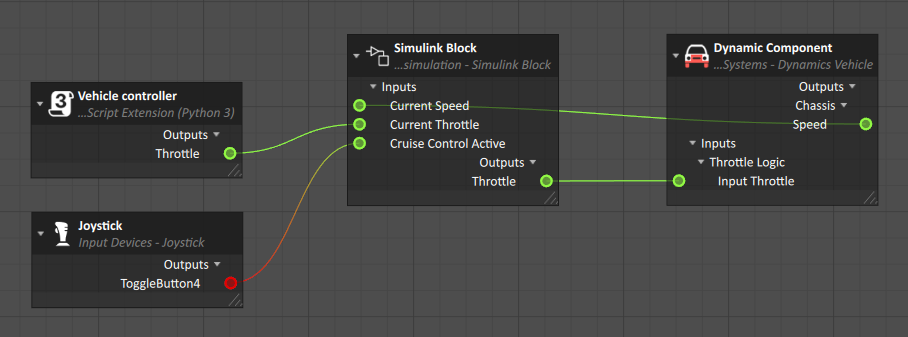
In this section, we connect the inputs and output from the UDP communication to variables from the components in the mechanism.
- From the Basics section in the Toolbox, insert a Connection Container. Rename it Cruise Control Connections.
- Open the Connections Editor by double-clicking on it.
Locate the following objects in the Explorer and insert the listed inputs or outputs from their Properties in the connection container:
Path > Object Input/Output (Section) Vehicles > UDP Receive Throttle (Outputs) Vehicles > UDP Send Current Speed; Current Throttle; Cruise Control Active (Inputs) Roles > Joystick ToggleButton4 (Outputs) Vehicles > Car FWD > Dynamic Component Input Throttle (Inputs > Throttle Logic); Speed (Outputs > Chassis) Vehicles > Vehicle Controller Throttle (Outputs) - Link the inputs and outputs together as shown in the picture:
- Save the mechanism.
Setting up the Cruise Control Simulink Model
In this section, we configure the Simulink cruise control model to simulate with our Sports Car mechanism.
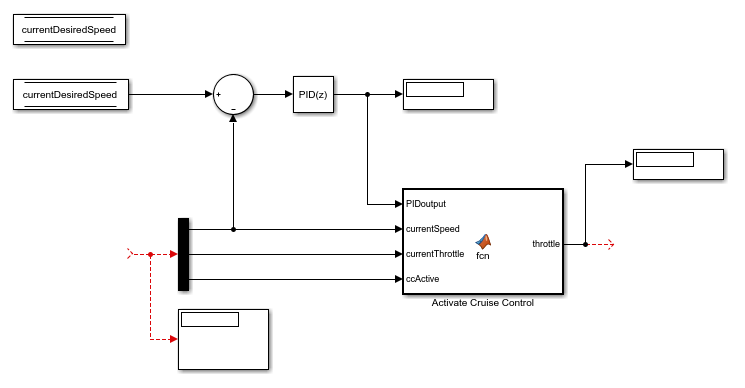
In Matlab Simulink, open the Cruise Control Simulink model found in the Cruise Control folder of the sports car (../Equipment/Vehicle_Sports_Car/Cruise Control/Simulink/CruiseControl_Workshop.slx).
This model was made using Matlab 2018b. It's using a discrete PID to control the speed of the vehicle.
Insert a Vortex Simulink block from the Vortex Section in the Simulink Library. Double-click on it to edit it properties.
If you don't see the block, make sure you followed the configuration steps in Making a Co-Simulation Between Vortex and Simulink
Double-click on the block and set the following parameters:
Property Value Notes IP 127.0.0.1 This is set to a localhost address. If you are using a network of PCs, make sure this is set to the IP address of the computer running Vortex. Port 736 736 is the default. Make sure this is the same port that Vortex is using. Path 'Cruise Control Config.json' This path is relative to your current Matlab Workspace. Make sure it's set to the Simulink folder (../Equipment/Vehicle_Sports_Car/Cruise Control/Simulink). Synchronization mechanism Active wait at each step This is to prevent Simulink running much faster than Vortex. Wait for Vortex before start True You should see the Inputs and Outputs defined above on the block. If they don't appear, make sure you set the path to the JSON config file correctly.
- Remove the Demux and Display blocks and connect the outputs of the Vortex block to their corresponding inputs in the Activate Cruise Control block. Also add terminators to the Status, Time and FrameIndex outputs.
- Add a Memory block and connect it to the output of the Activate Cruise Control function. Connect its output to the Throttle input of the Vortex block.
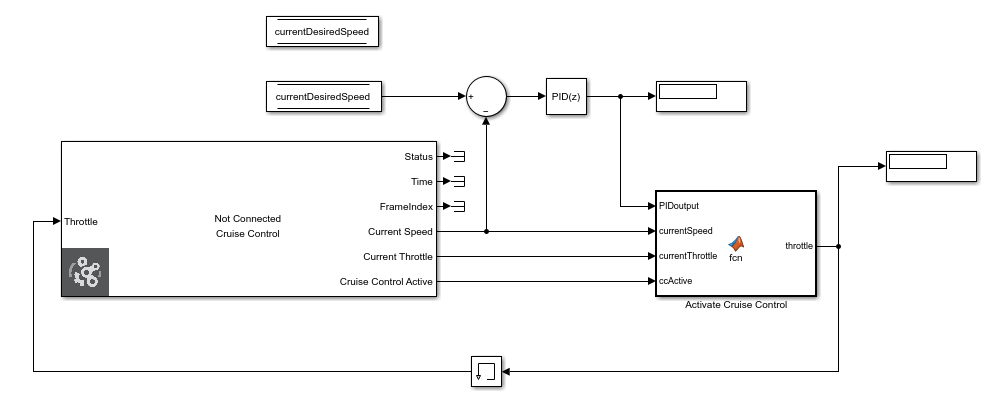
- Save the model in your work directory.
Testing the Cruise Control
In this section, we add the sports car mechanism to an empty scene and test the cruise control program.
Note An Xbox (or any Xinput) controller is needed for this section. If you are using a different input device, refer to the "Establishing Connections" section of this tutorial and replace the input for "Cruise Control Active" with the proper output of your device. This variable receives a "ToggleButton" type input, meaning that it changes state (True/False) when the button is released.
- Open the Sports Car Workshop scene found in your Vortex Demo Scenes folder: (../Scenario/SportsCar Scene/Sports Car_Workshop.vxscene).
- From the Basics section of the Toolbox, add a Mechanisms From Files
- If your Sports Car Mechanism is open on another tab, choose it from the list of Opened Resources. If not, click on Browse and locate it.
- Move the mechanism on the road or in a location where it is going to be easy to maneuver.
- In Simulink, Run (Ctrl + T) the CruiseControl Simulink model.
- Test (F7) the scene in Vortex.
- Drive the car in Vortex. If using an Xbox controller, pressing the Y button will activate or deactivate the cruise control. Notice that when the cruise control is activated, the speed of the car is stable even if using the throttle joystick. Deactivating the cruise control lets you regain control of the car's acceleration.
Creating a Standalone Executable
This section requires the Simulink Compiler license
In this section, we create a standalone executable of the Simulink model and launch it automatically with the Vortex Simulation.
- Open MATLAB.
- Navigate to the Simulink model folder (../Equipment/Vehicle_Sports_Car/Cruise Control/Simulink)
- Right-click in the Current Folder view on the left and select New -> Script.
- Name the script Cruise_Control.m
Double-click on the script and add the following code in the Editor.
function Cruise_Control() % This function should have the same name as the script.
    in = Simulink.SimulationInput('CruiseControl_Workshop'); % Function parameter should be the name of your Simulink model.
    in = simulink.compiler.configureForDeployment(in);
    out = sim(in);
end
In the MATLAB Command Window, input the following command:
mcc -m Cruise_Control.m
- If the compilation succeeds, a .exe file ( with the same name as your script will be created in the model's folder.
- Open the sports car mechanism.
- In the Simulink Block properties, click on the Browse button of the Model Program parameter.
- Select the standalone exectuable (Cruise_Control.exe) generated on step 6.
- Save and start the simulation.