Python 2 Scripting (deprecated)
How Script Extensions Work
Script extensions in the Vortex® Studio Editor are associated with either a mechanism or a scene. Each extension must implement at least one callback which corresponds to an event during simulation. For example, if you want a piece of code to run at each step in the simulation, then you need to implement either the pre_step or post_step callback function with that code. If you just need to initialize some value when the simulation starts, then you need to implement the on_add_to_universe callback function.
Adding a Script Extension
To add a Python script extension:
- If you are not already in the Mechanism or Scene editor, open the mechanism or scene that you want to extend.
- Select Simulation in the Toolbox, then double-click Script.
- Click OK in the resulting dialog.
You can now see a new Script icon with the name you entered in the Explorer panel. - After the script extension has been added, select it in the Explorer panel to see its Properties panel. Here, give the script a name. You can define your own inputs, outputs, and parameters for the script, edit the default code in the Script Editor and then connect any parameters you have defined before running the simulation.
Using External Python Script Files
The Vortex® Studio Editor allows you to link to an external Python script. To load a Python script, you must have a mechanism loaded.
- Add a Script extension.
- In the Properties panel, click the browse button to load a script from file.
The code of the script is displayed but is not editable directly from the editor. You can modify the Python file directly within the file. The simulation editor uses the latest version of the file which may differ from the displayed script. To update the displayed Python script, click the refresh button.
Defining Script Parameters
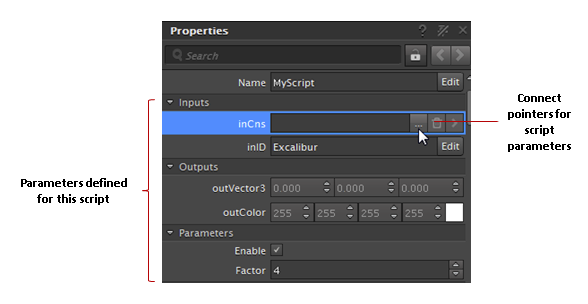
In order to access runtime values in Vortex script extensions, you may need to define inputs, outputs, and other parameters that your script will access through the self input argument.
For example, if you are writing a script to disable a hinge constraint, you need to set up at least one input to access the hinge constraint. If you need to write data to a different object, you need to set up an output parameter for it. If you need some random input from the user (for example, a factor to use in calculations or an Enable/Disable parameter to toggle the effect on and off), you can create a parameter to define that.
When you are ready to define your inputs, outputs or parameters, you need to edit the existing script definition. If you have not yet created one, follow the instructions under Adding a Script Extension before proceeding.
- To modify the parameters for a script extension, right-click the script in the Explorer panel and select Edit from the context menu.
- In the resulting dialog, expand the section that corresponds to the type of parameter you want to define (for example, Inputs).
- Click the Add button. A new row in the list appears with a default name and type.
- Enter the name for the new parameter under the Name column.
- Select the data type for the new parameter from the Type drop-down box.
- If you need to remove a parameter, click the Trash icon in the parameter row. The parameter disappears from the list.
- When you have finished setting all the inputs, outputs, and other parameters you need, click OK.
- At this point, you can implement your script code or connect the parameters. And if you need to add to or remove from the list of parameters or change their data type or name, you can always perform these steps again.
Writing the Script Code
You can use the Script Editor to edit the code for your script extension.
From the Explorer, locate the desired script.
Click the script extension you added.
The Properties panel now displays any parameters you have defined as well as the default code (placeholders for all available callbacks implemented as null functions).
Remove the callbacks you don't need and replace the
passstatement with code.
Checking Syntax In Your Code
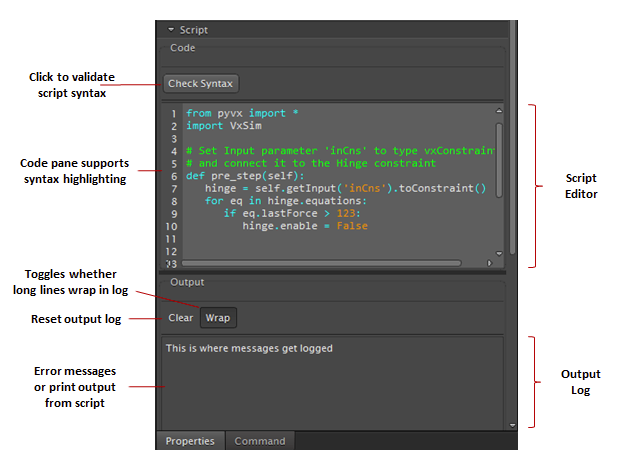
The Vortex® Studio Editor provides a number of features to help you writing your code, such as syntax highlighting and validation, and output logging.
Syntax highlighting makes it easier to read code because the Script Editor displays strings in orange, and Python keywords and operators in blue, and everything else in white:
As you write your code, you can validate it by clicking the Check Syntax button above the Script Editor.
If your code contains a syntax error, an error message is logged to the Output Log. If the Output Log becomes too cluttered, you can click the Clear button above it. In addition, the Wrap button allows you to toggle wrapping long lines in the Output Log.
Connecting Content Fields to Python Script
Once you have created your script extension and defined its parameters, you need to connect the parameters to objects or data that will be simulated before running the simulation.
For example, if you run a simulation where the script is trying to write to an output parameter that has not been connected, you will see something like this in the Output Log:
Traceback (most recent call last): File "<string>", line 6, in on_loaded RuntimeError: object is NULL |
Depending on the data type of the parameter you defined, you can either set a data value (for example, check/uncheck a boolean parameter, select a color for a VxColor parameter, etc.) or connect an object to a pointer (for example, select a dynamics part for a Part parameter, or a graphics node for a Node parameter, etc.).
- From the Explorer, locate the Scripts folder and expand it.
- Click the icon for the script extension you added to see any parameters you have defined in the Properties panel.
- For simple data types, you set values like any other properties; however, for pointers to dynamics and graphics objects (such as Parts, Collision Geometries, Attachments, Nodes, etc.), click the Browse button in the pointer parameter's reference box.
The Select<ParameterName> dialog box appears. - From the Explorer panel, click the object that you want to connect to the parameter.
The name of the object now appears in the Select<ParameterName> dialog box. - Click the Confirm button on the Select<ParameterName> dialog box.
The name of the object you connected now appears in the parameter box.


