Translating a Simulator into a New Language
- DEVOPS
 You can translate your simulator into a new language by adding a language for the multi-language Vortex Console application.
Adding a new Language for a Simulator
This document provides the workflow for adding a new language for the multi-language Vortex Console application.
Separate sets of translation files exist for the Vortex Studio and for the content (assets). New translation files need to be made for both Vortex Studio and content.
Create the new Translation Files for Vortex Studio
Vortex Studio TS translation files are found in the /resources/languages folder under the installed Vortex Studio (typical location is e.g. C:/CM Labs/VortexStudio 2020b)
Vortex Studio comes with eight English language translation source files:
console_en_US.ts
launcher_en_US.ts
metrics_en_US.ts
playerlib_en_US.ts
playerplugin_en_US.ts
playerqtlib_en_US.ts
port_en_US.ts
vxdesktopStyle_en_US.ts
Make a copy of all the English TS files, and rename each one for the new language. The naming convention is xxxxxxx_ll_CC.ts, where ll is the language code (lower case) and CC is the country code (upper case).
For example, for the Dutch language in the Netherlands, the files would be named xxxxxxx_nl_NL.ts. For a list of language and country codes, refer to https://wiki.openstreetmap.org/wiki/Nominatim/Country_Codes.
Each new TS translation file you created must have the correct Target language set for it. Since the copied files have English as their Target language, use the Qt linguist application, included in the Vortex Studio toolkit, to set the Target language.
You can find linguist.exe in the /bin folder under under the installed Vortex Studio. Refer to https://doc.qt.io/qt-5/linguist-translators.html#changing-the-target-locale.
Add Language-Specific Translation Text
Each new TS translation file you create must have the correct words and phrases added to complete the translations. If the translation is not done, the source text will be used.
Use the Qt linguist application to add the translations to all the new TS translation files you have created. You can find linguist.exe in the /bin folder under under the installed Vortex Studio. Refer to https://doc.qt.io/qt-5/linguist-translators.html.
This task is typically outsourced to a translation service.
Special case for Right-to-Left Languages
For a language that is written from right to left, such as Hebrew or Arabic, you will usually want to modify the the layout of the Console and the Exercise Reports to be right to left as well.
This is an optional step. It is possible to supply a translation file for a right to left language without specifying a right to left layout. Strings will be readable across the application and in the report, but screen and report layouts will follow the Latin left to right layout.
If you want a right to left layout, the layout direction must be properly defined in the console TS file console_ll_CC.ts. The layout direction source text is 'QT_LAYOUT_DIRECTION'. For a right to left layout, the translation text must be set to 'RTL'. If the translation text is not set, or set to any other string, the Latin left to right layout will be used.
Use Qt linguist to make sure the following is properly defined in your new console_ll_CC.ts file:

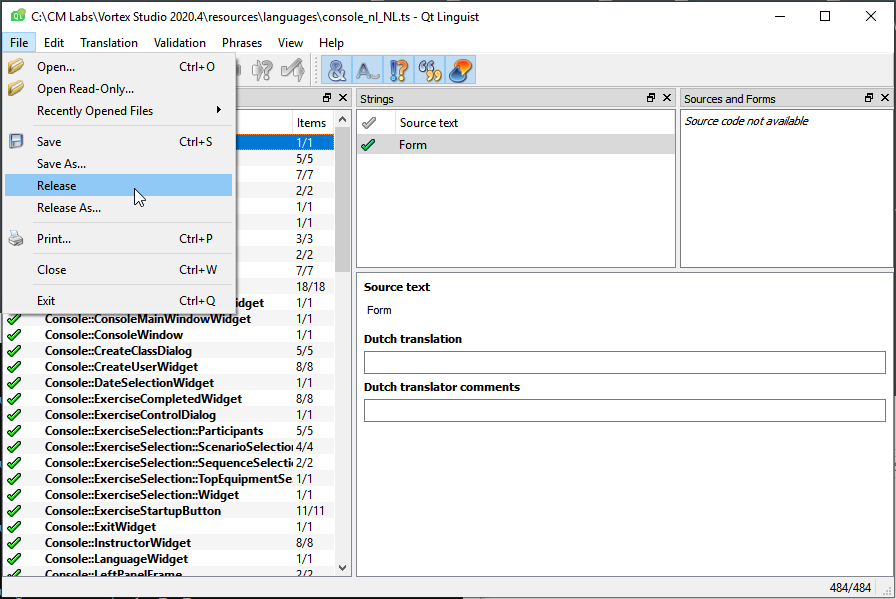
Generate the new QM Files
The QM file is a binary version of the TS file, that is optimized for fast access to translation.
Use the Qt linguist application to produce QM files out of the TM files. You can find linguist.exe in the /bin folder under under the installed Vortex Studio. Refer to https://doc.qt.io/qt-5/linguist-translators.html.
For each TS file, select File > Release to create a QM file with the same base name as the current TS file. The QM files are placed in the same location as the TS files.
Create the new Translation File for Content
What is 'Content'?
By Content we mean the asset files that are created and populated using the Vortex Editor. Those asset files define the graphics, the dynamics and the simulation logic: everything that will be in the simulation.
Your simulator may be using either
- content provided by CM Labs, or
- custom content
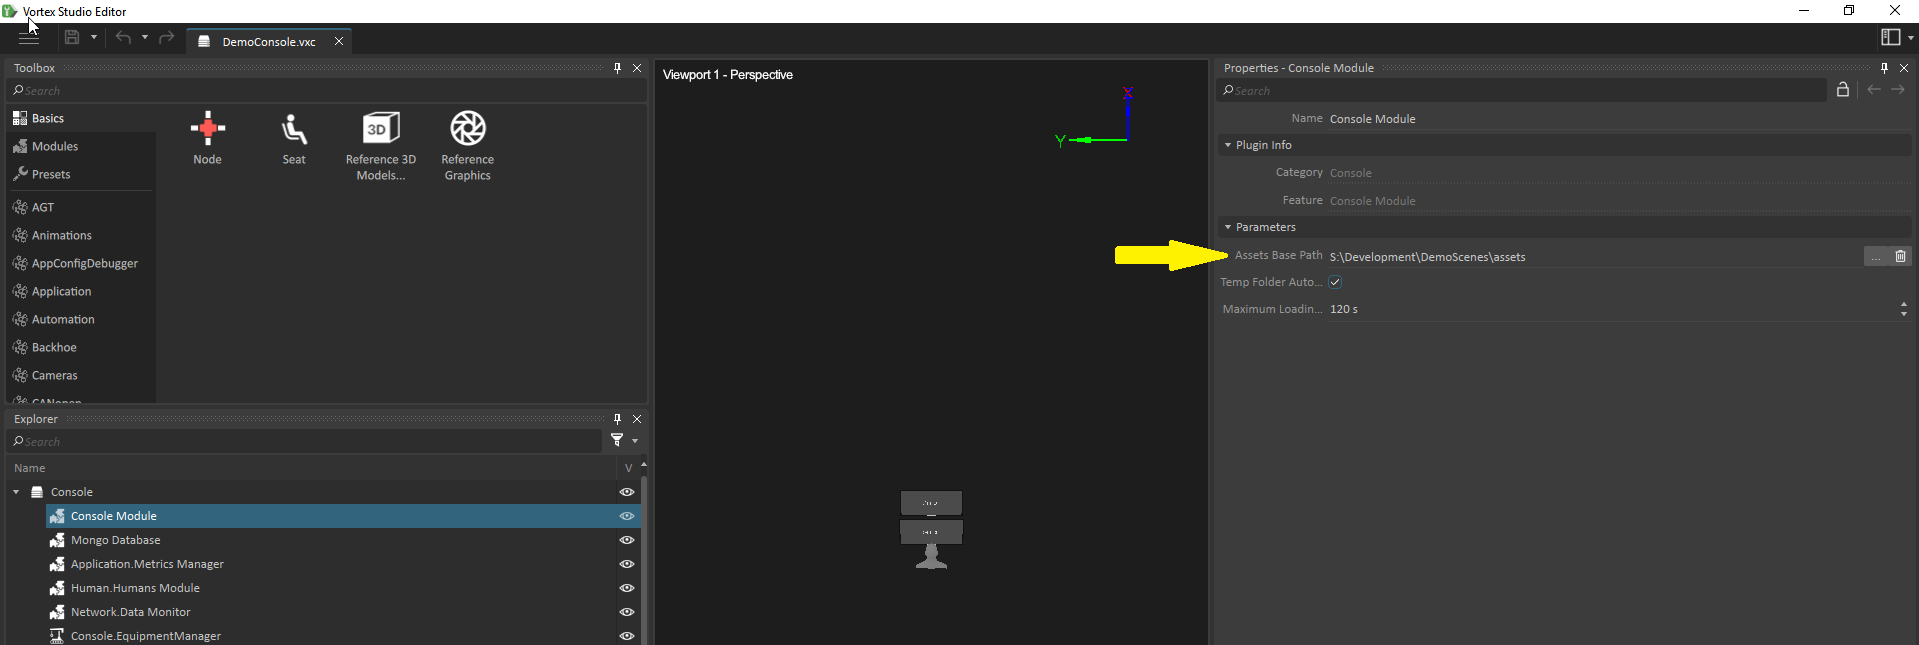
In either case, the content TS files for the simulator are found in a sub-folder (usually the localization sub-folder) below the assets base path.
To find the assets base path, open the simulator's Setup (*.vxc) file in the Vortex Editor, and examine the Console Module's 'Assets Base Path' property:
The process for adding translation text to the content files is the same as for the Vortex Studio translation files (see above). If the translation is not done, the source text will be used.
- Make a copy of the English language TS file and rename it, replacing the en_US suffix with the ll_CC suffix corresponding to the language and Country codes for the new language.
- Use Qt Linguist to enter the translations, or send it to a translation service
- Open the translated TS file with Qt linguist and publish it, to generate the QM file.
Validate the Translations
Refer to section Validate the Translations in Translating Content with Vortex Editor.