License Server Setup
- DEVOPS
 This information explains how to set up a license server, allowing any computer on your network to run Vortex Studio with floating licenses.
Setting Up a License Server
The process for setting up a license server is different for Windows and Linux operating systems.
Setting Up a License Server on Linux
Setting up a license server on a computer running Linux involves the following activities.
Install the Vortex Studio Licensing Tools Package for Linux
Before you can install a license server, you must download and install the Vortex Studio Licensing Tools Package.
Do the following:
- From the CM-Labs website, on the side menu, click Downloads.
- Click to expand the section under Tools and Extras (manual process).
- Click to download the correct version of Vortex Studio Licensing Tools for your operating system.
The file you download is named Vortex_Licensing_Tools_[version]_x64_rhel7_gcc48.tar.gz. It contains the following directories and files:
- The Vortex Studio License Manager Application in the
binfolder. - The associated library in the
libfolder. - The RLM license server in the
serverfolder.
Earlier versions of the Vortex Studio Licensing Tools package installed the RLM license server in thebinfolder. To avoid licensing issues, you must remove any previous license servers that were installed and start with the newest version. Any licenses you activated with previous installations will function correctly with the new license server. - The Vortex Studio License Manager Application in the
Create the RLM Service
- Connect as
rootuser. Create a user for RLM:
useradd --create-home --shell /bin/bash rlmuser
passwd rlmuser
Uncompress the new RLM installation directory:
mkdir /home/rlmuser/RLM
tar xz -C /home/rlmuser/RLM -f /tmp/Vortex_Licensing_Tools_[Version]*_x64_rhel7_gcc48.tar.gz
Set permissions on the RLM Server folder:
chown -R rlmuser.rlmuser /home/rlmuser/RLM
Create and set permissions on the CMLabs license folder:
mkdir /opt/cmlabs/licenseschown -R rlmuser.rlmuser /opt/cmlabs/licenses
To start the RLM server at system boot time, do the following (You may need to configure your firewall settings):
#! /bin/sh
#
# rlm          Start/Stop rlm
#

#----------------------------------------------------------------
#----------------------------------------------------------------
#----------------------------------------------------------------
# NOTE:
# NOTE: Configure these 5 variables for your system
# NOTE:

# Set rlmuser to the user under which rlm will run
rlmuser=rlmuser

# Set rlmdir to the directory where the rlm binaries are found
rlmdir=/home/rlmuser/RLM/server

# Set licfile to the path to the license file folder
licfile=/opt/cmlabs/licenses

# Set debuglog to the path to the debug log
debuglog=+$rlmdir/rlm.dl
#----------------------------------------------------------------
#----------------------------------------------------------------
#----------------------------------------------------------------

start() {
echo $debuglog
		su - $rlmuser -c "$rlmdir/rlm -c $licfile -dlog $debuglog &"
}

stop() {
		su - $rlmuser -c "echo 'y' | $rlmdir/rlmutil rlmdown RLM"
}

case "$1" in
	start)
		start
		;;
	stop)
		stop
		;;
	restart)
		stop
		sleep 2
		start
		;;
	*)
		echo $"Usage: $0 {start|stop|restart}"
		exit 1
esac

exit 0
Create link (required for Linux systems):
ln -s /etc/rc5.d/S98rlm /etc/init.d/rlm
Add executable permissions:
chmod 755 /etc/init.d/rlm
Add startup service on boot time:
chkconfig --add rlm --level 0356
chkconfig rlm on
Verify service startup:
service rlm start
service rlm stop
service rlm restart
Verify output log:
vi /home/rlmuser/RLM/bin/rlm.dl
An example of the output log appears as follows:
09/28 14:42 (rlm) License server started on rlm-linux-01
09/28 14:42 (rlm) Server architecture: x64_l1
09/28 14:42 (rlm) License files:
09/28 14:42 (rlm) /home/rlmuser/RLM/server/rlm_roam_server.lic
09/28 14:42 (rlm)
09/28 14:42 (rlm) Web server starting on port 5054
09/28 14:42 (rlm) Using TCP/IP port 5053
09/28 14:42 (rlm) ... adding UDP/IP port 5053
09/28 14:42 (rlm) Starting ISV server cmlabs on port 48012
09/28 14:42 (cmlabs) RLM License Server Version 12.1BL3 for ISV "cmlabs"
09/28 14:42 (cmlabs) Settings from RLM Version 12.1BL3 for ISV "cmlabs"
09/28 14:42 (cmlabs) Server architecture: x64_l1

Copyright (C) 2006-2016, Reprise Software, Inc. All rights reserved.

RLM contains software developed by the OpenSSL Project
for use in the OpenSSL Toolkit (http://www.openssl.org)
Copyright (c) 1998-2008 The OpenSSL Project. All rights reserved.
Copyright (c) 1995-1998 Eric Young (eay@cryptsoft.com) All rights reserved.

09/28 14:42 (cmlabs)
09/28 14:42 (cmlabs) Server started on rlm-linux-01 (hostid: ANY) for:
09/28 14:42 (cmlabs) rlm_roam
09/28 14:42 (cmlabs)
09/28 14:42 (cmlabs) License files:
09/28 14:42 (cmlabs) /home/rlmuser/RLM/bin/rlm_roam_server.lic
09/28 14:42 (cmlabs)
Verify License Server administration Web page access:
Go to: http://[HostName]:5054
Restart the server
As a root user (or as the rlm user), execute the following command:
service rlm restart
Setting Up a License Server on Windows
Setting up a license server on a computer running Windows involves the following activities.
Install the Vortex Studio Licensing Tools Package for Windows
Before you can install a license server, you must download and install the Vortex Studio Licensing Tools Package.
Do the following:
- From the CM-Labs website, on the side menu, click Downloads.
- Click to expand the section under Tools and Extras (manual process).
- Click to download the correct version of Vortex Studio Licensing Tools for your operating system.
Launch the .msi file and follow installation steps in the wizard.
If the license server will run on the same system that runs Vortex Studio software, make sure you install the Vortex Studio Licensing and Tools package in a different folder.By default, the installation is done in the following directory:
C:\CM Labs\Vortex Licensing Tools <version>and contains:- The Vortex Studio License Manager in the
binfolder - The RLM license server in the
serverfolder.
- The Vortex Studio License Manager in the
Earlier versions of the Vortex Studio Licensing Tools package installed the RLM license server in the bin folder. To avoid licensing issues, you must remove any previous license servers that were installed and start with the newest version. Any licenses you activated with previous installations will function correctly with the new license server.
Create an RLM Service
- Launch a command prompt with administrative rights.
You can launch a command prompt by using the Search Windows function to find
Command Prompt. Right-click on the search result and click Run as Administrator. - Go to the Vortex Studio Licensing Tools for Windows folder. For example,
C:\CM Labs\Vortex Licensing Tools [version number]. - Go to the server folder.
Execute the following command to install the service:
rlm -install_service -service_name rlm-cmlabs -dlog "C:\CM Labs\Licenses\server.log" -c "C:\CM Labs\Licenses"
Start the server with the following command:
sc start rlm-cmlabs
Restart the RLM License Server
You can restart the RLM server from a command prompt or from the Windows Task Manager.
To Restart the Server from a Command Prompt
- Launch a command prompt with administrative rights.
You can launch a command prompt by using the Search Windows function to find
Command Prompt. Right-click on the search result and click Run as Administrator. To stop the server, execute the following command:
sc stop rlm-cmlabs
To start the server again, execute the following command:
sc start rlm-cmlabs
To Restart the Server from the Windows Task Manager
- Start the Windows Task Manager application.
- In the lower part of the window, click More Details (if not already selected).
- Click the Services tab and locate
rlm-cmlabsin the list of services.
- Right-click on the
rlm-cmlabsservice and, in the menu that appears, click Restart.
Remove the RLM License Server
- Launch a command prompt with administrative rights.
You can launch a command prompt by using the Search Windows function to find
Command Prompt. Right-click on the search result and click Run as Administrator. - Go to the Vortex Studio Licensing Tools for Windows folder. For example,
C:\CM Labs\Vortex Licensing Tools [version number]. - Go to the
serverfolder. To stop the server, execute the following command:
sc stop rlm-cmlabs
To remove the service, execute the following command:
rlm -delete_service -service_name rlm-cmlabs
You should restart your computer before trying to install a new version of the service
Setting Up the main License Server Port
The main RLM port can be specified for security reasons.
After generating any license file, open the license file (.lic) from the license folder (C:/CM Labs/Licenses folder on Windows or /opt/cmlabs/licenses/ on Linux) in a text editor.
The following is a typical example
HOST my_PC disksn=215454SDF546 5053
ISV cmlabs
LICENSE cmlabs studio_full_1 2021.09 8-sep-2021 1 share=h
  issuer=hostedactivation issued=8-sep-2020 akey=4180-6846-9343-2958
  options="n=Vortex Studio Create Subscription - Player"
  _ck=a7d67a0731 sig="60P0453PD2SGEUKC28RT65EBE86CB2YBU5VABU822GA2HJY
  W14E5JTFJ3NX5GQQ2TEHQ21WHD8"
LICENSE cmlabs studio_full_2 2021.09 permanent 1 share=h
  issuer=hostedactivation issued=8-sep-2020 akey=4180-6846-9343-2958
  options="n=Vortex Studio Create Subscription - Player"
  _ck=d3d67aec91 sig="60PG4580QT22MKDHFFXUC69PX17X5T2Q5J0XACJH08A7DB9
  7TC6FEW3A7C5G07B5428FUKQEE0RG"
LICENSE cmlabs editor 2021.09 8-sep-2021 1 share=h
  issuer=hostedactivation issued=8-sep-2020 akey=4180-6846-9343-2958
  options="n=Vortex Studio Create Subscription - Editor"
  _ck=f4d6740100 sig="60PG4580JWQBQ1TEVMN0HU4YNGCGFH3DN8C9Q06908A053F
  6EBMHMAC9X5HD005XQT55B2UWU510"
The line "ISV cmlabs" must be edit to add port=<desired port>
HOST my_PC disksn=215454SDF546 5053
ISV cmlabs port=49676
LICENSE cmlabs studio_full_1 2021.09 8-sep-2021 1 share=h
  issuer=hostedactivation issued=8-sep-2020 akey=4180-6846-9343-2958
  options="n=Vortex Studio Create Subscription - Player"
  _ck=a7d67a0731 sig="60P0453PD2SGEUKC28RT65EBE86CB2YBU5VABU822GA2HJY
  W14E5JTFJ3NX5GQQ2TEHQ21WHD8"
LICENSE cmlabs studio_full_2 2021.09 permanent 1 share=h
  issuer=hostedactivation issued=8-sep-2020 akey=4180-6846-9343-2958
  options="n=Vortex Studio Create Subscription - Player"
  _ck=d3d67aec91 sig="60PG4580QT22MKDHFFXUC69PX17X5T2Q5J0XACJH08A7DB9
  7TC6FEW3A7C5G07B5428FUKQEE0RG"
LICENSE cmlabs editor 2021.09 8-sep-2021 1 share=h
  issuer=hostedactivation issued=8-sep-2020 akey=4180-6846-9343-2958
  options="n=Vortex Studio Create Subscription - Editor"
  _ck=f4d6740100 sig="60PG4580JWQBQ1TEVMN0HU4YNGCGFH3DN8C9Q06908A053F
  6EBMHMAC9X5HD005XQT55B2UWU510"
In this example, port "49676" will always be used for the main RLM server, even after a license server restart.
If you have activated multiples licenses on this server, each license file needs to have the same port.
Note About Setting Up a License Server Behind a Firewall
The license server will be communicating on 2 ports:
- The ISV port (default is 5053)
- The main RLM server port (default changes each time the RLM license server is restarted, see procedure 3236905229to specify it)
Both ports must be opened between the client and the server to be able to use licensing.
Setting Up the ISV Report Log
To keep track of license usage history, you can enable the REPORTLOG in the ISV options file.
This can be done easily from the web interface.
Web Interface
The web interface is available at port 5054 of the license server.
For example, if the server is at address 192.168.0.1, the web API can be open, using a browser at http://192.168.0.1:5054/
- Go to the Status page.
- Select the ISV server OPTIONS:

- Set the REPORTLOG file path, ROTATE frequency, and the PURGE_REPORTLOG options
The REPORTLOG file will be saved at C:\CM Labs\Licenses\report_log
ROTATE daily will create a new report file everyday with the date appended with this format : report_log.yyyy.mm.dd
Other options are weekly, monthly or a fixed #days
PURGE_REPORTLOG 66 will remove log files older than 66 days.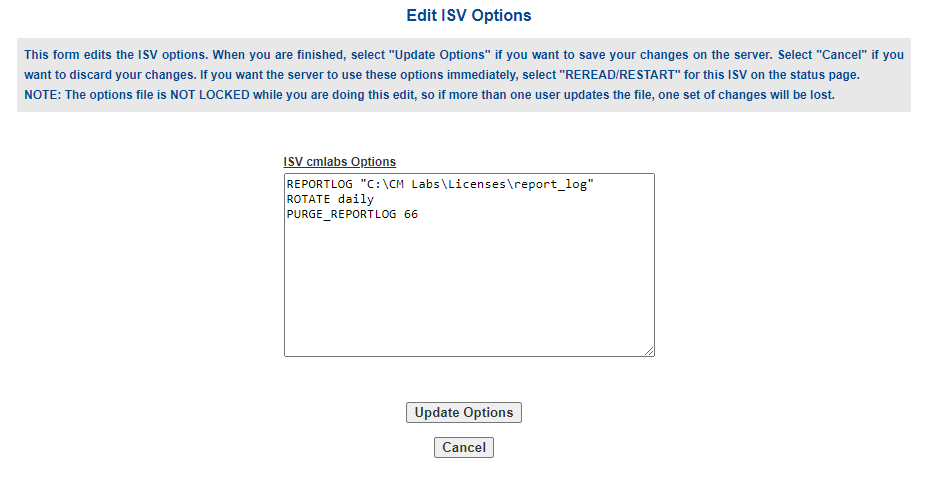
- Save the options to the file with the Update Options button.
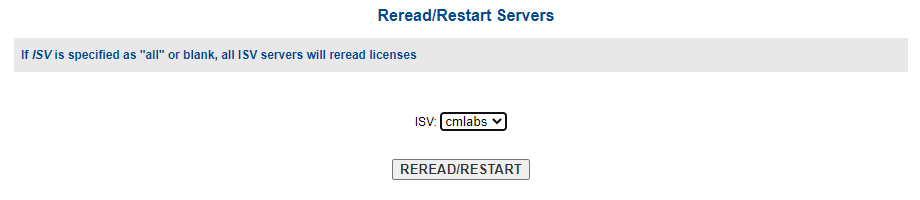
- Reread/Restart the server to enable the REPORTLOG
- Parse the report log files to extract information.
- The report log data format is well detailed in the RLM License Administration document: Reportlog File Format section (page 94) of the RLM documentation: Checkin, checkout, license denial, and license in use are part of the interesting data described in this section.