Publishing Lidar Point Cloud2 data over ROS2 from a Mechanism
In this tutorial, you will learn how to publish a Point Cloud2 data over a ROS2 simulation using Vortex® Studio Editor.
Prerequisites
User should have satisfied the prerequisites that are given in the tutorial : Publishing TF2 over ROS2 from a mechanism. This tutorial will make use of the assets that were created during that tutorial.
Have a mechanism that contains a Lidar Sensor
In order to publish some Lidar data, there is, indeed, a need to have such extension in the mechanism. To make this tutorial easier to follow, it starts with the mechanism that has been created during the Publishing TF2 over ROS2 from a mechanism . If you already have a mechanism that contains a lidar extension, this section can be skipped.
- Start the Vortex® Studio Editor.
- From the Panel 'Your Documents' locate the mechanism file called 'Car - Hatchback - WithTF' and open it.
- Do 'Save As' under the name 'Car - Hatchback - WithLidar.vxmechanism'
- From the Toolbox panel, go to the Sensors category and choose 'Lidar Sensor'.
- Double click on the icon. This add a lidar to the mechanism.
- Fields of the Lidar extension can be changed as the user need. But leave the 'Output as distance field' to be not selected and for a better visual experience set:
- Range = 20m
- Horizontal FOV Start = -45
- Horizontal FOV Length = 90
- Attach the Lidar to the car.
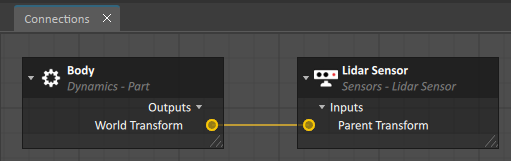
- Open the connection editor.
- Create a connection between: 'Car - Hatchback'->Physics::Assembly->Body::Outputs->World Transform to 'Car - Hatchback'->'Lidar Sensor'::Inputs->'Parent Transform'.
- Set the local position of the Lidar as desired, we have chosen a relative position of [2.5, 0.0, 0.5].
- Save the file.
Add the Point Cloud2 Publisher
- In the Toolbox, go to the ROS2 category.
- Locate the Node extension and double click on it. This adds a ROS2Node extension to the mechanism.
- Set the 'Node Name' to be 'LidarNode'.
- Choose QoS to be 'Sensor'
- Locate the PointCloud2 Publisher extension and double click on it. This adds the publisher to the mechanism.
- Assign the Lidar extension and the Node extensions just created to the publisher. To do so,
- In the Explorer panel, select the PointCloud2 Publisher extension.
- Drag the Lidar Sensor extension toward the Property panel and drop it onto the 'Lidar Sensor' field of the PointCloud2 Publisher.
- Drag the Node extension toward the Property panel and drop it onto the 'ROS2 Node' field of the PointCloud2 Publisher.
- The rclcpp sensor_msgs::msg::PointCloud2 requires a frame_id that will correspond to the frame of reference from which the lidar data is captured. To do so,
- Having PointCloud2 Publisher selected, go to Property panel and assigned a name to the field 'Frame ID'. In this tutorial, we have chosen 'Lidar_frame'.
Define the 'Lidar_frame' reference frame in TF2
Now that the PointCloud2 Publisher is setup to publish a lidar data from the reference frame id called 'Lidar_frame', we need to define that frame in TF2 topic.
This step has been covered in the tutorial Create Transform Stamped extensions, but for convenience, here are the steps.
- From the Toolbox, find the Transform Stamped extension.
- Create one instance of the extension.
- Set the 'Transform Broadcaster'.
- Have the new Transform Stamped instance selected.
- Drag the instance of the Transform Broadcaster extension from the Explorer panel and drop it on the field called 'Broadcaster'.
- Set the pose of the Lidar extension to be broadcasted.
- Navigate the Explorer panel until Lidar extension.
- Drag it onto the "IMobile" field of a Transform Stamped.
- Set the 'Frame ID' field to be the same as the one set for the PointCloud2 Publisher instance, ie: 'Lidar_frame'.
- Take a look at the Explorer panel and notice that Transform Stamped has taken the name 'Lidar_frame'.
- Finally, set the 'Lidar_frame' to be a child of the 'chassis' Transform Stamped.
- Save the mechanism file.
Verify the simulation results
Do the next few steps to assess if the simulation behave as expected.
- Run the simulation.
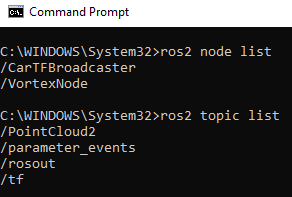
- Start a command prompt and source ROS2
- Runs few commands from the ROS2 tools,. Expect the following results:
- Finally, run rviz2 and assess if the lidar point cloud is displayed as expected.
Conclusion
User has learned how to add a 'Point Cloud2 publisher' to ROS2. Please, don't forget to save the mechanism that has been authored in this tutorial. The next tutorial will use it.
We suggest to choose 'Car - Hatchback - WithLidar.vxmechanism' as the file name.
Please, follow the next tutorial where users will learn how to add several instances of a mechanism that contains a 'Point Cloud2 publisher': Publishing Lidar Point Cloud2 data over ROS2 from a Scene