Publishing Lidar Point Cloud2 data over ROS2 from a Scene
This tutorial shows how to use multiple instances of a mechanism that publishes Point Cloud2 in a Vortex® Studio Scene.
Prerequisites
User should have satisfied the prerequisites that are given in the tutorial : Publishing TF2 over ROS2 from a mechanism, Publishing TF2 over ROS2 from a Scene, and Publishing Lidar Point Cloud2 data over ROS2 from a Mechanism . It is recommended to have ran these tutorials.
Introduction
First, lets recall that, in ROS2, all nodes across a ROS2 simulation should have different names and that, all TF2's frame ids published must have a unique name.
In regards of those two requirements, when it comes the need to use several instances of a mechanism that are using some ROS2 extensions, some care must be taken to not violate those requirements.
This tutorials will shows how to setup a scene in such a way that, several instances of a same mechanism containing PointCloud2 Publisher extensions coexist in the scene.
First step, preparing the scene
- Started the Vortex® Studio Editor.
- From the main page locate the scene called Scene_2_Hatchback_instances.vxscene and load it.
- Do 'Save As' right away under the name 'Scene_2_Hatchback_instances_with_lidars.vxscene'.
- Right click on the 3DView, select the grid option and choose "Use Grid".
The mechanism in that scene was created in the tutorial Publishing TF2 over ROS2 from a mechanism. It doesn't contain any lidar sensor or publisher. On the other end, the mechanism that was created in the tutorial Publishing Lidar Point Cloud2 data over ROS2 from a Mechanism does contain a lidars.
The next steps will make use it. To do so:
- Right click on the first mechanism called 'Car - Hatchback' and choose 'Replace Mechanism...' from the contextual menu.
- Browse to the mechanism file called 'Car - Hatchback - WithLidar.vxmechanism' and click 'Open'.
- Repeat the steps 1 and 2 for the second mechanism.
- Save the scene.
Now the scene contains two instances of the mechanisms that was created in Publishing Lidar Point Cloud2 data over ROS2 from a Mechanism. They contain a Lidar and a Point Cloud2 publisher.
Testing the integrity of ROS2 simulation
Running the simulation and using ROS2 commands will reveal that some things are not consistent as shown here:
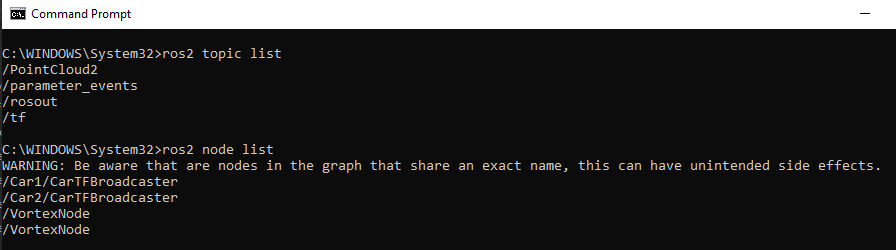
- We should have two topics with referring to PointCloud2, the output only shows one. This is because, at this point, they have the same name and so ros can't discriminate between the two.
- There is two nodes with the same name (/VortexNode)
At this point of creating the scene, the requirements of ROS2 given in the introduction are not satisfied. The next steps will show how to manage the scene to resolve the issues.
Fixing the issues
While the simulation is running, look at the output field 'FQN Node Name' from the 'Node' of each mechanism. They are the same, leading to a duplicate node name as stated by the ros command. Next, look at the output field 'FQN Topic Name' from the 'PointCloud2 Publisher' of each mechanism. They are also the same, leading ROS2 to be unable to see them two. This looks like the same issue that has been discussed in the tutorial Publishing TF2 over ROS2 from a Scene, and the solution is similar.
- Stop the simulation.
- Open the mechanism 'Car - Hatchback'.
- Double click on the VHL called 'ROS2 Interface'.
- Add the field 'Namespace' from the 'Node' extension. (Pay attention to not drop the field under the column labelled 'Data'.)
- In the VHL, for readability, rename the two fields.
- Namespace → Broadcaster Namespace
- Namespace (1) → Node Namespace
- Do steps 2 to 5 again but this time for the mechanism 'Car - Hatchback (1)'.
- Switch back to the Scene document tab.
- In the Explorer panel, select the ROS2 Interface of the first car and set both field to Car1.
- In the Explorer panel, select the ROS2 Interface of the second car and set both field to Car2.
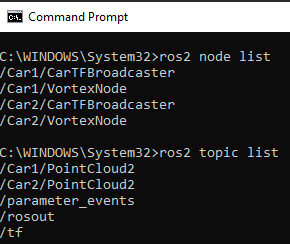
At this point, running the simulation and assessing the integrity of ROS2 simulation should give the following result.
This result seems promising, but running the rviz2 will reveal that the frame ids are not correct. This is because, to have unicity in frame ids, the 'Lidar_frame' has been amended by the 'Transform Stamped' extension. Look at Setting name for frame ids for more details.
Although that this is good for the unicity of frame id, it has the side effect to that the 'PointCloud2 Publisher' use 'Lidar_frame' as a frame id that do not exist anymore in TF2. To fix this issue, do the few next operation.
- Create a connection between the two frame ids. To do so:
- Stop the simulation
- Switch to the Mechanism Editor tab.
- Create a 'Connection Container'
- From the Explorer panel, select the 'Lidar_frame' and drag its output field called 'Frame ID' to the connection view.
- From the Explorer panel, select the 'PointCloud2 Publisher' and drag its parameter field called 'Frame ID'.
- Connect them.
- This connection will keep the two frame id with the same name.
- Switch back to the Scene Document tab
- Run the simulation
- Run rviz2 to verify the result.
Conclusion
This tutorial has shown that, using several instances of a mechanism that contains ROS2 extensions may result in braking some rules in ROS2, leading to an inconsistent setup on the ROS side of the co-simulation. The tutorial shows how to author the mechanism file to have them publishing ros entities with respecting rules about unicity of topic's names and frame id names.