Integrating Vortex Studio with Unreal Engine
- DEVOPS
To use the following guide, you must be familiar with Vortex mechanisms, Vortex Graphics Galleries, and the Unreal Editor.
In the following documentation, you will be able to simulate Vortex mechanisms just like any other assets in an Unreal level.
With the Vortex Studio Plugin for Unreal Engine, the Unreal Editor lets you connect to parameters that you expose in Vortex Studio.
Any Vortex Studio simulation parameter can be sent to a function in an Unreal blueprint (get/set) and included in your Unreal level.
Vortex Studio automatically detects landscape components that you create in Unreal around a Vortex vehicle. A corresponding height field is created and streamed in Vortex Studio at run time. To monitor contacts and collisions during simulation, you can show the height field at the same time using the Vortex Studio Remote Debugger application.
During the simulation, Vortex Studio sends information about the position and orientation of each body to the Unreal Engine. Parameters and outputs can be accessed via the mechanism's interface. To ensure smooth gameplay with accurate synchronization and realistic movements, Vortex Studio sends information about the position and orientation of each body to the Unreal Engine. Parameters and outputs that you expose using a VHL interface let you control the Mechanism in Unreal.
Vortex Studio manages external devices, such as motion platforms and CANopen-compliant devices for controlling vehicles and enriching simulation.
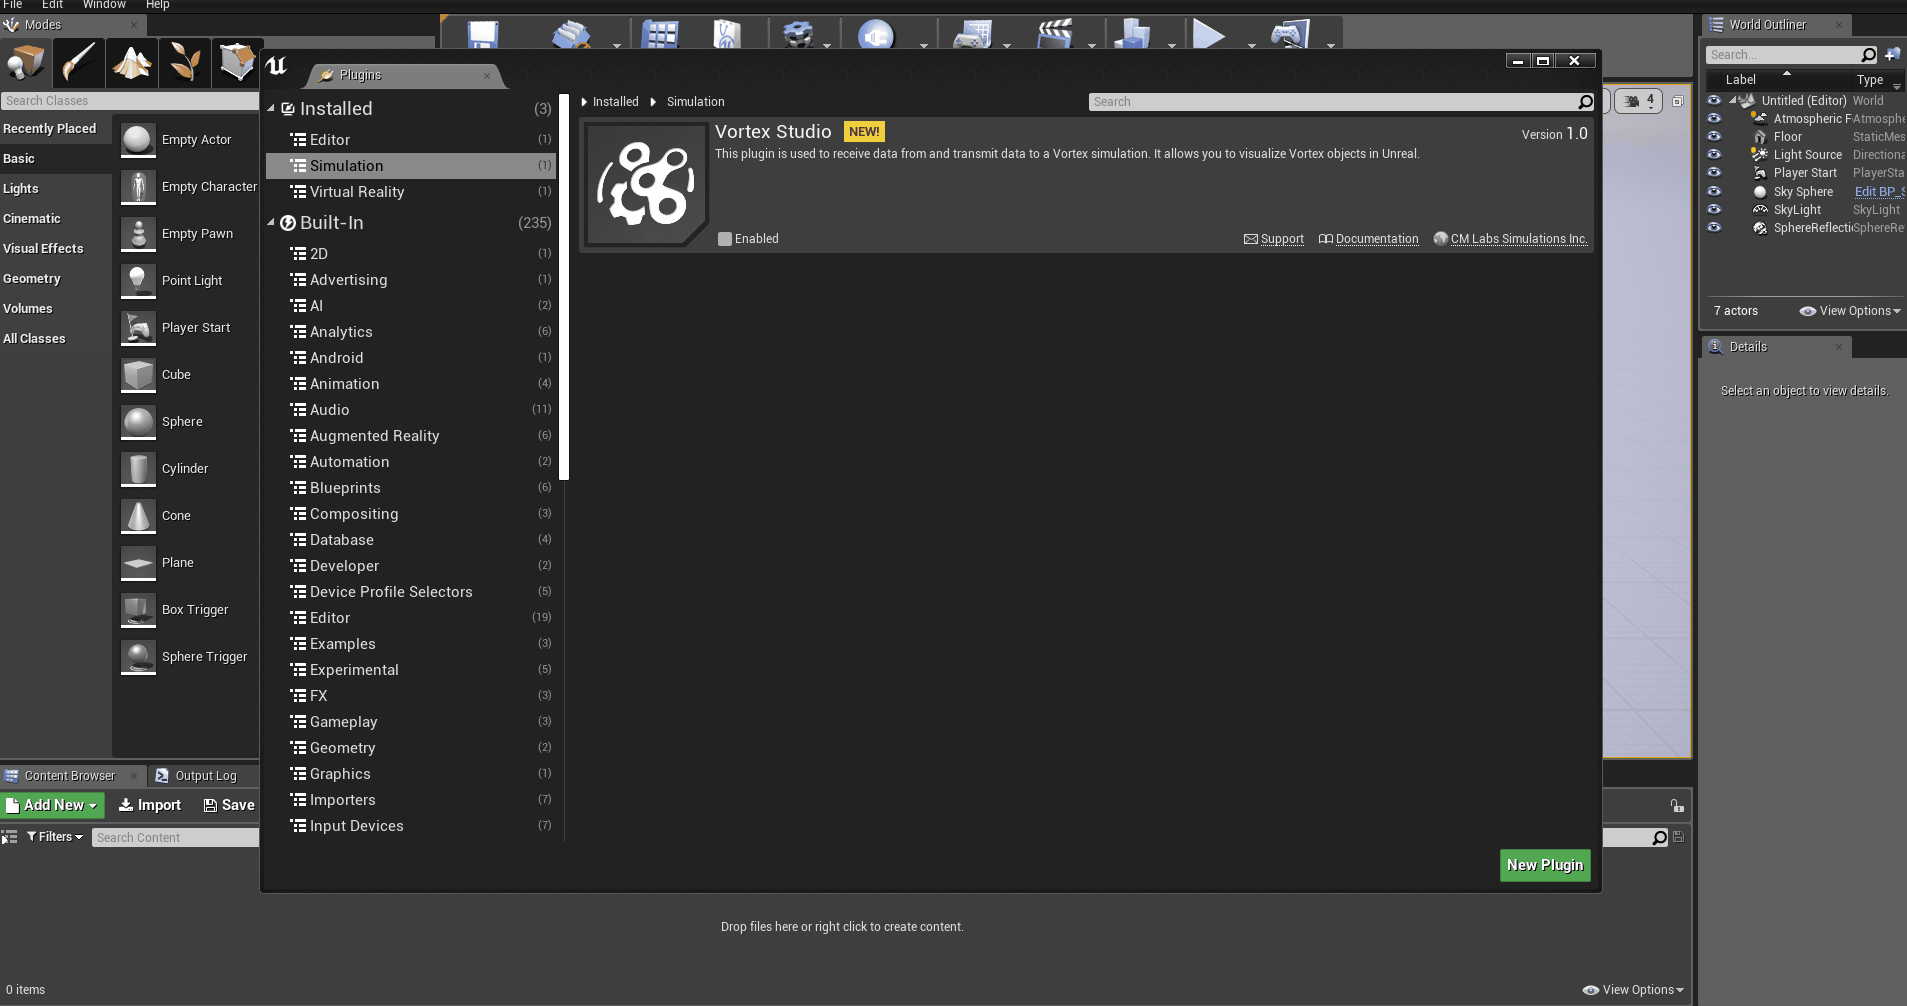
Installing the Vortex Studio Plugin
Installing the Vortex Studio Plugin involves downloading the plugin from the Unreal marketplace and configuring basic parameters.
Prerequisites
To use the Vortex Studio for Unreal Engine 4 plugin, you must have Vortex Studio and Unreal Engine 4.26.
Download the plugin from the Unreal Marketplace and install it following these steps:
IMPORTANT
To install the Plugin with the Epic Games Launcher
- Open the Epic Games Launcher and login using your account information.
- Click the Marketplace tab.

- In the search bar, type
Vortex.The Vortex Studio plugin appears in the list.
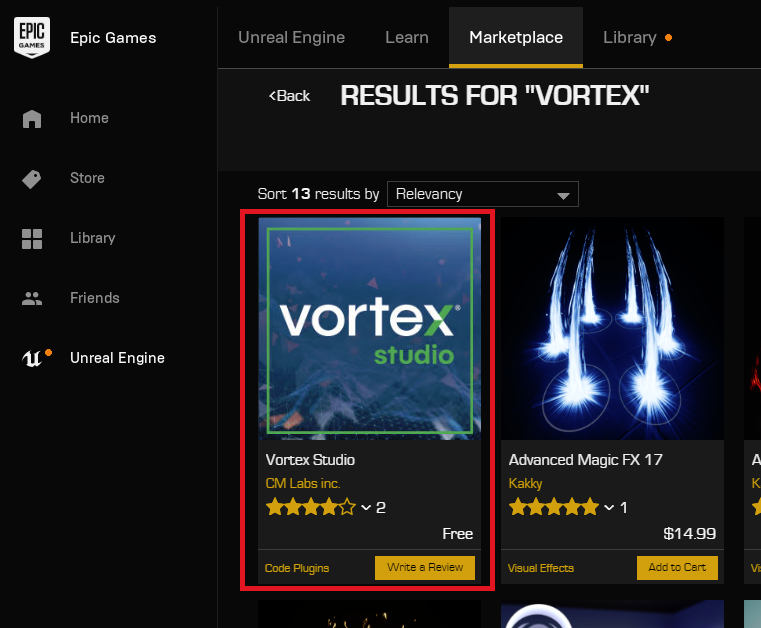
- Click Vortex Studio plugin and click on Install to Engine.
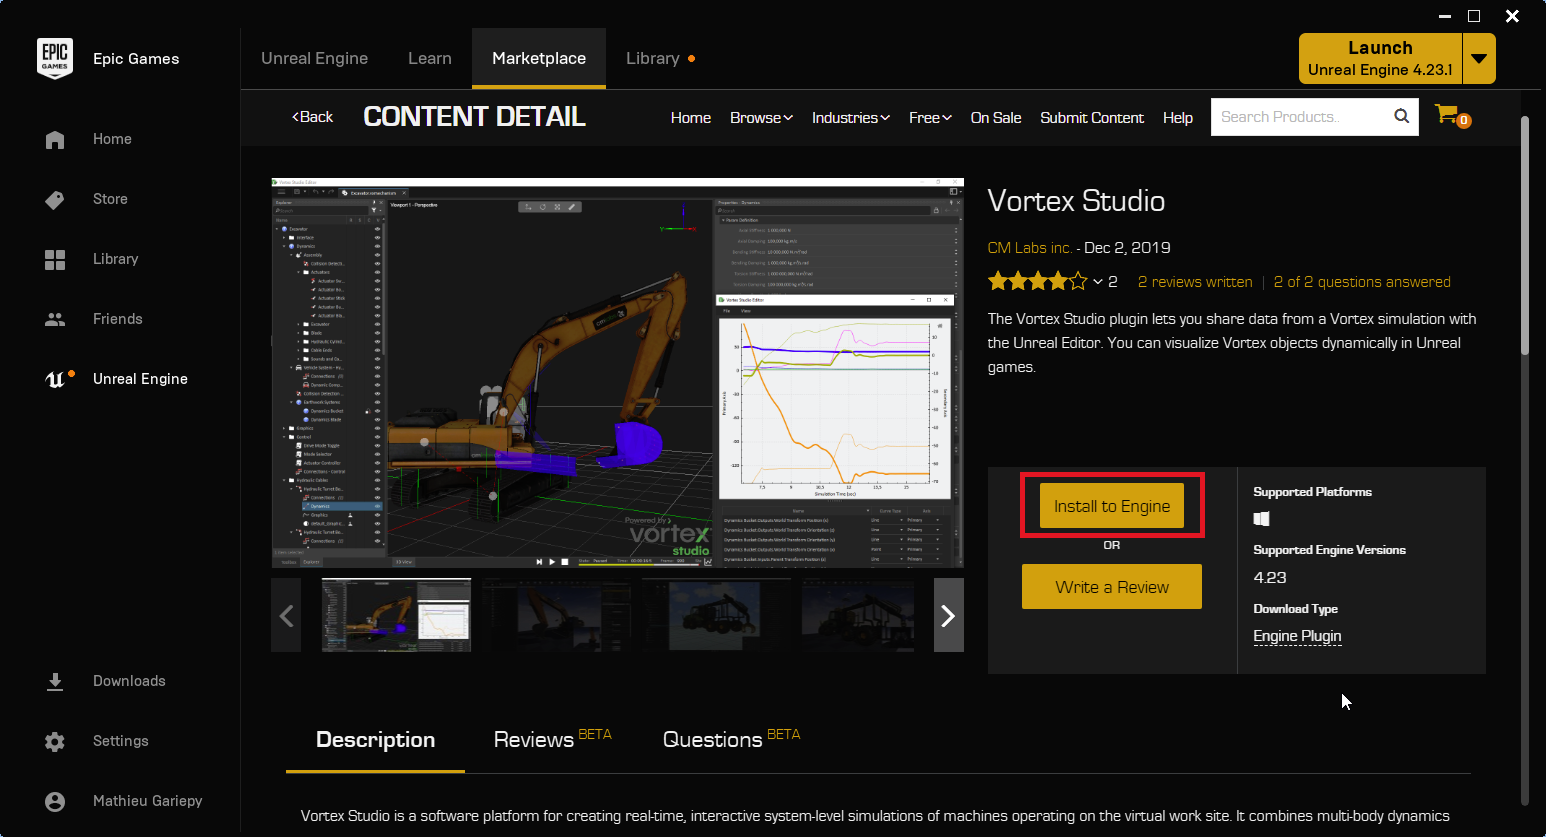
The Vortex Studio plugin now appears in your Unreal projects
To install the Plugin from the 7z File
- Open the folder Plugins at the following address
<Unreal Engine Installation Folder>\Engine\Plugins\. - If you see a subfolder named VortexPlugin remove it.
- Copy the 7z named
Vortex_Studio_Unreal_Plugin_[ReleaseNumber].7zinto the Plugins folder. - In the 7-zip context menu, select Extract Here.
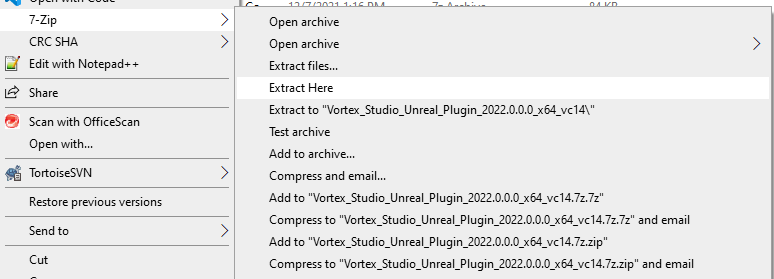
- Delete the 7z file.
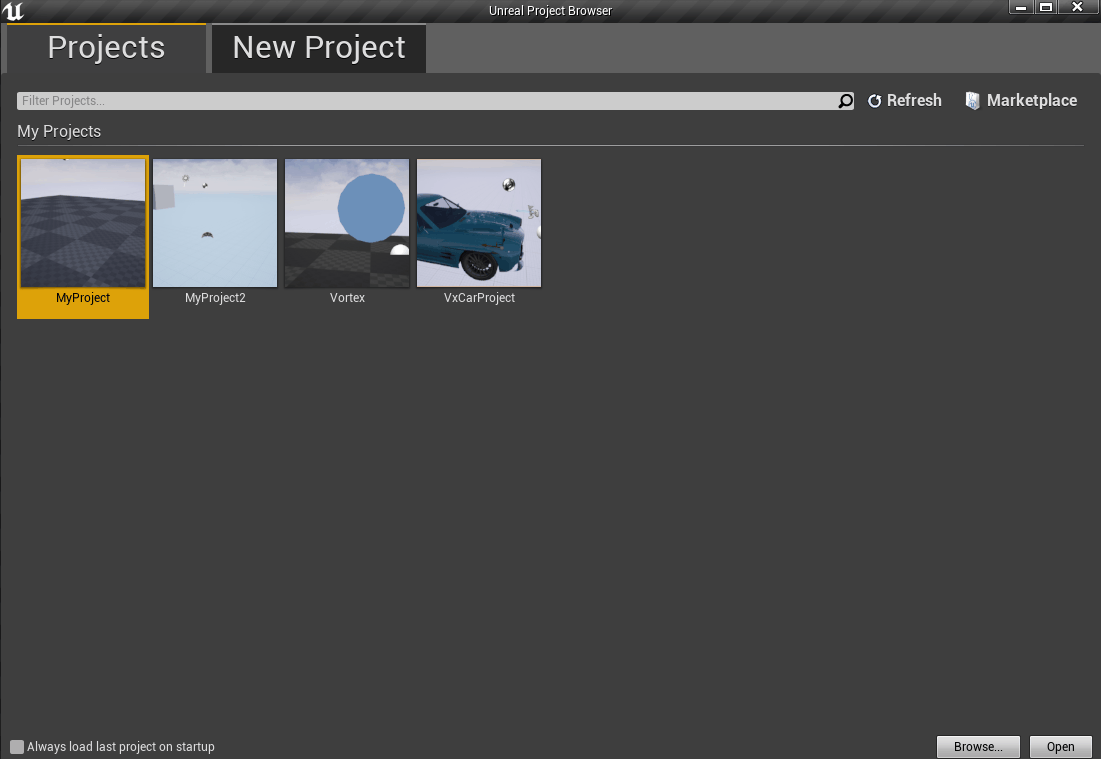
Running a Sample Project
For convenience, CM Labs offers a sample project that you can use to understand the different features of the Vortex Studio integration with Unreal. You can also use it as a starting point for your own projects.
To download the sample project files do the following:
- In a web browser go to https://cm-labs.exavault.com/share/view/1s3xe-amykk3cw
- To begin the download, click the filename of the sample project:
Vortex_Studio_for_Unreal_Forklift_Sample_[ReleaseNumber].7zand extract the content on your computer. - Open the Unreal Engine 4.26 and click the Launch button.

- In the Unreal Project Browser, click Browse and navigate to the extracted sample files.
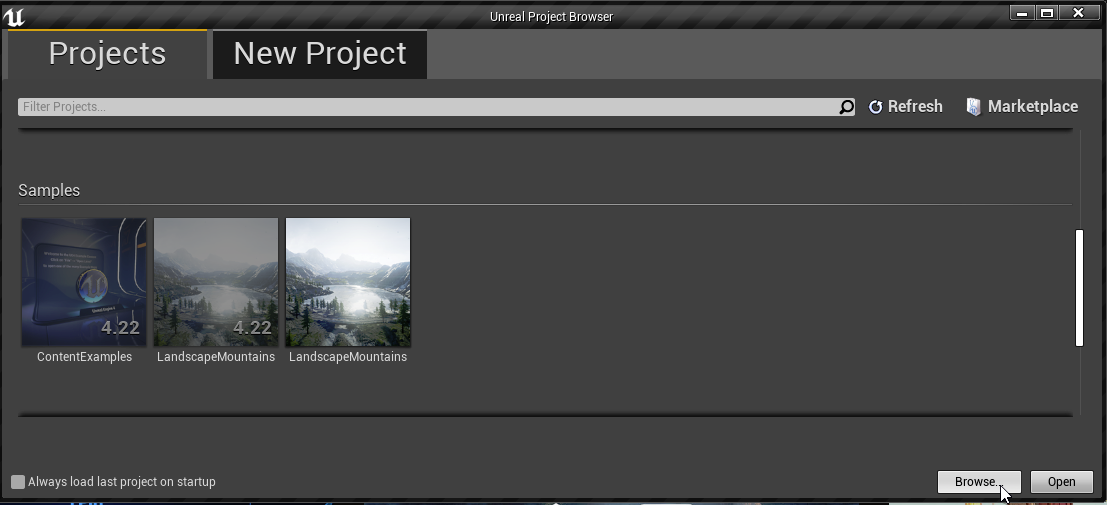
- Open the
ForkliftSim_uprojectfile.The project opens in the Unreal Editor.
NOTE: It can take several minutes for the project and to load for the first time.
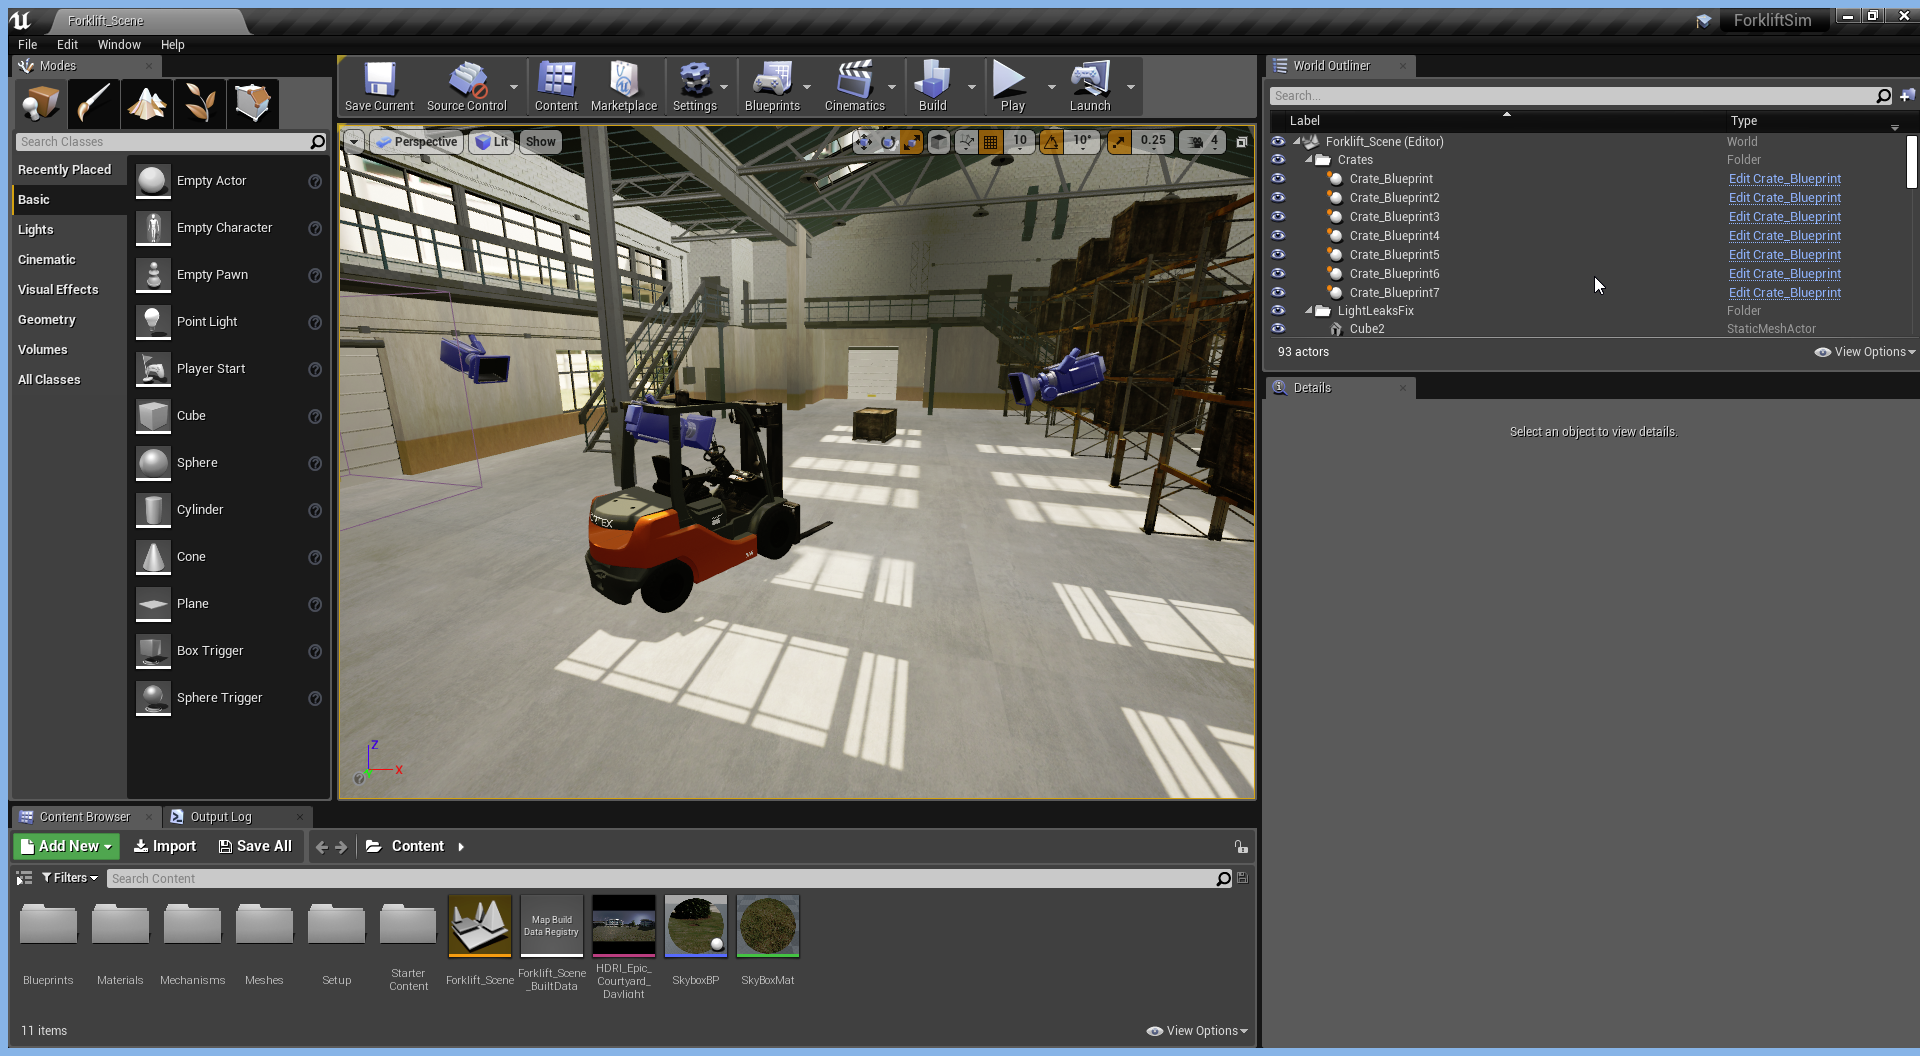
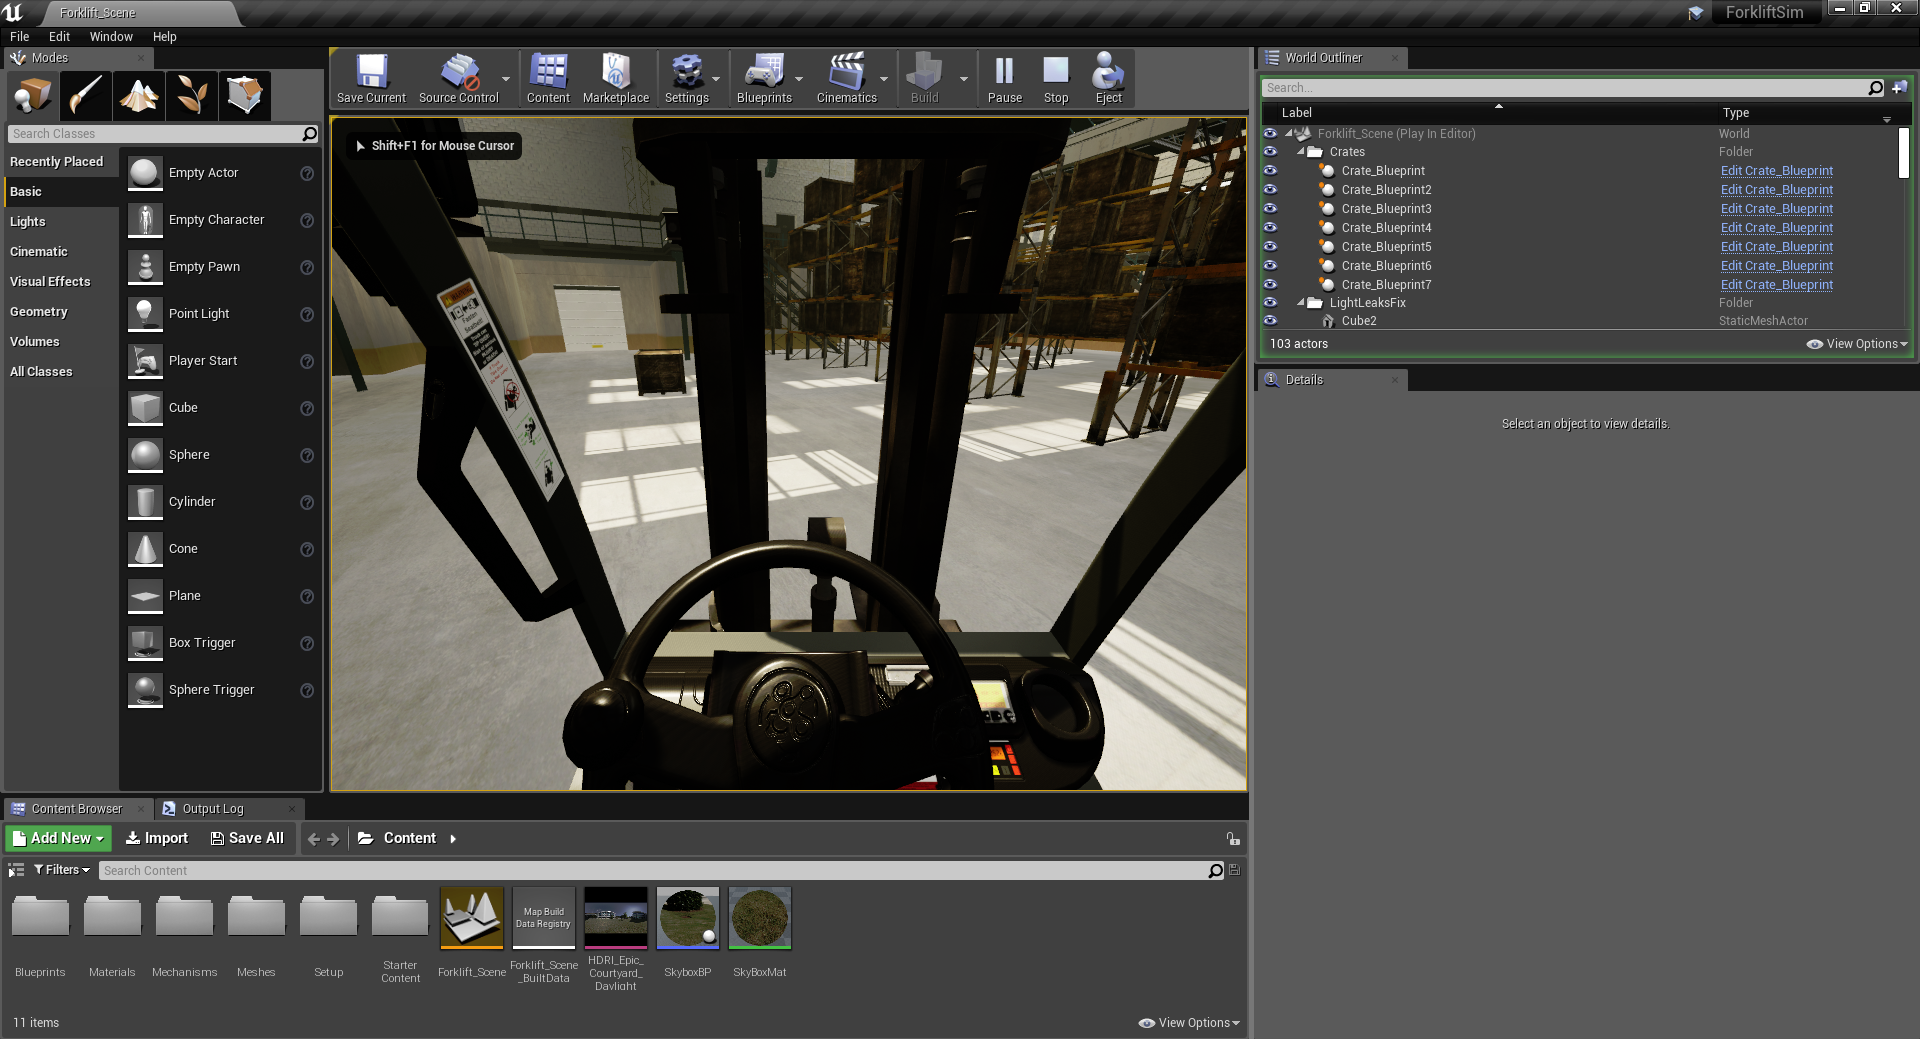
- To start the simulation, press the Play button.
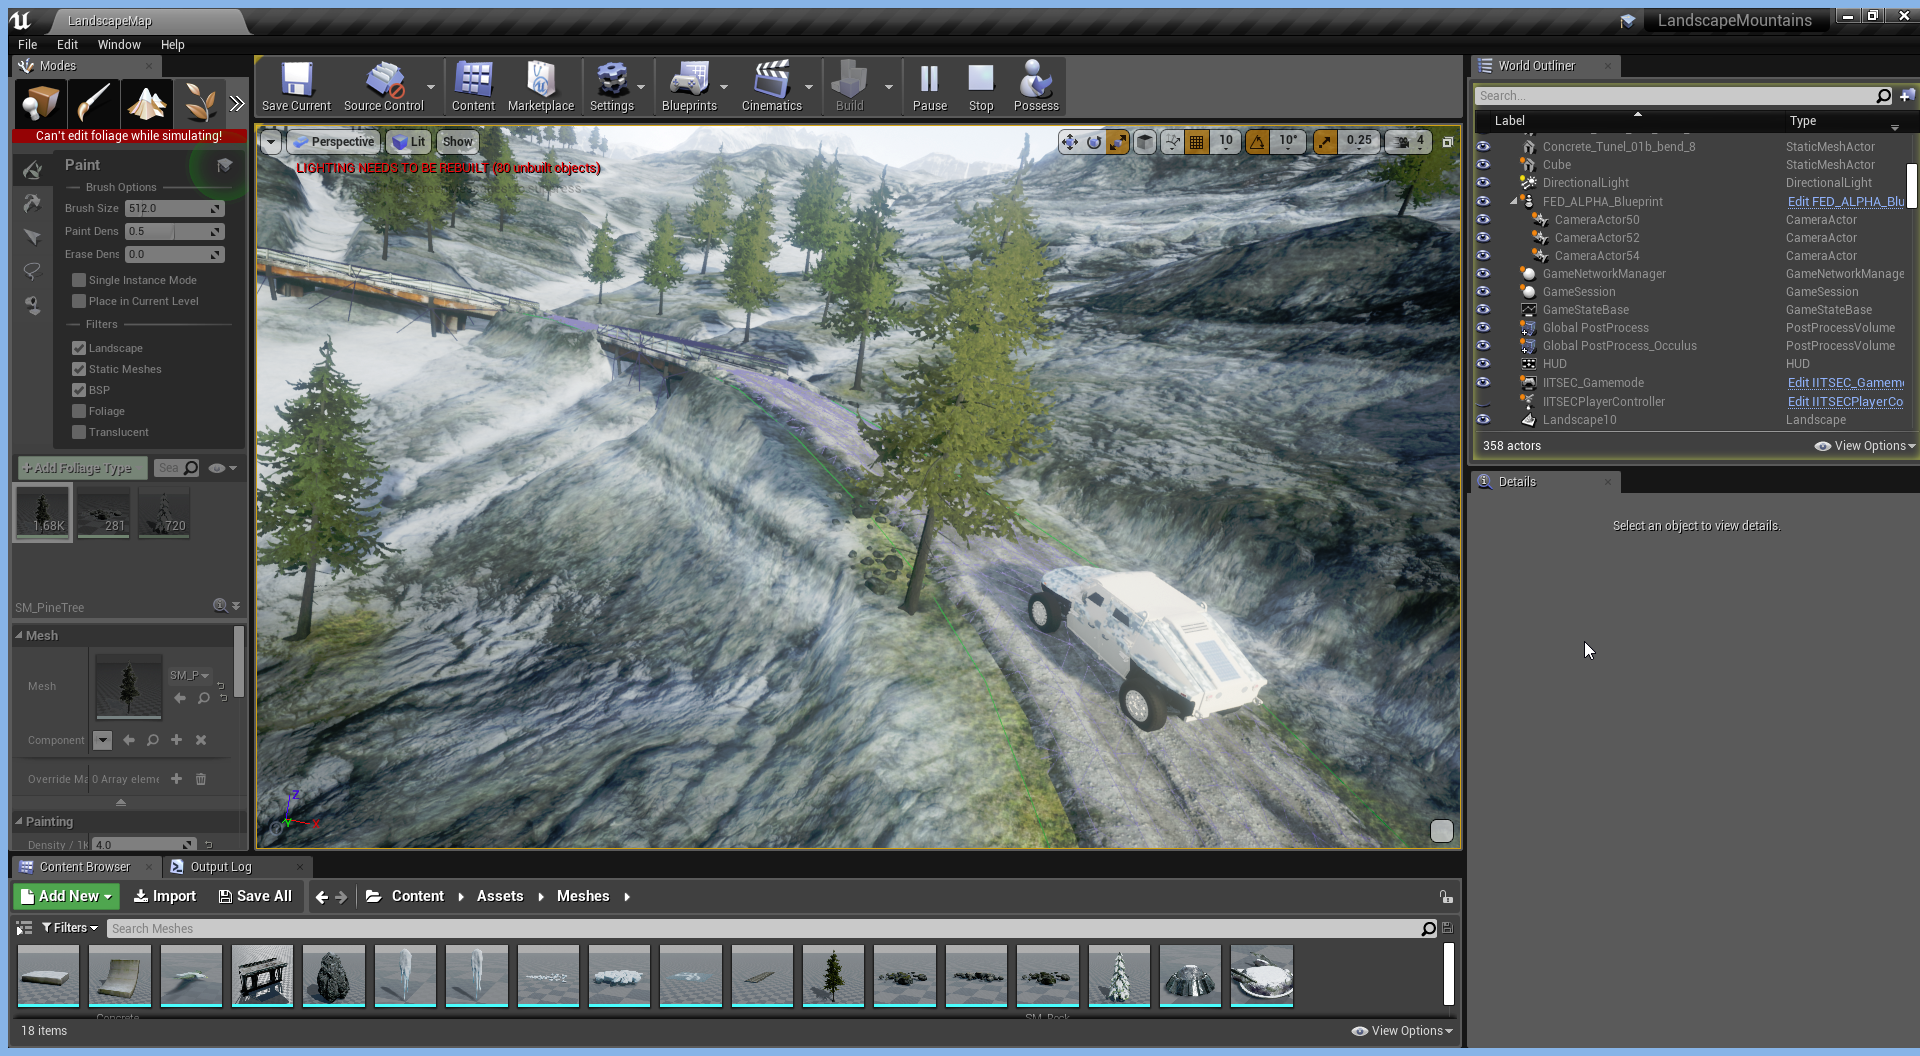
You can use a Direct Input game controller to control the forklift.
Organizing Vortex Studio Assets
This section assumes that you already have a good understanding of Vortex Studio Editor Documents.
The Vortex Studio plugin lets you import Vortex mechanisms to an Unreal project.
To create a valid Unreal project using Vortex Studio, you must copy the Vortex assets you want to use in your new Unreal project under the Content directory for the project. Vortex assets include files with the following formats:
- *.vxmechanism (Mechanism Document)
- *.vxassembly (Assembly Document)
- *.vxgraphicgallery (Graphics Gallery Document)
- *.vxc (Setup Document)
- *.vxmaterials (Material Table)
Example
In this example, you have the following folder hierarchy for a Vortex forklift mechanism:
- Forklift
- Dynamics
- Forklift.vxmechanism
- Forklift_Assembly.vxassembly
- Graphics
- Forklift2016.vxgraphicgallery
- Dynamics
To build a valid Unreal project, you must move the same folder structure to a sub-folder of the Content folder for your Unreal project. The structure of your Unreal project would appear as follows:
- MyProject
- MyProject.uproject
- Config
- ...
- ...
- Content
- Vortex_Mechanisms
- Forklift
- Dynamics
- Forklift.vxmechanism
- Forklift_Assembly.vxassembly
- Graphics
- Forklift2016.vxgraphicgallery
- Dynamics
- Forklift
- Vortex_Mechanisms
Creating Your First Project
Bringing your first Vortex Studio project into Unreal involves verifying that the plugin is enabled, restarting the application, and verifying settings for the project with the plugin.
About Vortex Studio Project Settings
You can customize several settings for your project in the Unreal Editor from the Project Settings window.
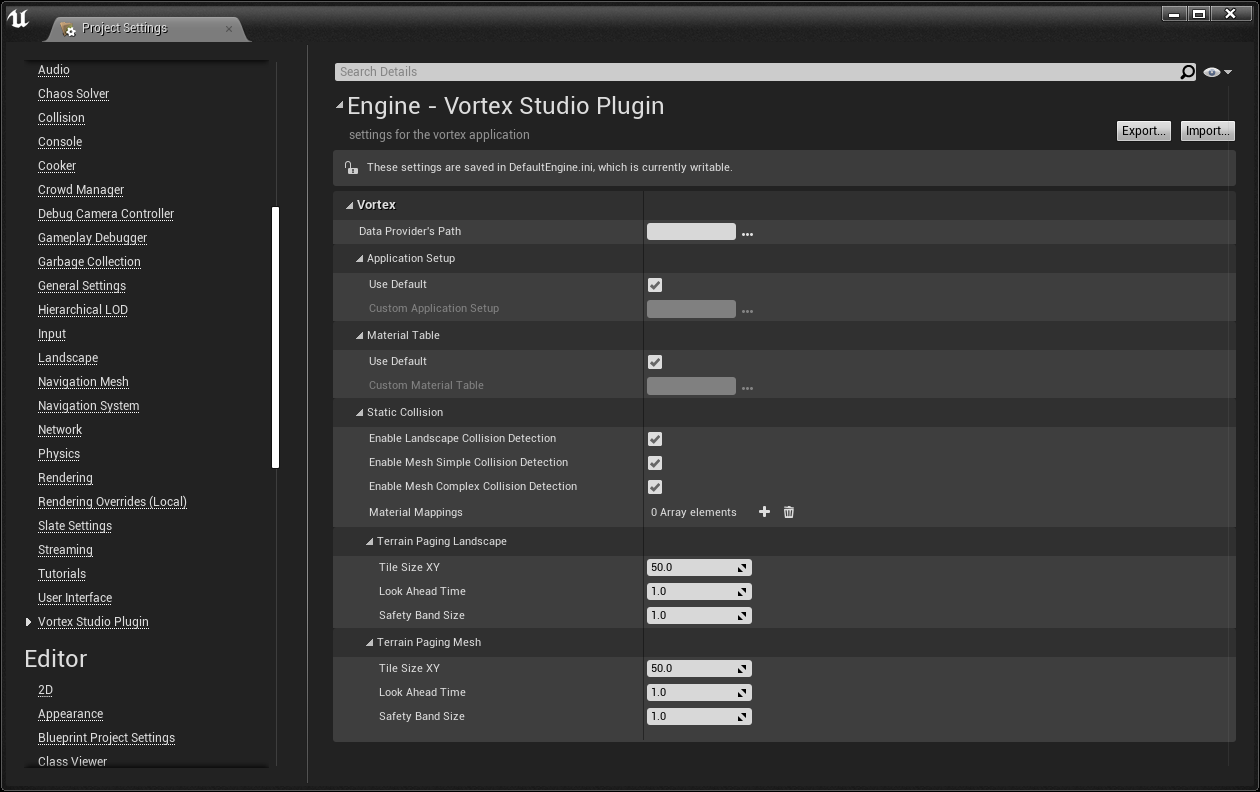
Specifically, you can customize the following settings for your project:
| Category | Setting Name | Description |
|---|---|---|
| Data Provider's Path | This setting is for advanced usage. Specifies a path (must be under the Default: None. | |
| Application Setup | Use Default | When set to true, the Vortex Studio simulation in the Unreal application uses this default Application Setup Document packaged with Vortex Studio:
Default: True. |
| Custom Application Setup | This setting is only used when Application Setup->Use Default is false. It allows using a custom Application Setup Document for your Unreal project. It is strongly recommended to use the default Application Setup Document for Vortex integrations as a starting point. The default file is under:
Your custom Application Setup Document must reside under the Default: None (not used) | |
| Material Table | Use Default | When set to true, the Vortex Studio simulation within Unreal will use this default Material Table packaged with Vortex Studio:
Default: True |
| Custom Material Table | This setting is only used when Material Table->Use Default is false. It lets you specify a custom Material Table for your Unreal project. It is strongly recommended that you use the default Material Table for Vortex Studio integrations as a starting point. The default file is under:
Your custom Material Table must exist under the Default: None (not used) | |
| Static Collision | Enable Landscape Collision Detection | If true, Unreal Landscapes will be transferred to Vortex Studio at runtime, using the underlying Vortex terrain paging system, so your mechanisms can collide with them. For additional parameters that allow tuning the performance of the terrain paging system, please see the Static Collision → Terrain Paging category below. Default: True |
| Enable Mesh Simple Collision Detection | If true, Collision On a Simple Shaped Mesh for all Unreal Static Meshes will be transferred to Vortex Studio at runtime, using the underlying Vortex terrain paging system, so your mechanisms can interact with them. Note that Vortex Studio always uses the colliding geometry (simple or complex) that PhysX would use in Unreal. For additional parameters that allow tuning the performance of the terrain paging system, please see the Static Collision → Terrain Paging category below. Default: True | |
| Enable Mesh Complex Collision Detection | If true, Collision On a More Complex Mesh for all Unreal Static Meshes will be transferred to Vortex Studio at runtime, using the underlying Vortex terrain paging system, so your mechanisms can interact with them. Note that Vortex Studio always uses the colliding geometry (simple or complex) that PhysX would use in Unreal. For additional parameters that allow tuning the performance of the terrain paging system, please see the Static Collision → Terrain Paging category below. Default: True | |
| Material Mappings | Allows associating an Unreal Physical Material to a Vortex Contact Material by name. This lets you specify which contact material a Vortex collision uses for computation purposes. The application only uses these associations when at least one of the following settings is enabled:
Default: None. | |
| Static Collision → Terrain Paging Landscape | Tile Size XY | Size in meters, in world X and Y direction, of the square tiles used by the landscape terrain pager for landscape collision queries and caching. Use Tile Size XY value around the Landscape Component size for better results. For more information on this parameter and the terrain paging system underlying the Unreal integration, refer to Integrating Vortex Studio using the VortexIntegration API. |
| Look Ahead Time | Specifies the time, in simulation seconds, the terrain pager should forecast ahead. All the terrain to be reached within the specified time, at the current velocity, will be requested. If the terrain paging system experiences slow downs when navigating, consider reducing this parameter. For more information on this parameter and the terrain paging system underlying the Unreal integration, refer to Integrating Vortex Studio using the VortexIntegration API. | |
| Safety Band Size | Specifies the distance (in meters) to grow the paged region by, as a safety band, in order to account for objects changing direction. If the terrain paging system experiences slow downs when navigating, consider reducing this parameter. For more information on this parameter and the terrain paging system underlying the Unreal integration, refer to Integrating Vortex Studio using the VortexIntegration API. | |
| Static Collision → Terrain Paging Mesh | Tile Size XY | Size in meters, in world X and Y direction, of the square tiles used by the terrain pager for Mesh collision queries and caching. If the terrain paging system experiences slow downs when navigating on a complex terrain with many obstacles (e.g., trees) consider reducing this parameter. Note that a too drastic reduction (e.g., a value of 1 meter) can in itself lead to slowdowns. A balance can be found through experimentation. For more information on this parameter and the terrain paging system underlying the Unreal integration, refer to Integrating Vortex Studio using the VortexIntegration API. |
| Look Ahead Time | Specifies the time, in simulation seconds, the terrain pager should forecast ahead. All the terrain to be reached within the specified time, at the current velocity, will be requested. If the terrain paging system experiences slow downs when navigating on a complex terrain with many obstacles (e.g., trees) consider reducing this parameter. For more information on this parameter and the terrain paging system underlying the Unreal integration, refer to Integrating Vortex Studio using the VortexIntegration API. | |
| Safety Band Size | Specifies the distance (in meters) to grow the paged region by, as a safety band, in order to account for objects changing direction. If the terrain paging system experiences slow downs when navigating on a complex terrain with many obstacles (e.g., trees) consider reducing this parameter. For more information on this parameter and the terrain paging system underlying the Unreal integration, refer to Integrating Vortex Studio using the VortexIntegration API. |
To Create a New Unreal Project Using the Vortex Studio Plugin
- Open the Unreal Engine 4.26 and click the Launch button.

- In the Unreal Editor, follow steps in Unreal documentation to create a new project.
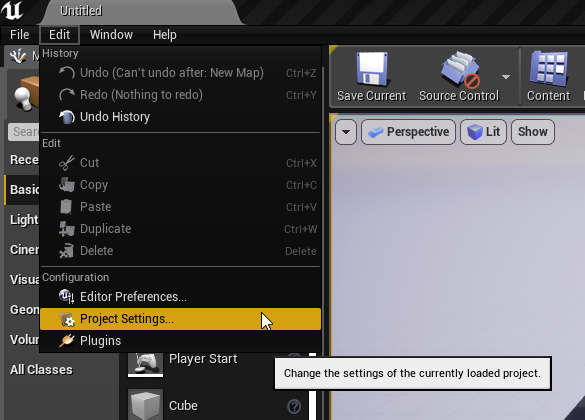
- In the upper left, click Edit and then click Plugins.
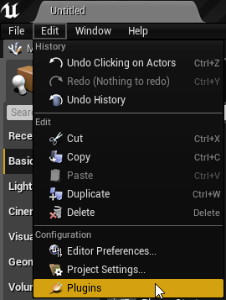
- Confirm that the Vortex Studio plugin is installed.
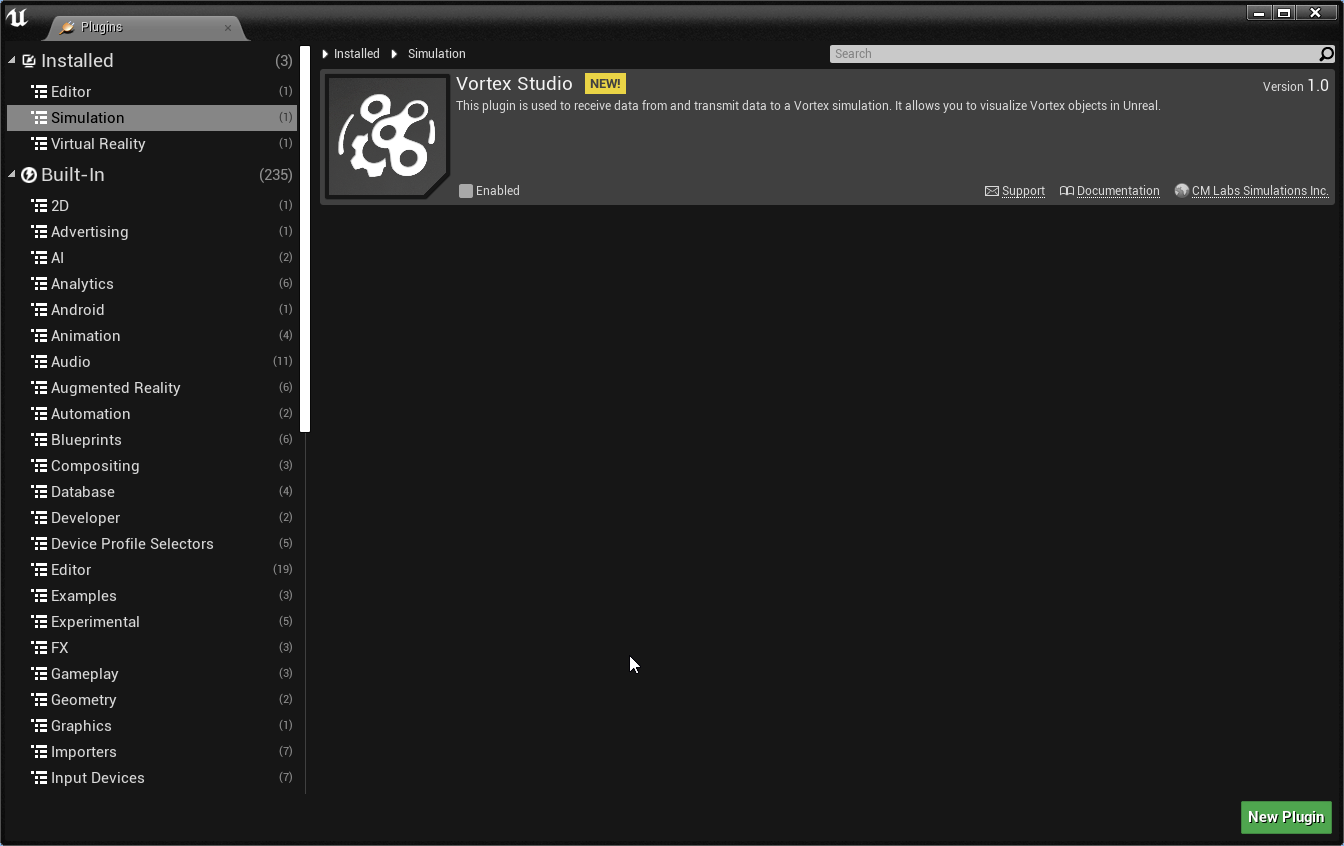
To enable the plugin, click to select Enabled.
In the lower right, click Restart Now.
The project re-opens with the Vortex Studio plugin enabled.
Save the project to permanently enable the plugin.
Managing the Frame Rate Between Vortex Studio and the Unreal Editor
By default, new Unreal projects use a variable frame rate. The Vortex Studio integration in Unreal Engine uses a fixed frame rate of 60 Hz. If you do not change the default settings, the simulation will run at unrealistic speeds.
IMPORTANT
Example: Setting the Frame Rate in Vortex Studio and the Unreal Engine
In this example, you want a simulation to run at 90 Hz.
To set the Frame Rate in the Unreal Editor, do the following:
- In the Unreal Editor, open your project.
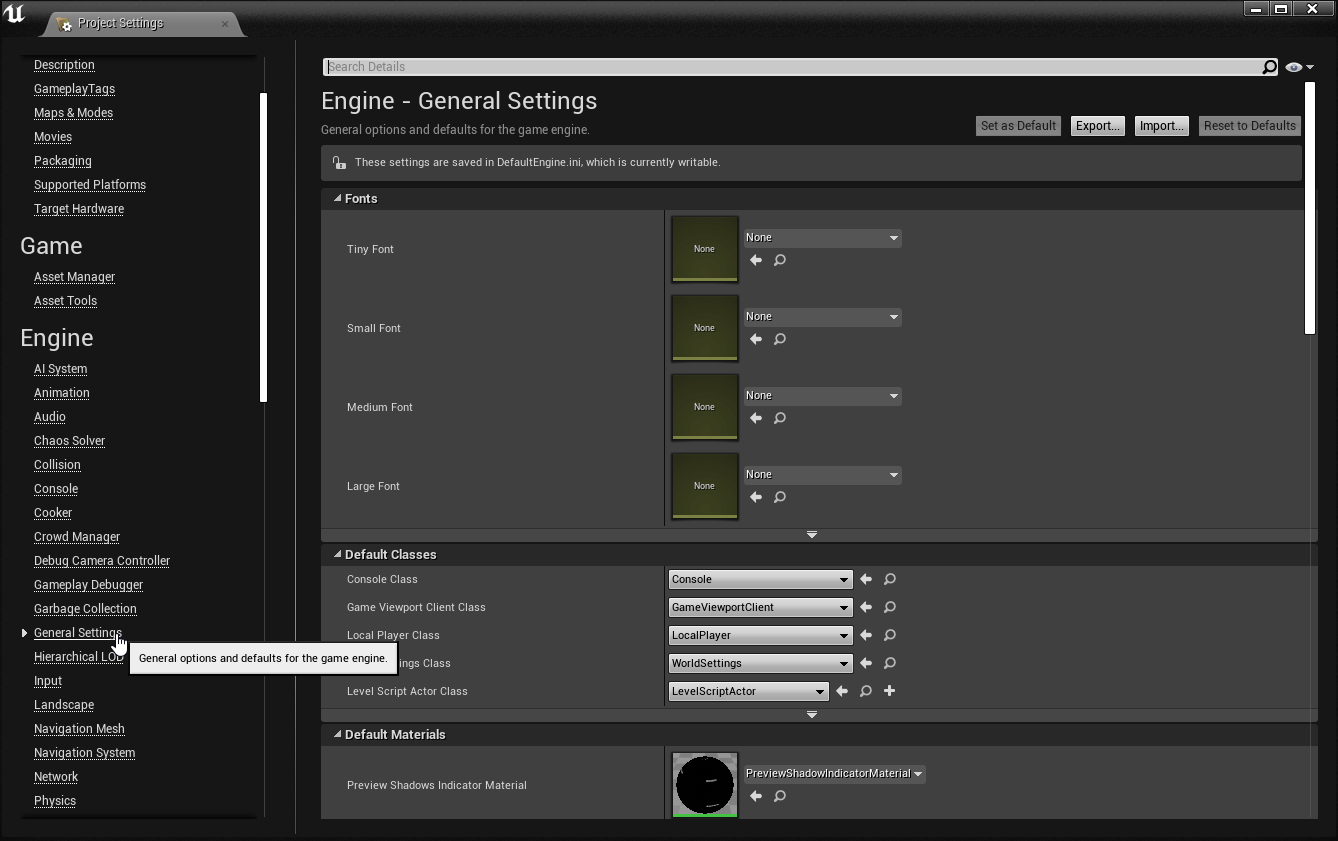
- Click Edit and then click Project Settings.
- In the Project Settings window, under the Engine section, click General Settings.
- Scroll down to the Framerate section and do the following:
- Click to select the Use Fixed Frame Rate checkbox.
- In the Fixed Frame Rate field, specify 90.00.
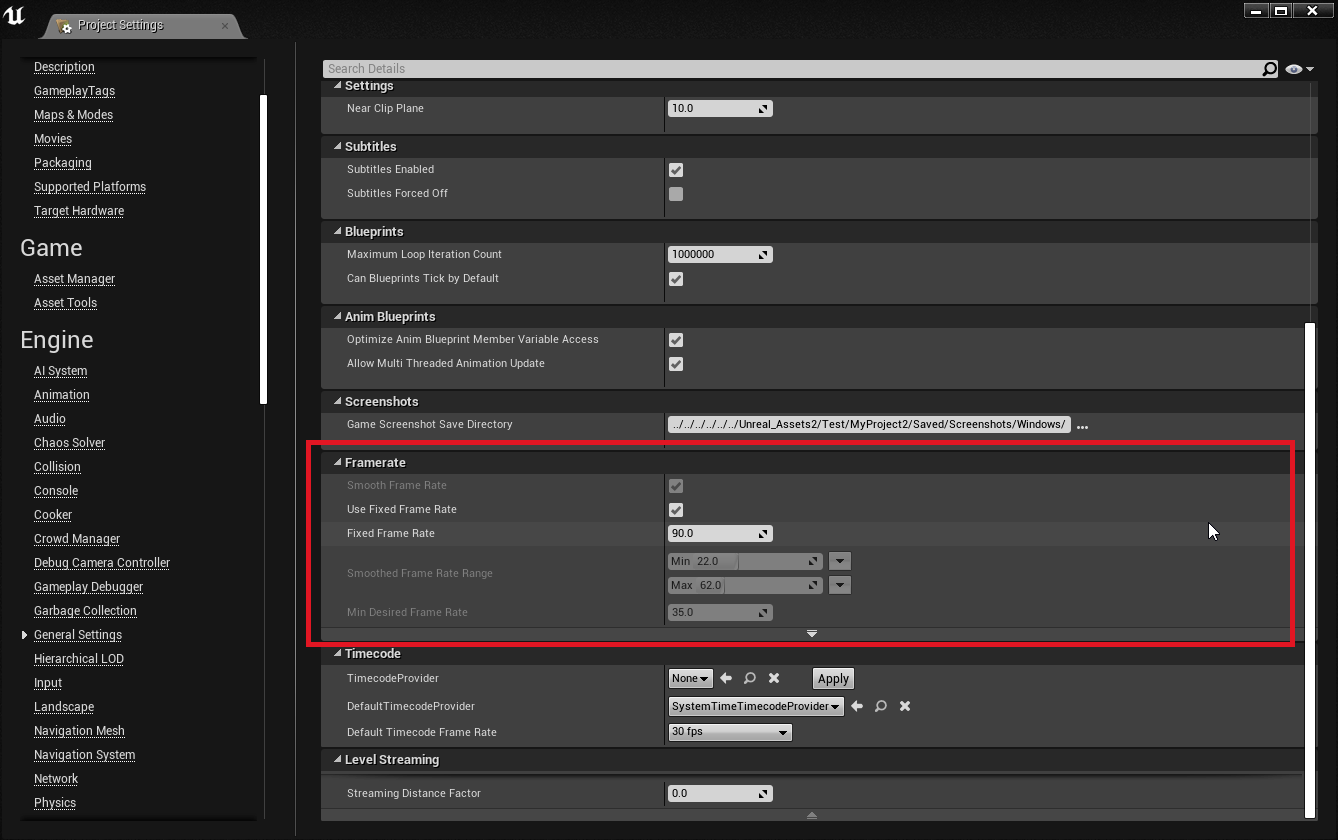
- Save the settings and restart the project.
To set the Frame Rate in the Vortex Studio Editor, do the following:
Prerequisite: You must have a custom Simulator Setup User Guide (not the default one provided with Vortex Studio). For more information, see About Vortex Studio Project Settings.
Make sure the custom application setup document is saved in the Content directory of your Unreal project.
- In the Vortex Studio Editor, open the custom Application Setup Document for this project.
- In the Explorer panel, click Setup.
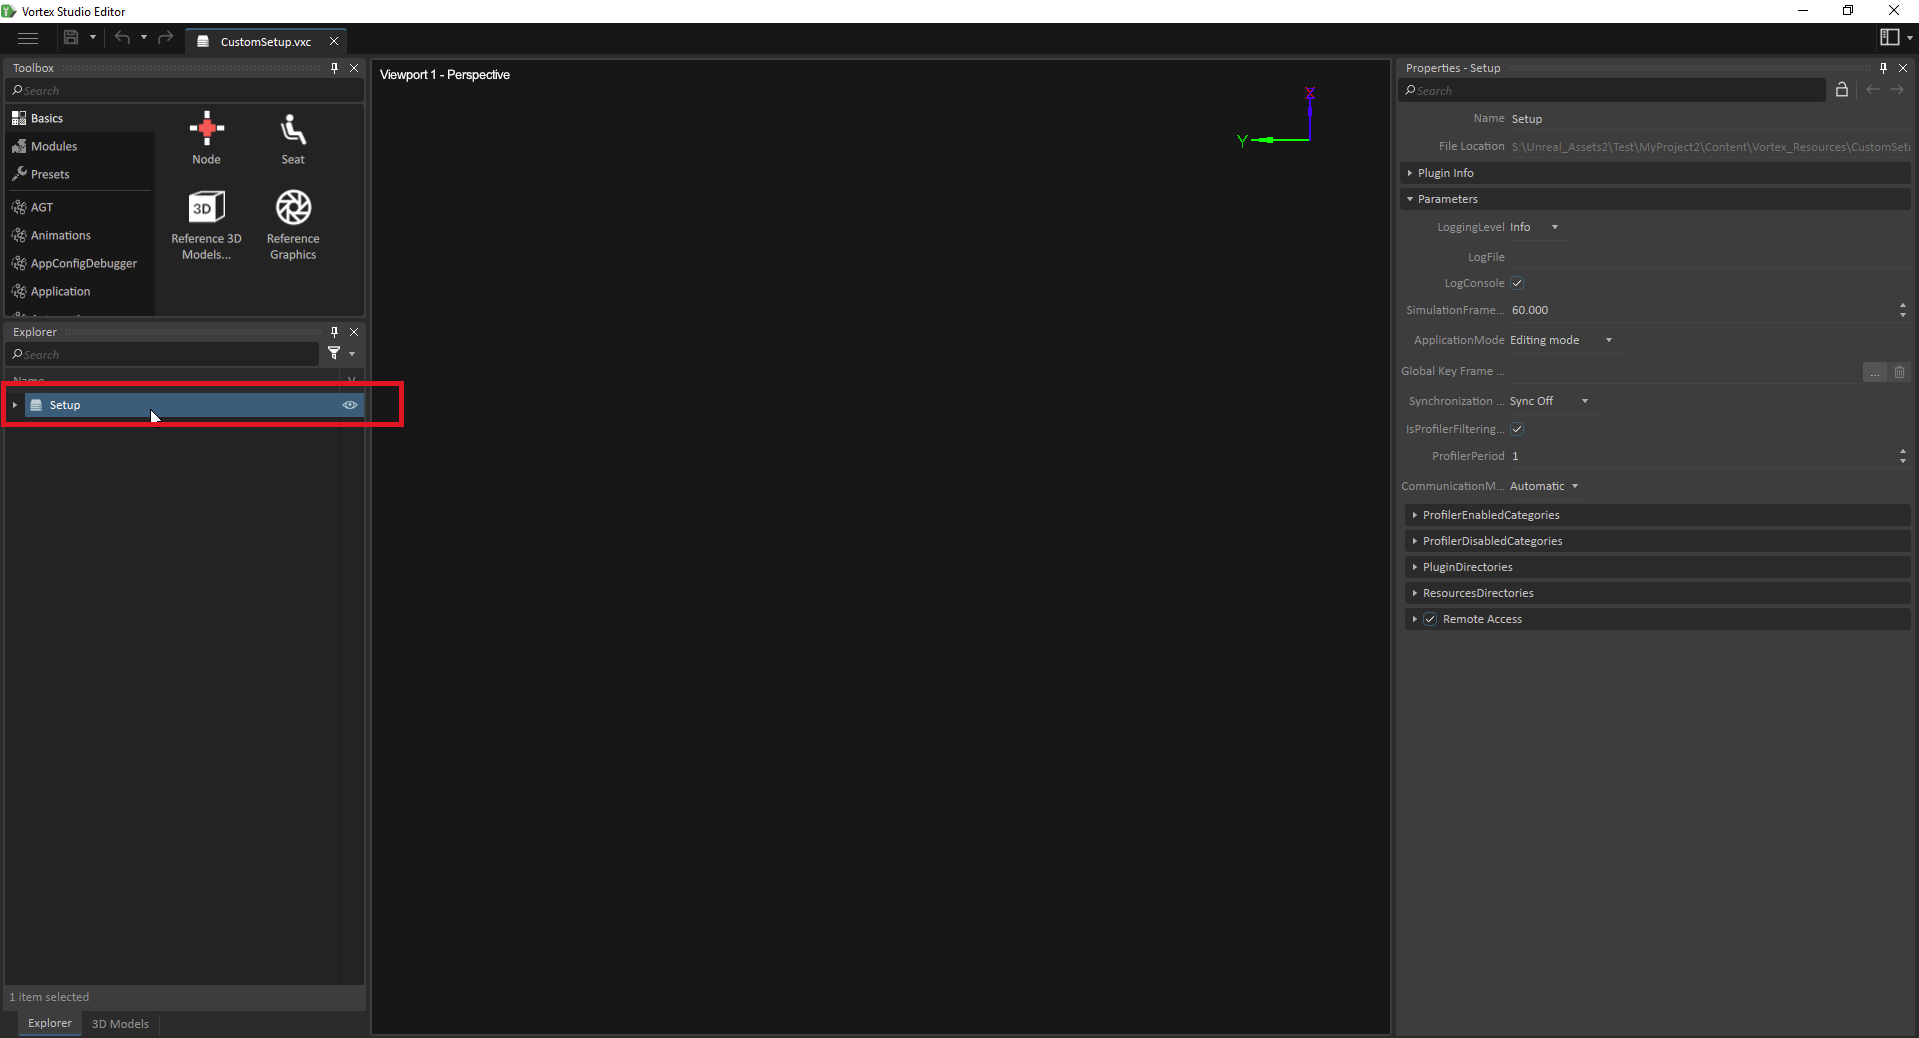
- On the right of screen, in the Properties panel, set the Simulation Frame Rate value to 90.00.
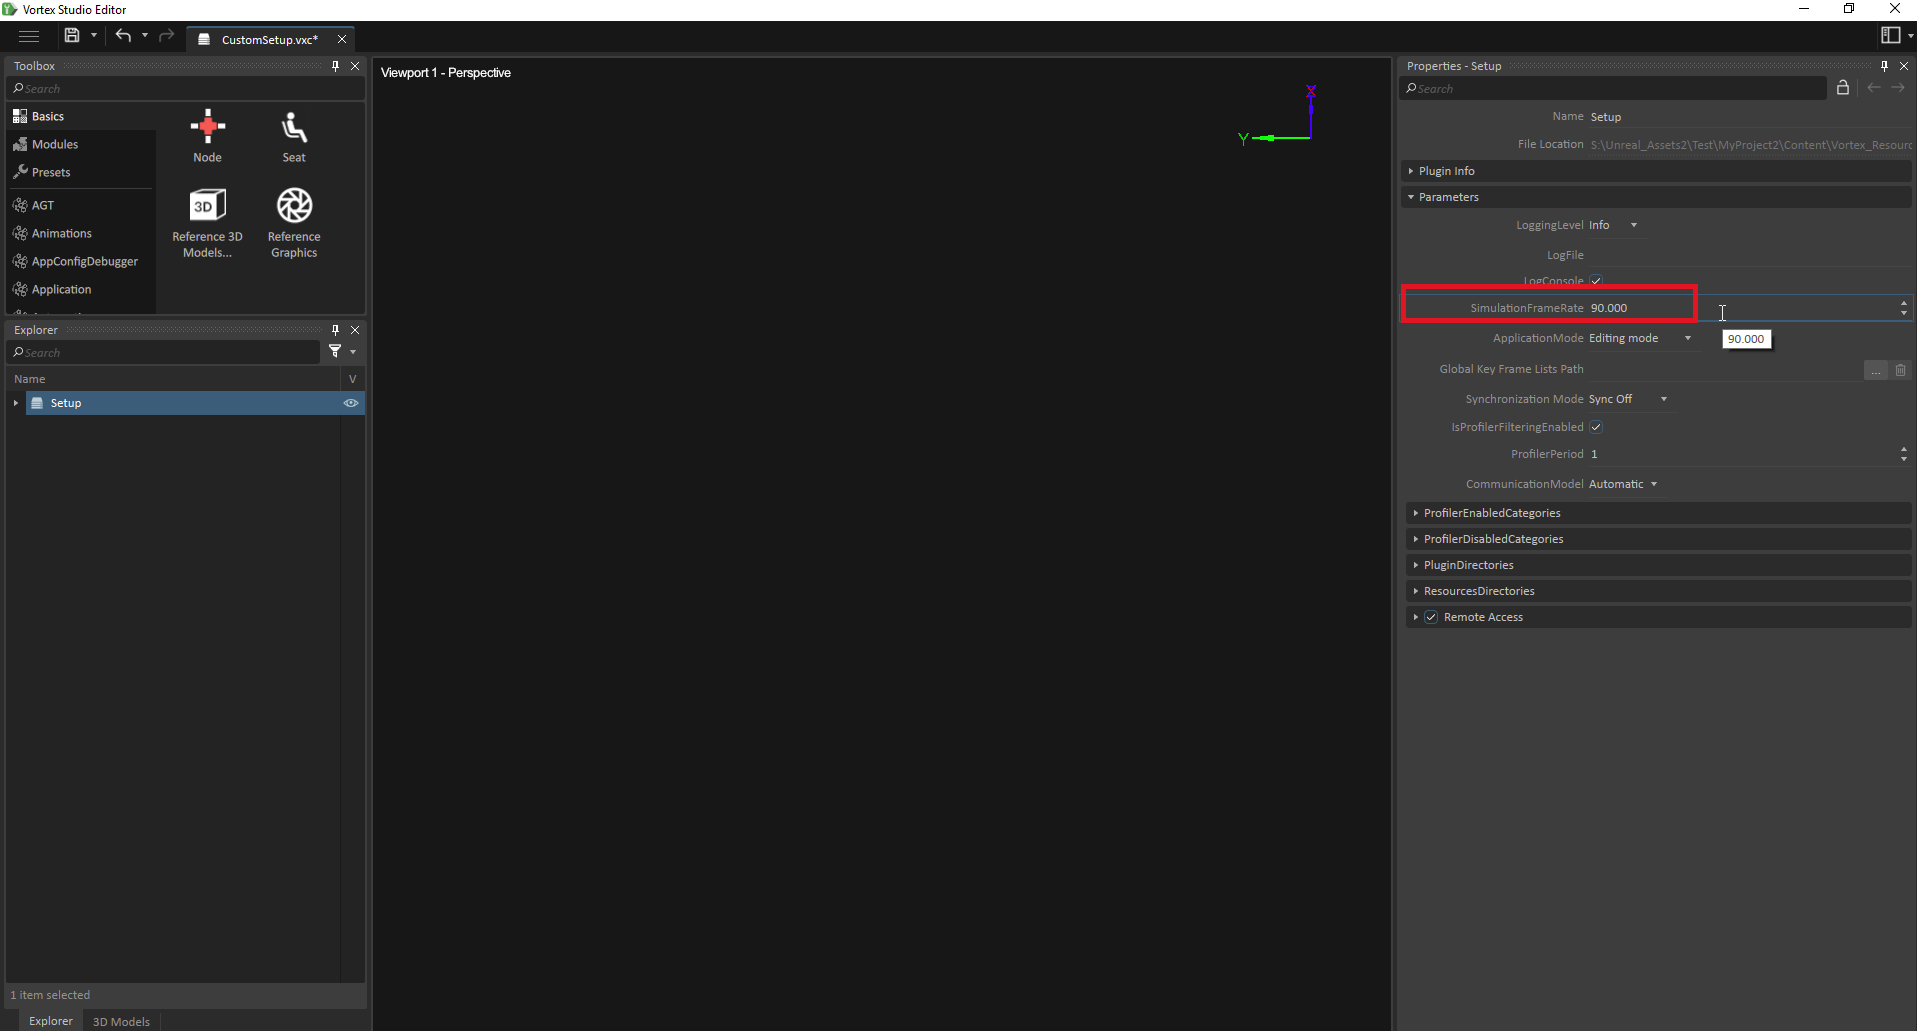
- To save your changes, click the Save button.

- When you restart the Unreal Editor, validate that the settings have been correctly configured.
Importing Mechanisms into Unreal
When you import a mechanism from Vortex Studio to the Unreal editor, the application identifies all Graphics Galleries (.vxgraphicgallery) in the mechanism file (.vxmechanism). The application imports all textures, materials, and meshes from the galleries as standard Unreal assets in the directory you specify.
Unreal creates a new Actor blueprint subclass to represent the Vortex Studio mechanism. You can use the new blueprint class to instantiate your Vortex Studio mechanism in an Unreal map. The class accomplishes the following things:
- It replicates the Vortex Studio graphics node hierarchy using the imported graphics galleries and uses it to create a hierarchy of corresponding Unreal Scene and Static Mesh components.
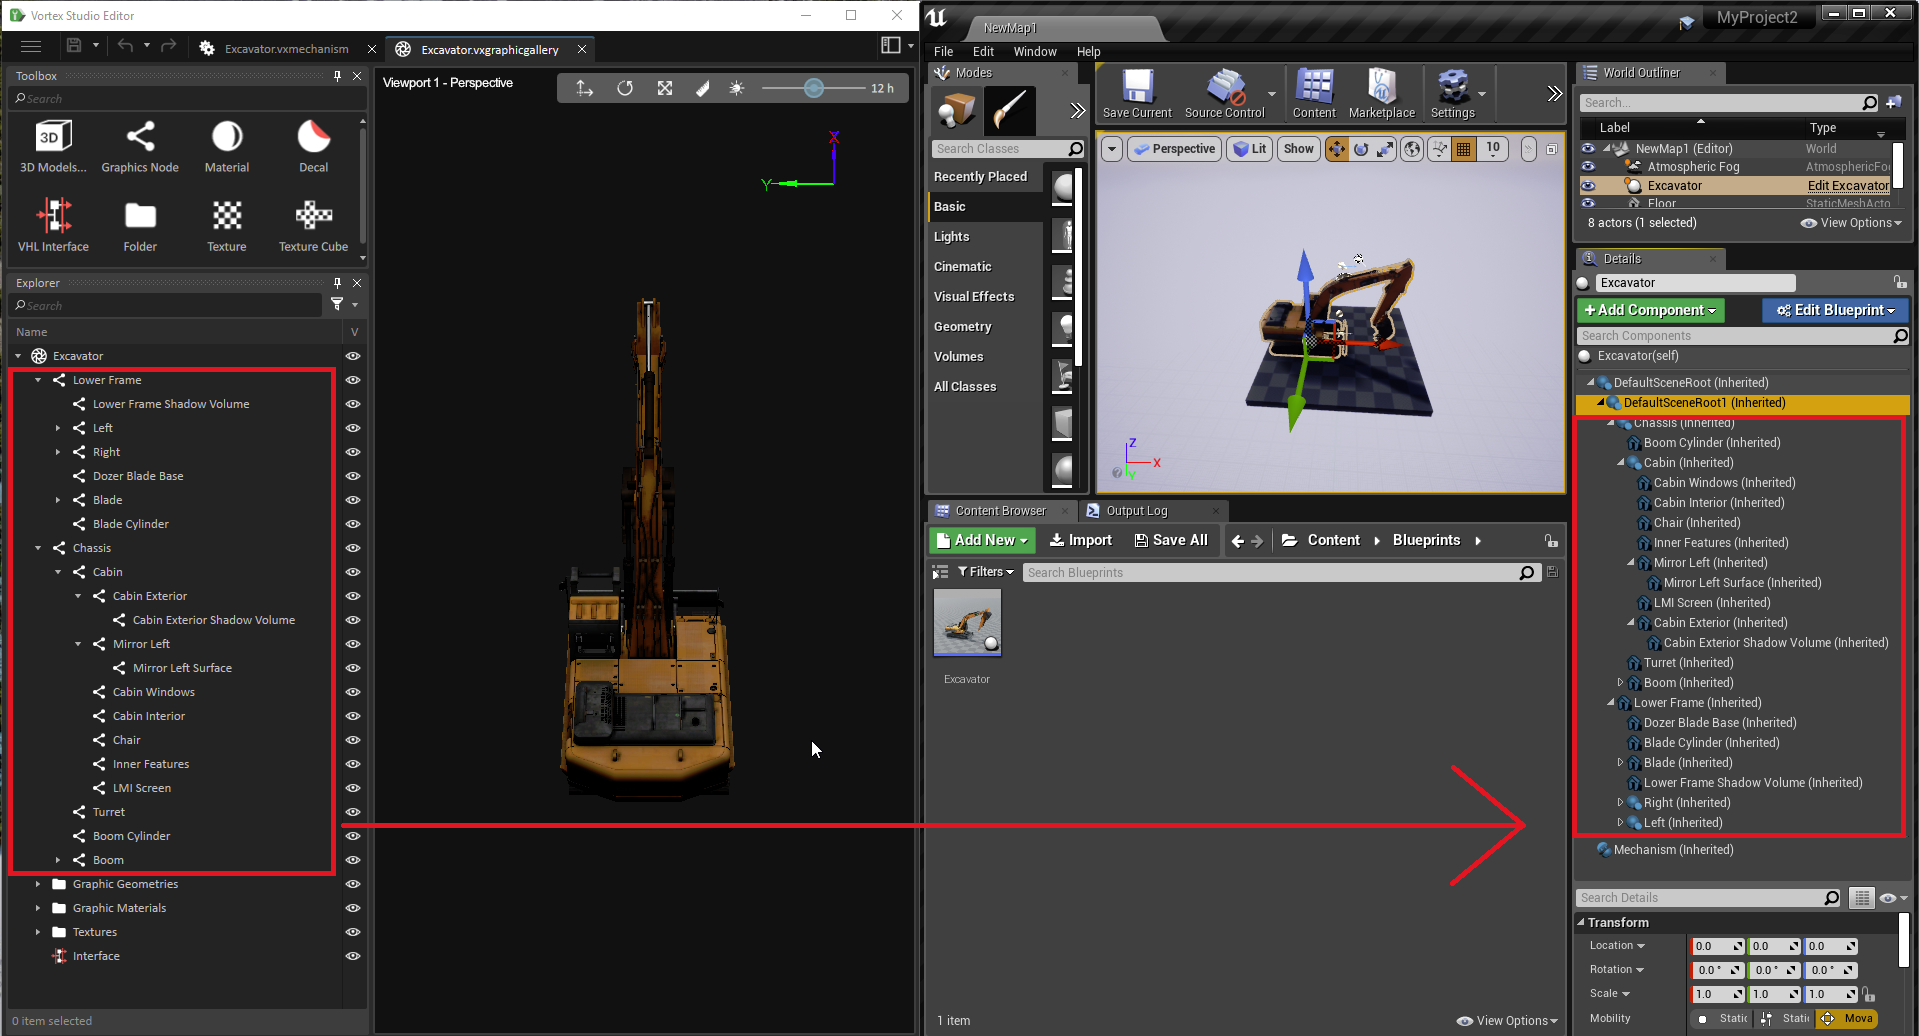
- It automatically updates the position and orientation of relevant Unreal Scene and Static Mesh components when Vortex Studio parts are moving.
When a Vortex Studio part moves, the blueprint analyzes connections between parts and graphics nodes in Vortex Studio (typically under the Skin connection container) to detect which components move.
The Unreal Editor does not expose the automatic mapping which occurs.The Skin connection container and all relevant graphic nodes in Vortex Studio are required for the integration and must not be deleted.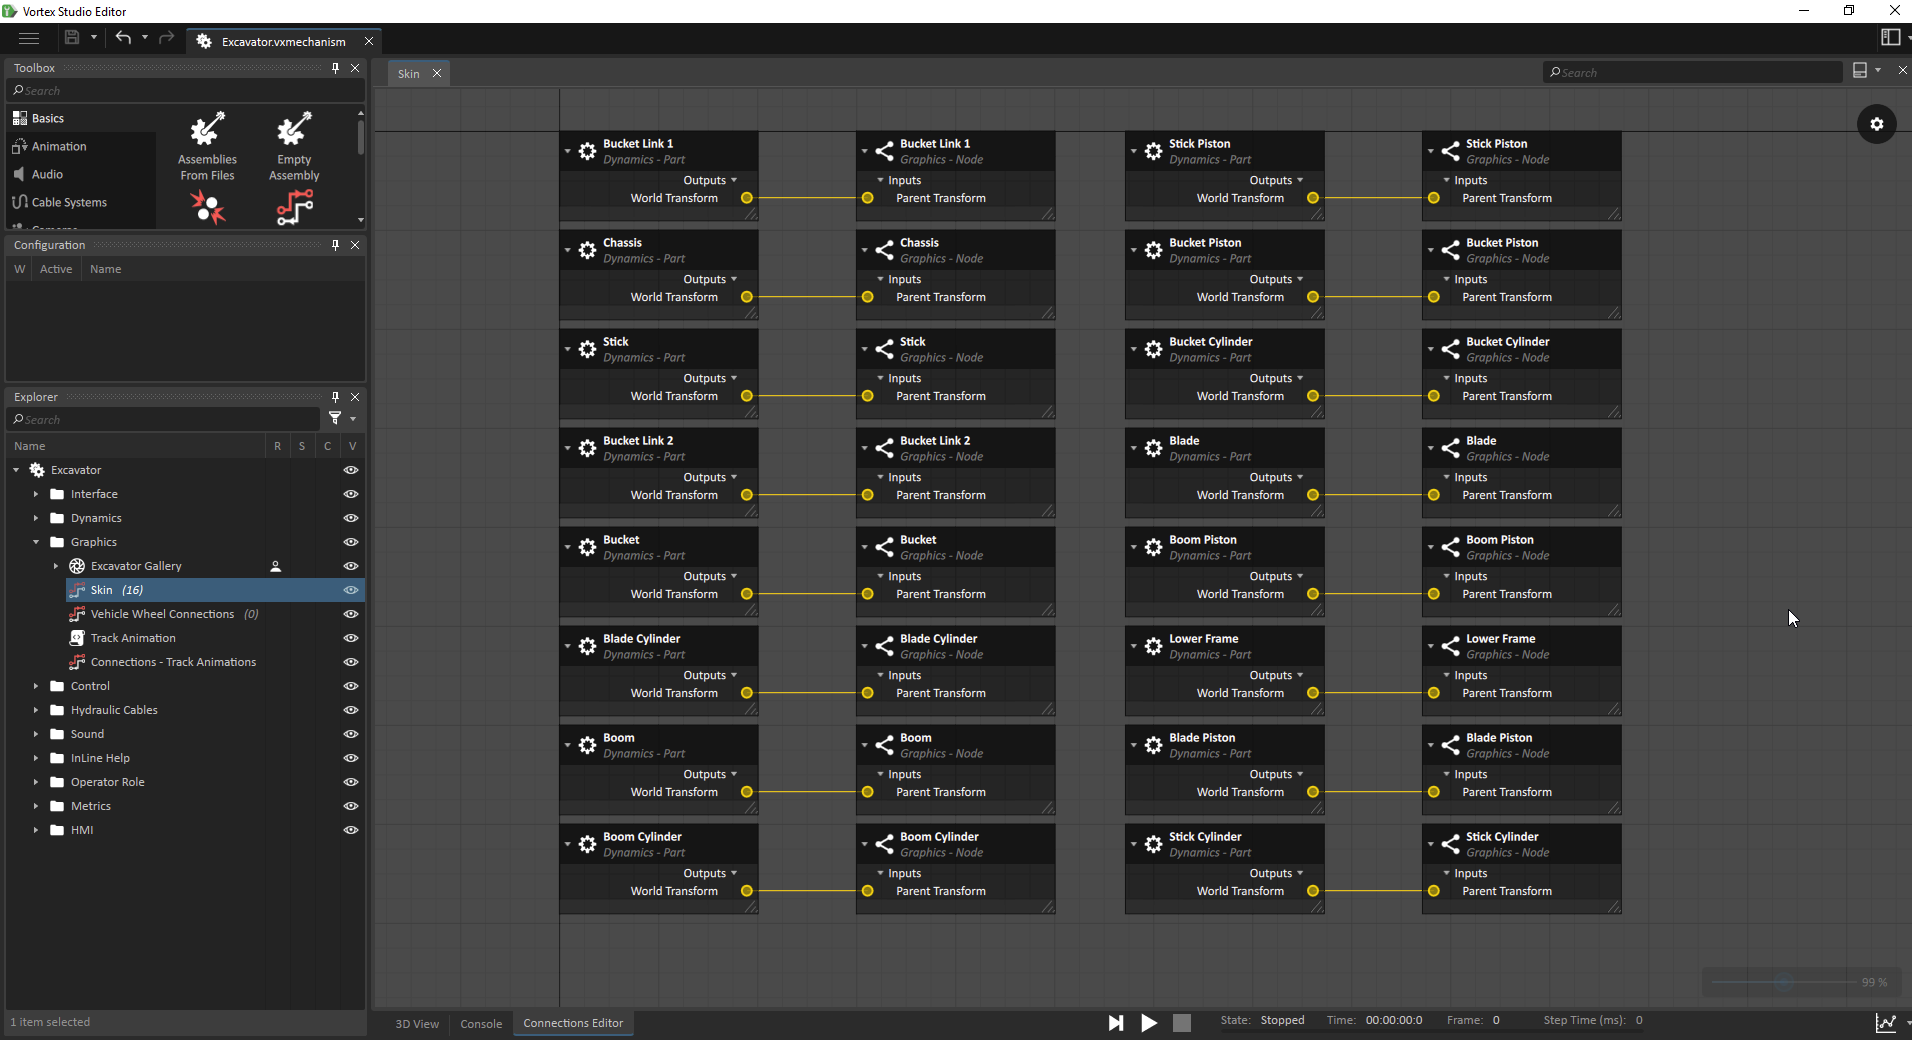
Importing a Vortex Studio mechanism into Unreal involves preparing your Vortex Studio project, specifying project settings in the Unreal Editor, and creating a new project blueprint.
Preparing your Vortex Studio Project for Import
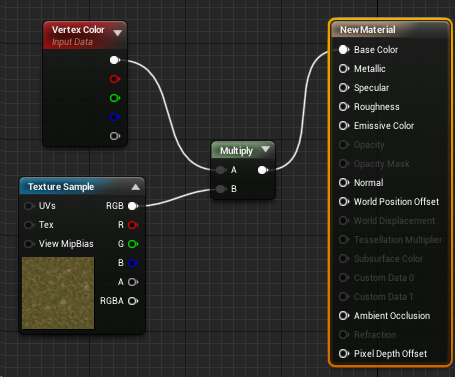
When you import a mechanism from Vortex Studio, Unreal creates a version of each material in the Graphics Gallery. Each material that Unreal creates becomes a material instance of "BaseGraphicsMaterial". This material uses a single texture, the first albedo texture defined in the original material, and configures it to use UV set 0. The material instance uses no other textures or material inputs (such as Emission, Occlusion, Specular, or Gloss). Unreal imports every texture currently in the Graphics Gallery.
After you import a mechanism for Vortex Studio to the Unreal Editor, you can modify the graphics gallery contents and the Unreal Editor will automatically update behavior in your project there. Renaming any meshes in Unreal Editor breaks the related Unreal mesh <=> graphics node mapping. If a name changes, you must rename the mesh in Unreal Editor to the name it had when you imported the project.
To Import a Mechanism from Vortex Studio to the Unreal Editor
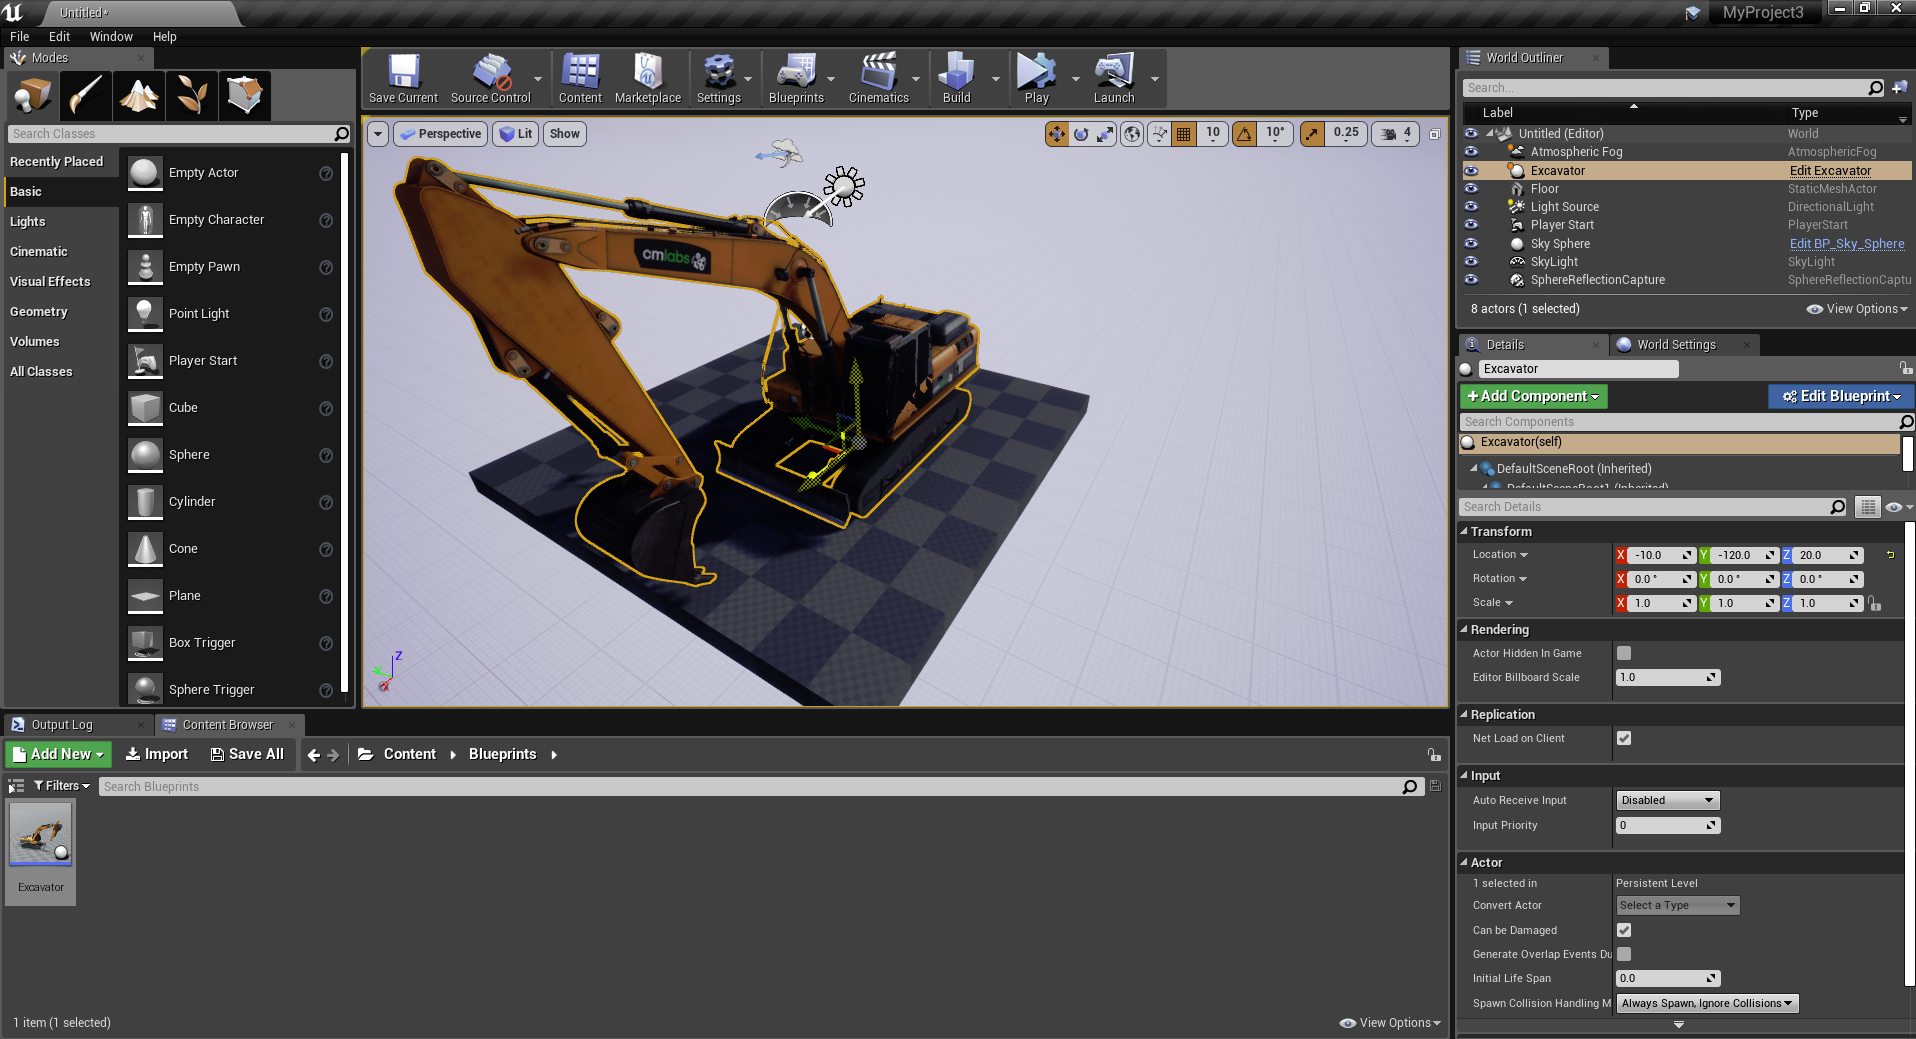
To add Vortex Studio mechanism to your Unreal project, do the following:
- Make sure your Vortex Studio assets are 3249752426 in the Content folder for your Unreal project.
- In the Unreal Editor, select the directory in the Content Browser where you will import your Vortex mechanism, including textures, material instances static meshes, and a VortexMechanism Unreal asset.
- Option 1:
- Drag and drop the .vxmechanism file you want to import from Windows Explorer into the Content Browser.
- A pop-up window for selecting a folder appears
- After selecting a folder to save the generated blueprint, the application imports the mechanism.
- Option 2
- Right-click on the directory in the Content Browser and then click Import to /Game/...
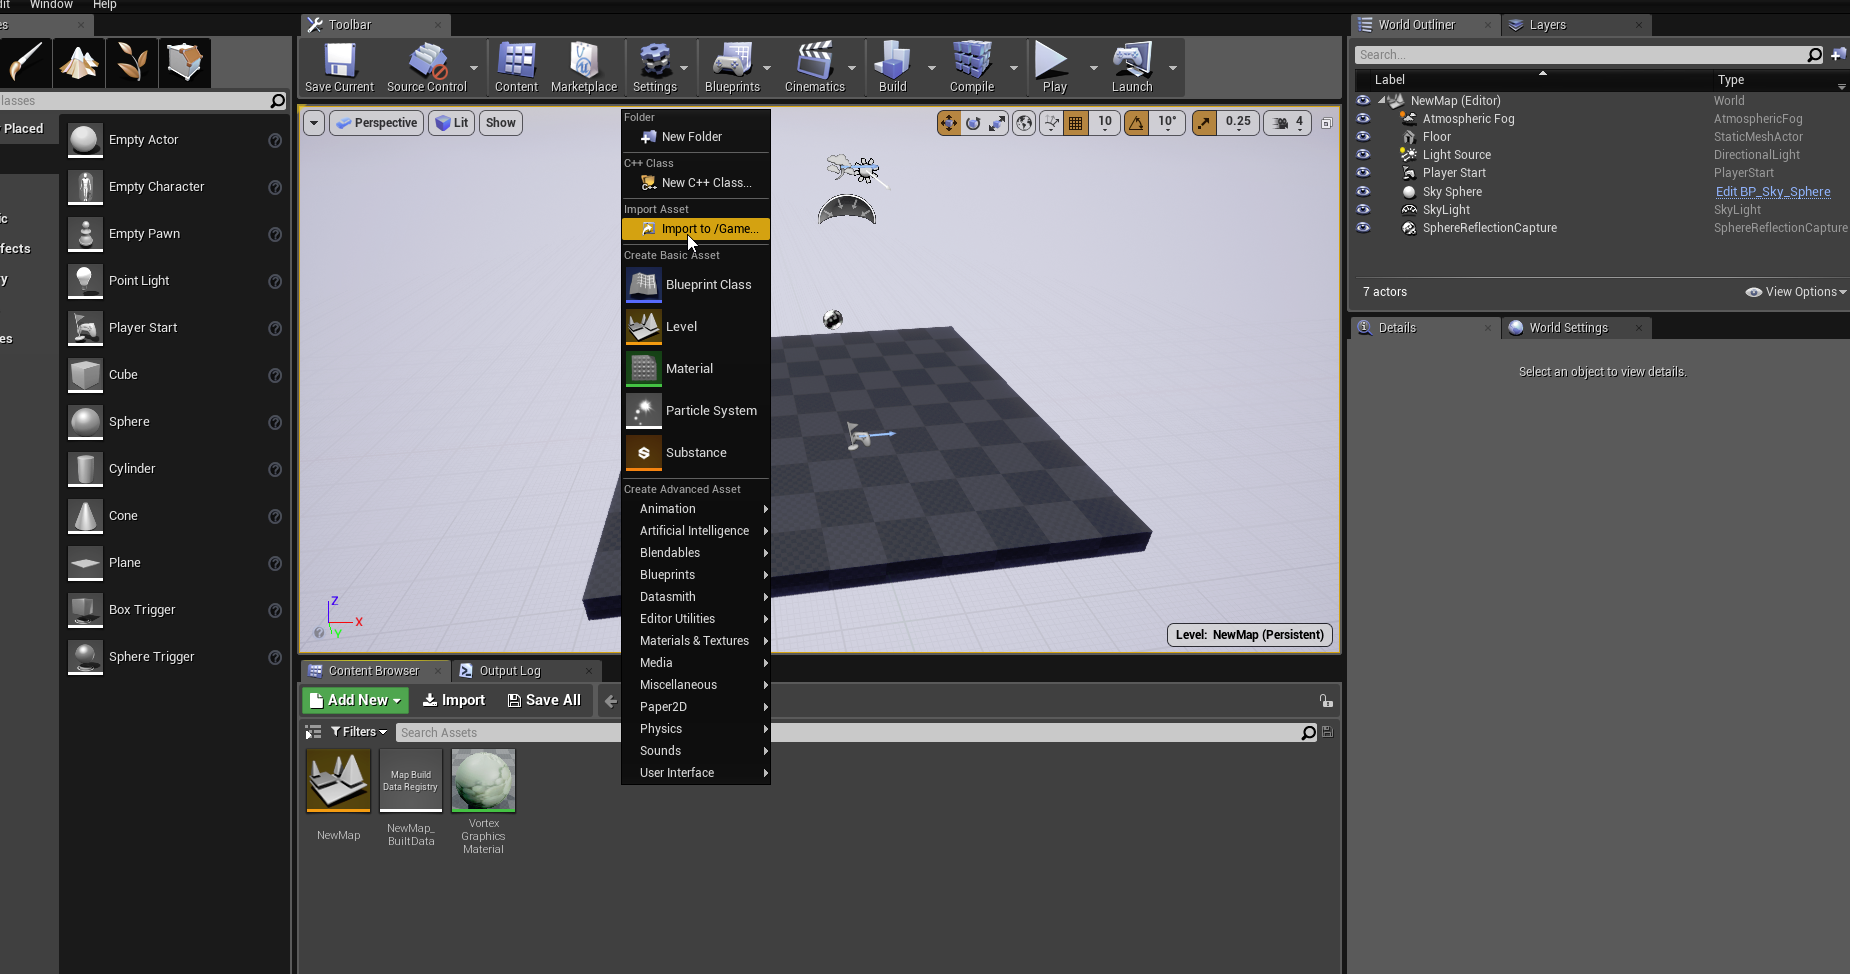
- A pop-up window for selecting a folder appears.
- Select the .vxmechanism file you want to import and click Open.
- The application imports the mechanism and generates a blueprint.
- Right-click on the directory in the Content Browser and then click Import to /Game/...
- Select a folder for the new blueprint class and then click OK.
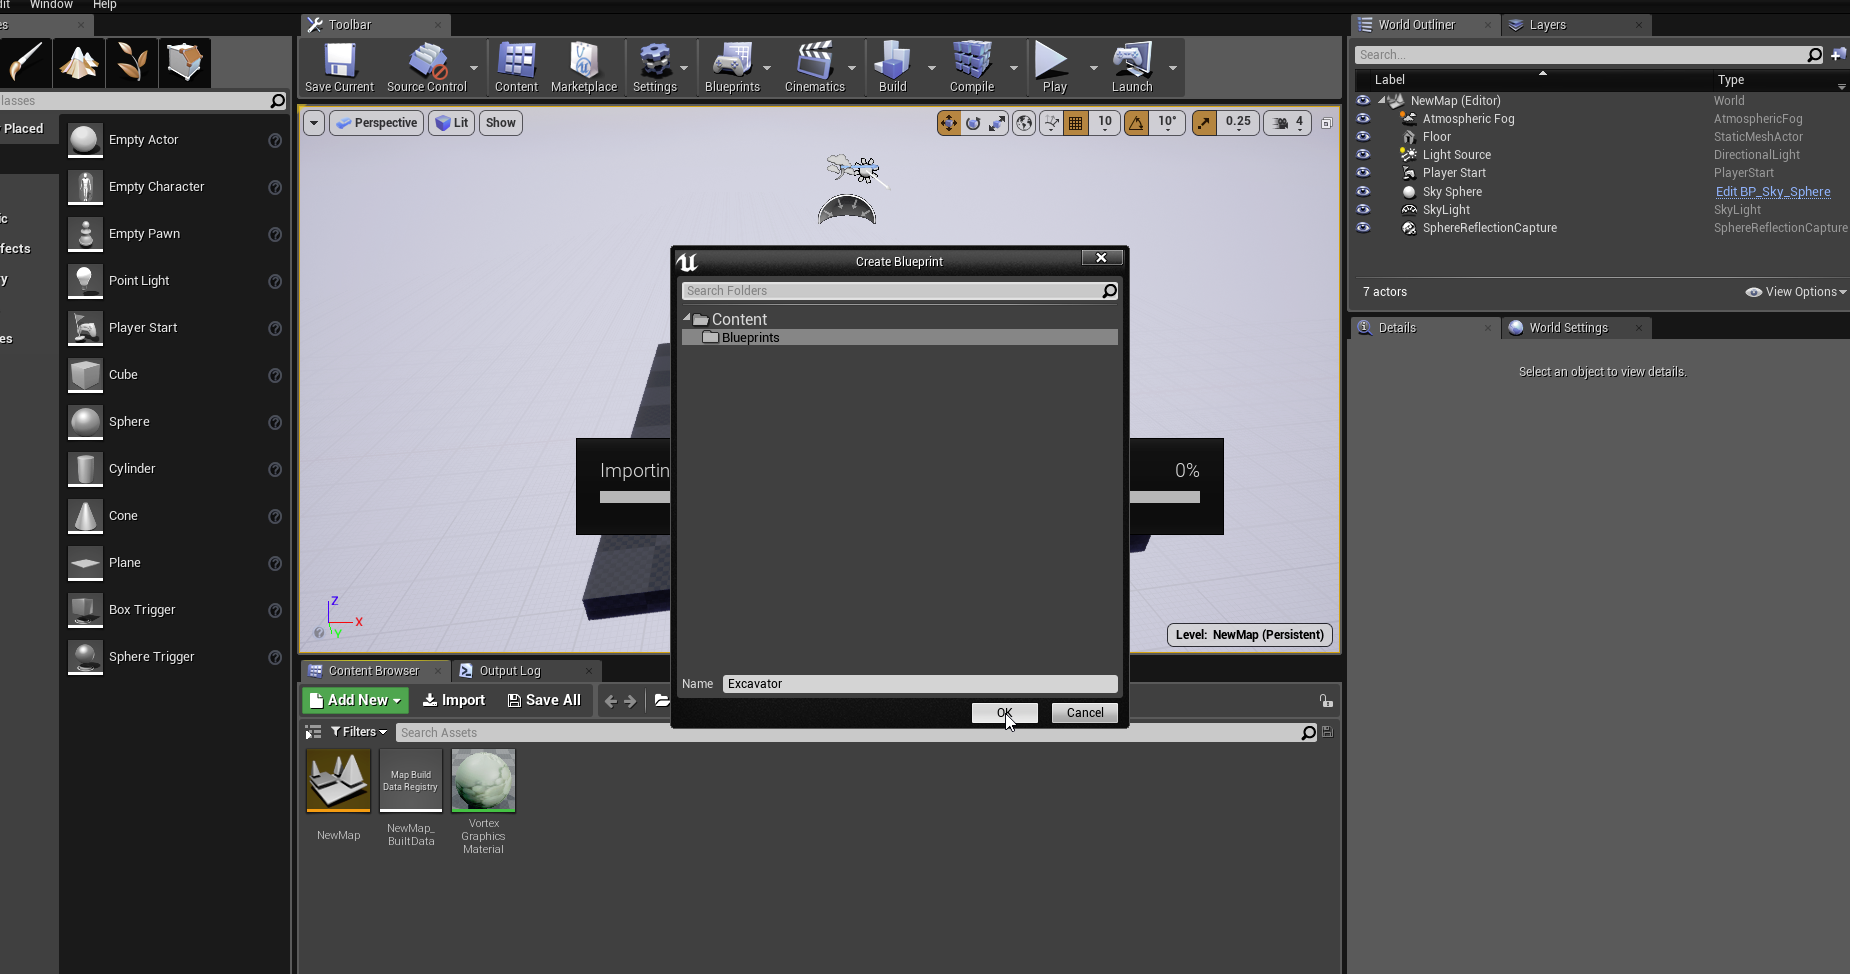
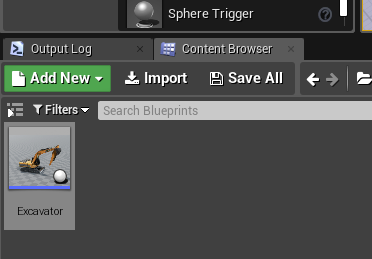
- Drag-and-drop the generated mechanism blueprint from the Content Browser into the viewport.

- You can open the blueprint to get or set additional values from Vortex Studio. The blueprint appears empty while the application maps the meshes and transforms from Vortex.
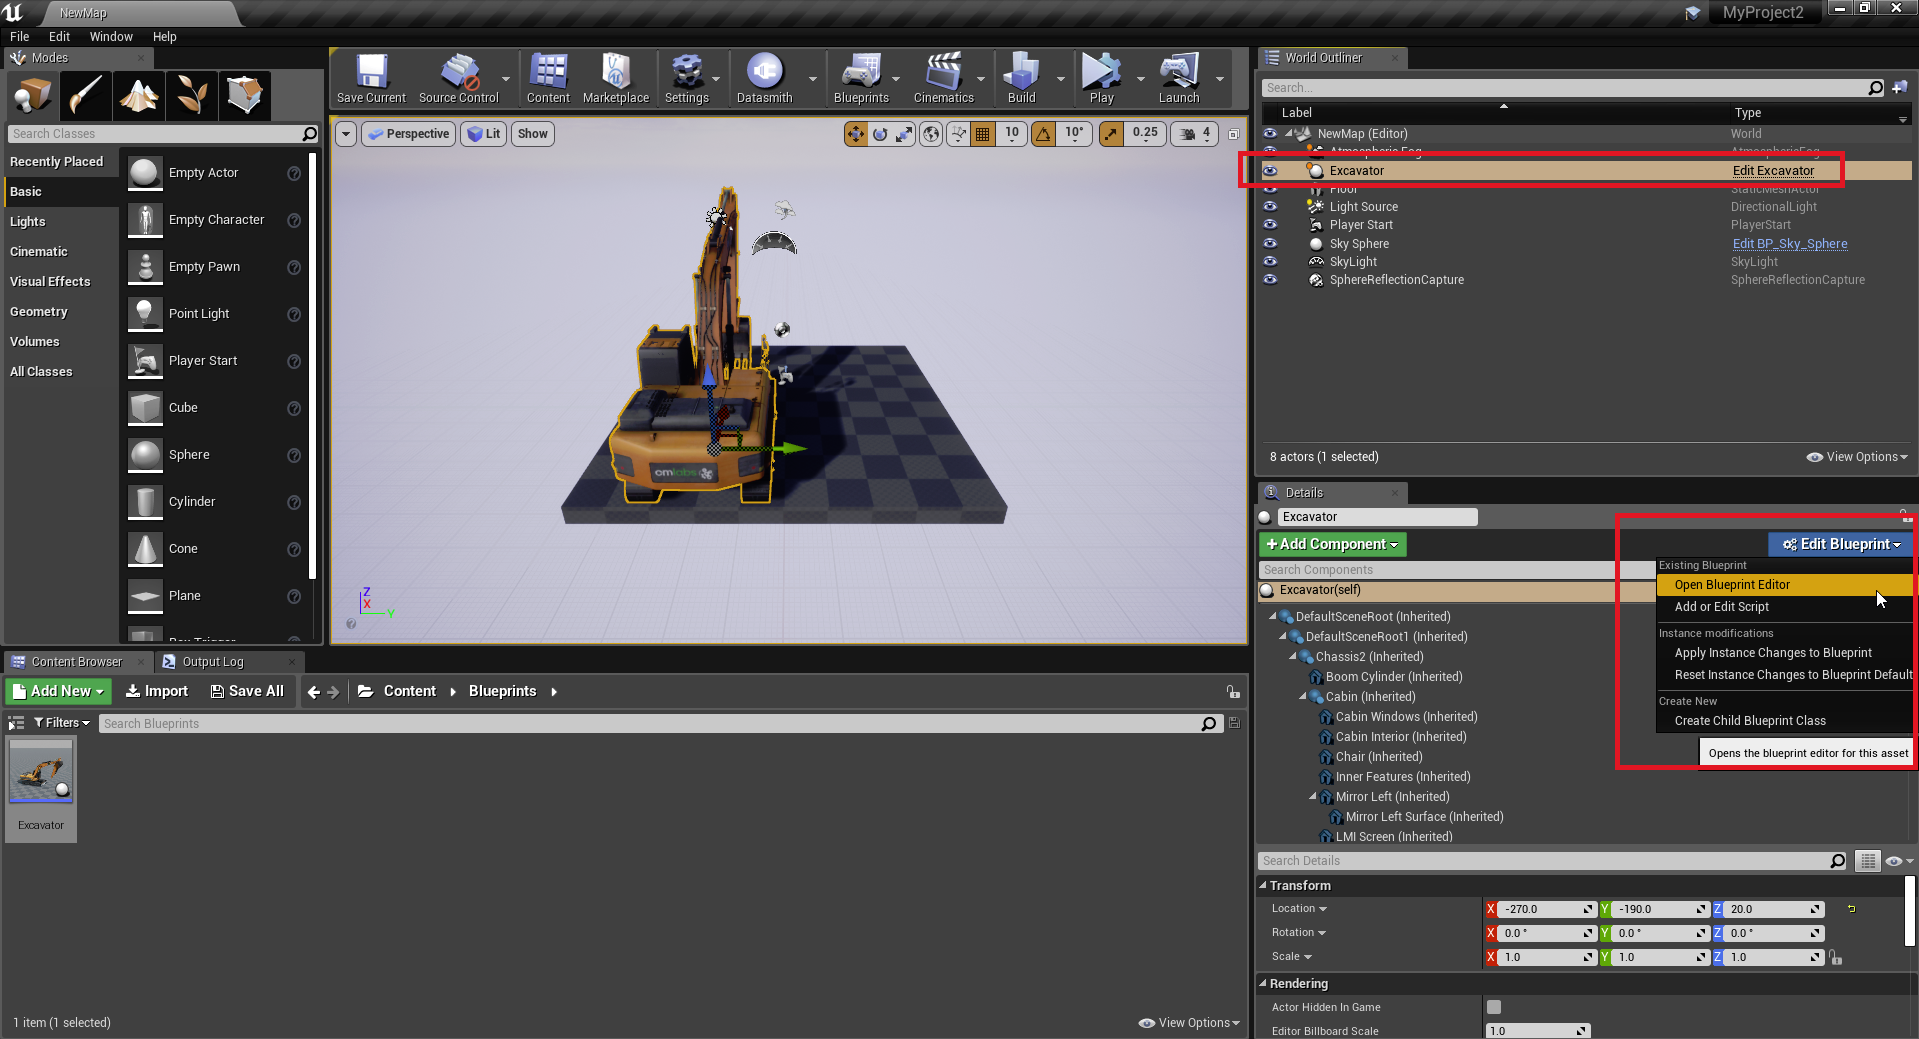

(Optional) To Take Control of the New Actor
To take control of the new Actor in Unreal, do the following:
- In the Blueprint Editor for your new Actor, on the toolbar click File and then click Reparent Blueprint.
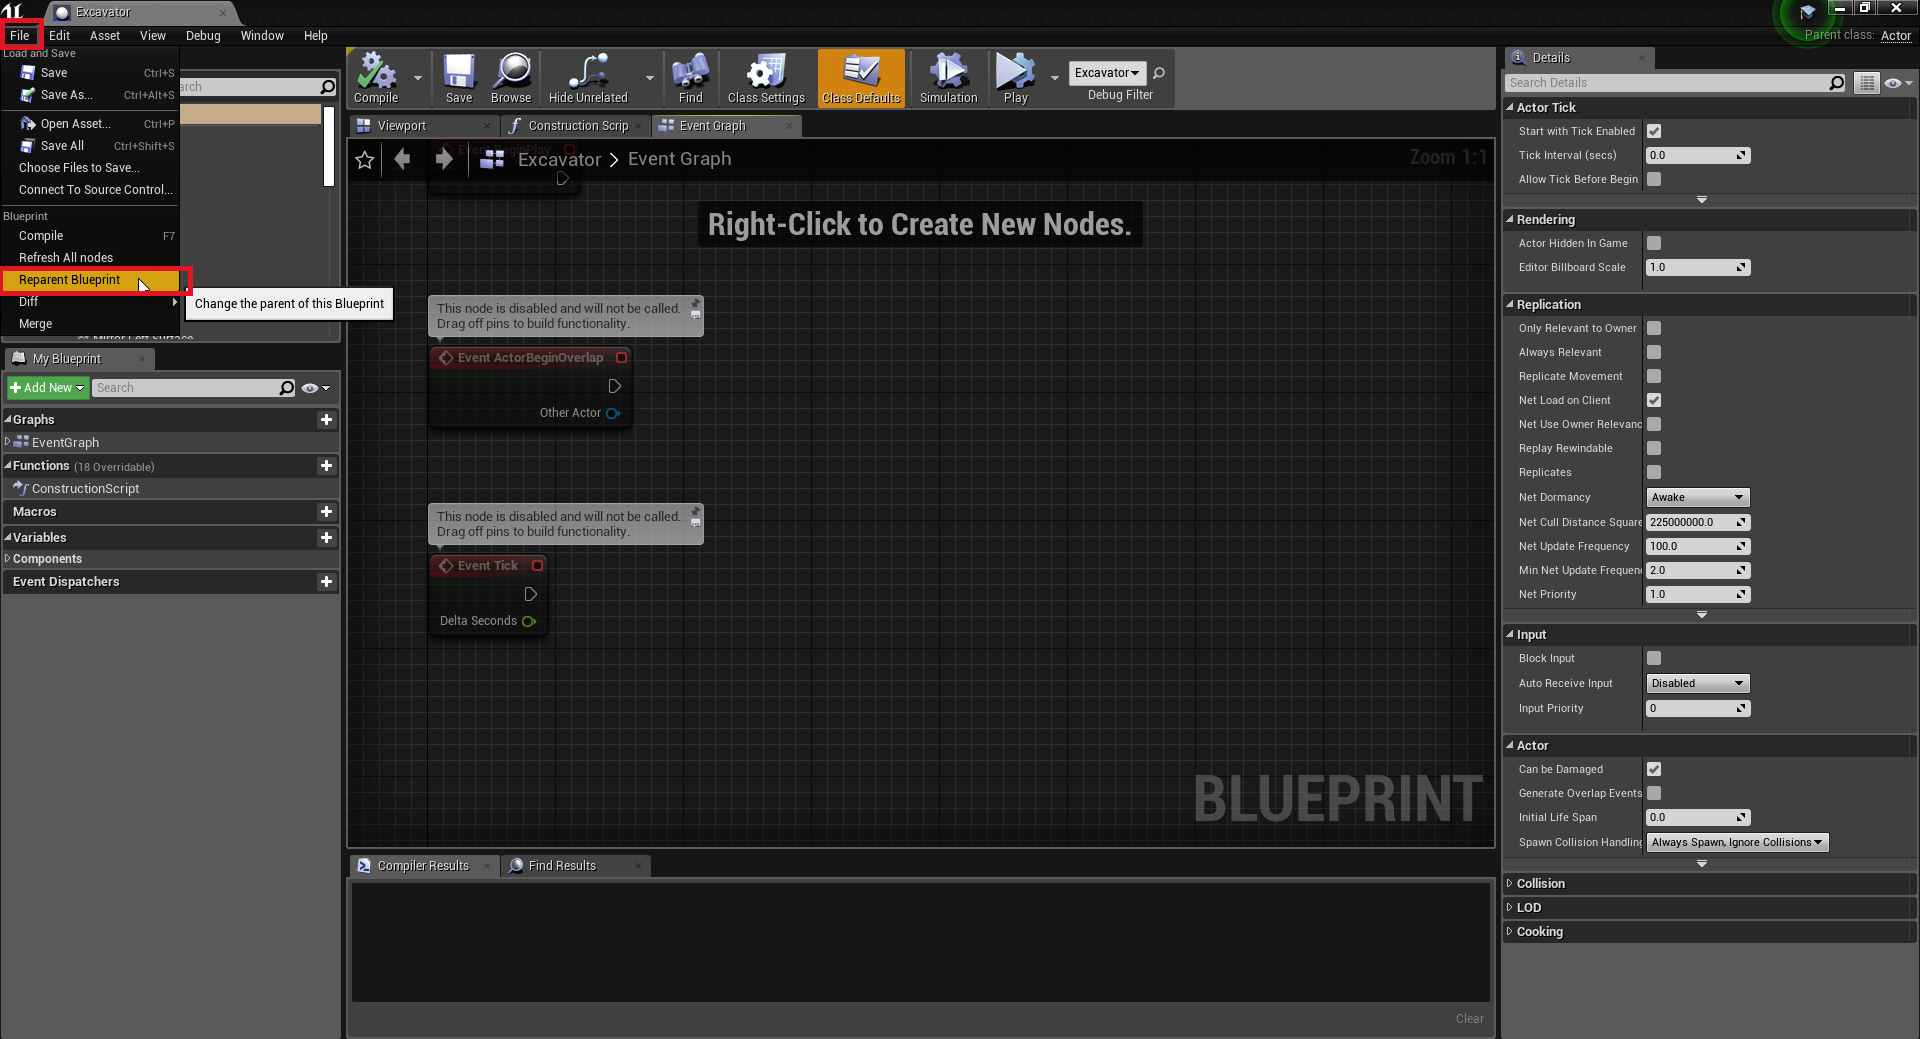
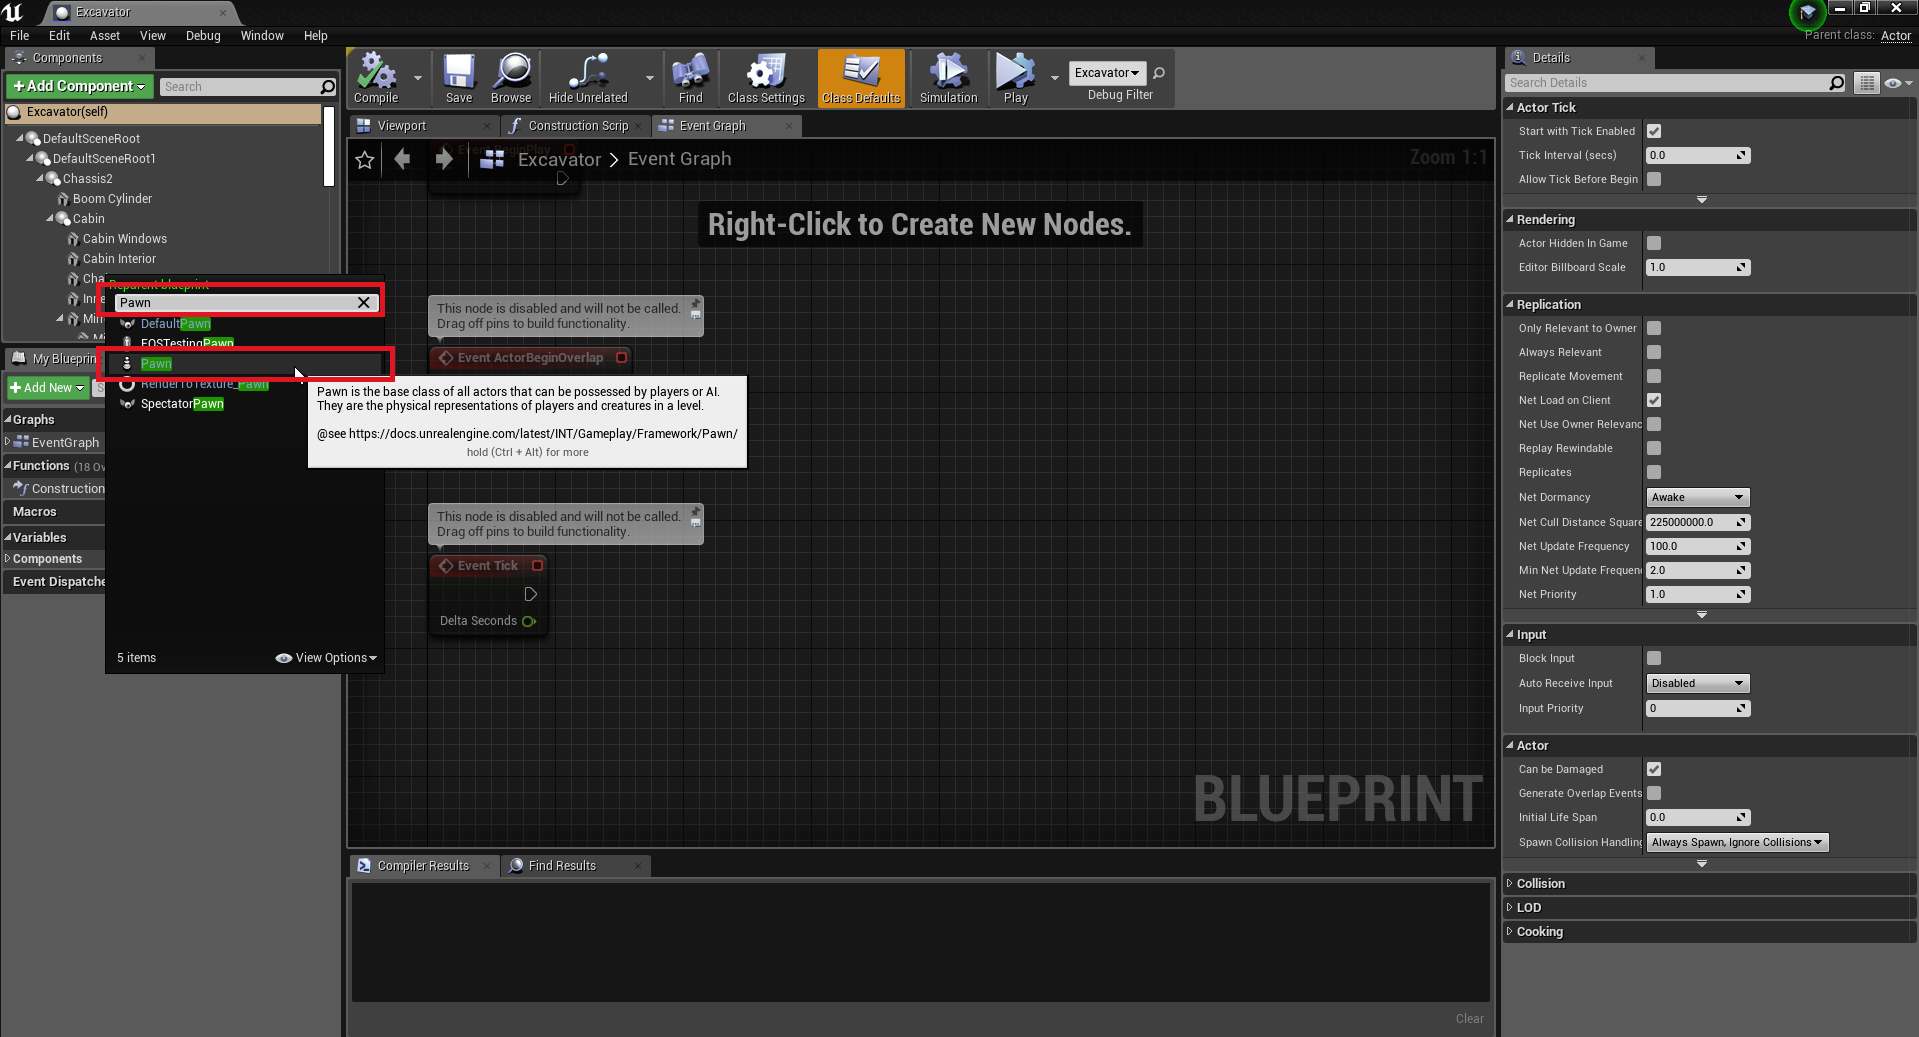
- In the Reparent Blueprint list, search for
Pawnand then click to select it.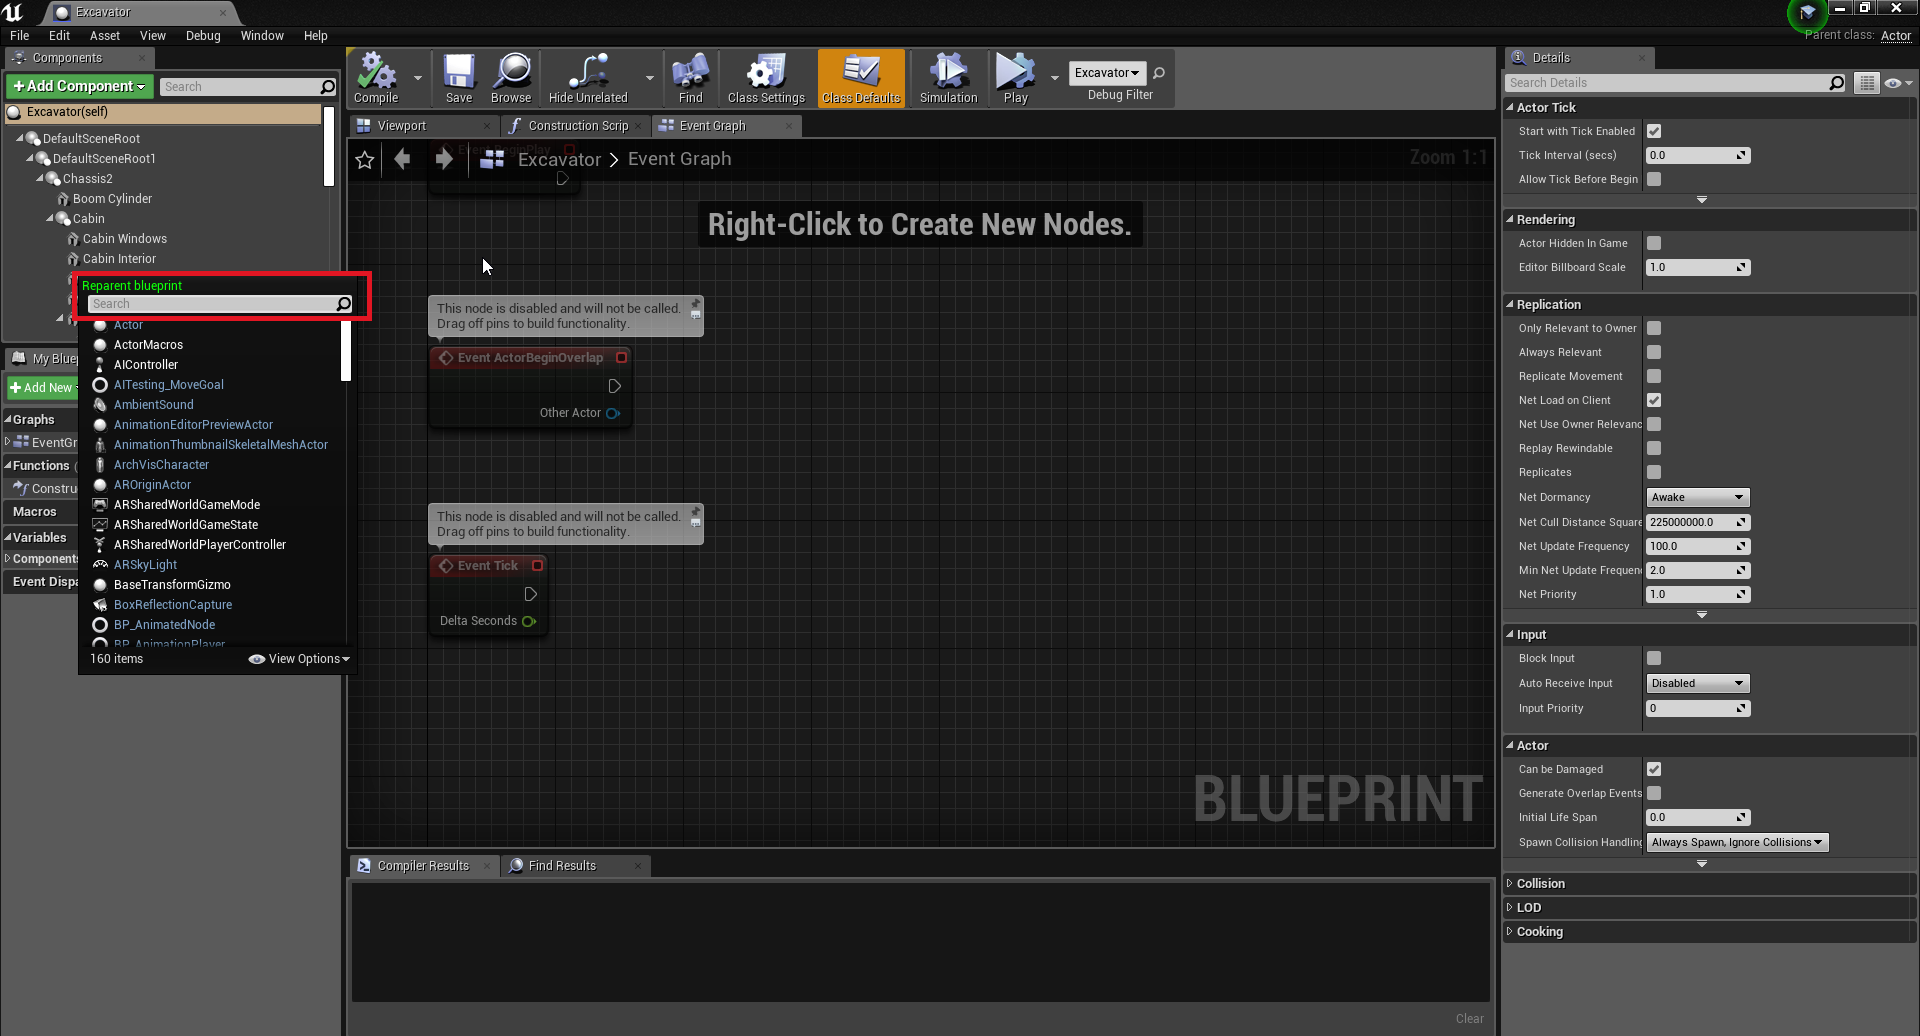
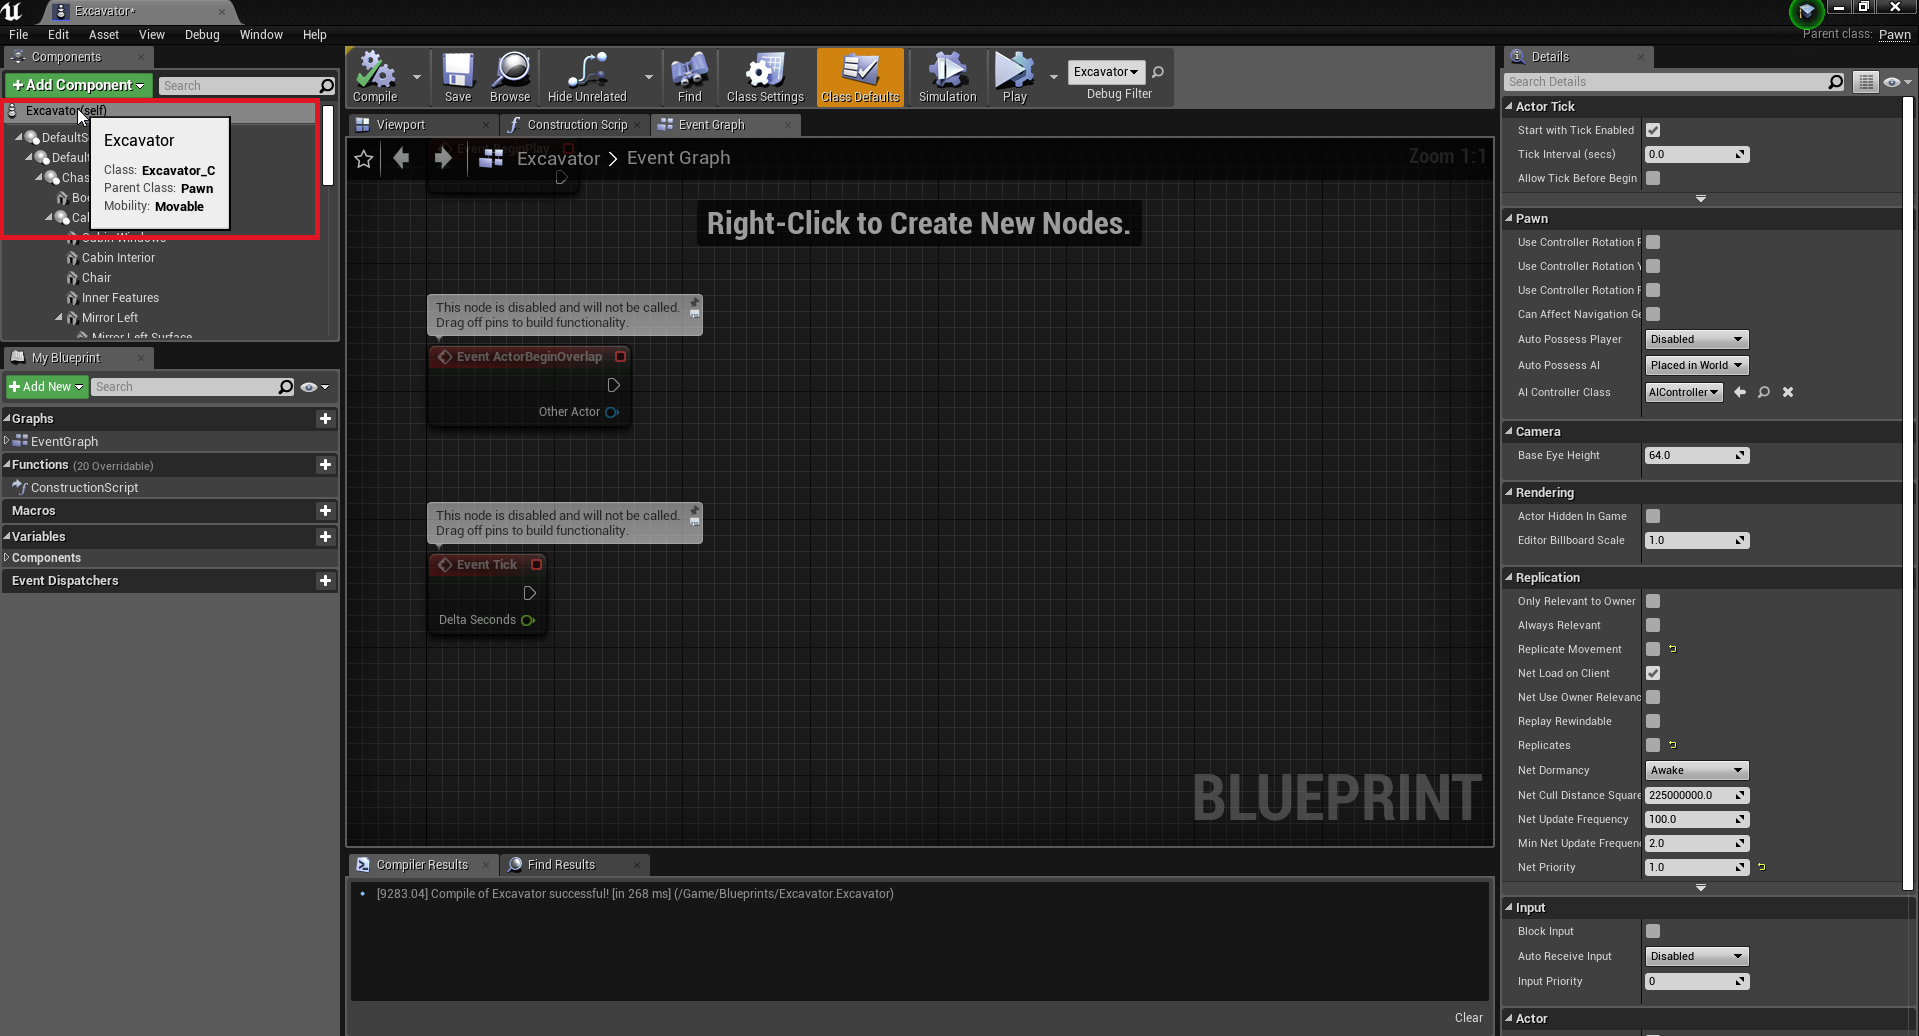
- To verify the new parent class for your blueprint, use the mouse to hover over the root element of the Components panel.
The parent class of the blueprint is now Pawn.
- To add a camera to the blueprint, click the +Add Component button and select the camera you want to add from the menu.
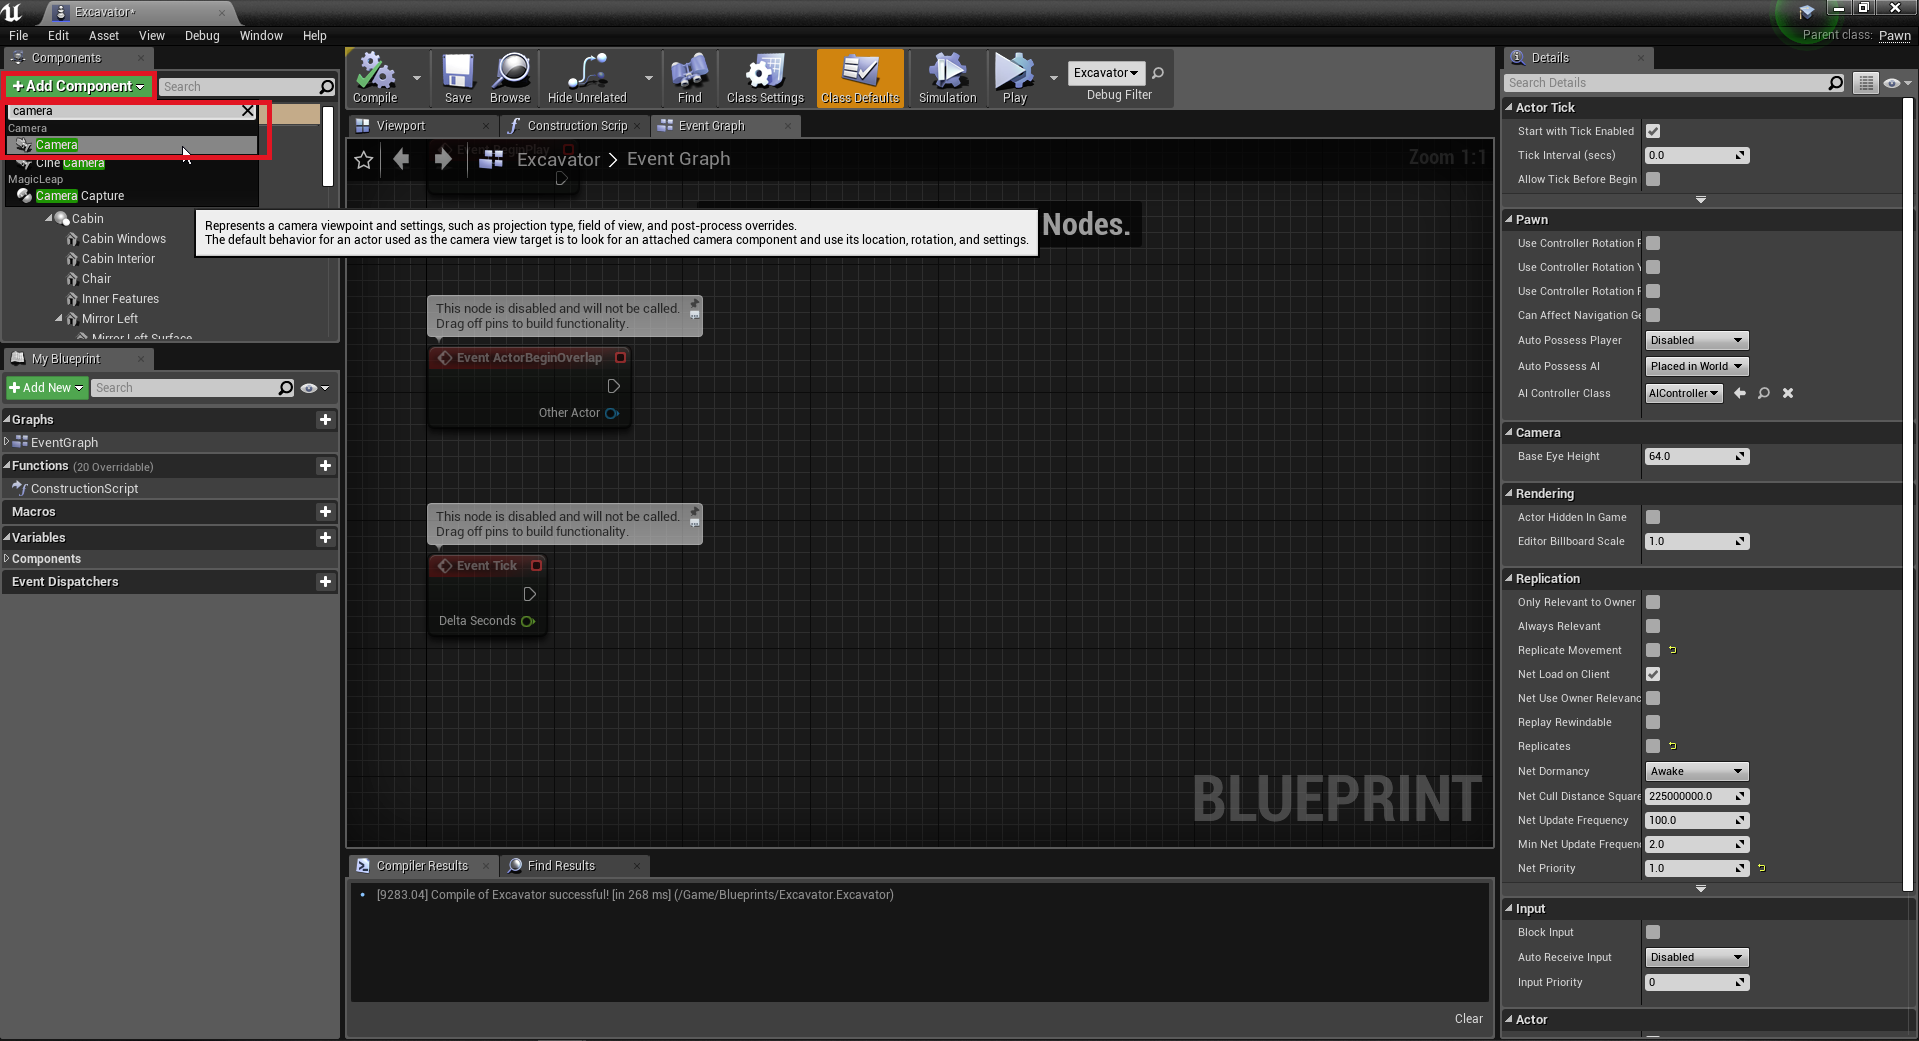
- Click Compile and then click Save.

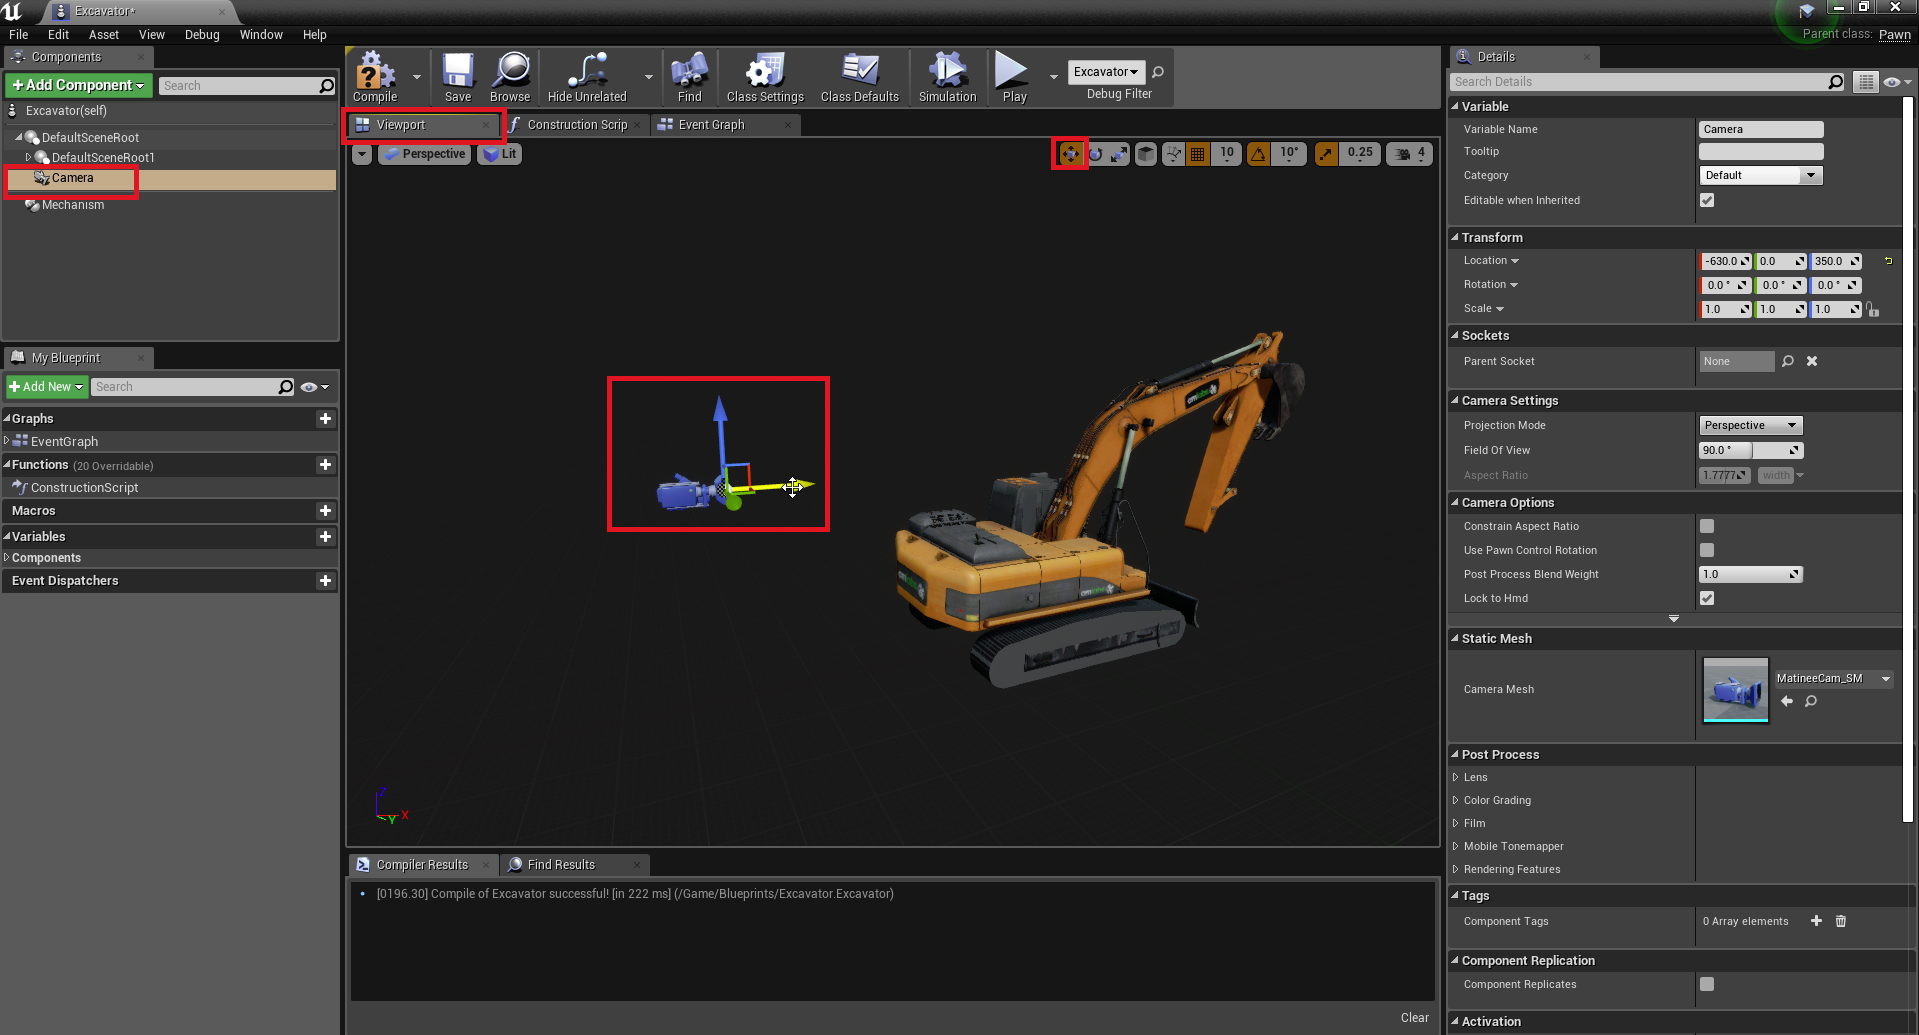
- In the Components panel, click to select the new camera. Then, switch the center view to Viewport and use manipulators to move your camera to the correct location.
- When the camera is added and in the correct position, in the Components panel, click select the root element (the self element).
- On the right of the screen, in the Details panel, scroll down to the Pawn category and assign Auto Possess Player to a valid player ID. For example,
Player 0.
- Compile and save the blueprint.
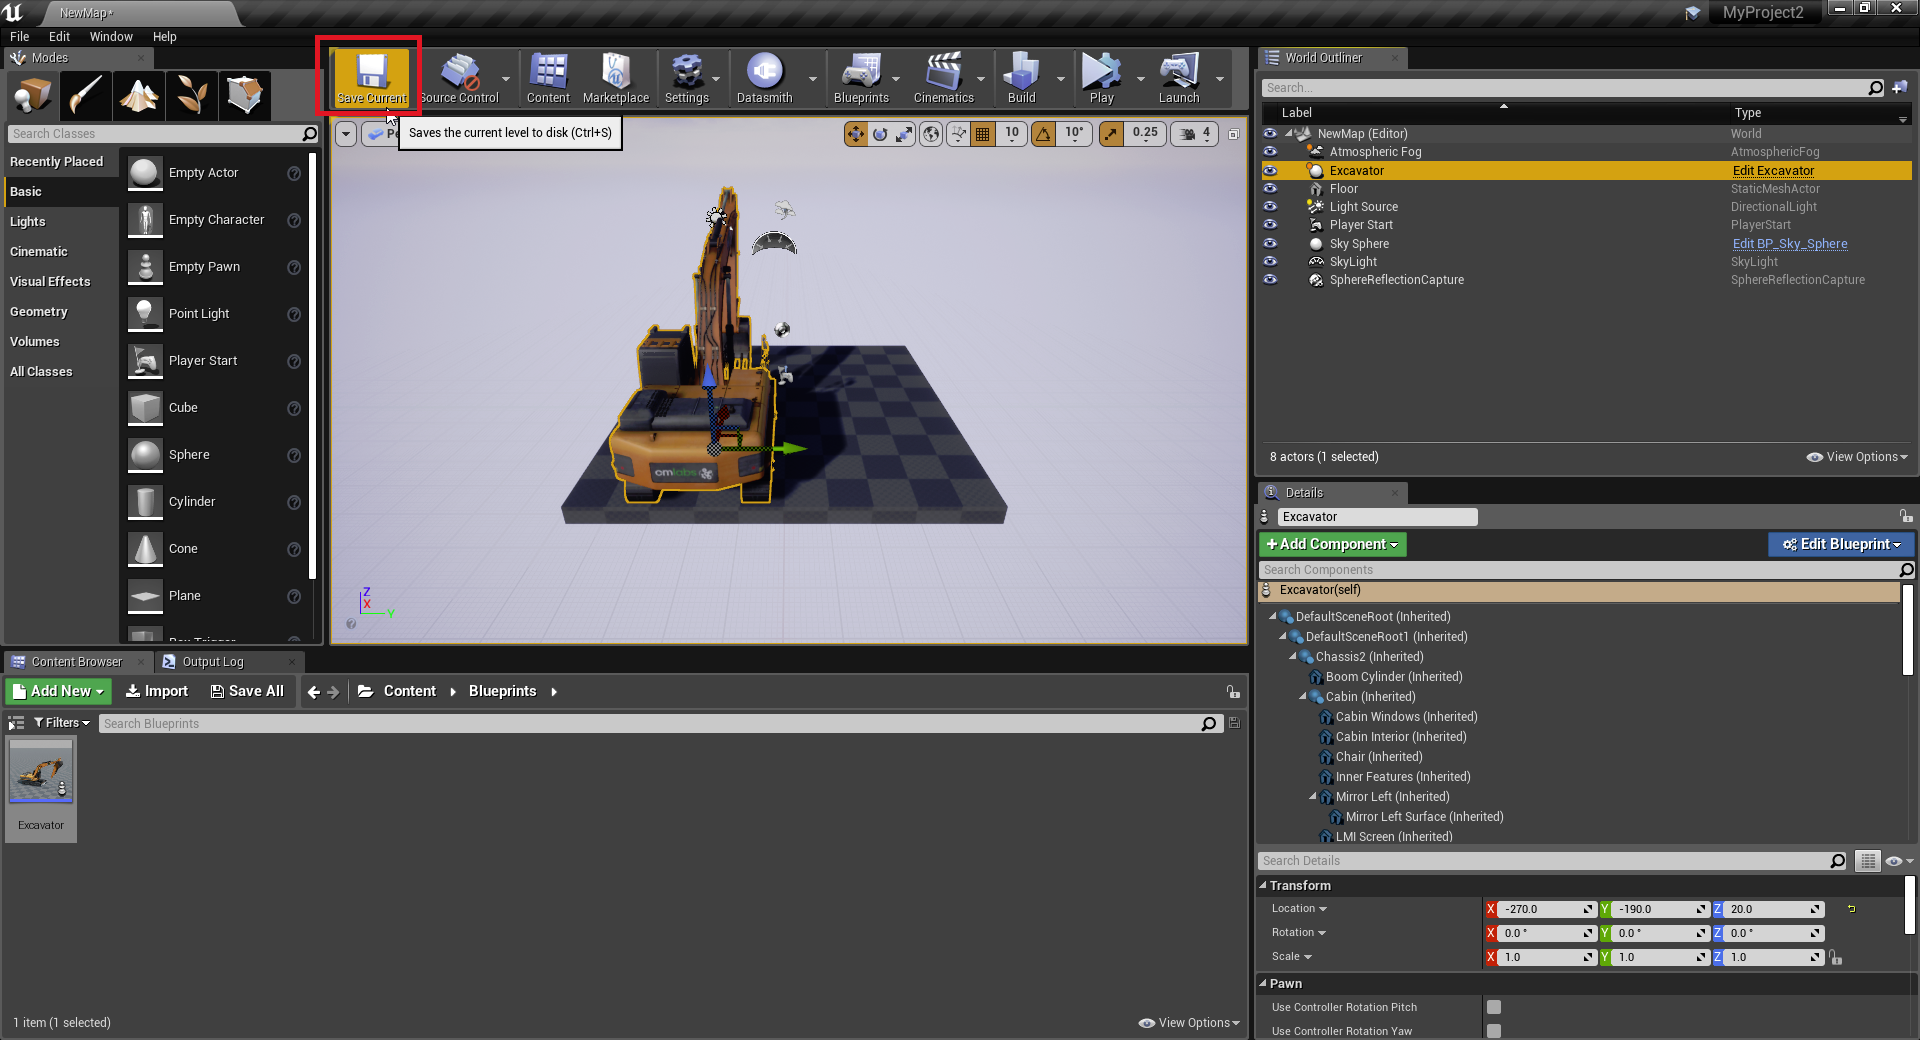
- In the main window of the project, click the Save Current button.
- Now, because the Pawn blueprint is automatically possessed when the simulation begins, the 3D view should automatically display what the Blueprint camera sees when you press the Play button.
Enabling Vortex Simulation
For simulation with Vortex content to function correctly, your Unreal Level Blueprint must include functions to start and stop Vortex simulation in the context of your Unreal gameplay.
To add these functions, do the following:
- Open your Level Blueprint:
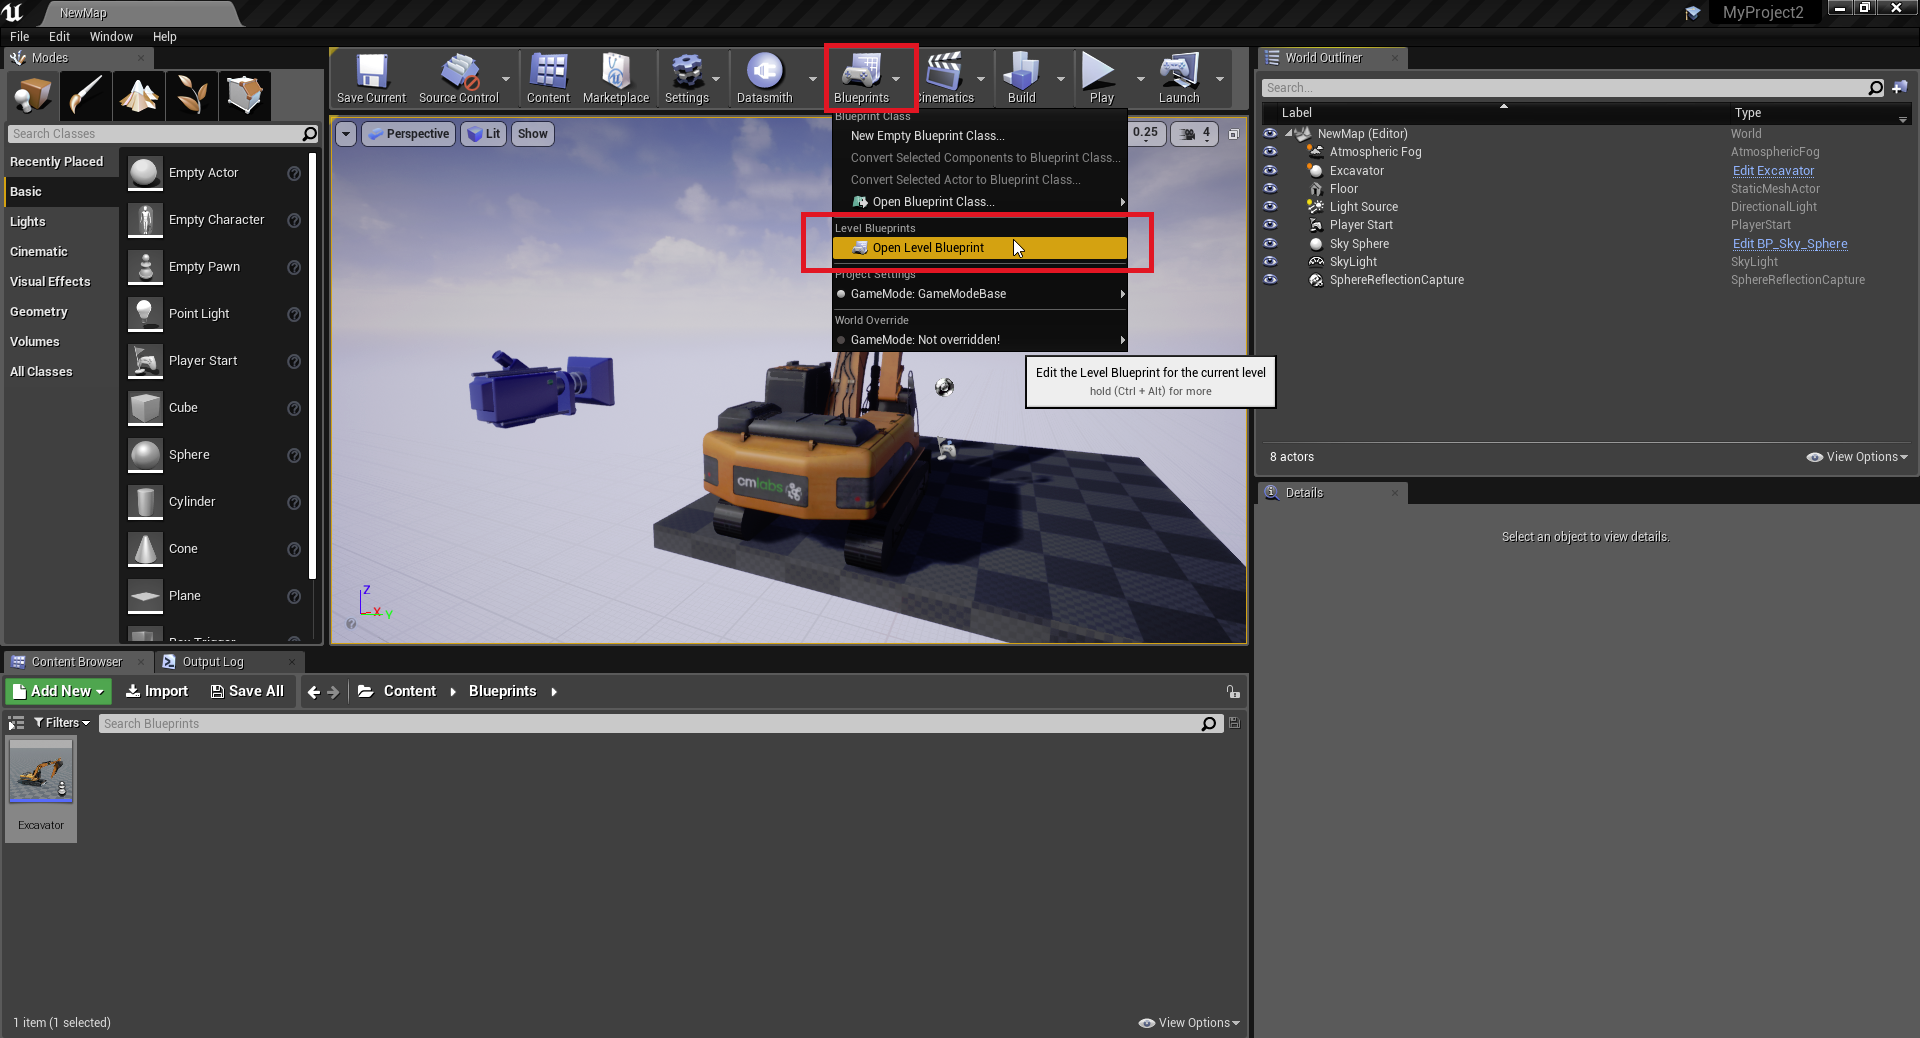
- In the Event Graph, find the EventBeginGameplay item.
- In the EventGameplay item, use the left mouse button to click the Exec icon and drag it to the right and then release the mouse button.
A pop-up window for adding a function appears
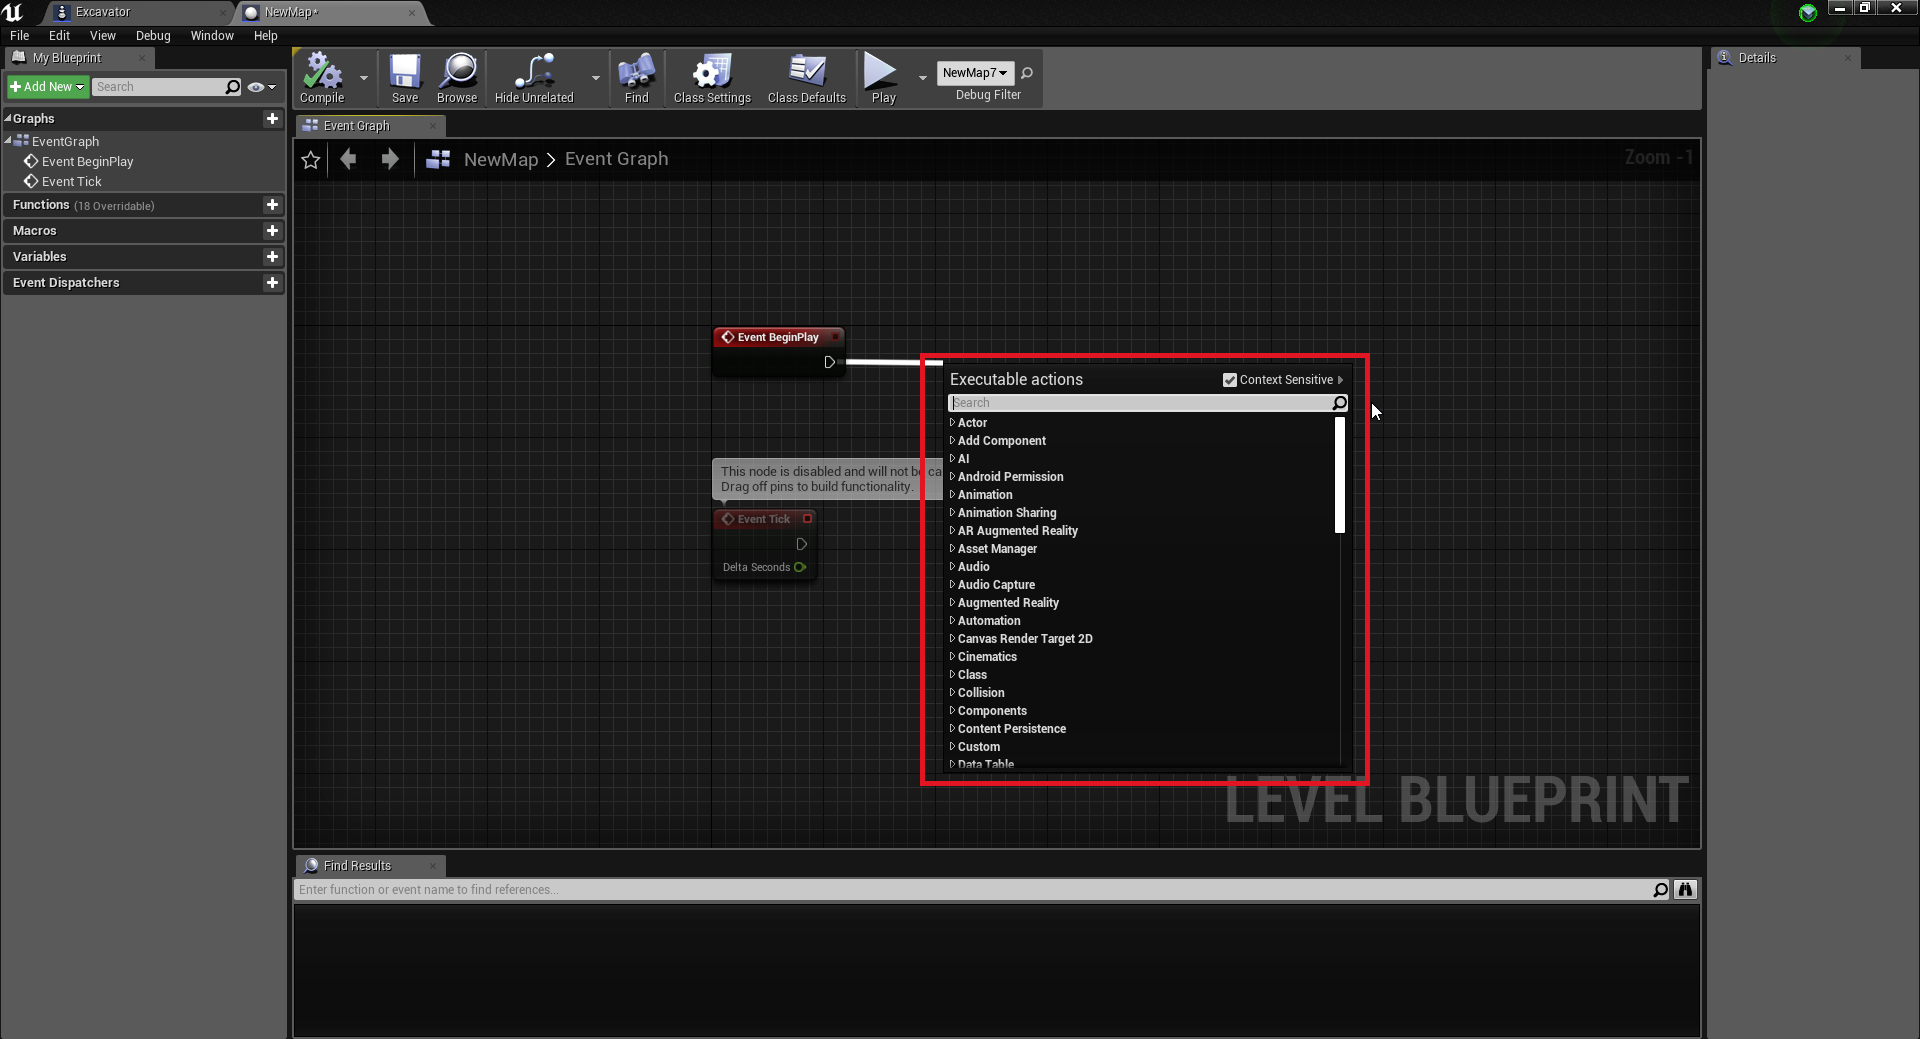
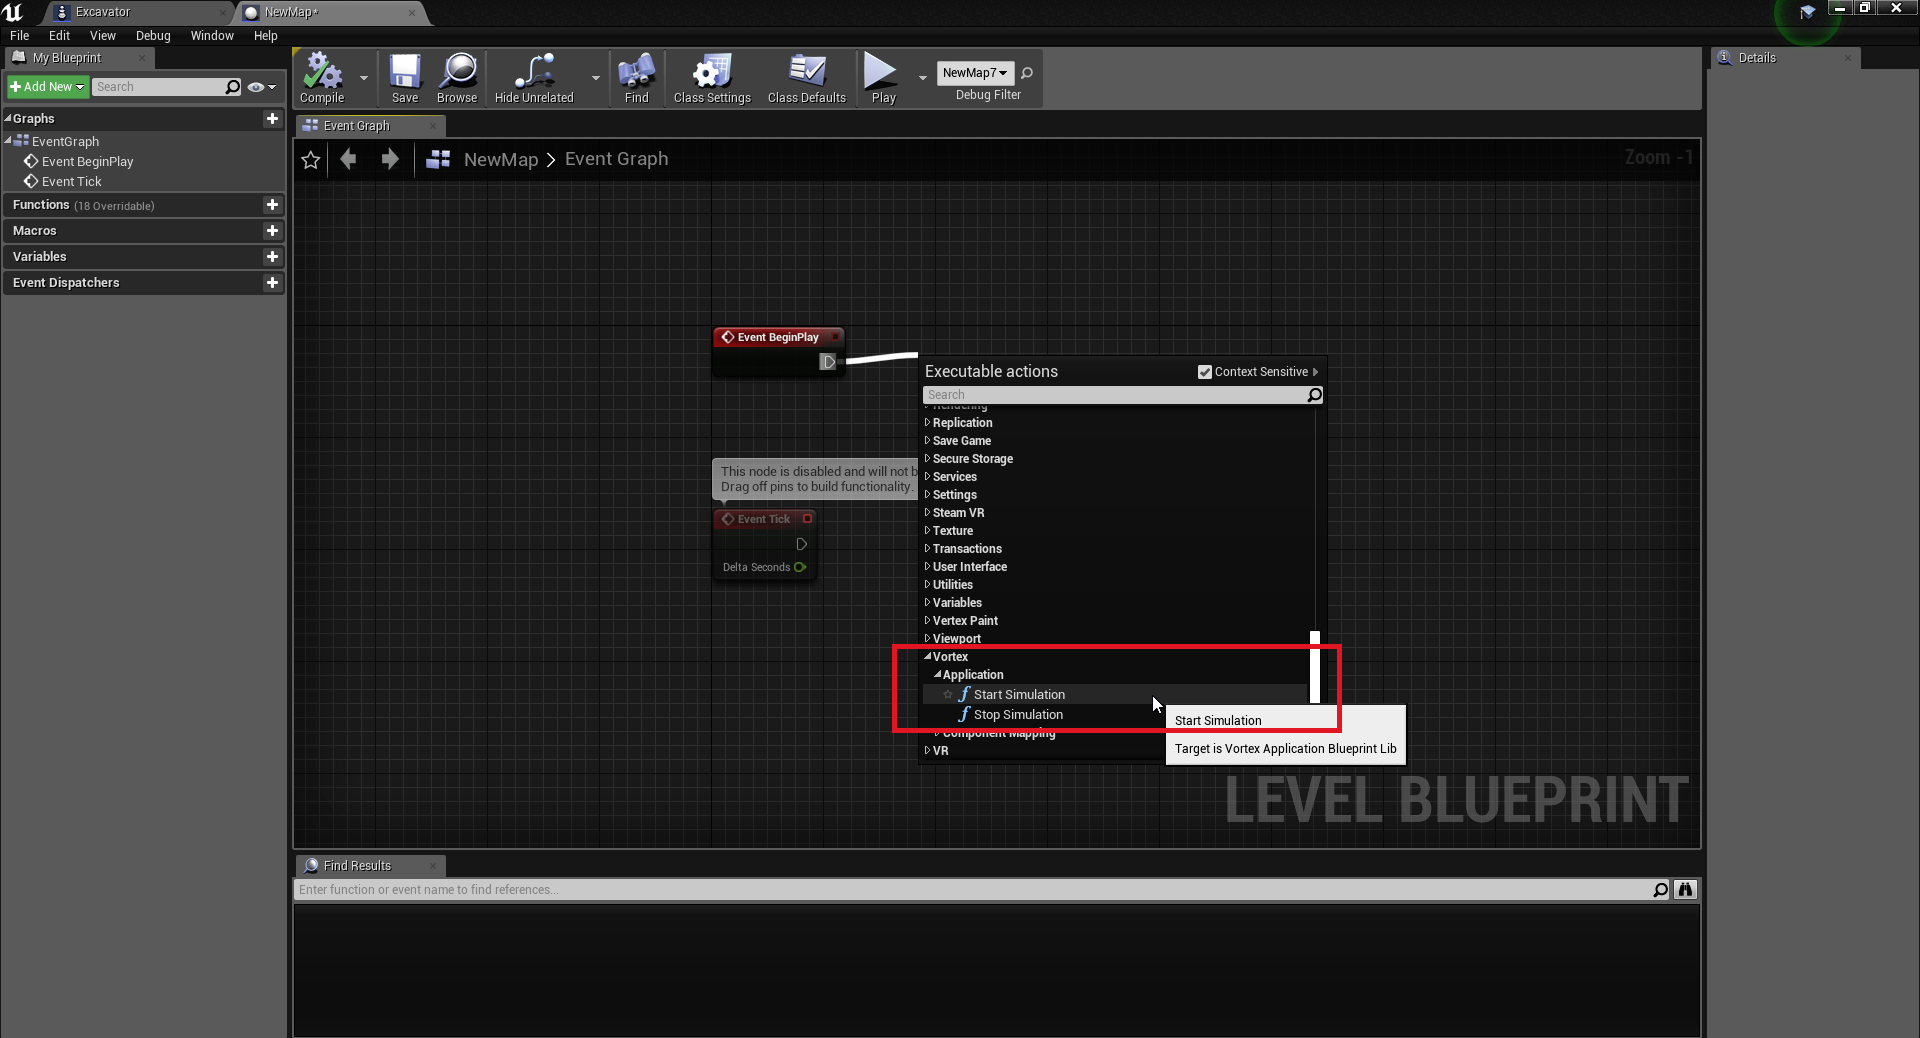
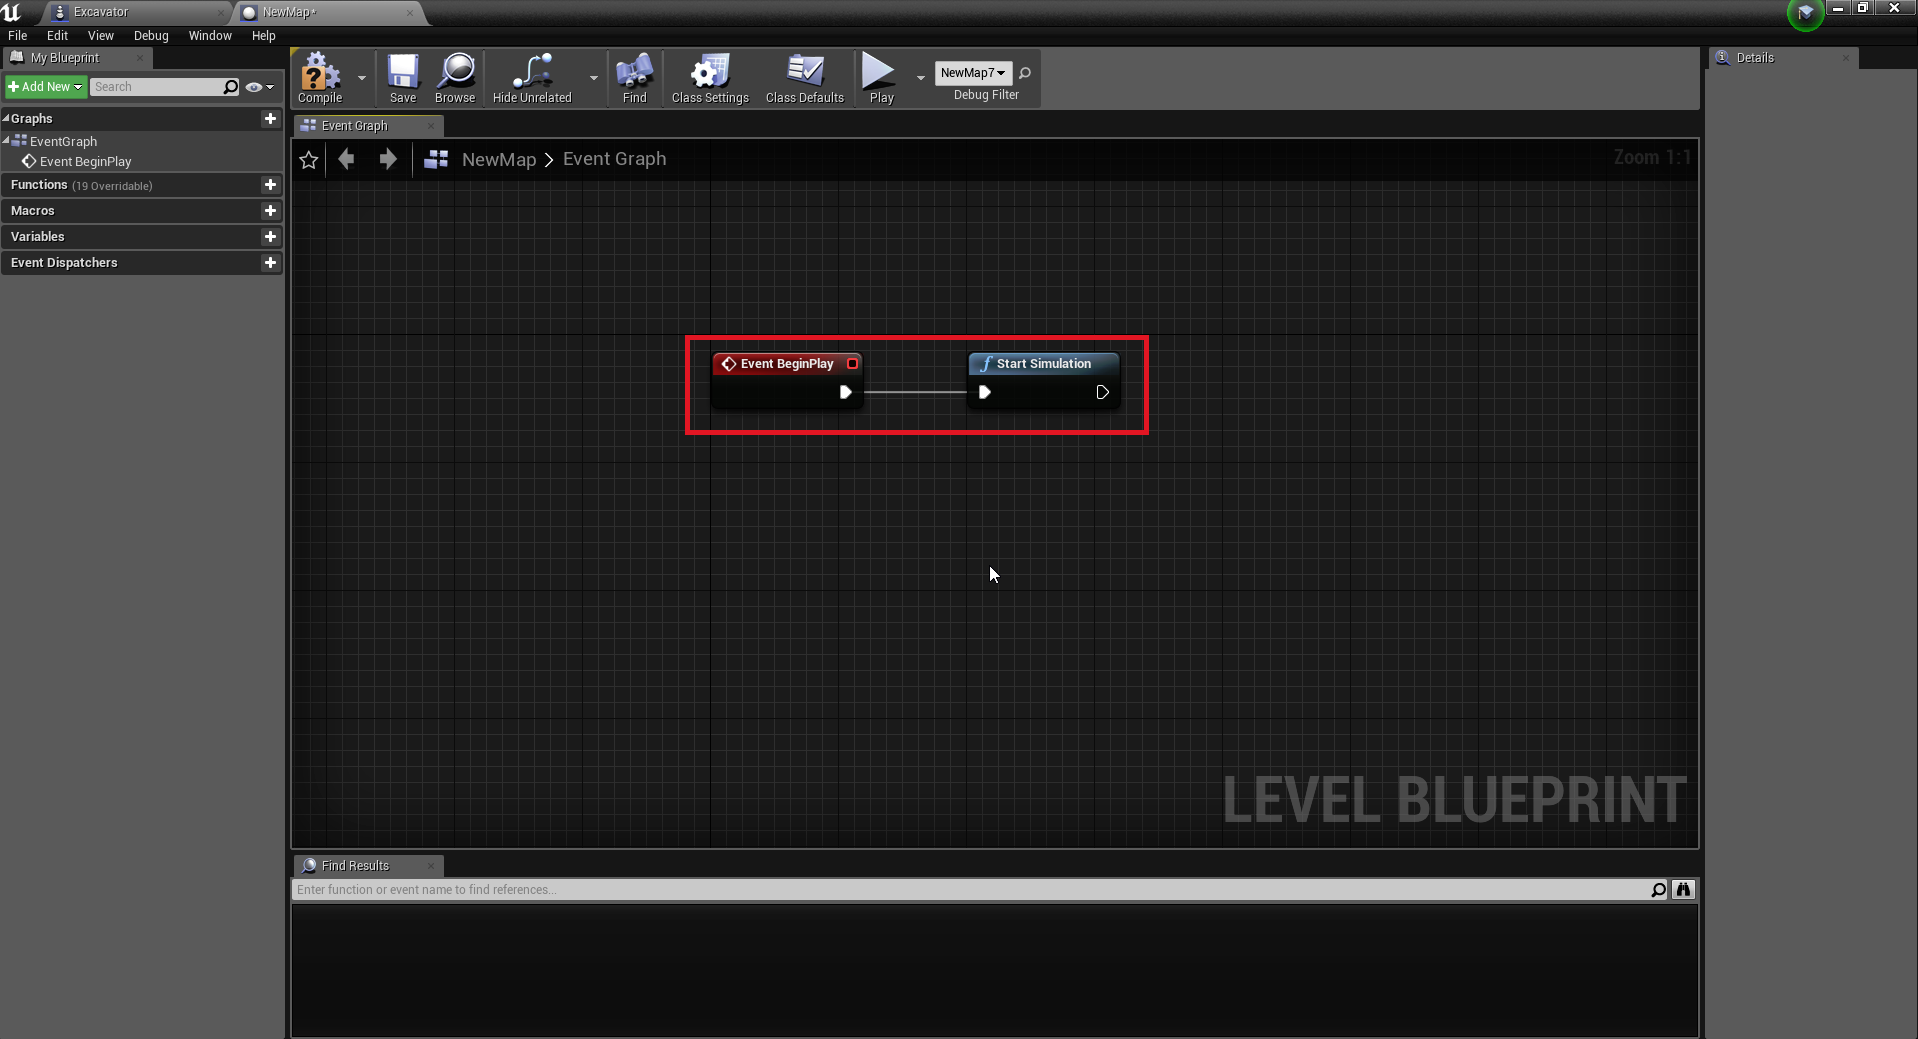
- In the pop-up window, scroll to the Vortex →Application category and click Start Simulation.
- In the Event Graph area, right-click anywhere on the empty space (not on a node).
- In the search bar of the blueprint actions pop-up window that appears, type
end playand then select the search result Event End Play.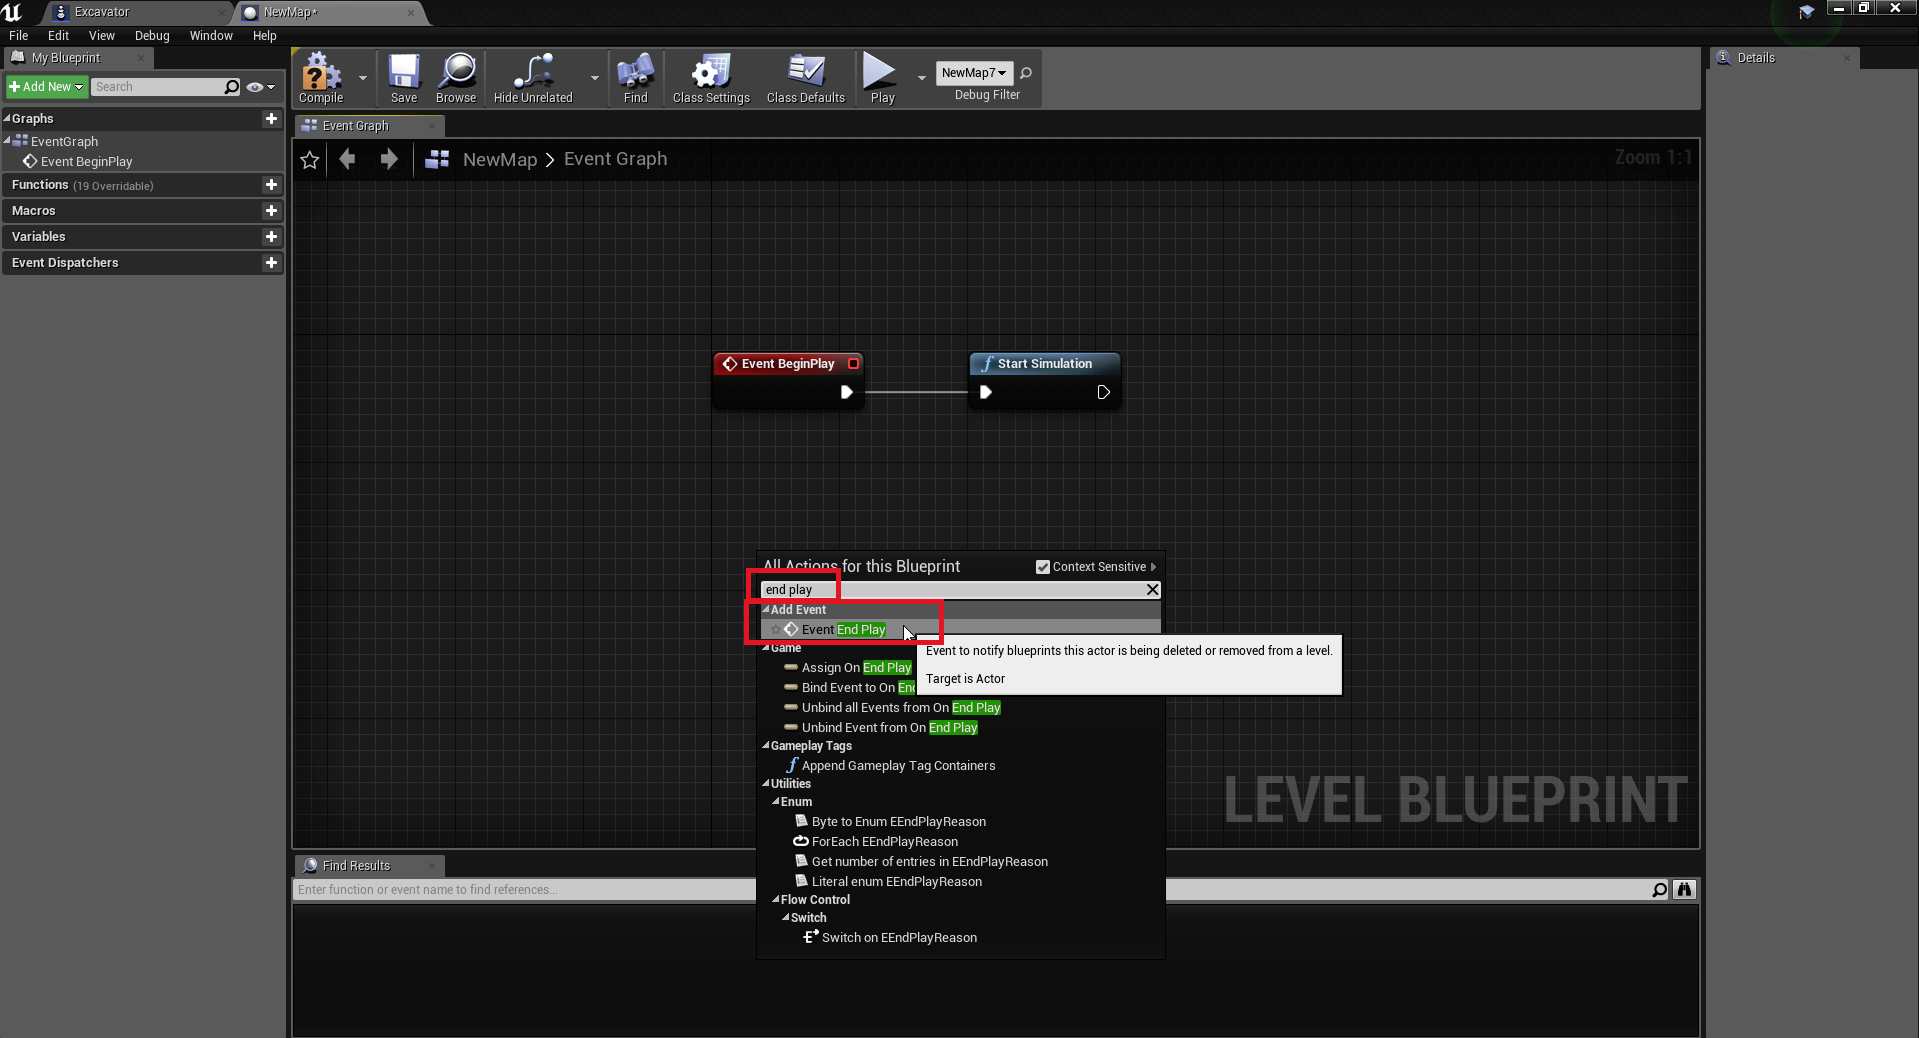
- Use the same process to add a Stop Simulation function. Click the Exec icon on the new Event End Play and drag it right before you release the mouse button. Then, add the Stop Simulation function.
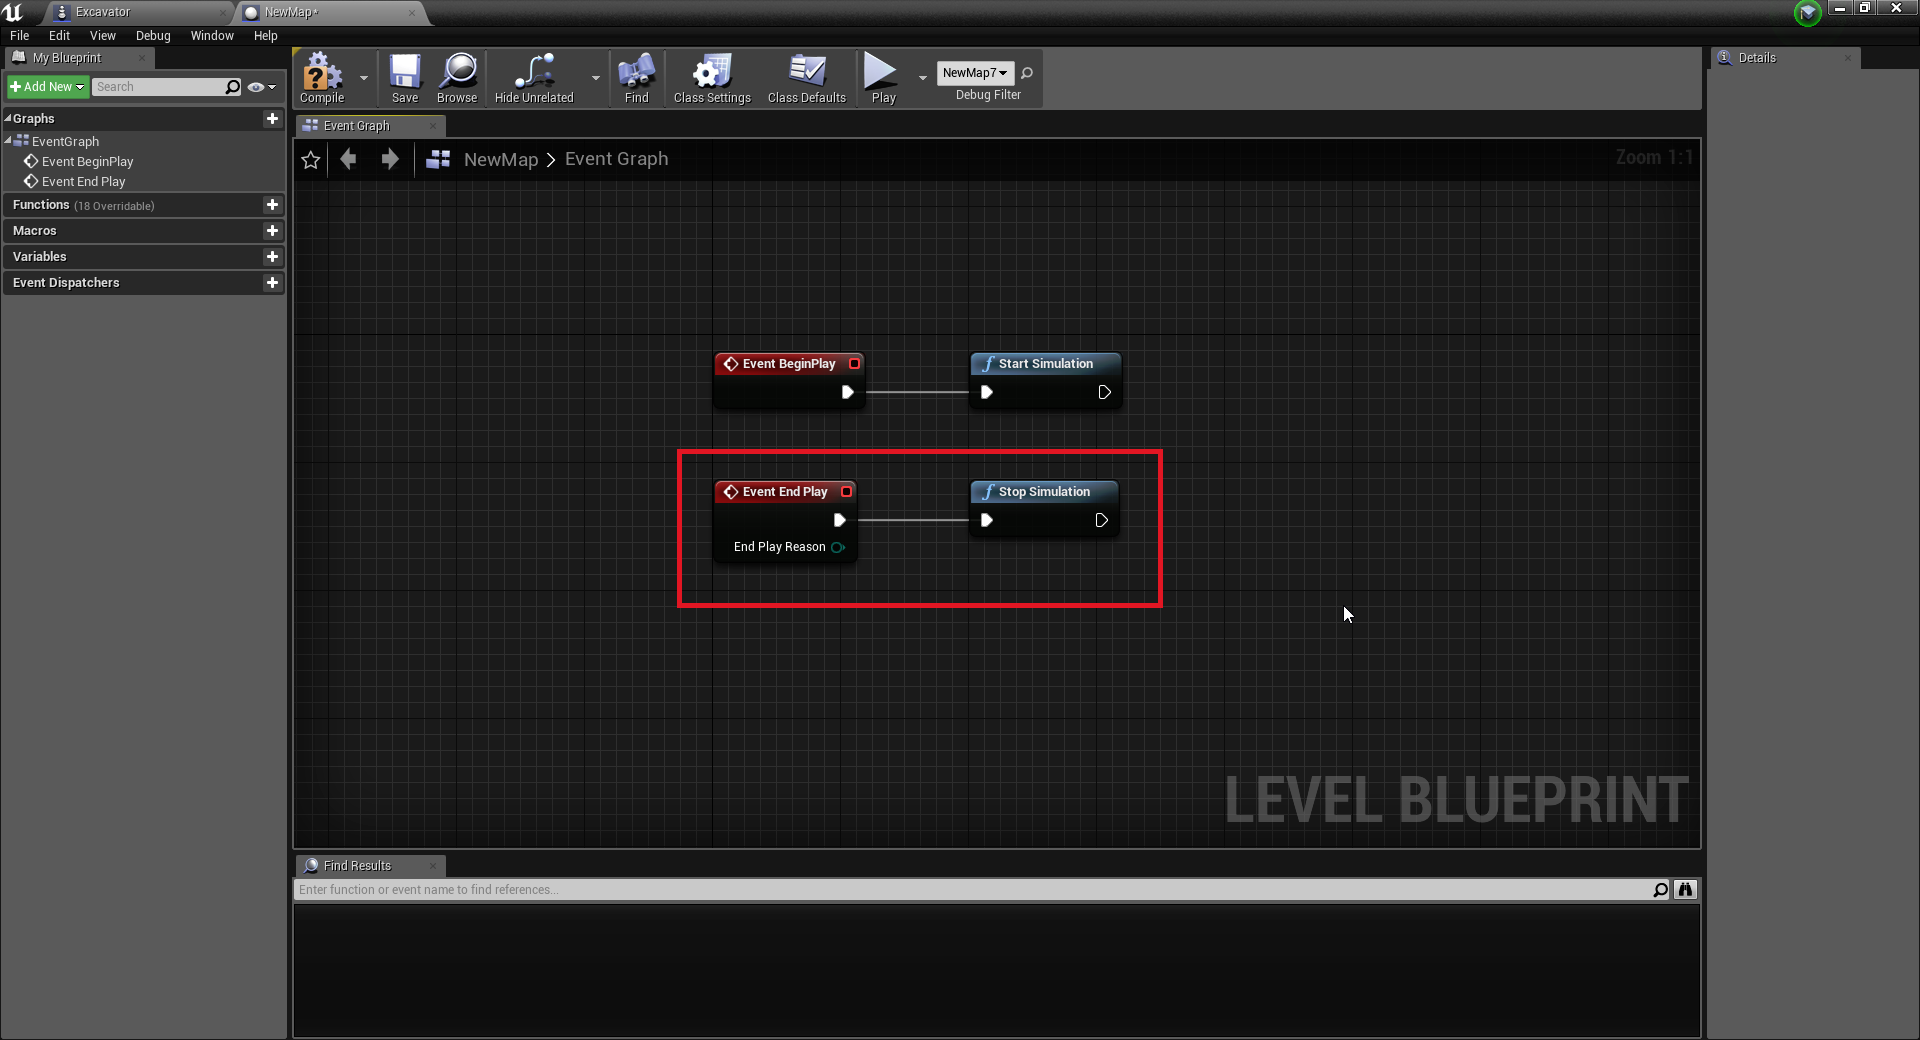
- Compile and save the Level Blueprint.
- To save your map, press the Save Current button in the main Unreal Editor interface.
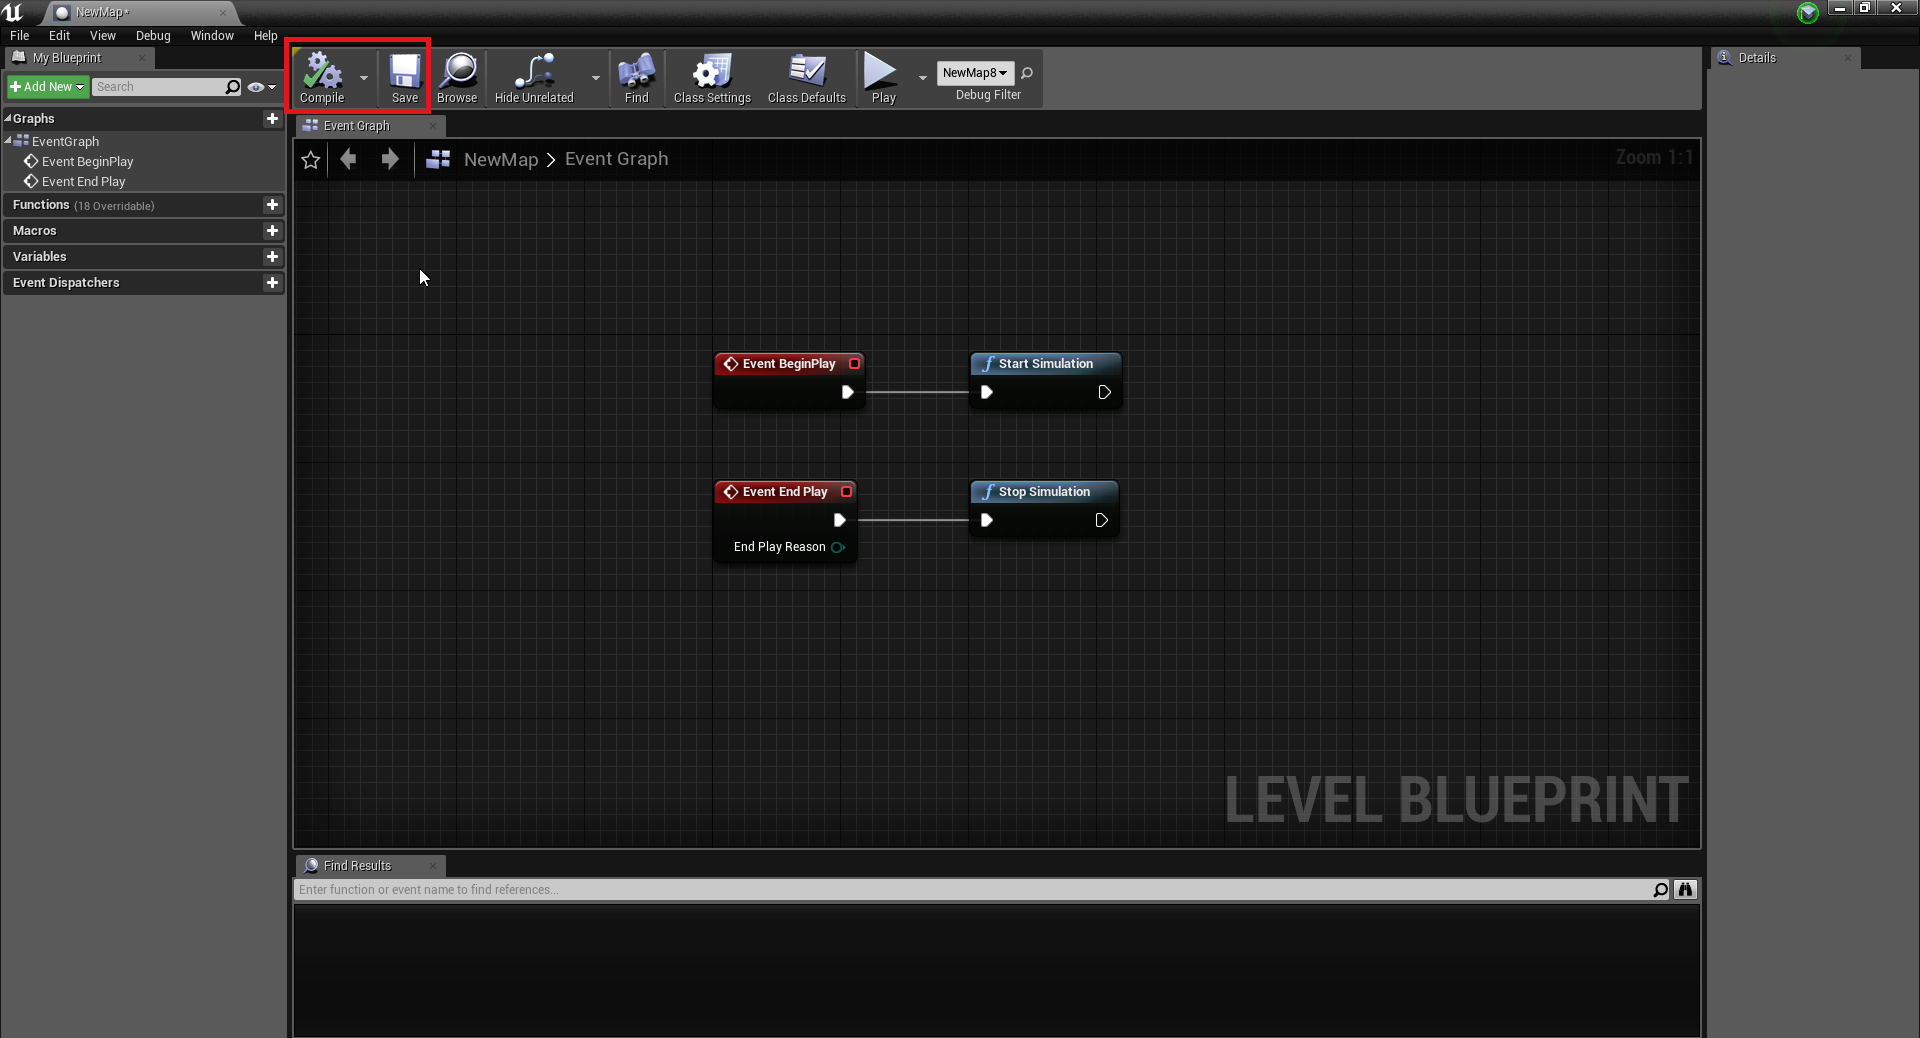
 To make sure that the Vortex simulation can start correctly, always press the Save Current button before you press Play. This of course will also save to disk any changes to your map.You can call the Start Simulation and Stop Simulation functions at any time, but you must make sure the Vortex simulation has completely stopped when you stop the Unreal simulation. All Vortex mechanisms must be loaded when the Vortex simulation is not running.
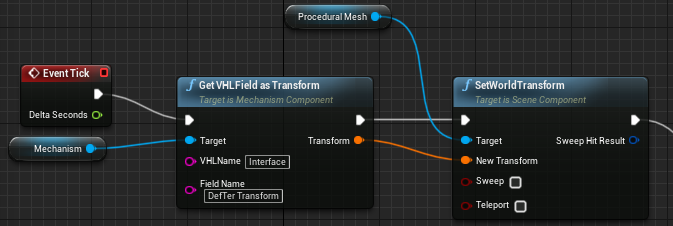
Get/Set Vortex Studio Mechanism Inputs and Outputs (IO)
After you import Vortex mechanisms to an Unreal project, you must get/set Vortex mechanism inputs and outputs (IO) from the Unreal simulation.
Available IO for mechanisms are defined by the following mechanism interfaces:
Outputs from these interfaces can be read from Unreal, while inputs can be set with new values from the Unreal simulation.
For this purpose, a set of useful blueprint functions are exposed by the Vortex Studio plugin. To quickly find them, type VHL in the action search bar:
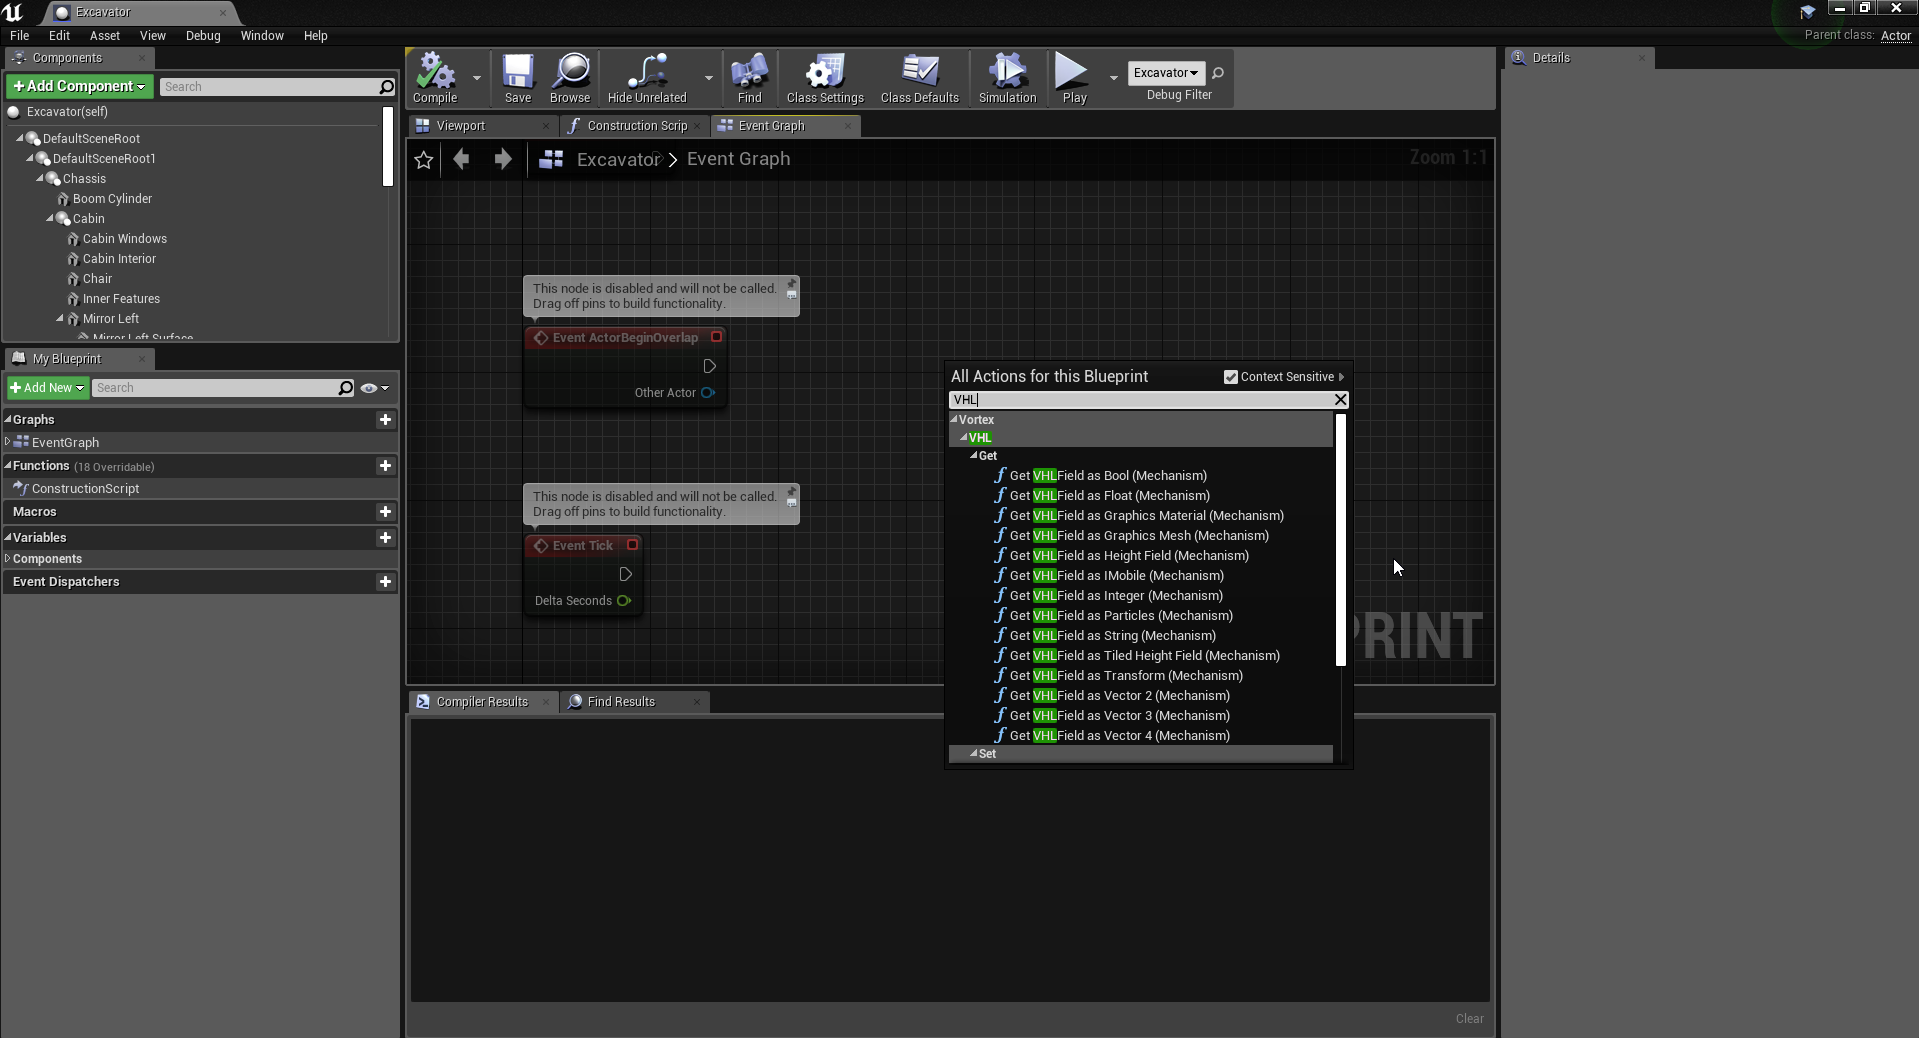
Each function must have a Mechanism Component as a target. This component is automatically created under the blueprint class created when you import a Vortex mechanism (see Importing Mechanisms into Unreal).
The following functions are available to you:
| Blueprint Function | Description |
|---|---|
| From Vortex to Unreal | |
| Get VHLField as Bool | Allows to search for a specific VHL/Control interface's output field on the target mechanism. This function assumes the desired field is a boolean field and will return its value as a bool. |
| Get VHLField as Float | Allows to search for a specific VHL/Control interface's output field on the target mechanism. This function assumes the desired field is a double field and will return its value as a float. |
| Get VHLField as Integer | Allows to search for a specific VHL/Control interface's output field on the target mechanism. This function assumes the desired field is an integer field and will return its value as an int32. |
| Get VHLField as String | Allows to search for a specific VHL's output field on the target mechanism. This function assumes the desired field is a string field and will return its value as an FString. |
| Get VHLField as Transform | Allows to search for a specific VHL's output field on the target mechanism. This function assumes the desired field is a Matrix44 field and will return its value as an FTransform. |
| Get VHLField as Vector 2 | Allows to search for a specific VHL's output field on the target mechanism. This function assumes the desired field is a Vector2 field and will return its value as an FVector2D. |
| Get VHLField as Vector 3 | Allows to search for a specific VHL's output field on the target mechanism. This function assumes the desired field is a Vector3 field and will return its value as an FVector. |
| Get VHLField as Vector 4 | Allows to search for a specific VHL's output field on the target mechanism. This function assumes the desired field is a Vector4 field and will return its value as an FVector4. |
| From Unreal to Vortex | |
| Set VHLField as Bool | Allows to search for a specific VHL/Control interface's input field on the target mechanism. This function assumes the desired field is a boolean field and will set its value from a bool. |
| Set VHLField as Float | Allows to search for a specific VHL/Control interface's input field on the target mechanism. This function assumes the desired field is a double field and will set its value from a float. |
| Set VHLField as Integer | Allows to search for a specific VHL/Control interface's input field on the target mechanism. This function assumes the desired field is an integer field and will set its value from an int32. |
| Set VHLField as String | Allows to search for a specific VHL/Control interface's input field on the target mechanism. This function assumes the desired field is a string field and will set its value from an FString. |
| Set VHLField as Transform | Allows to search for a specific VHL/Control interface's input field on the target mechanism. This function assumes the desired field is a Matrix44 field and will set its value from an FTransform. |
| Set VHLField as Vector 2 | Allows to search for a specific VHL/Control interface's input field on the target mechanism. This function assumes the desired field is a Vector2 field and will set its value from an FVector2D. |
| Set VHLField as Vector 3 | Allows to search for a specific VHL/Control interface's input field on the target mechanism. This function assumes the desired field is a Vector3 field and will set its value from an FVector. |
| Set VHLField as Vector 4 | Allows to search for a specific VHL/Control interface's input field on the target mechanism. This function assumes the desired field is a Vector4 field and will set its value from an FVector4. |
All functions have similar structures:
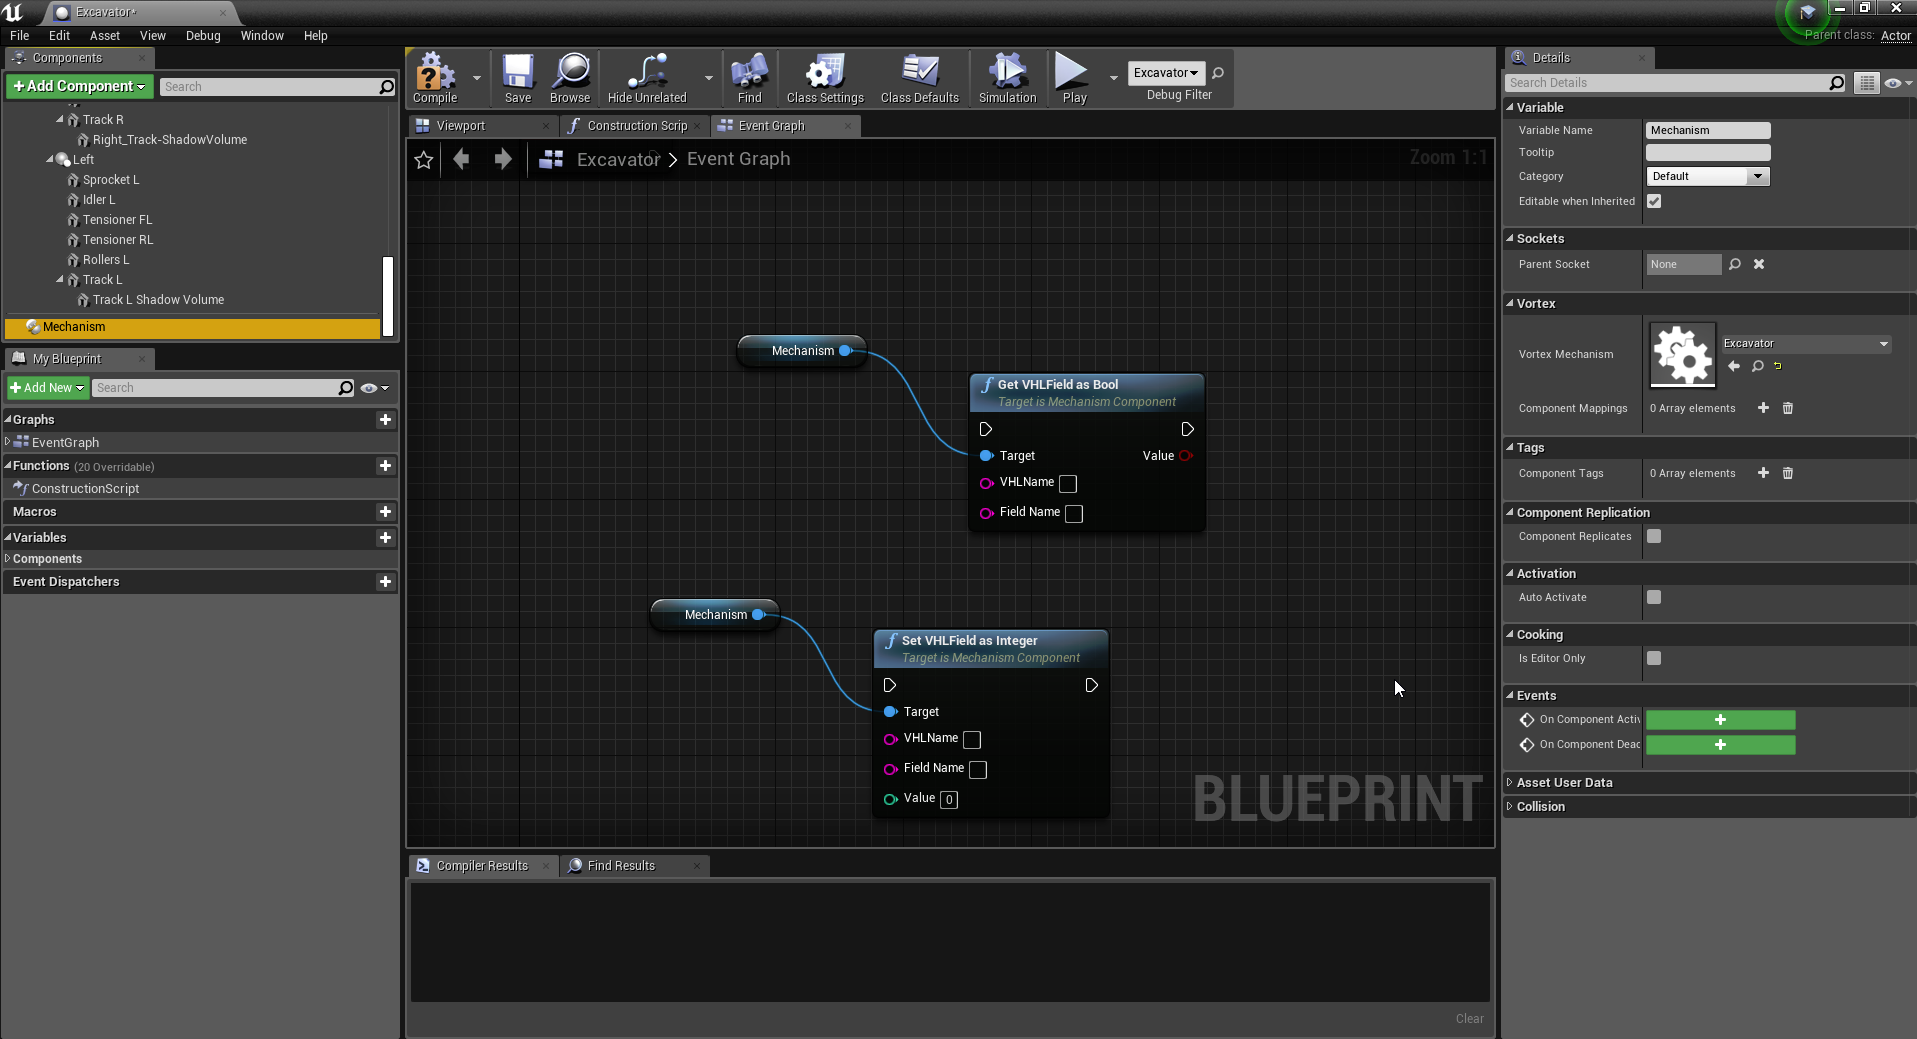
You must connect the Exec input to the correct Event tick. For example, if the data is get/set every tick, then the Exec of Event Tick must connect to the Exec input for the new function.
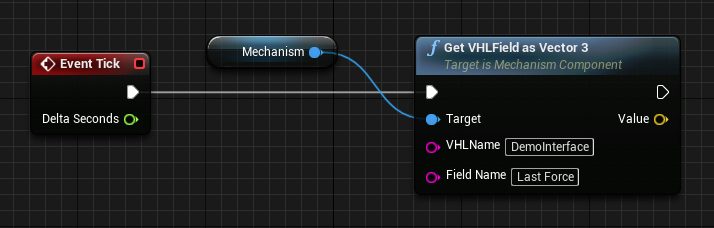
Get VHLField as ...
| Input | Target | Specifies on which Mechanism Component to call this function. The Mechanism Component refers to the specific .vxmechanism file from Vortex. |
| Input | VHLName | The name of the VHL/Control interface to search for. |
| Input | Field Name | The name of the output field to search for. |
| Output | Value | The returned value (the type differs for each variation of the Get VHLField as ... function). |
Set VHLField as ...
| Input | Target | Specifies on which Mechanism Component to call this function. The Mechanism Component refers to the actual .vxmechanism file from Vortex. |
| Input | VHLName | The name of the VHL/Control interface to search for. |
| Input | Field Name | The name of the input field to search for. |
| Input | Value | The value to assign to the specified field (the type differs for each variation of the Set VHLField as ... function). |
Earthworks Systems
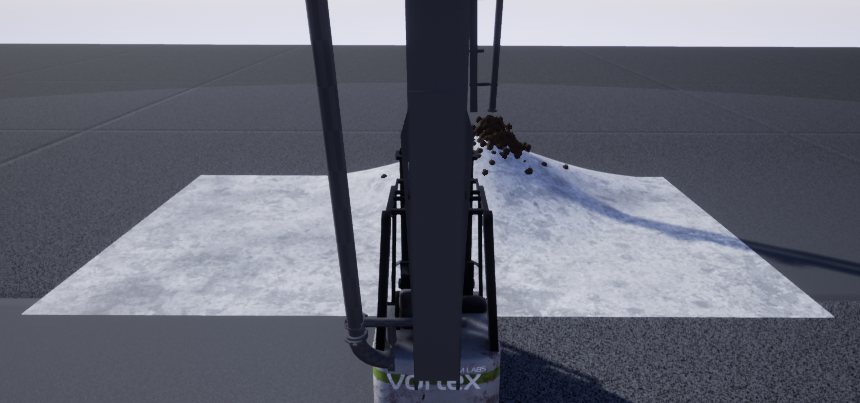
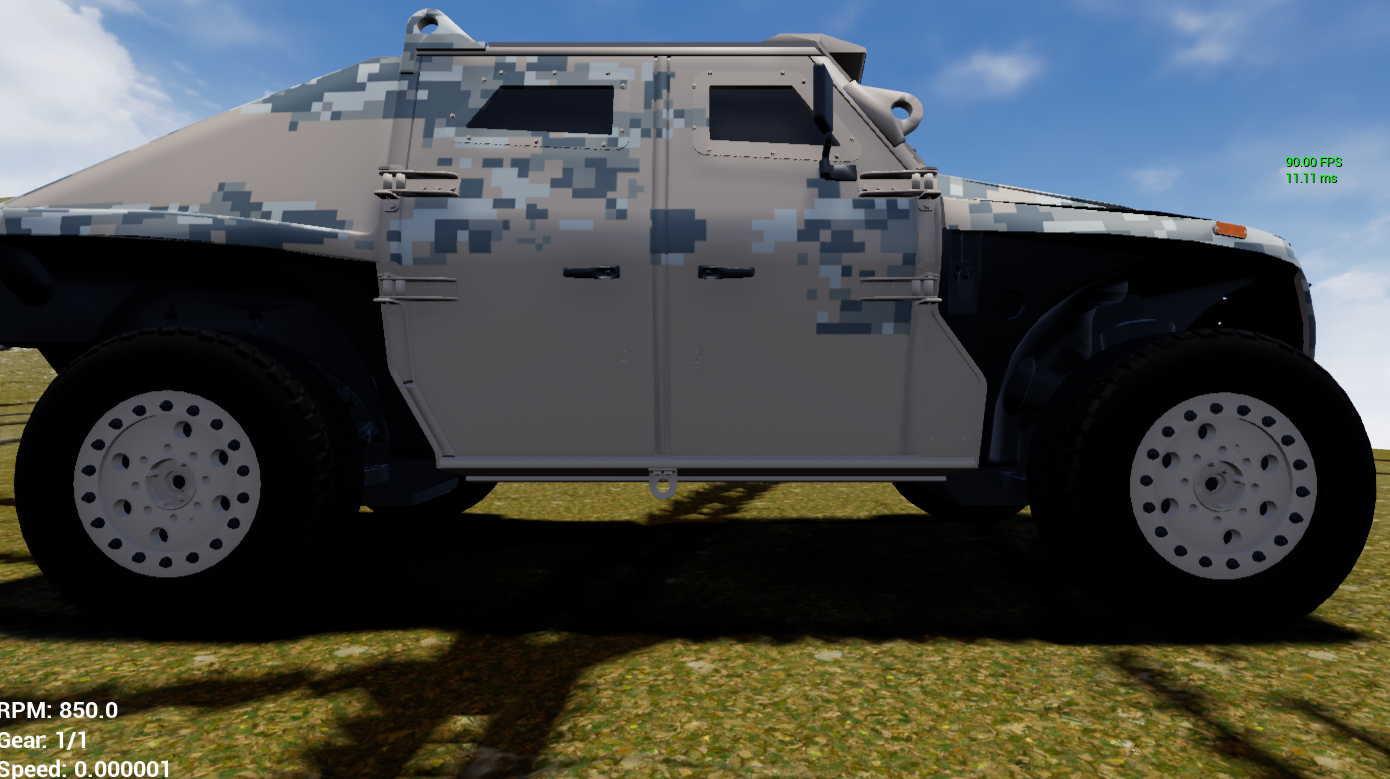
As a Vortex Studio and Unreal Engine user, you can combine the best of both worlds and use Vortex Studio Earthworks as your soil simulation in Unreal Engine. While an Unreal Engine Landscape can be sculpted and edited in Unreal Editor, it is usually a static and non-deformable object during the simulation. The Vortex Studio Earthwork Systems allows you to make otherwise rigid terrain surfaces deformable within a limited area. Earthmoving operations such as digging, trenching, filling, etc generate particles and respect mass conservation.
To do this, you will want to create one (or many) Deformable Terrains in Vortex Studio, as well as cutting tools or buckets, and import them in Unreal Engine. This guide will help you put it together for the following Earthworks constructs: Soil Bin, Deformable Terrain, Soil Particles. Refer to official Vortex Studio documentation (Earthwork Systems Tutorials) for the remaining Earthworks features: Soil Layer, Soil Emitter, Soil Culling Geometry, Soil Mass Sensor, Soil Materials, Bucket, Blade, Generic Bucket. They work without any specific adaptation needed for Unreal Engine.
A single Soil Particle extension is responsible for all particles generated in a simulation from any deformer on any Soilbin or Deformable Terrain. A single Soil Materials extension is responsible for all soil materials present in a simulation. With this in mind, a single Vortex Mechanism should contain a Soil Particles and Soil Materials extension and this Mechanism should be added once to a given Unreal level. Refer to Unreal Engine documentation about Levels if you are not familiar with them (https://docs.unrealengine.com/en-US/Engine/Levels/index.html).
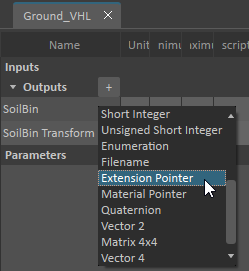
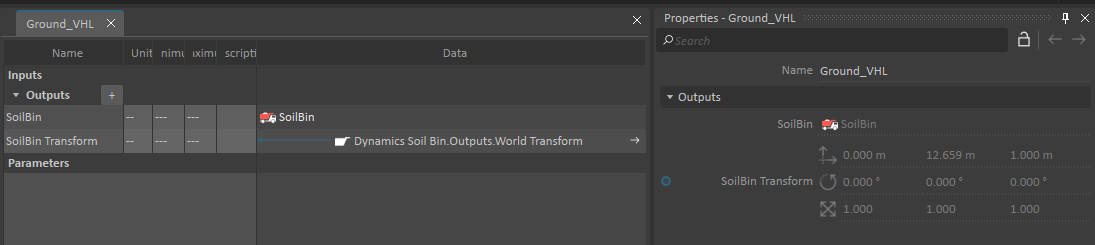
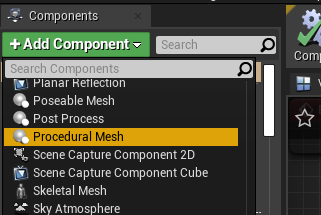
Soilbin
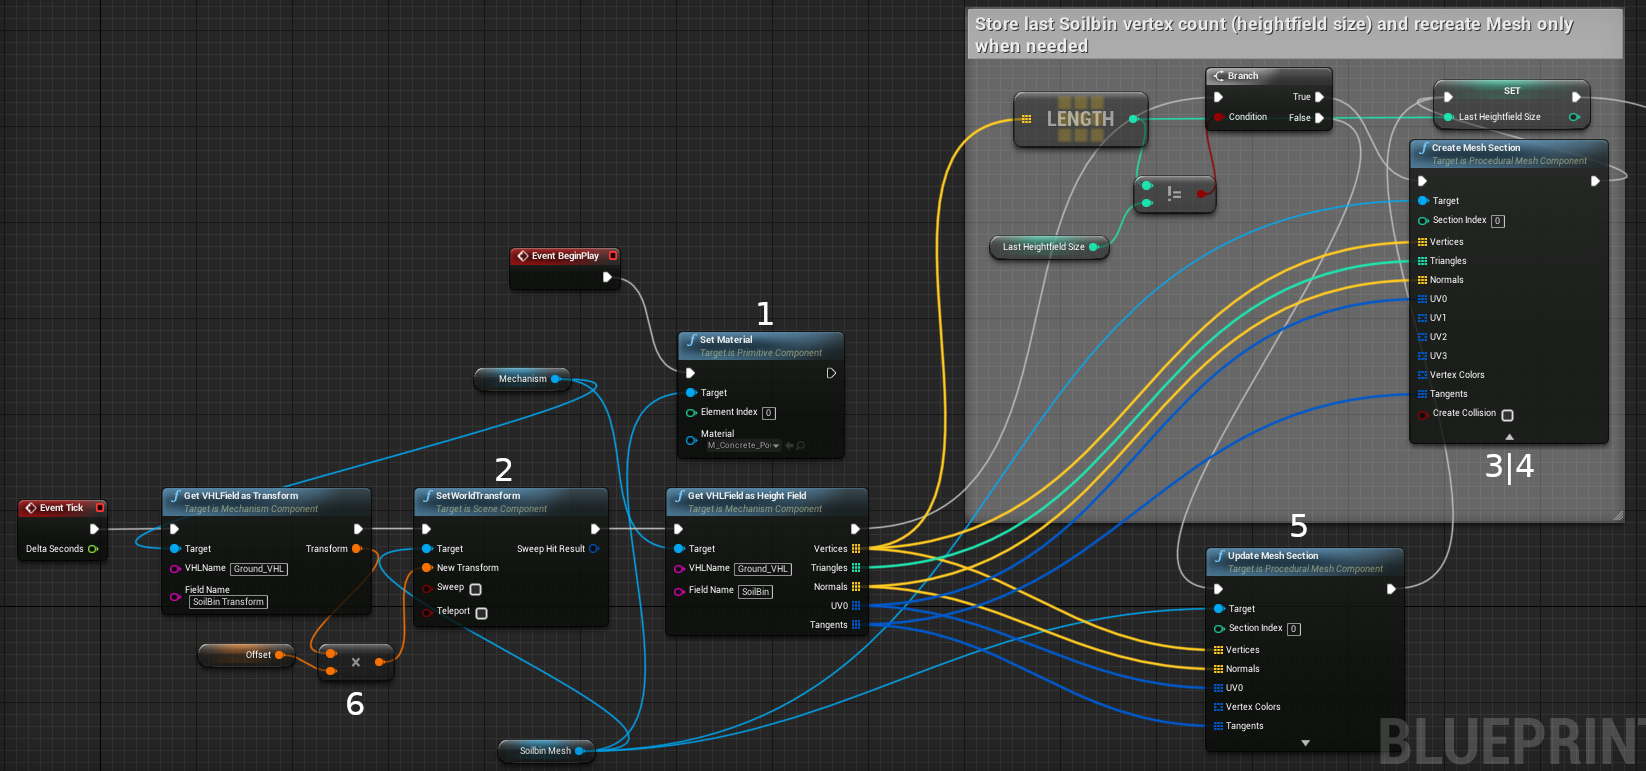
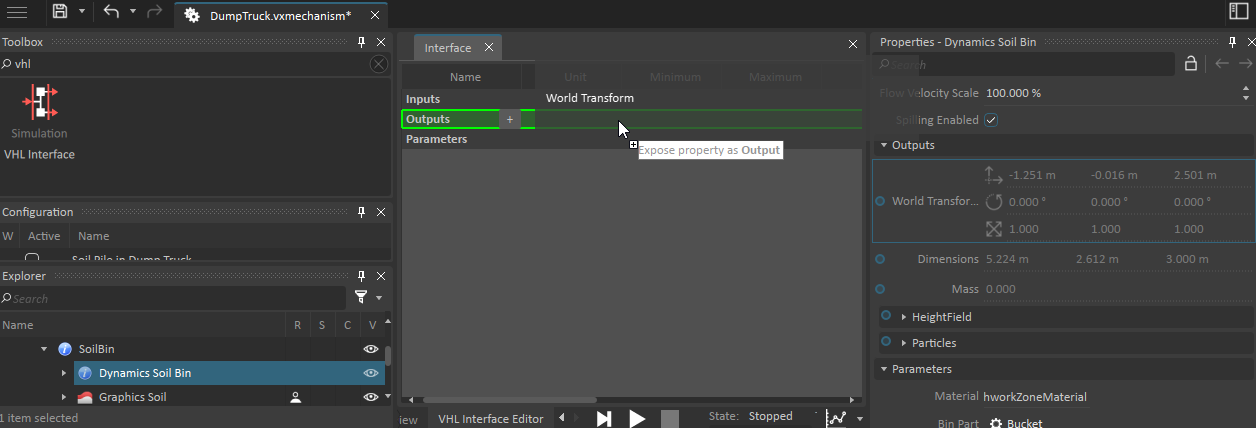
As a Vortex Studio and Unreal Engine user, you can see your Vortex Studio Soilbin and interact with it in Unreal Engine. Here are the steps:
| Information | Media | |
|---|---|---|
| 1 |
|  |
| 2 |
|
|
| 3 |
|
|
| 4 |
|
|
| 5 |
|
|
| 6 |
|  |

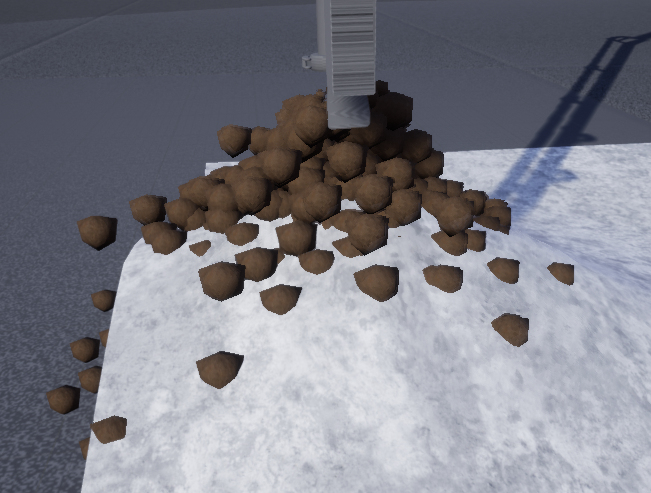
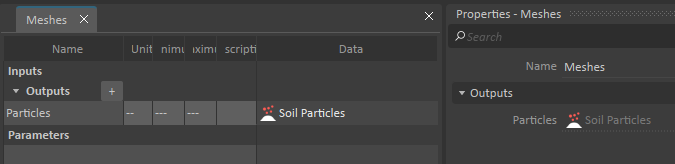
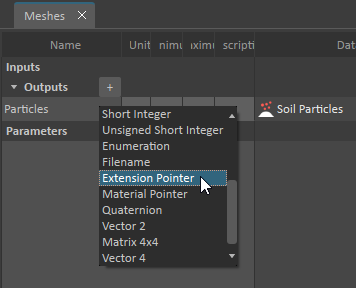
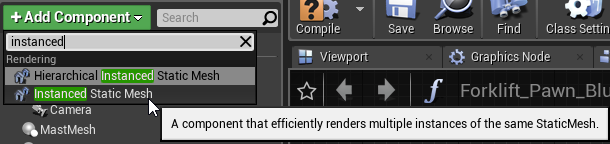
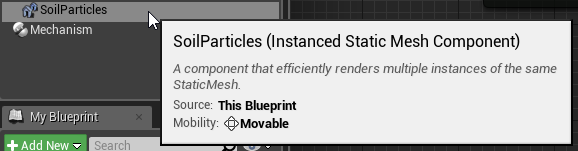
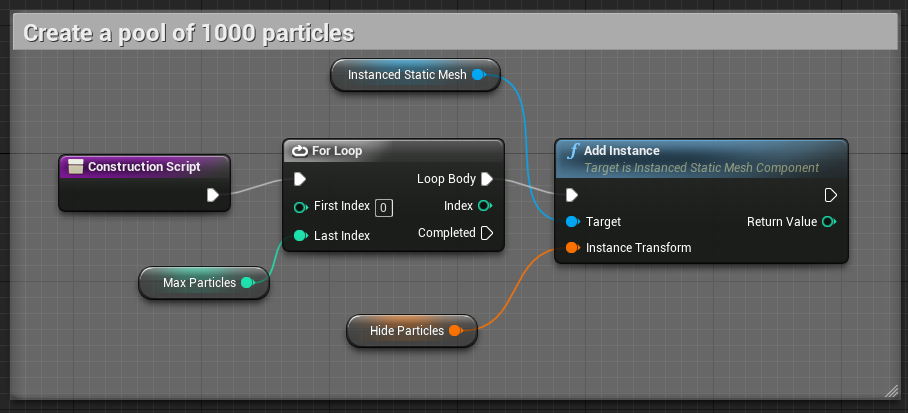
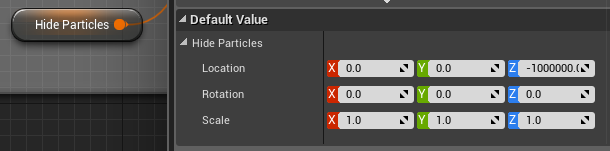
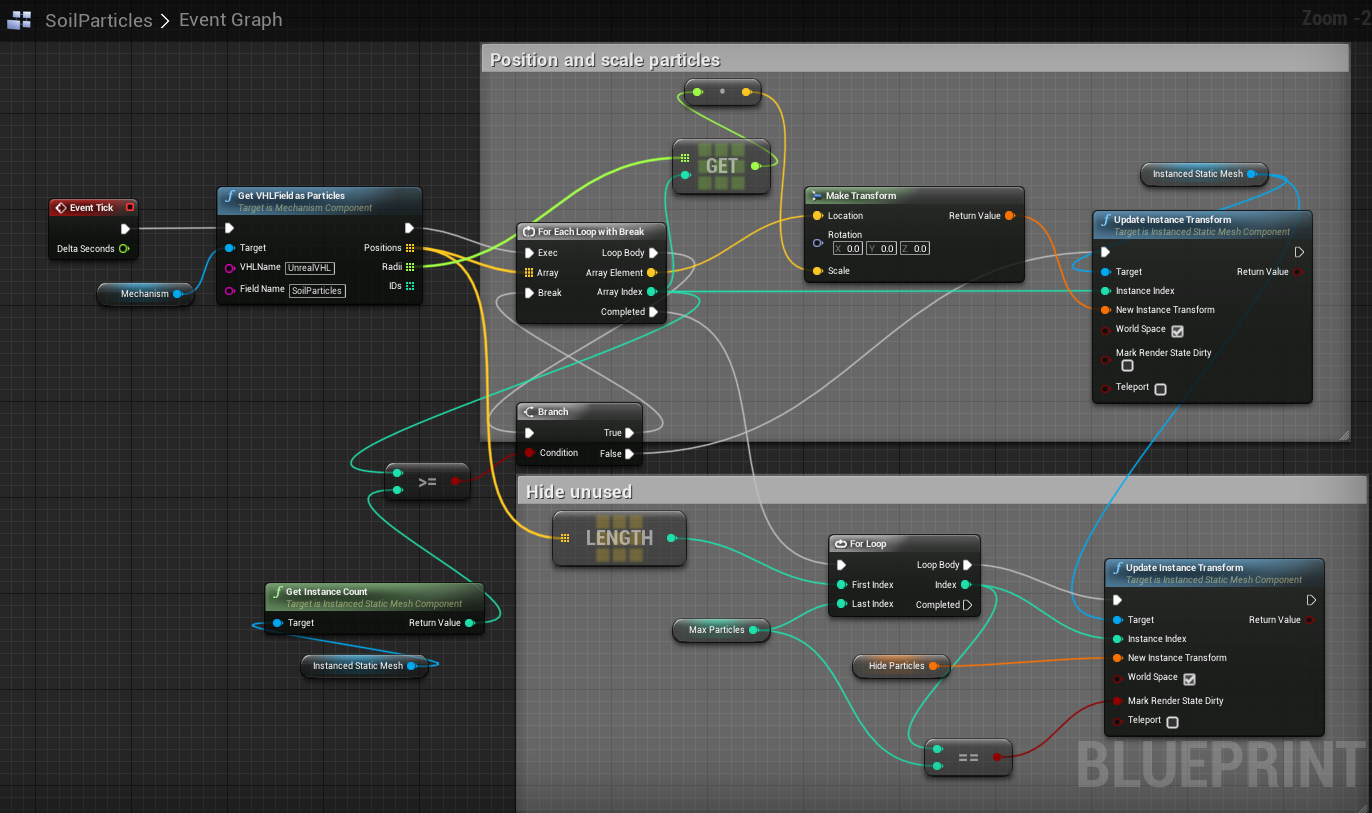
Soil particles
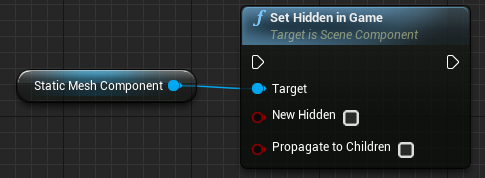
When simulating any Earthworks System in Unreal Engine, you will want to see a visual representation of the dug soil (inside or falling from a bucket for example). In Vortex Studio, this dug soil is represented by the Vortex Studio Particle extension. Ensure that your particle system is set up with particle culling and has a reasonable maximum particle count. Refer to official Vortex Studio documentation (Earthwork Systems Tutorials). Once that is set up, here are the steps to use it in Unreal Engine:
| Information | Media | |
|---|---|---|
| 1 |
|
|
| 2 |
|
|
| 3 |
|
|
| 4 |
|
|
| 5 |
|
|
| 6 |
|
|
| 7 |
|
|
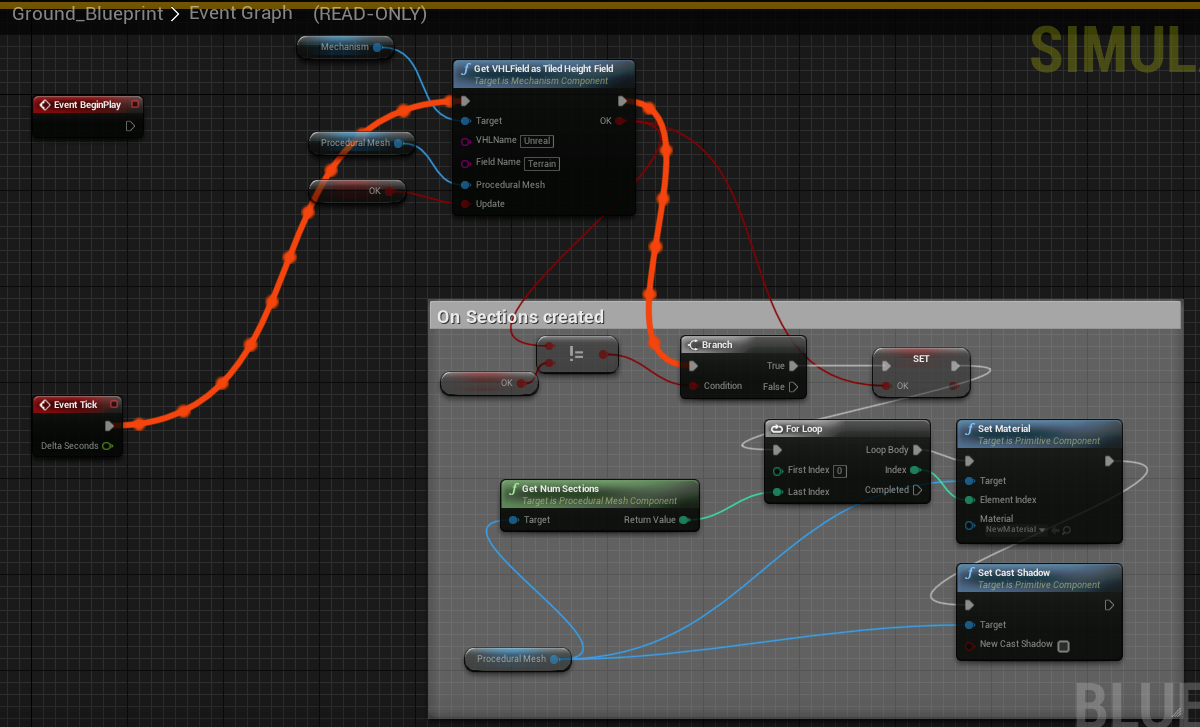
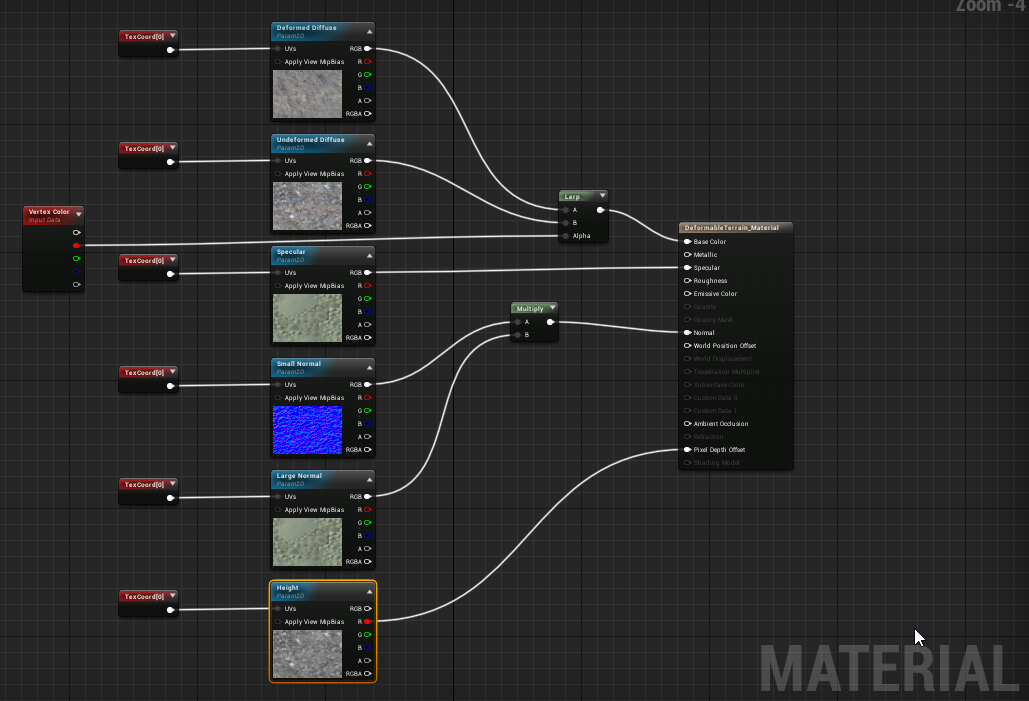
Deformable Terrain
As a Vortex Studio and Unreal Engine user, you can see your Vortex Studio Deformable Terrain and interact with it in Unreal Engine. Here are the steps:
For general information about creating a Deformable Terrain in Vortex Studio, refer to Deformable Terrain
| Information | Media | |
|---|---|---|
| 1 |
|
|
| 2 |
| |
| 3 |
|
|
| 4 |
|
|
| 5 |
|
|
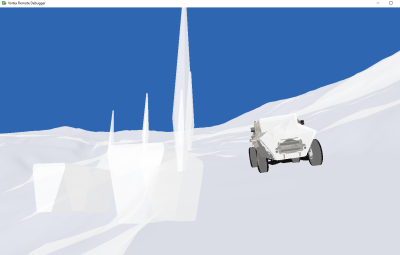
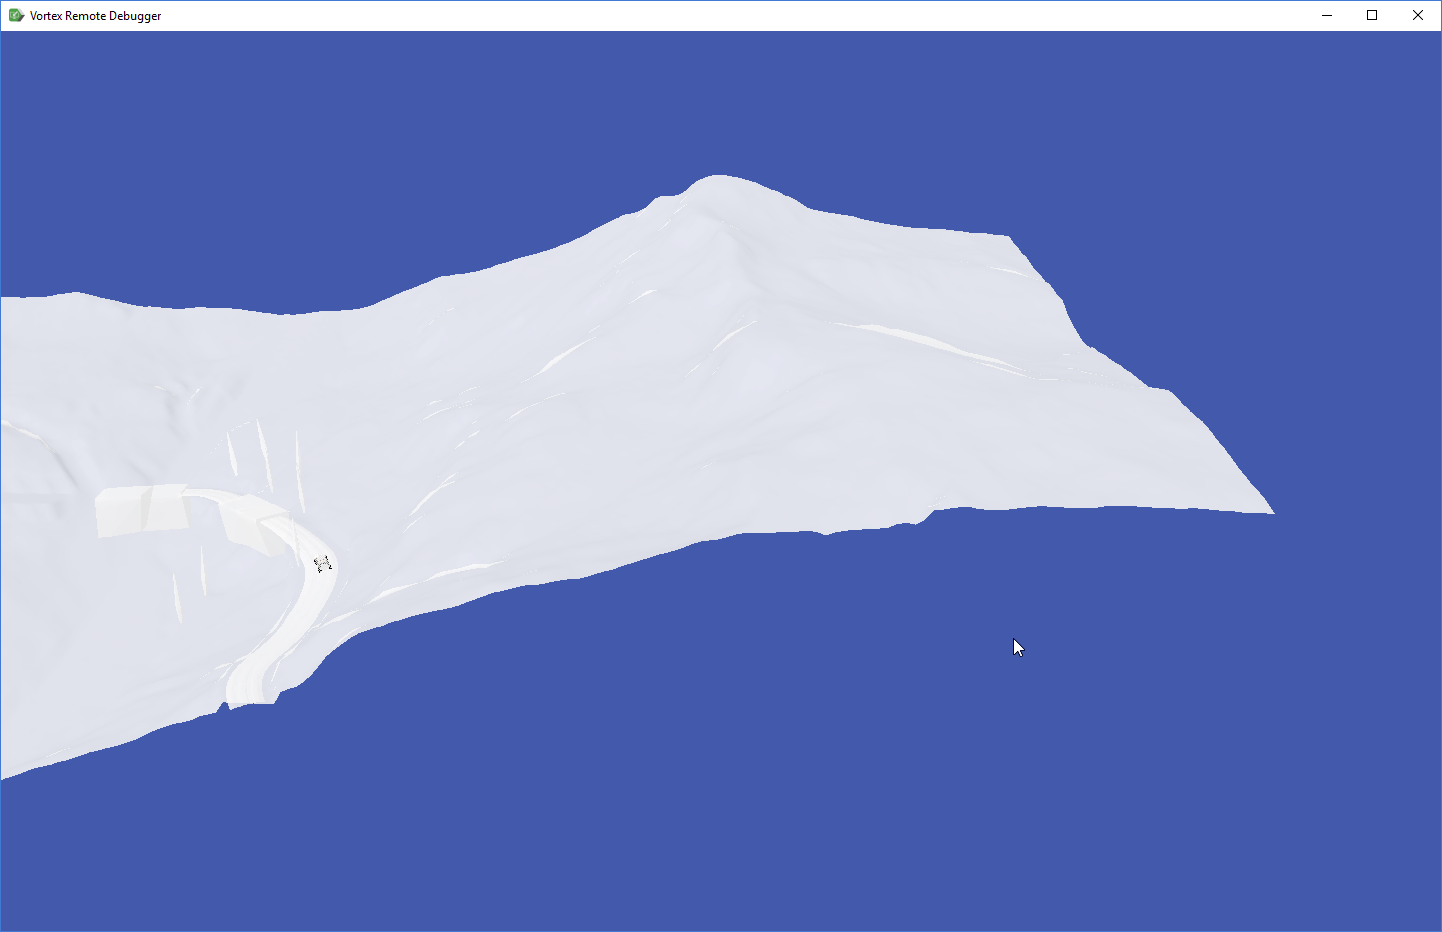
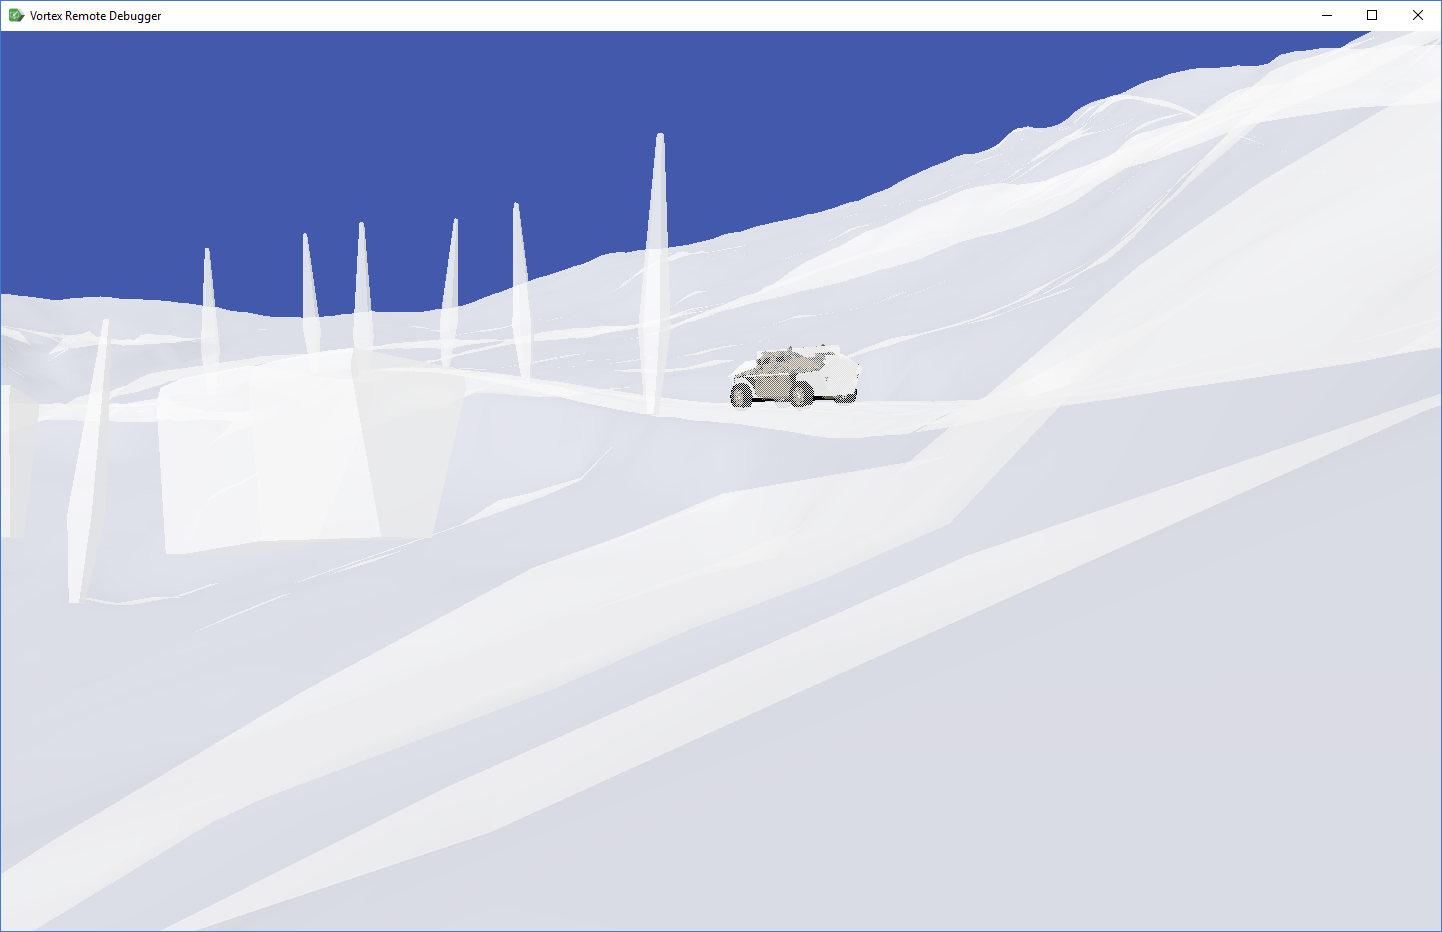
Visualizing the Vortex Simulation for Debugging Purposes Using the Vortex Remote Debugger
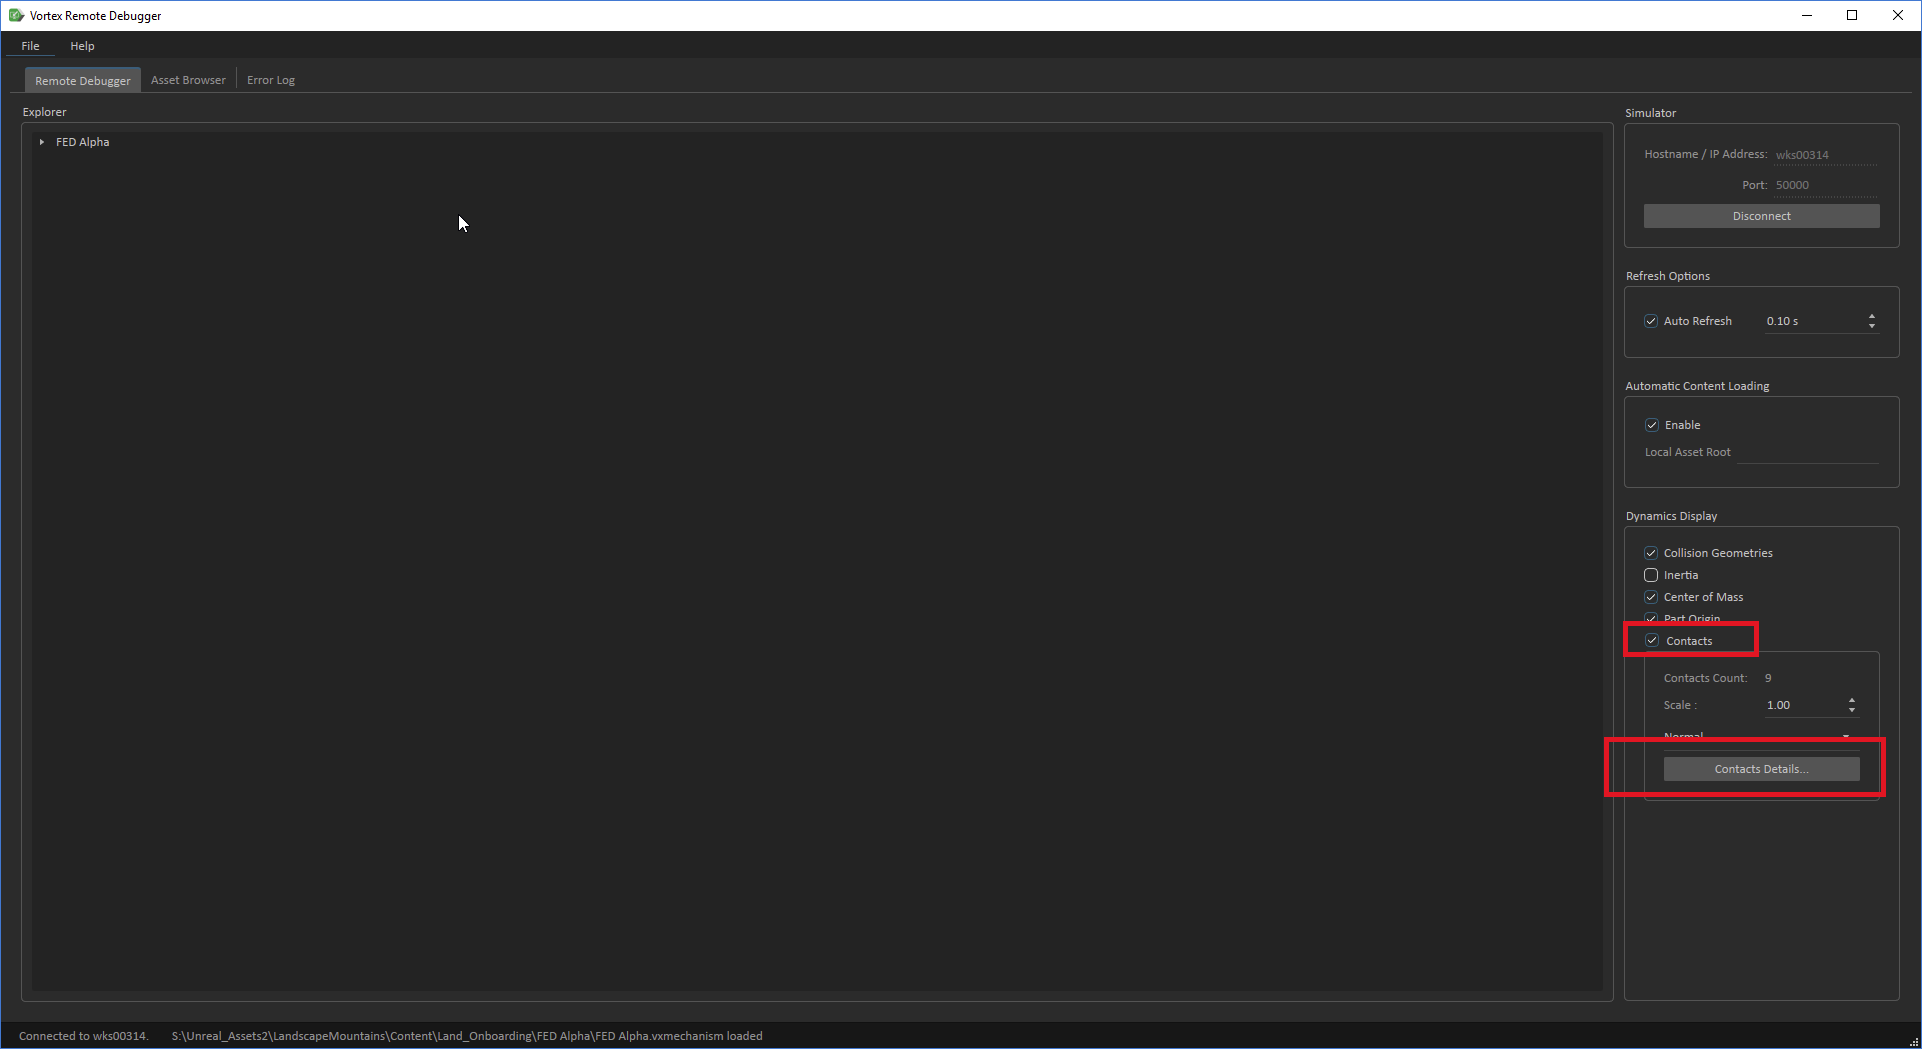
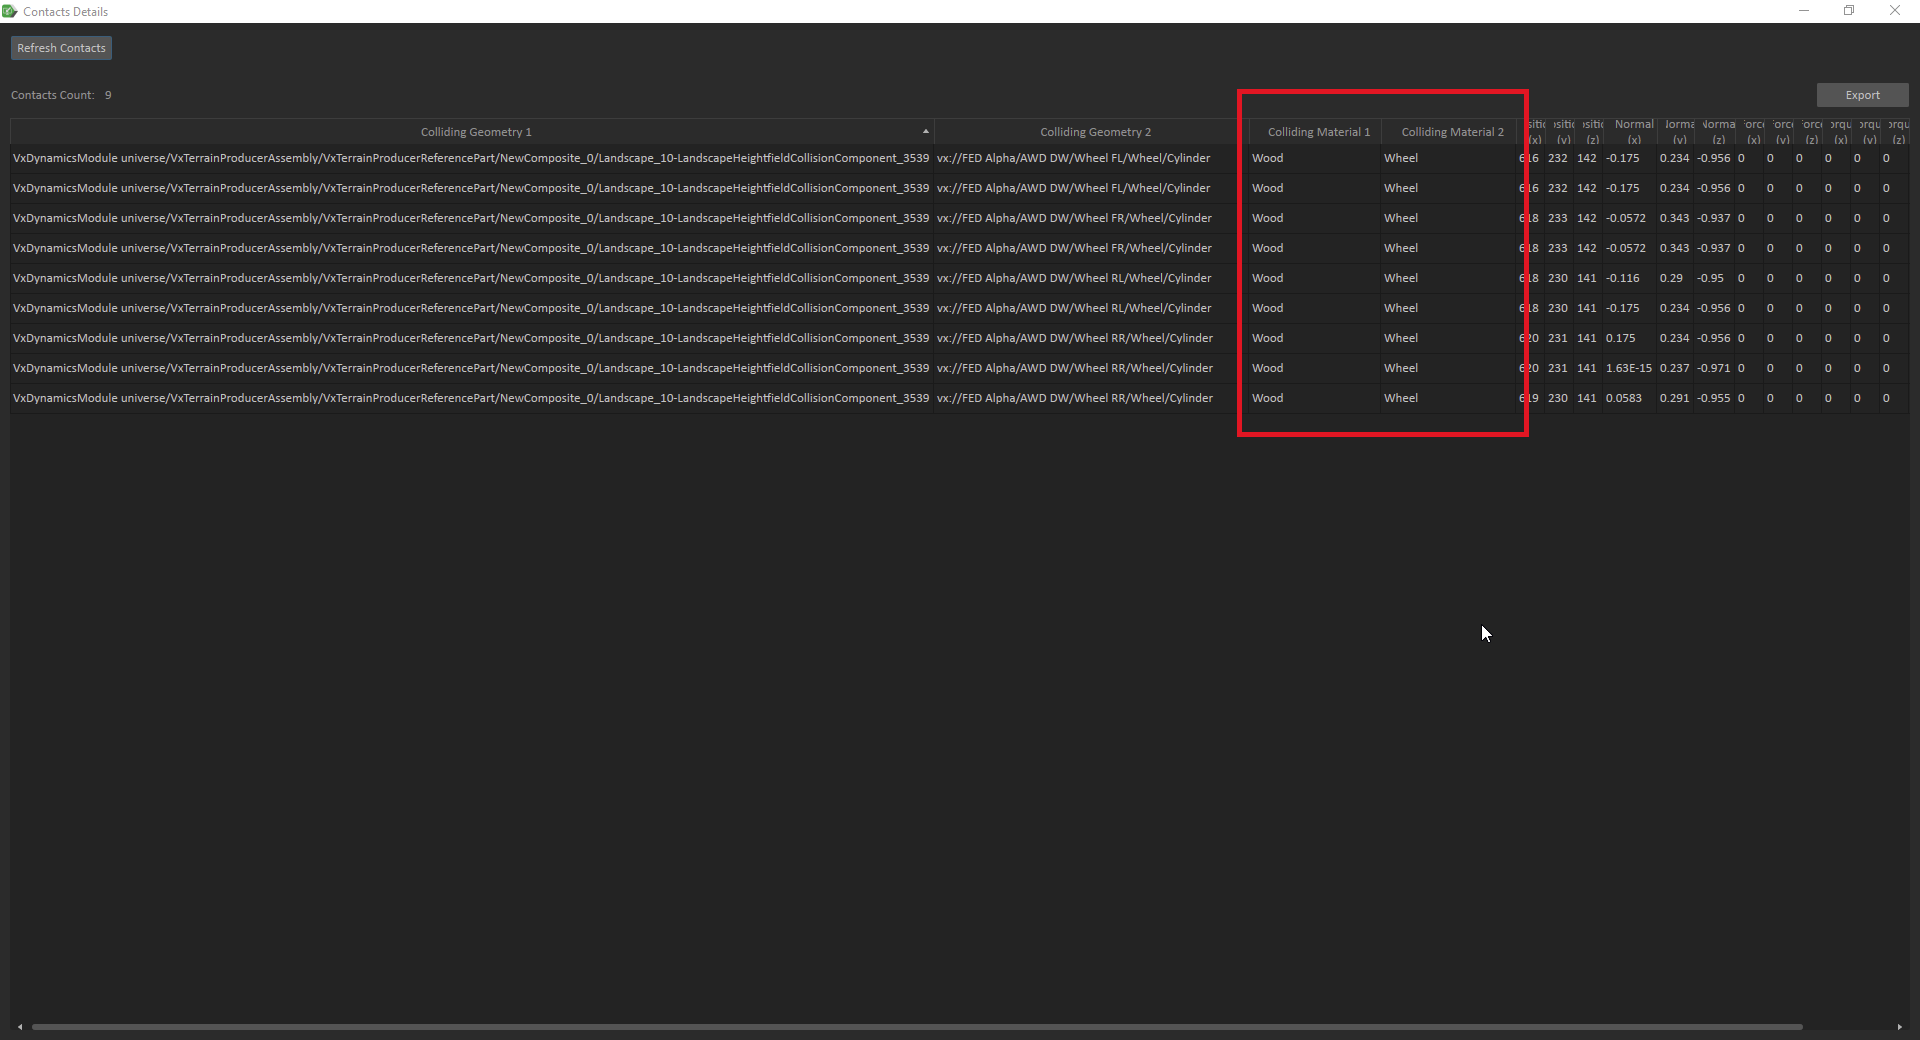
It can be useful to use the Vortex Studio Remote Debugger tool visualize your simulation. The tool lets you inspect collision geometries, contacts, part origins, and more to identify the source of problems.
|
 |

Supported Colliding Objects in Unreal
The Unreal Engine supports multiple colliding objects in your simulations, including landscape and static meshes.
Landscape
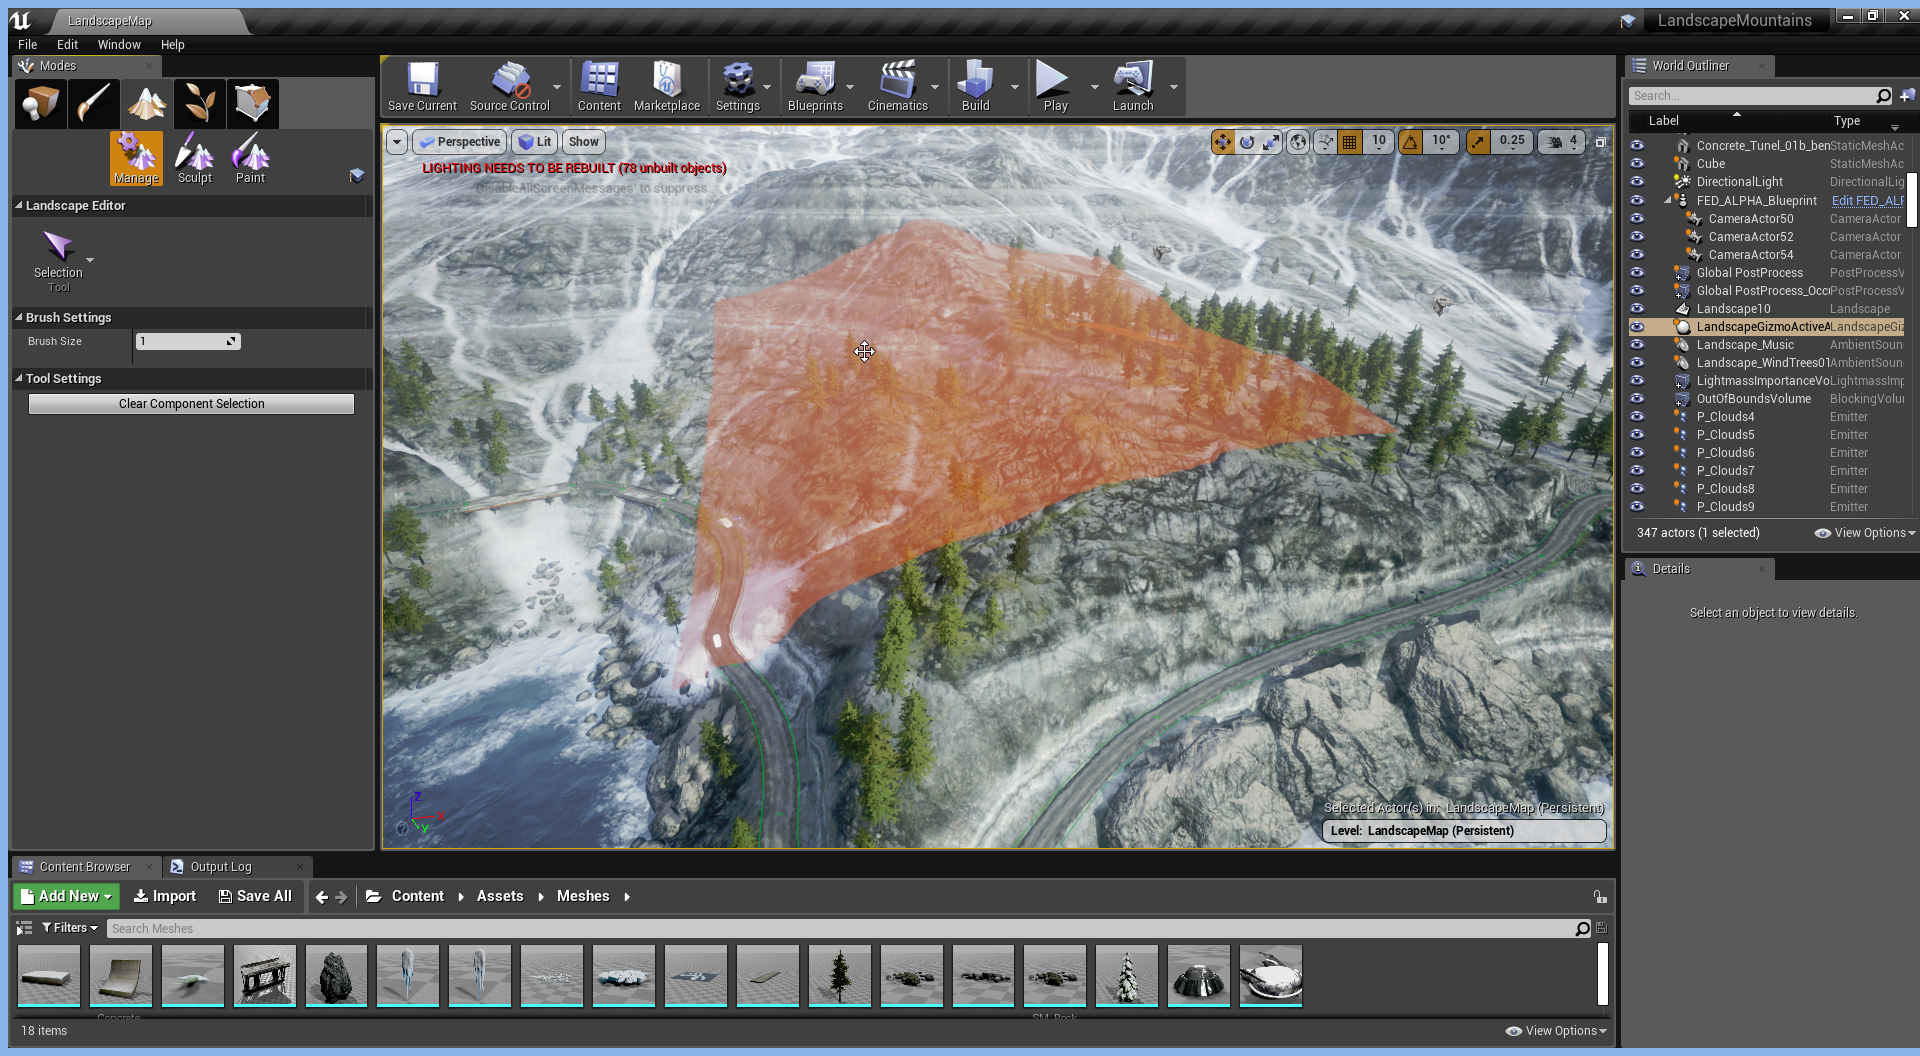
The landscape is the primary tool to create a terrain in the Unreal Engine. This object uses a height map to define the elevations of the terrain. It includes several Landscape Components (each with the same number of quads).
The plugin automatically discovers Landscape Components within a 50m x 50m range around any given Vortex Mechanism and creates the corresponding height field in the Vortex world (all this occurs at runtime).
The following image shows an example of a landscape component made of 127 X 127 quads (16129 quads):

You can inspect any generated height fields in the Vortex world using the Vortex Remote Debugger. The following image shows an example of generated height fields in the Vortex Remote Debugger:
Meshes That Do Not Simulate Physics
With the plugin, the application can generate collisions between a Vortex Mechanism and any Unreal mesh that does not simulate physics (static). For example, the system can generate collisions with the following:
- Static meshes
- Instanced static meshes, such as foliage
- Landscape splines
The Unreal Engine supports 2 different types of collisions:
- Simple Collision
- Complex Collision
By default, the application uses simple collisions, since they support better performance. You can override the collision type at different levels in Unreal Engine, in Project Settings or for the individual mesh. For more information about simple and complex collisions in Unreal, see: https://docs.unrealengine.com/en-US/Engine/Physics/SimpleVsComplex/index.html
The plugin always uses the same collision type as the one currently being used by PhysX on the Unreal Engine side. The integration supports the following shapes:
| Supported Simple Collision Shapes |
|
| Supported Complex Collision Shapes |
|
IMPORTANT: To function correctly, the static meshes cannot be in a blueprint containing a Deformable Terrain or a Soil Bin. The statics mesh must exist in a separate actor.
Example of Meshes that Do Not Simulate Physics
The following image shows a default simple collision used by a tree mesh (for foliage).
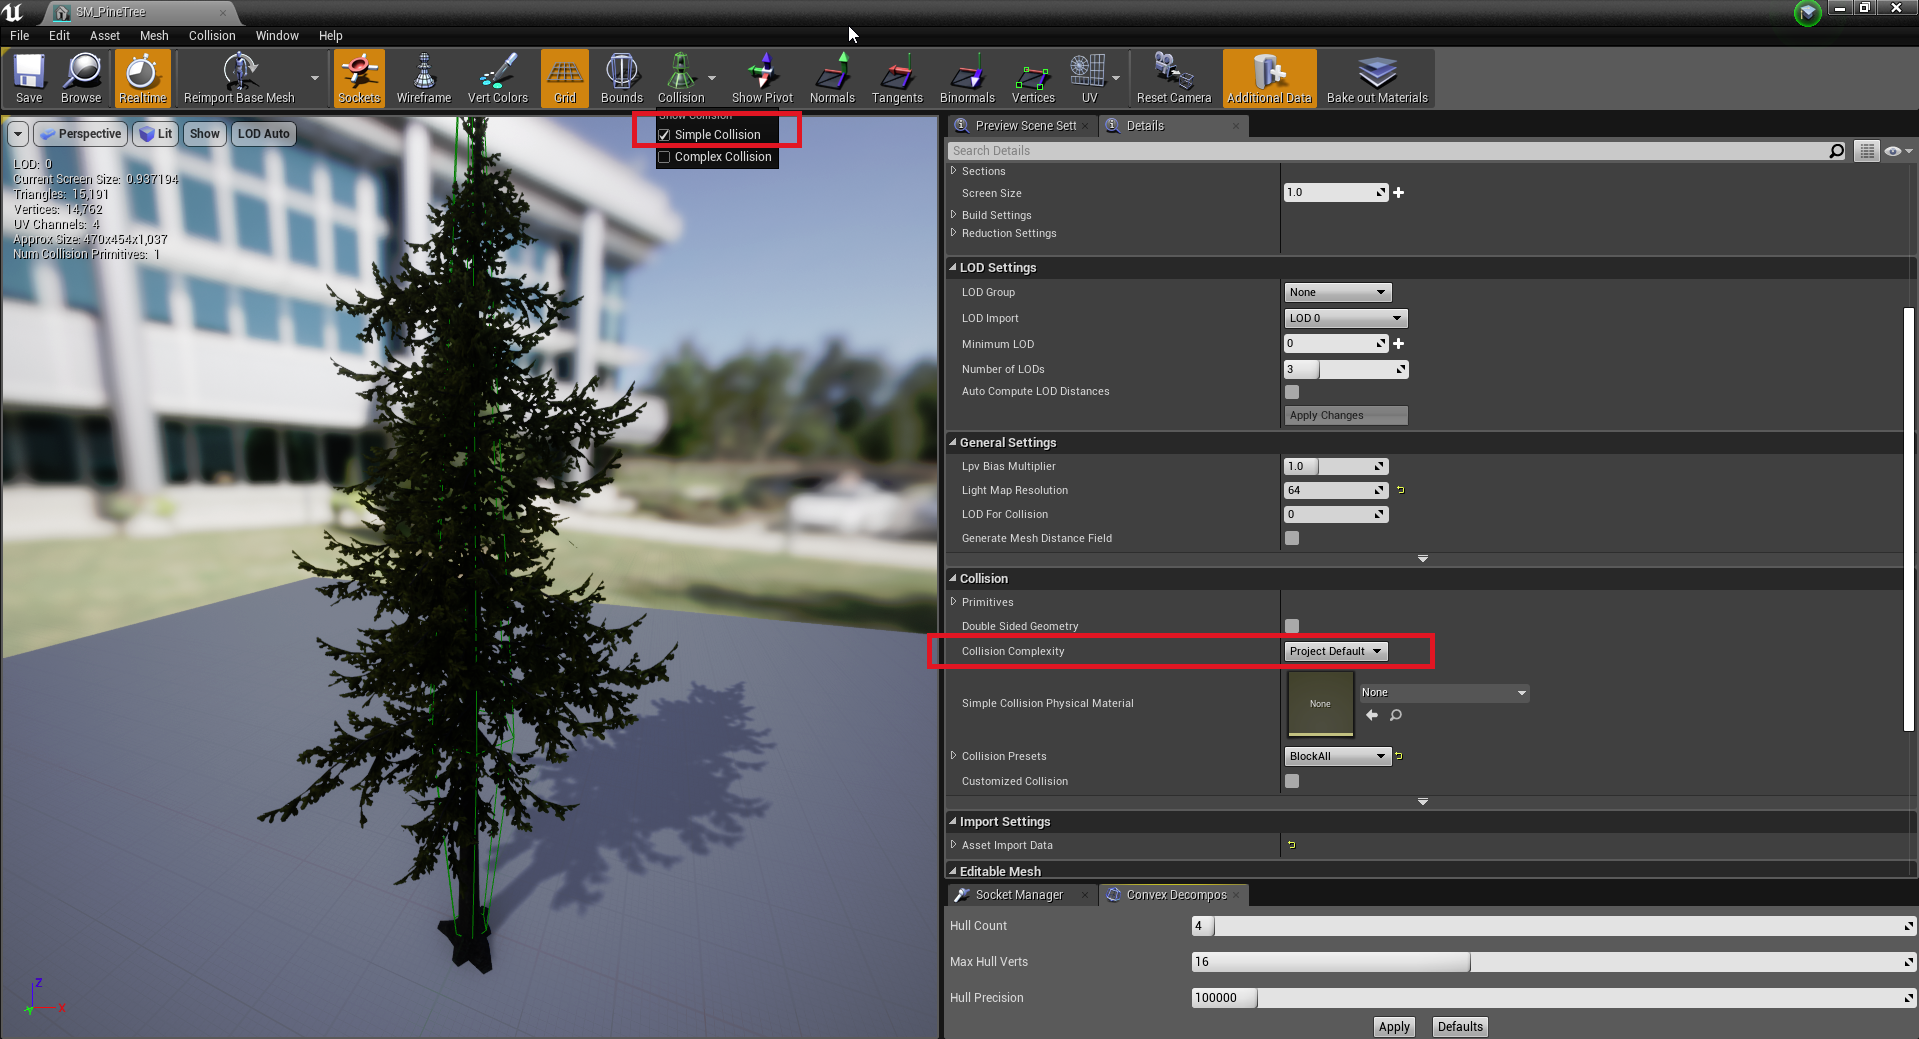
You can visualize the resulting geometry in the Vortex Remote Debugger:
Mapping Contact Materials
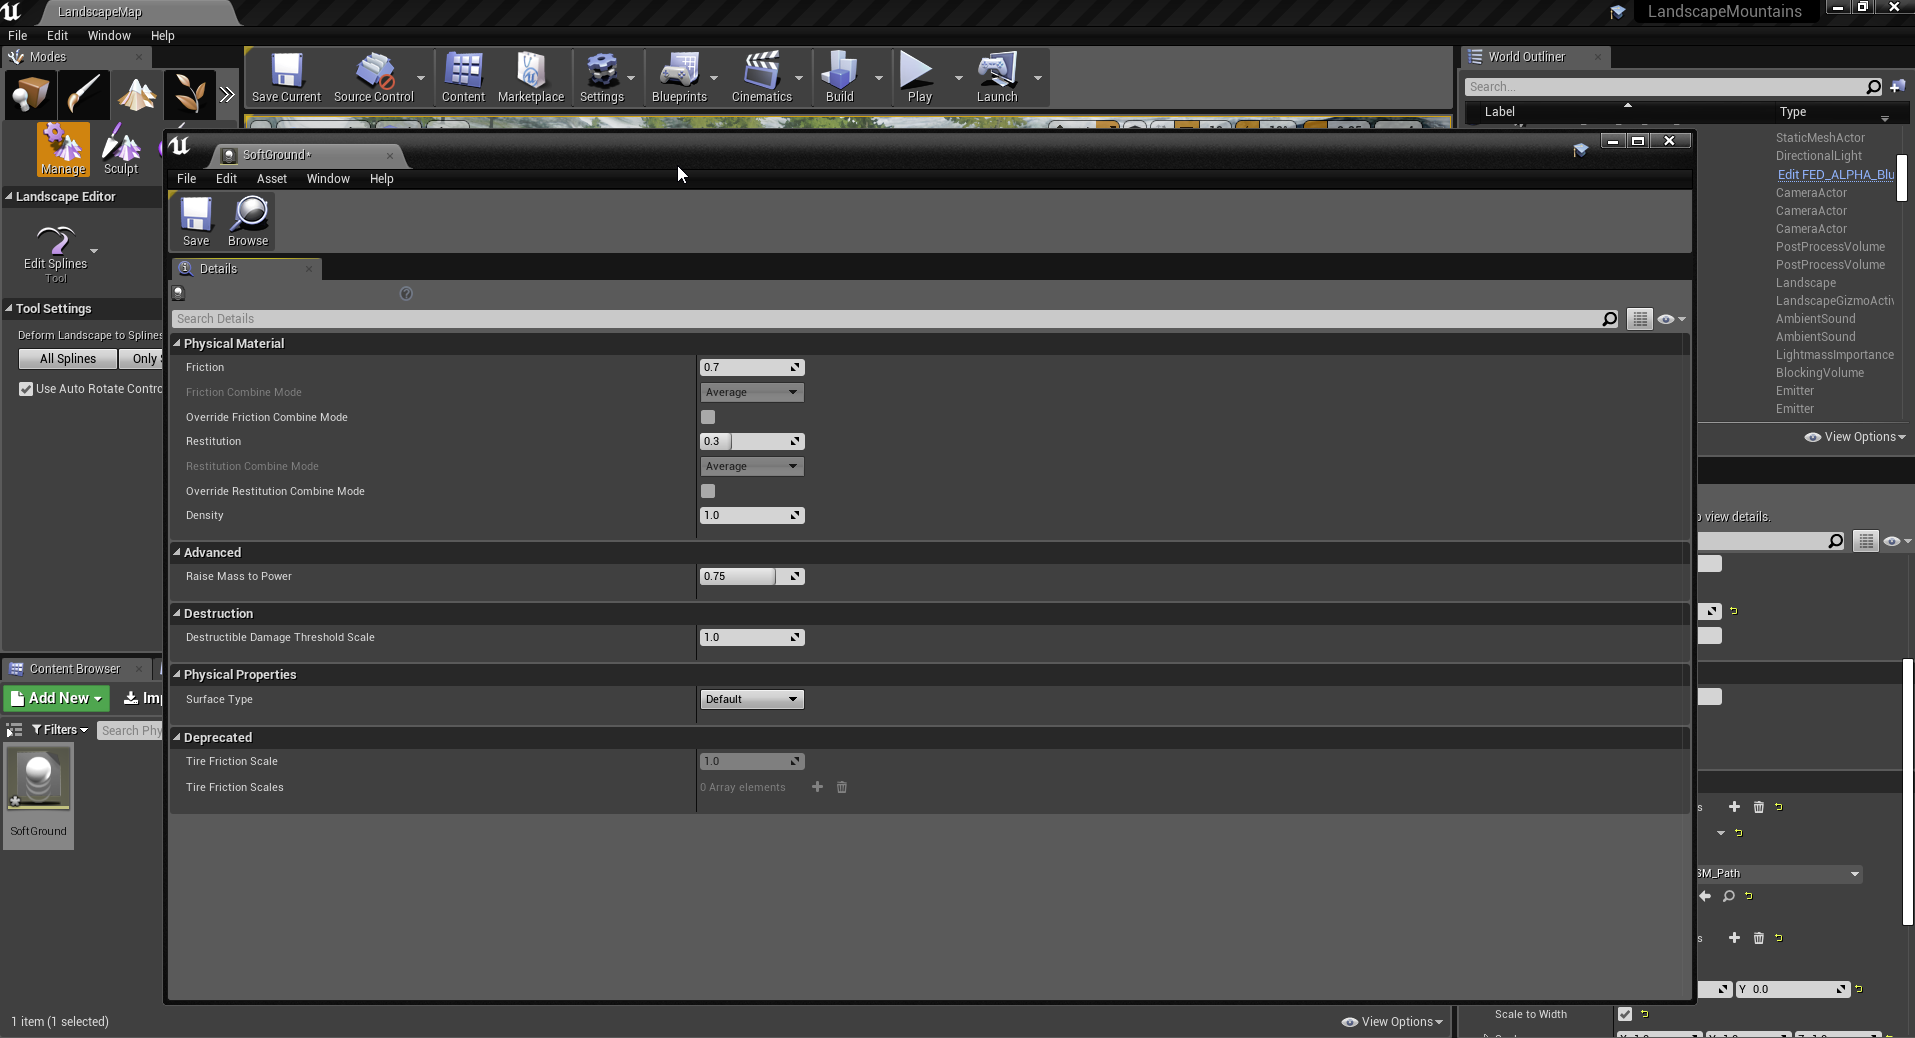
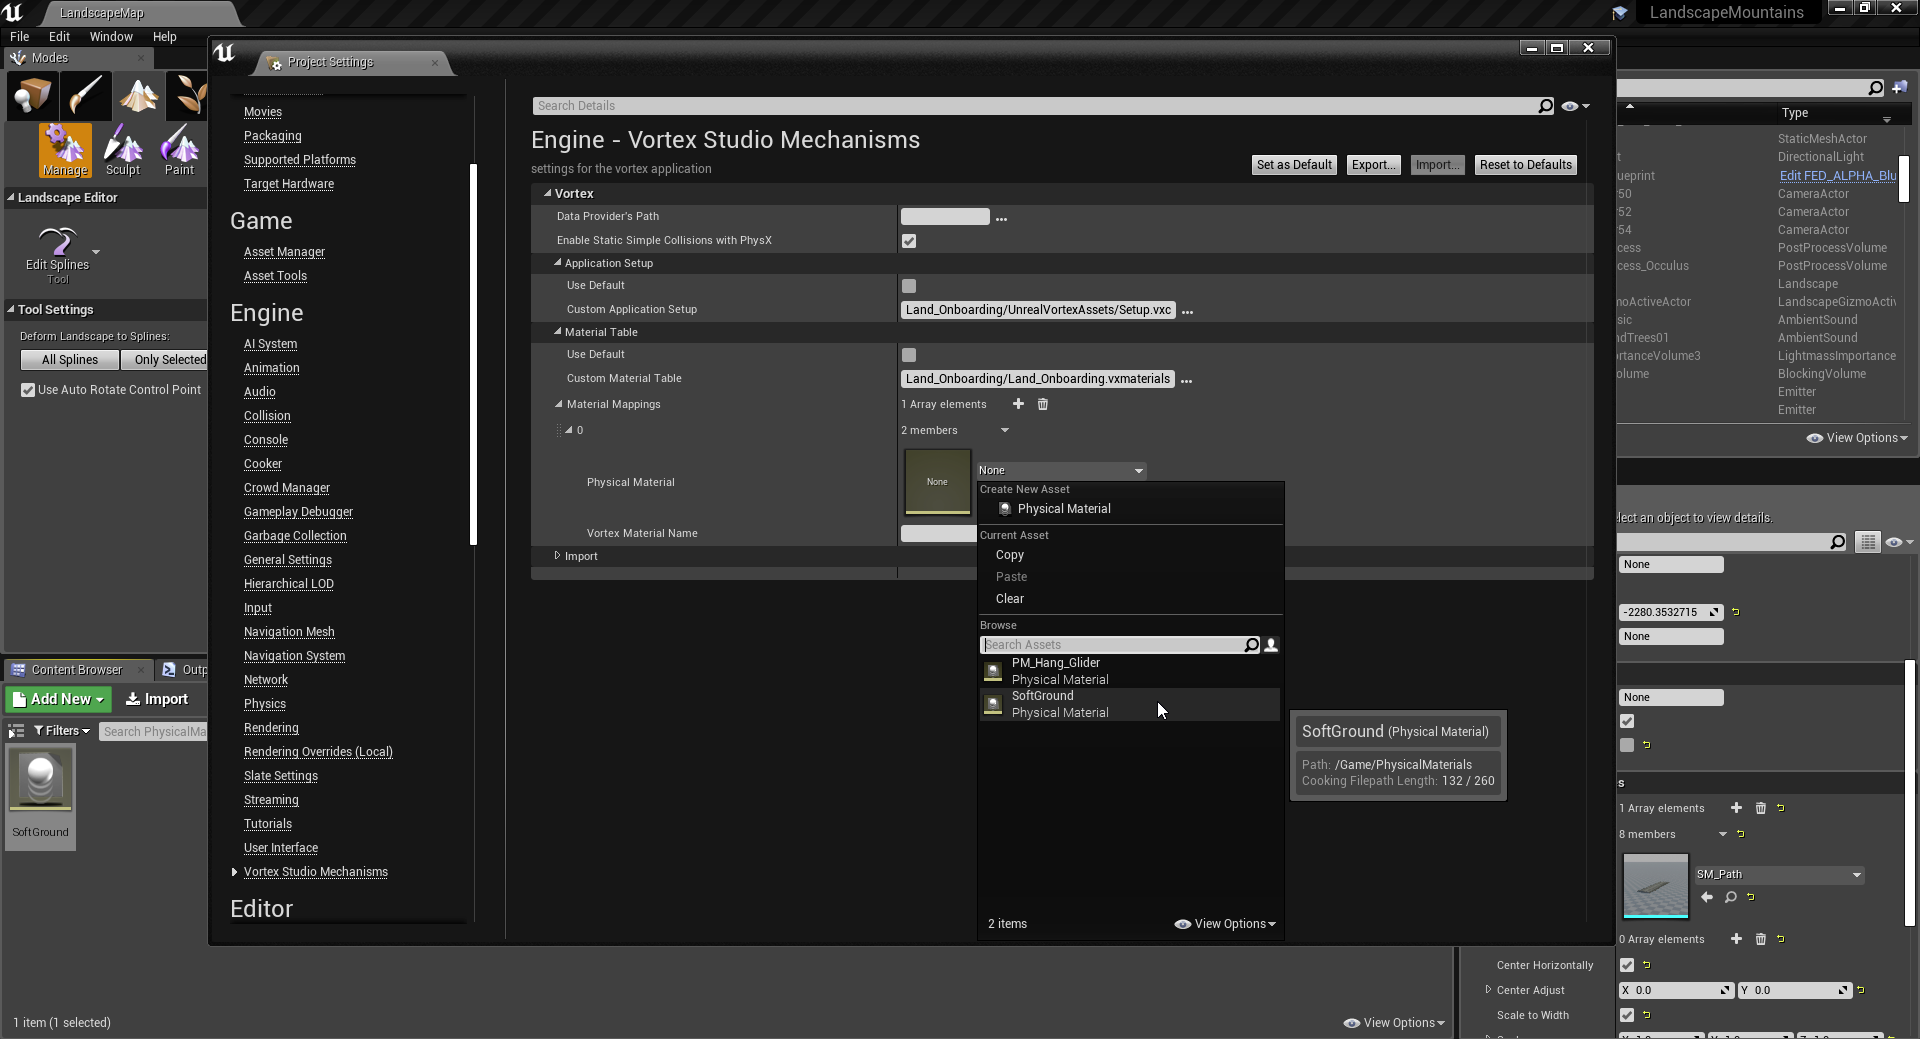
The Vortex Plugin for the Unreal Engine lets you specify which dynamic materials the application uses for a given collision. To configure this, you can map physical materials in Unreal to dynamics materials in Vortex Studio.
The physics properties you define for material in the Unreal Editor do not affect materials in Vortex Studio. The changes you make only apply to PhysX simulation in the Unreal Engine.
Create a Mapping for Contact Materials
To create a mapping for contact materials, do the following:
- If a Physical Material does not already exist in your Unreal project for the type of material you want to use, create a new one:
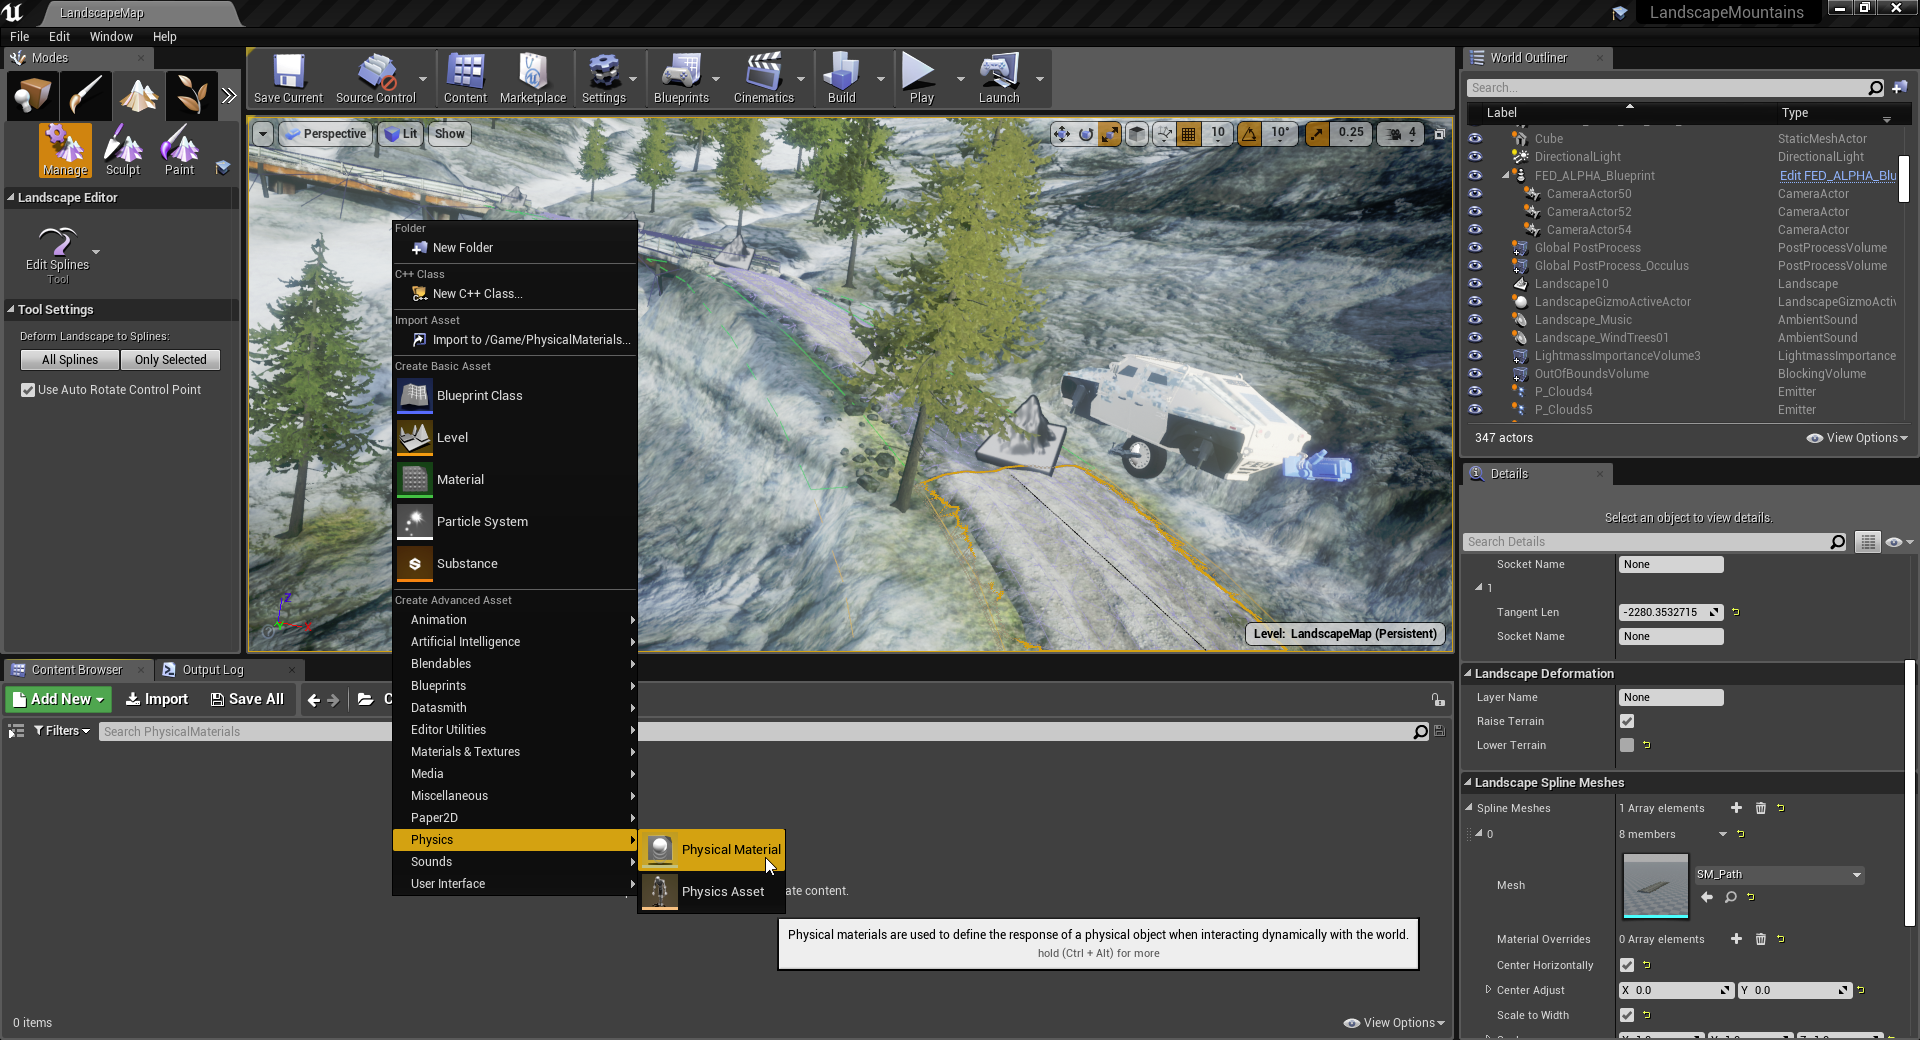
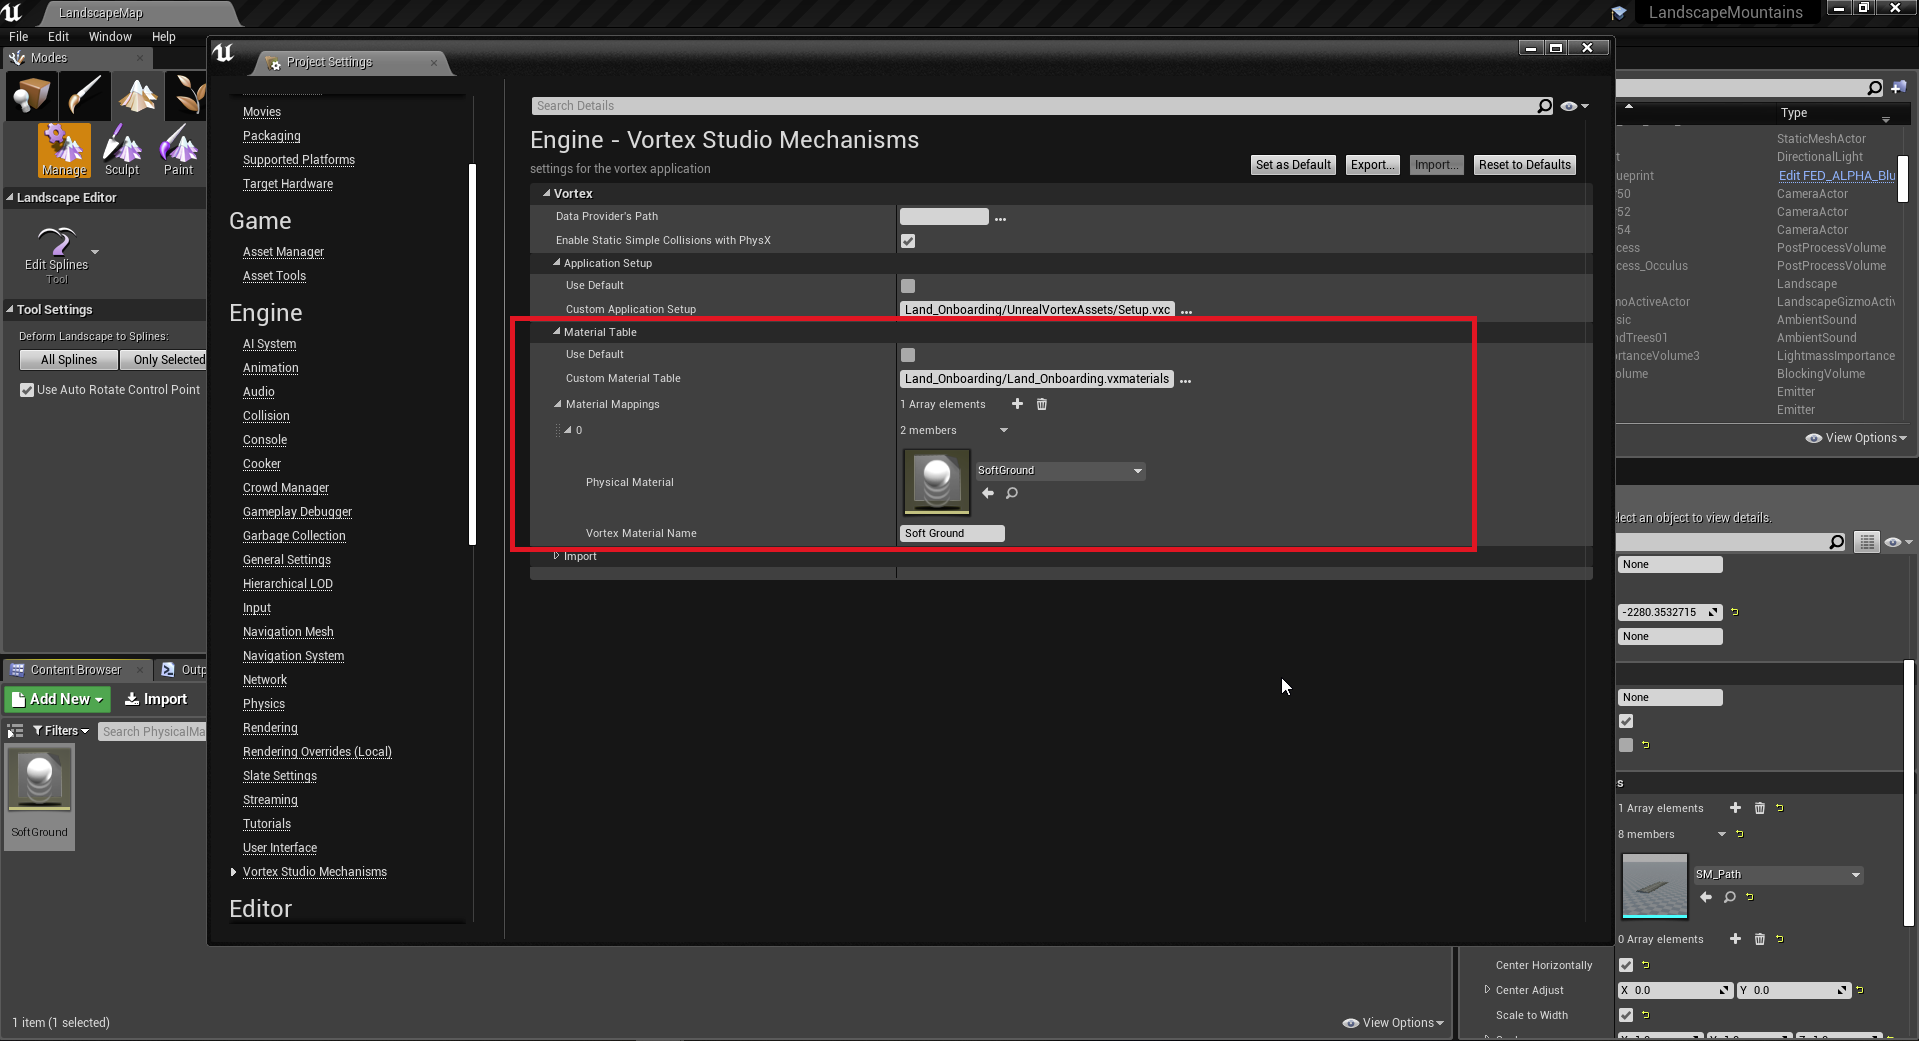
- Navigate to Project Settings → Vortex Studio and do one of the following:
- Click to select the Vortex material table you want to use.
- Accept the default material setting.
- Create a Material Mapping. In this new mapping, select the Unreal physical material you want to use and write the Vortex dynamics material that you want to associate it with. You can create a landscape mapping, static Mesh mapping, or static mesh mapping with complex collisions.
Map Landscape Materials
The Unreal Editor lets you assign physical materials by Landscape Layer. You can inspect each later here:
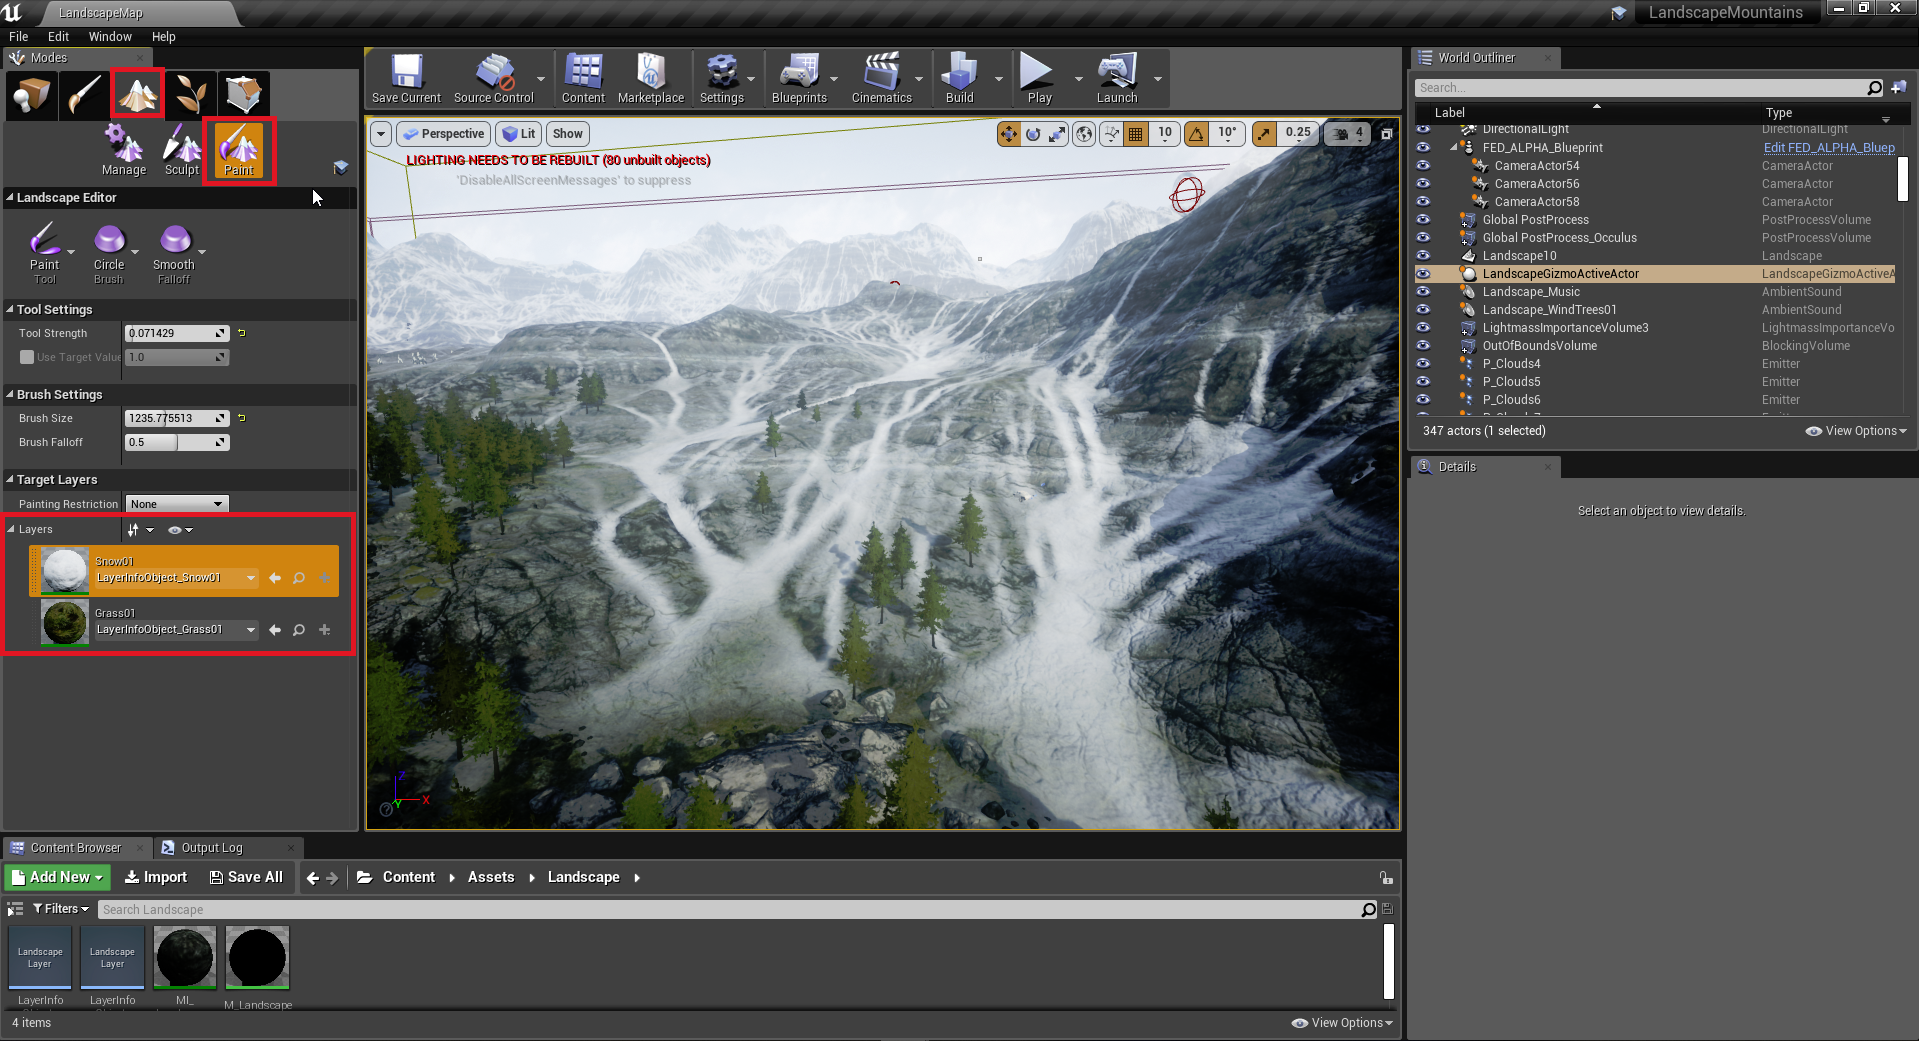
To map landscape materials, do the following:
- Click to select the layer that you will associate with a physical material.
- To automatically select the Landscape Layer Info Object, click on the lens icon next to it.

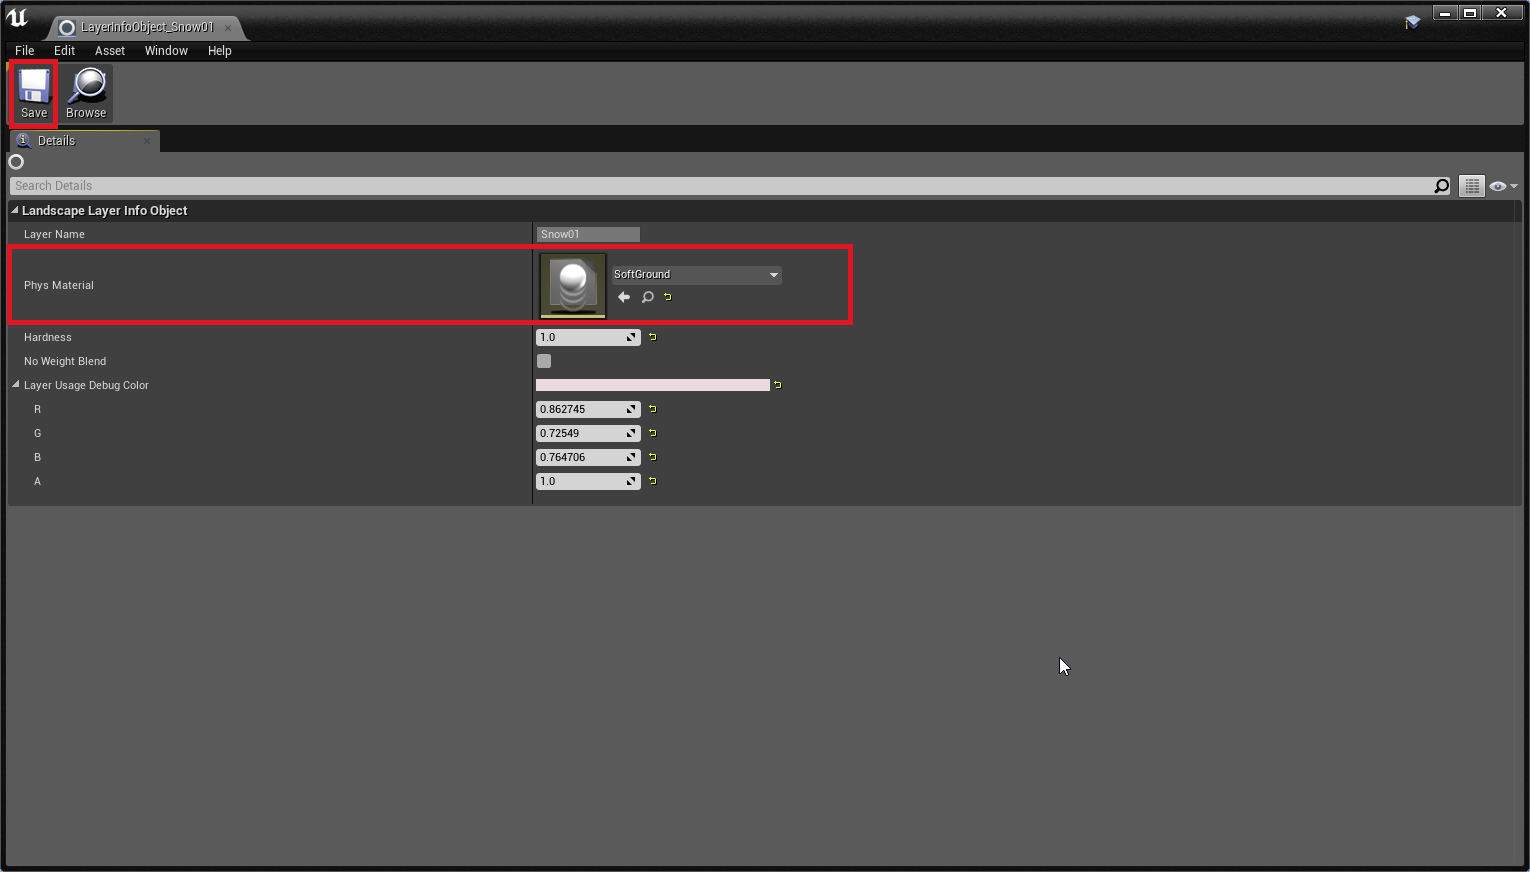
- From the Content Browser, double click on the Layer Info Object. The following window appears:
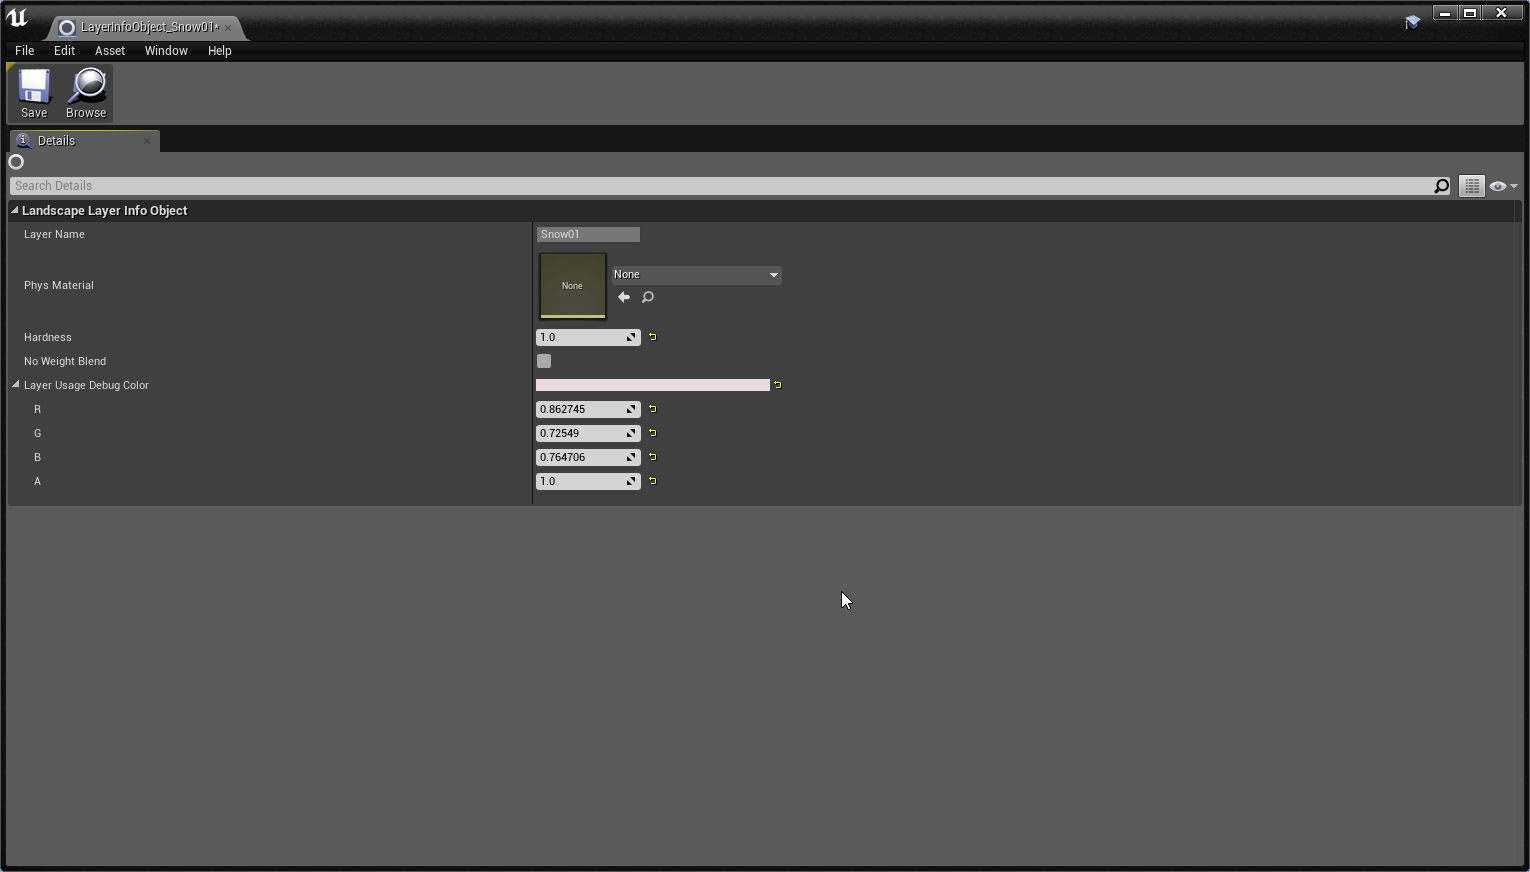
- Specify the Physical Material that you will associate with the layer and then press the Save.
Map Static Meshes
To map a static mesh, do the following:
- In the Unreal Editor, open a window for the static mesh that you want to associate with a physical material.
- Select the Simple Collision Physical Material that you will use for this mesh and save the changes.
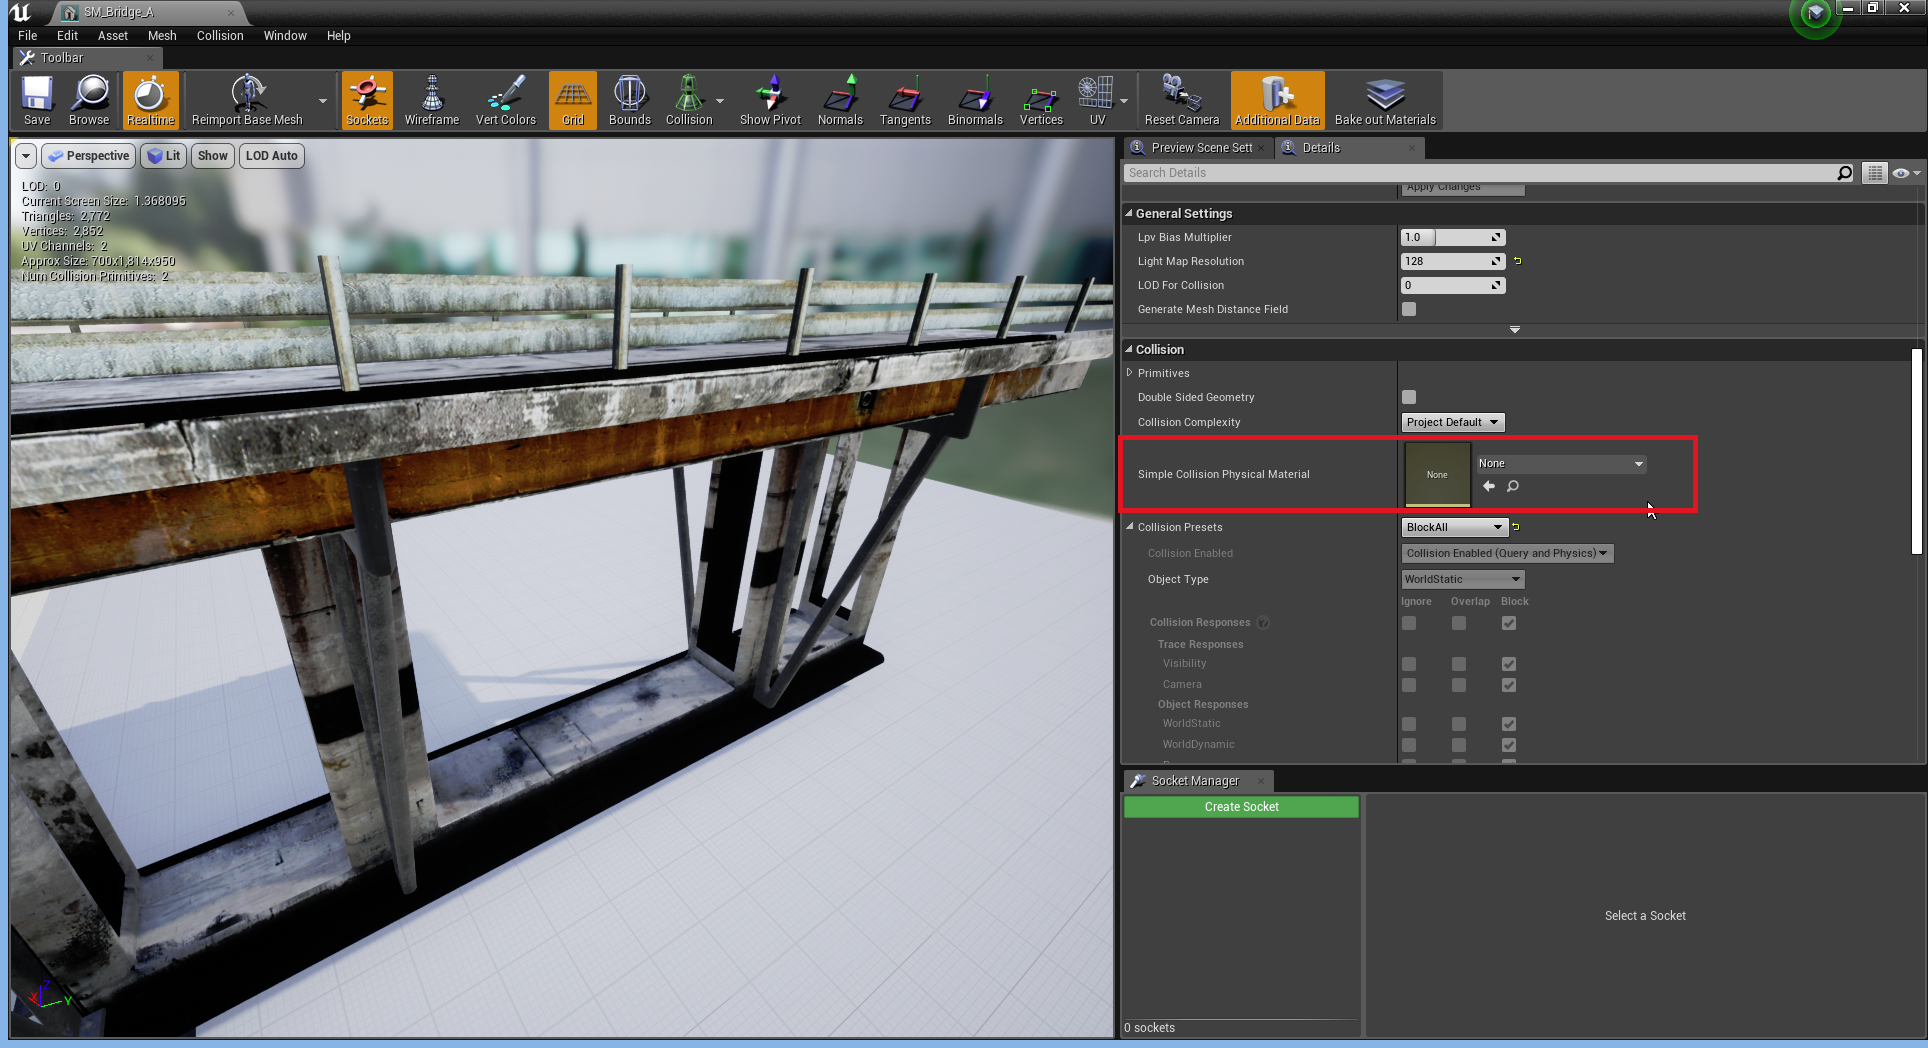
The system only applies the physical material if the mesh uses simple collisions
Map a Static Mesh Using Complex Collisions
To map a static mesh that uses complex collisions, do the following:
- In the Unreal Editor, open a window for the static mesh that you want to associate with a physical material.
- Search for graphics materials in the mesh.
When you use a complex collision, the application uses a graphics material to apply each physical material (a one-to-one relationship). You must pay special attention to the graphics material you select for the static mesh.

- Double click on the graphics material you want to open an editor for it.
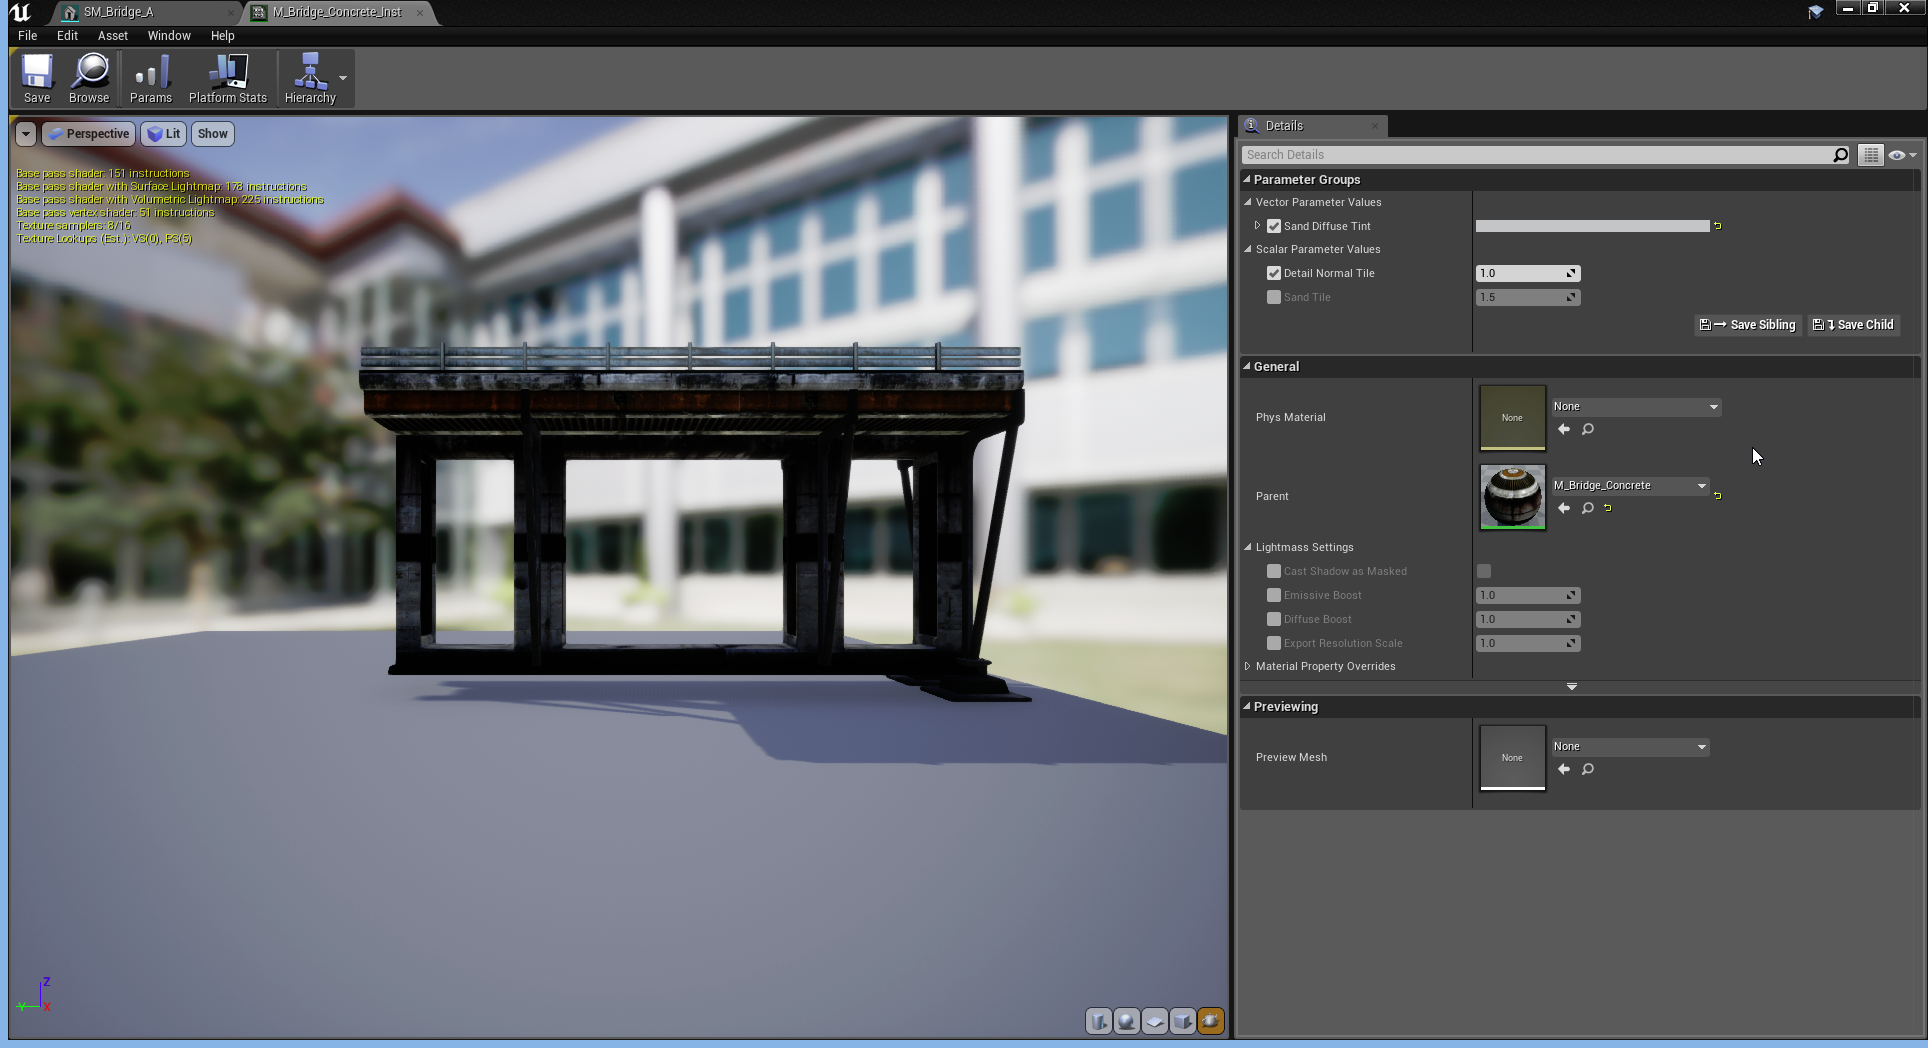
- From the editor window for the graphics material, select the physical material you will associate with the graphics material.
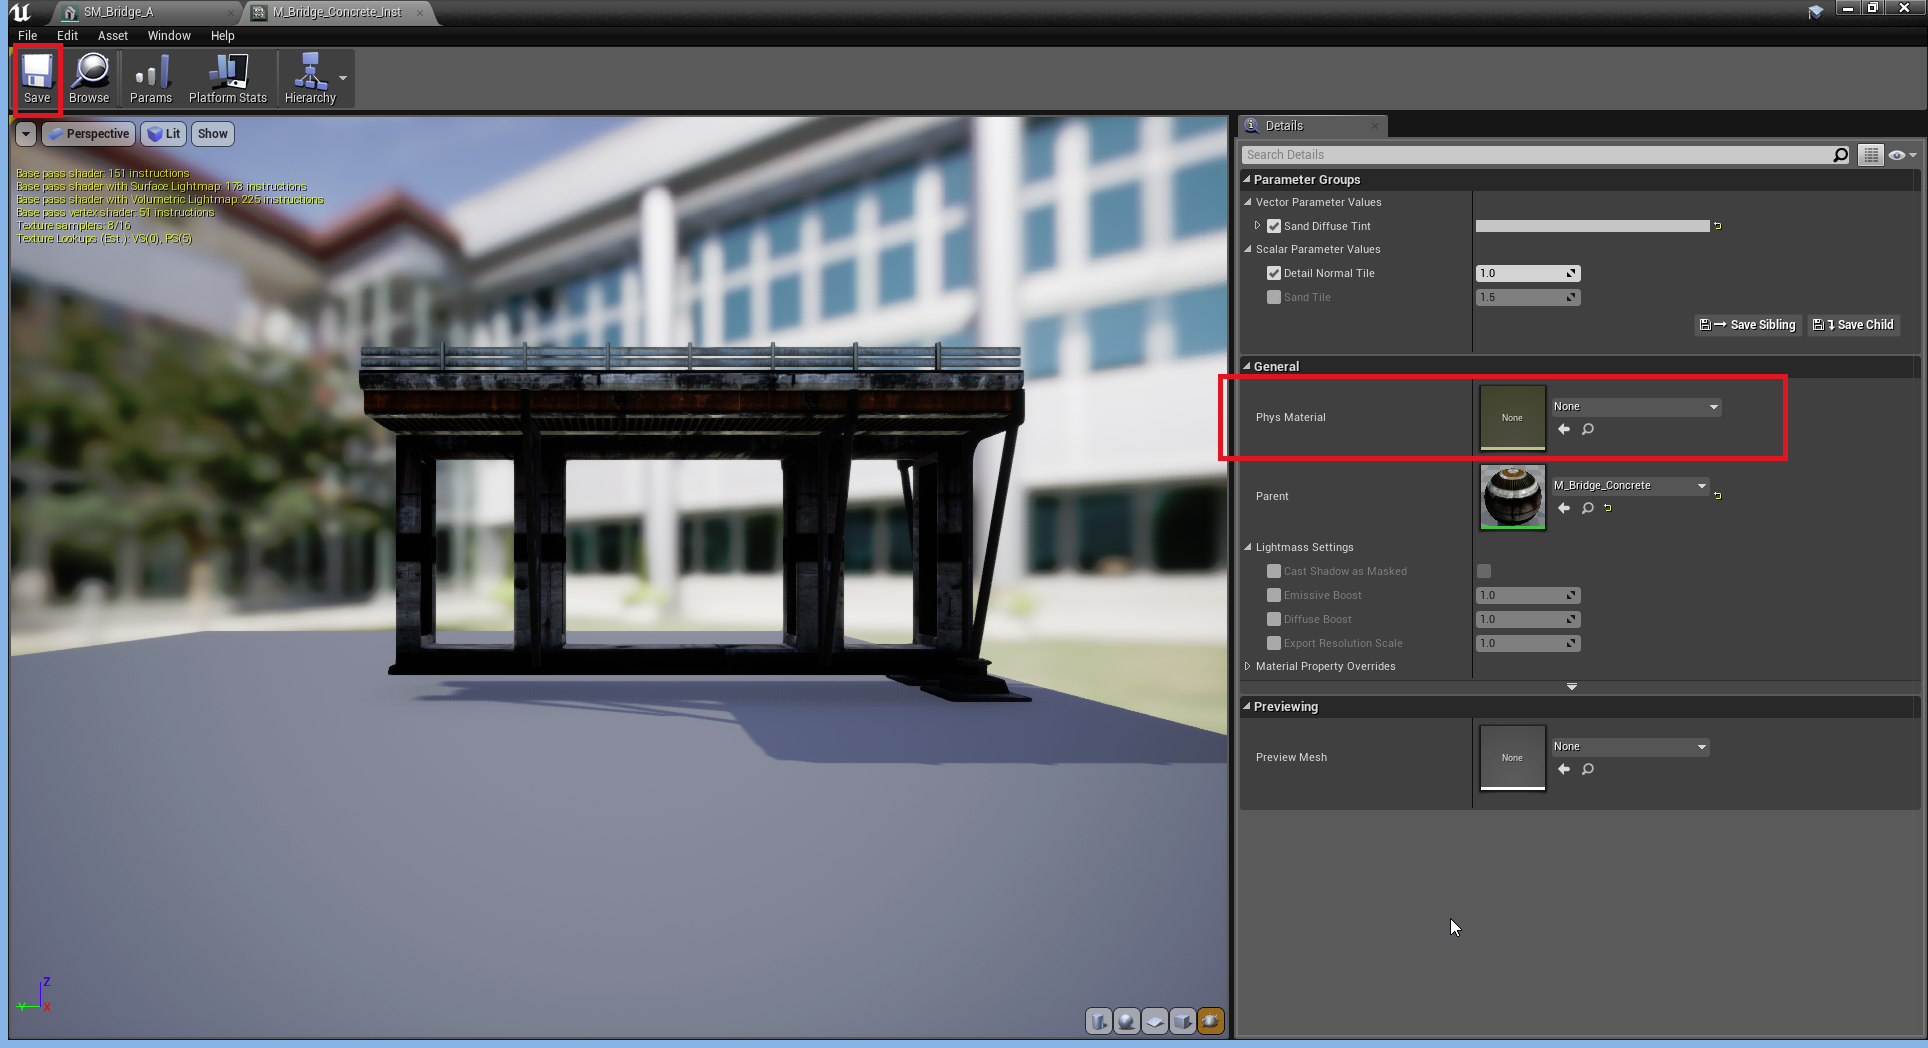
The application only applies the physical materials if the mesh uses complex collisions.
- (optional) Use the Vortex Studio Remote Debugger to debug Vortex Studio dynamics material.
Using the Vortex Studio Remote Debugger tool, you can inspect the dynamics material the Vortex Studio uses for a given contact from the following page:
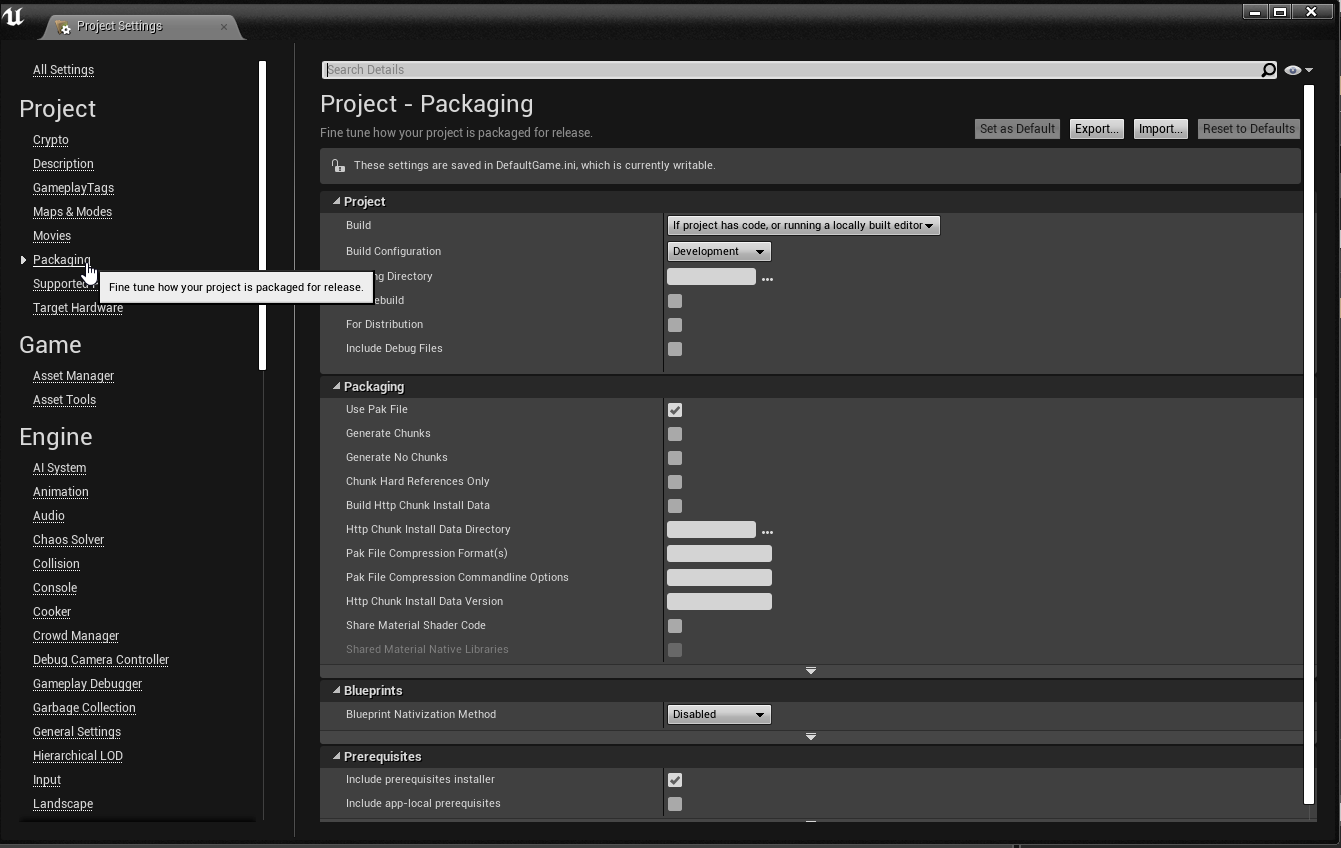
Packaging Your Project
Before you can distribute your simulation to users as an Unreal project, you must package it. Packaging ensures that all code and content is up to date and in the correct format to run on your target platform. For more information about packaging projects in Unreal, see the Packaging Projects topic in Unreal online documentation: https://docs.unrealengine.com/en-US/Engine/Basics/Projects/Packaging/index.html.
When you package an Unreal project that uses the Vortex Studio plugin, you must include all Vortex Studio assets with all the Unreal assets in the packaging process.
To prevent disorganization, CM Labs strongly recommends that you isolate the Vortex Studio assets, including mechanisms, assemblies, graphics galleries, the application setup document, and any material tables, in sub-folders under the Content folder of the Unreal project directory.
IMPORTANT: You can only use the Vortex Studio Plugin for Unreal Engine to package a project for Windows (64-bit)
To Package Your Project
To package a Vortex Mechanisms directory, including all dependent files, do the following:
- In the Unreal Editor, open the Project Settings for you project.
- Under Project, click to select Packaging.
- At the bottom of the Packaging items, click Show Advanced.
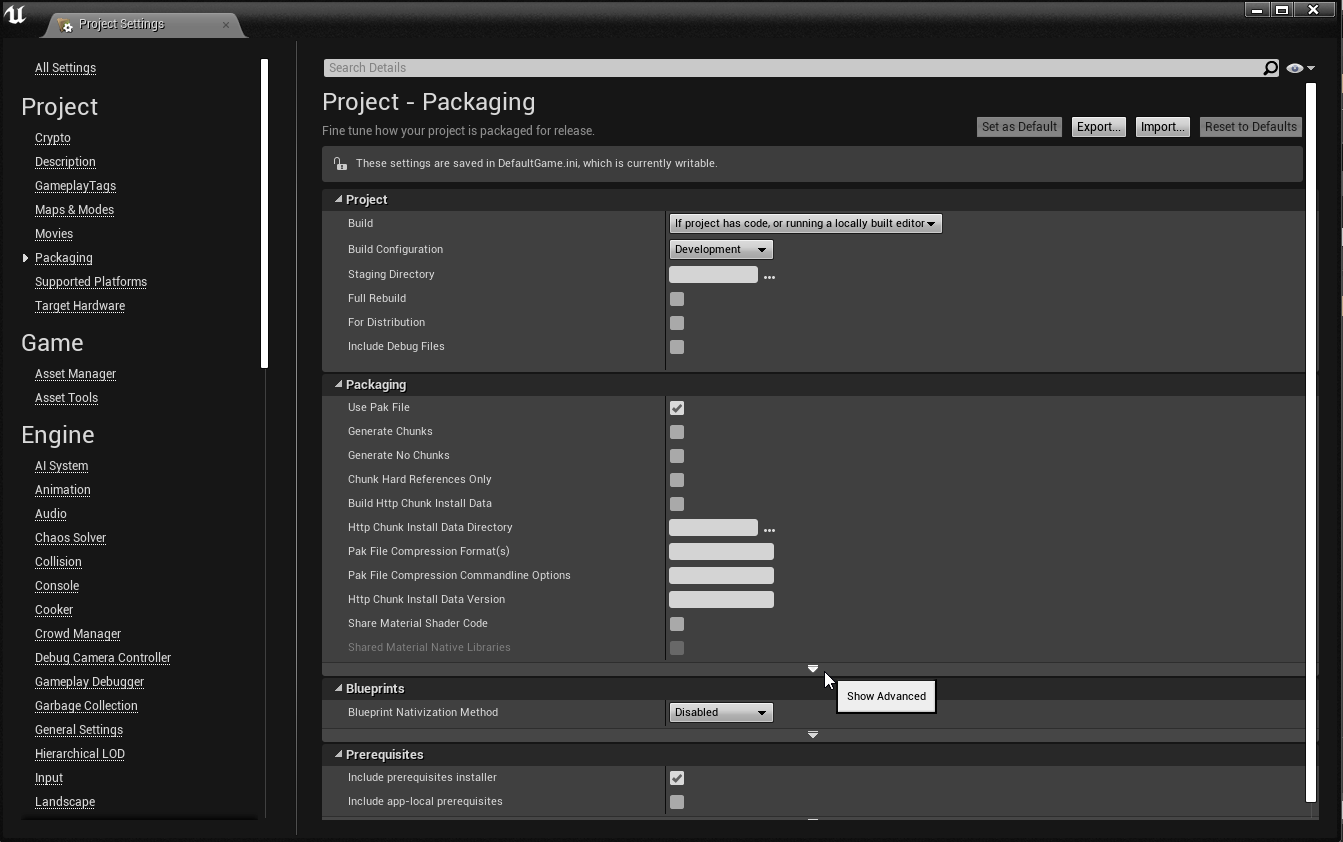
- Scroll down to Additional Non-Asset Directories to Copy.
- To add a new entry, press the + button and click to select the
Vortex_Mechanismsdirectory under theContentdirectoryA packaged version of your Unreal project will now run correctly.
Viewing Vortex Studio Log Files in the Unreal Editor
When you develop a project in the Unreal Editor using Vortex Studio content, you may need to refer to application information about the Vortex Studio simulation for debugging purposes. To facilitate troubleshooting, the Vortex Studio plugin and the Vortex Studio application log messages. To access application logs, follow these steps:
To View Vortex Studio Plugin for Unreal Engine Logs
When you use the plugin, Vortex Studio generates logs in the Output Log window of the Unreal Editor. The application groups log files under the LogVortex category:
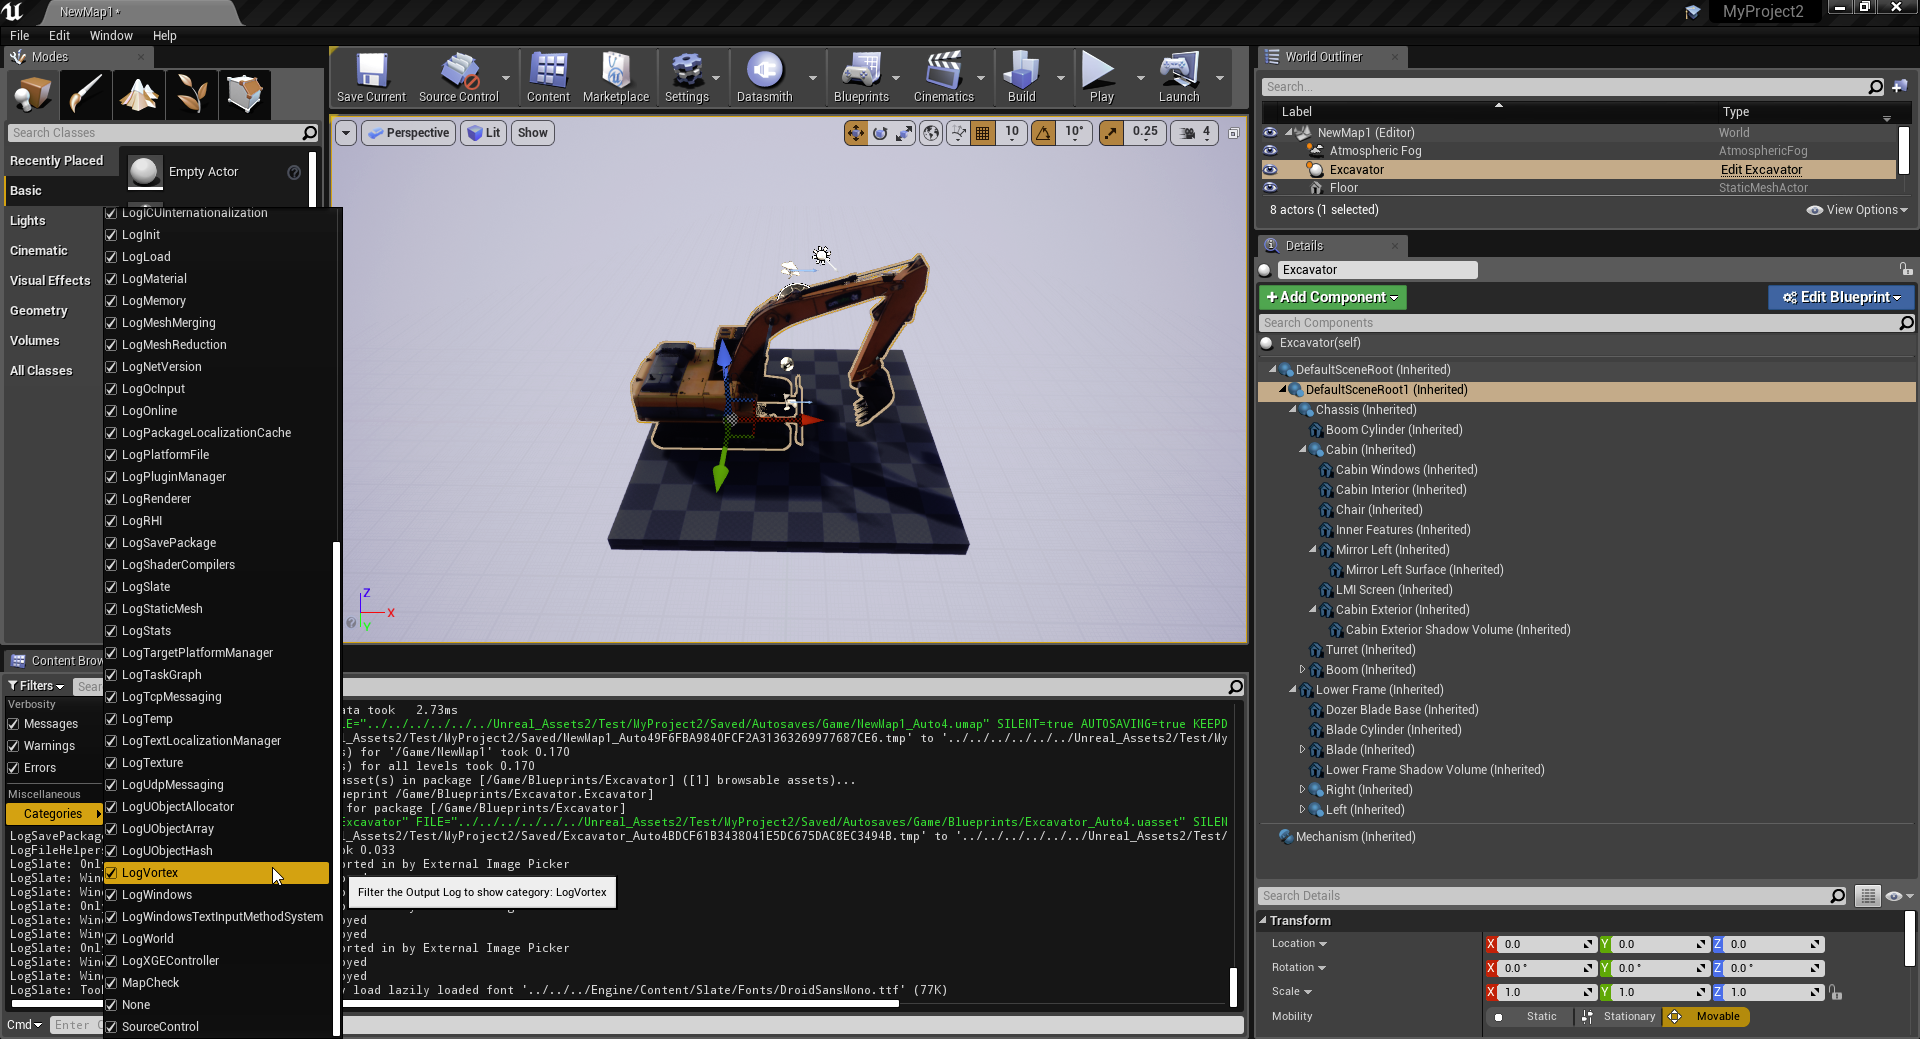
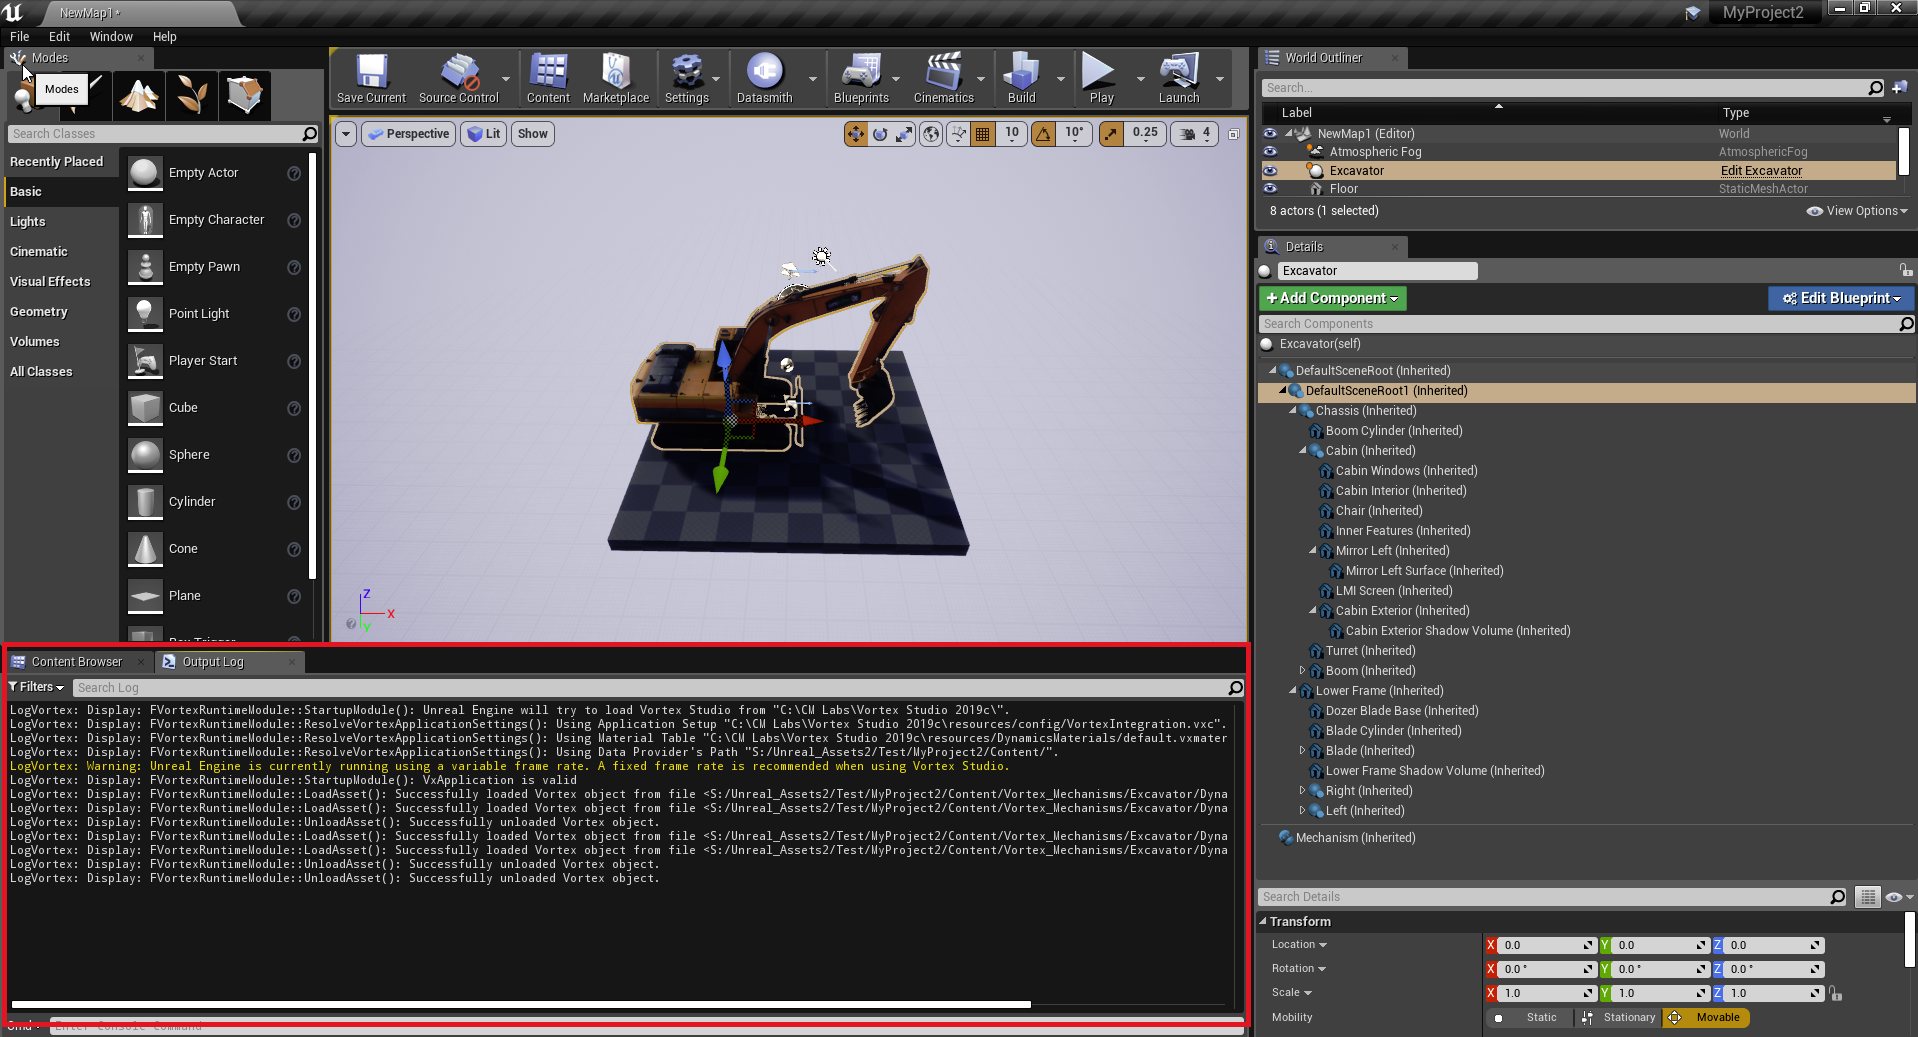
You can also find these logs in the Saved/Logs subfolder of your Unreal project.
Logs from the Vortex Application
Logs generated by the Vortex Studio application are output as .log files in the Saved/Logs subfolder of your Unreal project.
Limitations
Physical Interaction Between Unreal and Vortex Studio
The Vortex Studio Plugin for Unreal Engine allows Vortex mechanisms to interact with Unreal static objects only. When enabling this feature, a 50m x 50m detection box is used in the Unreal world around each Vortex Mechanisms to automatically detect all static obstacles. Those obstacles are streamed at runtime to Vortex to create corresponding collision geometries.
Supported Platform
The Vortex Studio Plugin for the Unreal Engine only supports the "Windows (64-bit)" platform.