C++ Tutorial 2: Integrating in a Third-Party Application
Vortex Studio applications can be integrated with third-party applications using various methods. This module covers how the entire Vortex Studio Dynamics engine can be integrated into a C++ application.
Requirements
Participants must have some basic C/C++ training before taking this training module. To be able to compile and run code, participants must have Visual Studio 2015 (VC14), Visual Studio 2017 (VC15) or Virtual Studio 2019 (VC16) installed.
Introduction
A second use of the SDK is to embed the Vortex Studio dynamics engine in a larger C++ application. In this situation, Vortex Studio does not control its main application loop. The parent application loads up the Vortex Studio engine, then can either:
- load content that was created using the Editor
- dynamically create all mechanisms, assemblies and parts through code
Once all content is loaded or created, the parent application tells the engine to perform simulation steps when needed. Data can be injected into the engine before a step is executed, while data can be extracted from the engine after execution took place.
This type of integration allows for a very tight coupling of Vortex Studio with another application, with direct access to data in either direction.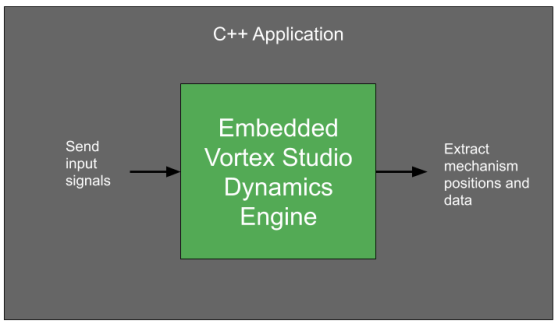
More information on this topic can be found in Integrating the Application.
Running ExVHLIntegration Example
A great example of integrating Vortex Studio dynamics in a third-party application is the ExVHLIntegration example found in the C:\CM Labs\Vortex Studio <version>\tutorials directory. You can either compile the code for this application or run the pre-compiled version by running the runExVHLIntegration.bat script located in the C:\CM Labs\Vortex Studio <version>\tutorials\bin directory.
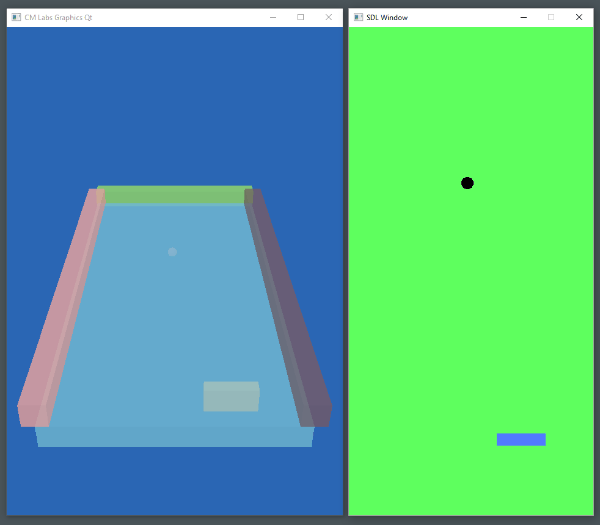
This example opens up two windows when it starts up. The window shown on the left in the image above is a Vortex Studio 3D view showing a mechanism made from simple collision geometries. The window on the right is rendered using a utility library called SDL. At every step of this application's execution, C++ code queries the keyboard to see if the paddle should move left or right, sends this data to Vortex Studio, asks Vortex to run its physics, then queries the position of the paddle and ball to render its graphics. The left-hand Vortex Studio window renders automatically as part of the Vortex application execution. This type of window is especially useful when developing an integration in a third-party application. It can be activated or hidden based on the content of the setup document that the code reads in at initialization. We'll take a closer look at the code of this sample below.
The file main.cpp contains the application's main function, the typical starting point for most C/C++ applications. It follows by instantiating the application's main class and asks that class to execute.
#include "ExVHLIntegration.h"

// main is a macro in SDL_main.h
#ifdef main
#undef main
#endif

// Start the game's loop
int main(int argc, const char *argv[])
{
	ExVHLIntegration app;
	return app.exec();
}
Looking at the exec method, the first thing it does it to call the class's _init method, which we'll look at in a moment. It then goes into a main loop until the value of the mRunning variable is called. In this main loop, the application will handle incoming events, update the physics, render graphics, then wait a bit to run at 60 Hz and go through the same loop.
int ExVHLIntegration::exec()
{
	int status = 0;

	try
	{
		// Pre-Loop Initialization
		_init();

		Uint32 last = 0;
		while (mRunning)
		{
			Uint32 now = SDL_GetTicks();

			// Handle the frame rate to step every 1/60 of a second
			if (now > last + (1000/60))
			{
				// Handles the event received by SDL
				_events();

				// Step the physic engine and manage the custom integration rules
				_update();

				// Draw the entities on the 2d display buffer
				_render();

				// Step done, let's wait for the next one
				last = now;
			}
			else
			{
				SDL_Delay(1);
			}
		}
	}
	catch(...)
	{
		// Something's wrong.
		status = 1;
	}

	// Happy ending
	_cleanup();
	return status;
}
The first part of the _init method is related to the SDL portion of this application, creating a window for the 2D view, creating a renderer and configuring it, as well as loading some graphic assets.
void ExVHLIntegration::_init()
{
	// Initialize the SDL library's video component and events.
	if(SDL_Init(SDL_INIT_VIDEO) < 0)
	{
		throw std::runtime_error("Error initializing the SDL library.");
	}

	// 400x800 window
	mWindow = SDL_CreateWindow("SDL Window", SDL_WINDOWPOS_UNDEFINED, SDL_WINDOWPOS_UNDEFINED, 400, 800, 0);
	if (mWindow == nullptr)
	{
		throw std::runtime_error("Cannot create the SDL window.");
	}

	// Graphic renderer
	mRenderer = SDL_CreateRenderer(mWindow, -1, SDL_RENDERER_ACCELERATED);
	if (mRenderer == nullptr)
	{
		throw std::runtime_error("Cannot create the SDL renderer.");
	}

	SDL_SetRenderDrawColor(mRenderer, 94, 255, 94, 255);
	SDL_RenderClear(mRenderer);
	SDL_RenderPresent(mRenderer);

	// Load the ball bitmap
	mBallTexture = _load("../resources/ExVHLIntegration/Bitmap/ball.bmp", true);
	if (mBallTexture == nullptr)
	{
		throw std::runtime_error("Cannot load ../resources/ExVHLIntegration/Bitmap/ball.bmp.");
	}

	// Load the paddle bitmap
	mPaddleTexture = _load("../Resources/ExVHLIntegration/Bitmap/paddle.bmp");
	if (mPaddleTexture == nullptr)
	{
		throw std::runtime_error("Cannot load ../resources/ExVHLIntegration/Bitmap/paddle.bmp.");
	}
Once SDL initialization is complete, the code moves on to initializing the Vortex Studio part of the application, first by called the VortexCreateApplication function and passing to it a setup document (ExVHLIntegration.vxc), then loading a Vortex vxscene file and storing a pointer to the resulting scene in a variable.
After the scene is loaded, the following two blocks of code retrieve pointers to the ball and paddle mechanisms.
// Initialize Vortex with the VortexIntegration API
// - Use the setup file provided
// - No need for a material table (there is one in the scene)
// - No need for a Data Store

mVortexCreated = VortexCreateApplication("../resources/ExVHLIntegration/ExVHLIntegration.vxc", nullptr, nullptr, nullptr, nullptr);
if (!mVortexCreated)
{
	throw std::runtime_error("Cannot create Vortex Application with setup \"../resources/ExVHLIntegration/ExVHLIntegration.vxc\".");
}

// Load the scene, keep the handle for the Unload
mScene = VortexLoadScene("../resources/ExVHLIntegration/Design/ExVHLIntegration.vxscene");
if (mScene == nullptr)
{
	throw std::runtime_error("Couldn't load scene \"../resources/ExVHLIntegration/Design/ExVHLIntegration.vxscene\".");
}

// Keep the mechanism references for easier manipulation and rendering.
// Ball mechanism
mBall = VortexGetChildByName(mScene, kBall);
if (mBall == nullptr)
{
	throw std::runtime_error("Couldn't find Ball Mechanism in scene \"../resources/ExVHLIntegration/Design/ExVHLIntegration.vxscene\".");
}

// Paddle mechanism
mPaddle = VortexGetChildByName(mScene, kPaddle);
if (mPaddle == nullptr)
{
	throw std::runtime_error("Couldn't find Paddle Mechanism in scene \"../resources/ExVHLIntegration/Design/ExVHLIntegration.vxscene\".");
}

// Set the application running flag
mRunning = true;
As mentioned before, the _events, _update, and _render methods are then called sequentially every iteration. The _events method's main function is to listen for keyboard events and determine if the paddle should be moved to the left or right and store the resulting outcome in some global variables. We won't go into the details of this code here.
The _update method is more interesting, as we can see below. It first determines if the paddle is moving left or right, then it uses a function called VortexSetInputReal whose parameters are the mechanism pointer, a string to the name of a VHL interface under this mechanism, and another string containing the name of the VHL interface element that we want to write to. This simple function allows developers to easily write to any variable that's been added to a VHL interface.
Next up is the VortexUpdateApplication function, which will get Vortex to simulate. If that function returns false, then we set the mRunning variable to false, as it would indicate that the Vortex component has terminated its execution. The mRunning variable is checked every iteration in the exec method to determine if the parent application should exit.
After running the dynamics, we use the _getPosition function to retrieve a position matrix for the ball using the ball mechanism pointer, the name of its VHL interface, and the parameter name for the position in that interface. With this information in hand, the code checks to see if the ball has fallen lower than a certain position and flags the application to exit if that condition is met.
void ExVHLIntegration::_update()
{
	// User moves the paddle by pressing left or right arrow button. Pressing both will stop the paddle.
	double dir = static_cast<double>( g_inputs.right - g_inputs.left );

	// Access the input Velocity from the VHL Interface of the paddle mechanism and moves it at a speed of 4 unit per second in the given direction.
	VortexSetInputReal(mPaddle, kInterface, kVelocityId, 4.0 * dir);

	// Updates the Vortex application.
	if ( !VortexUpdateApplication() )
	{
		mRunning = false; // The simulation was terminated, we're done.
	}

	// Get the ball's position that by its interface Position output value.
	auto pos = _getPosition(mBall, kInterface, kPositionId);

	// Special rule: if the ball hits the bottom of the 2d screen, the application close
	if (_toSDLRect(pos).y > 790)
	{
		mRunning = false;
	}
}
// Utility function that extract the Vortex coordinates into easy to use x,y,z coordinates.
VortexCoordinates _getPosition(VortexObjectHandle handle, const char* interfaceName, const char* outputName)
{
	double pos[3] = { 0., 0., 0. };
	double rot[4] = { 0., 0., 0., 0. };
	VortexGetOutputMatrix(handle, interfaceName, outputName, pos, rot);

	return VortexCoordinates{pos[0], pos[1], pos[2]};
}
Last but not least, the _render function retrieves the position of the paddle and the ball using each mechanism's VHL interface, then calls some SDL functions to prepare data and update the graphics in the 2D application.
void ExVHLIntegration::_render()
{
	SDL_RenderClear(mRenderer);

	// Position and draw the paddle
	{
		auto pos = _getPosition(mPaddle, kInterface, kPositionId);
		SDL_Rect dstRect = _toSDLRect(pos, kPaddleWidth, kPaddleHeight);

		SDL_RenderCopy(mRenderer, mPaddleTexture, 0, &dstRect);
	}

	// Position and draw the ball
	{
		auto pos = _getPosition(mBall, kInterface, kPositionId);
		SDL_Rect dstRect = _toSDLRect(pos, kBallWidth, kBallHeight);

		SDL_RenderCopy(mRenderer, mBallTexture, 0, &dstRect);
	}

	// Update the SDL window with any rendering performed since the previous call.
	SDL_RenderPresent(mRenderer);
}
The final bit of code relating to embedding Vortex Studio in a third-party application is the clean-up phase, found in the _cleanup method. As can be seen in the code below, pointers are free by being set to nullptr, the VortexUnloadScene and VortexDestroyApplication functions are called to unload and free the content of the dynamics simulation, as well as free all memory related to Vortex Studio. Finally, some SDL cleanup functions are called at the same time.
void ExVHLIntegration::_cleanup()
{
	// No longer needs the references
	mBall = nullptr;
	mPaddle = nullptr;

	// Unload the scene
	if (mScene != nullptr)
	{
		VortexUnloadScene(mScene);
		mScene = nullptr;
	}

	// Destroy Vortex
	if (mVortexCreated)
	{
		VortexDestroyApplication();
		mVortexCreated = false;
	}

	// Release owned memory.
	SDL_DestroyTexture(mBallTexture);
	SDL_DestroyTexture(mPaddleTexture);
	SDL_DestroyRenderer(mRenderer);
	SDL_DestroyWindow(mWindow);

	SDL_Quit();
}
Compiling this code produces an executable application that will be able to load and simulate Vortex Studio Content. When executed, the application will load a number of DLLs (Dynamic Link Libraries) from the Vortex Studio installation directory. You must therefore make sure that your path includes the bin and plugins folders of Vortex Studio for the correct version that was used to link your application.