Vortex Studio Director
- DEVOPS
 The Vortex Studio Director is a desktop-based application that provides system integrators with an interface for creating, configuring, launching and monitoring a simulator.
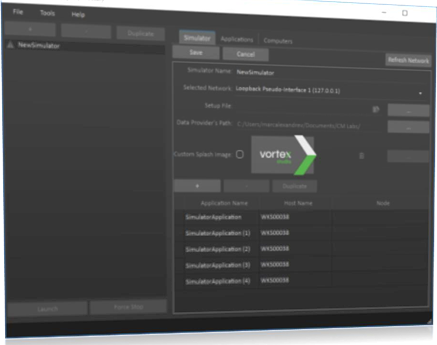
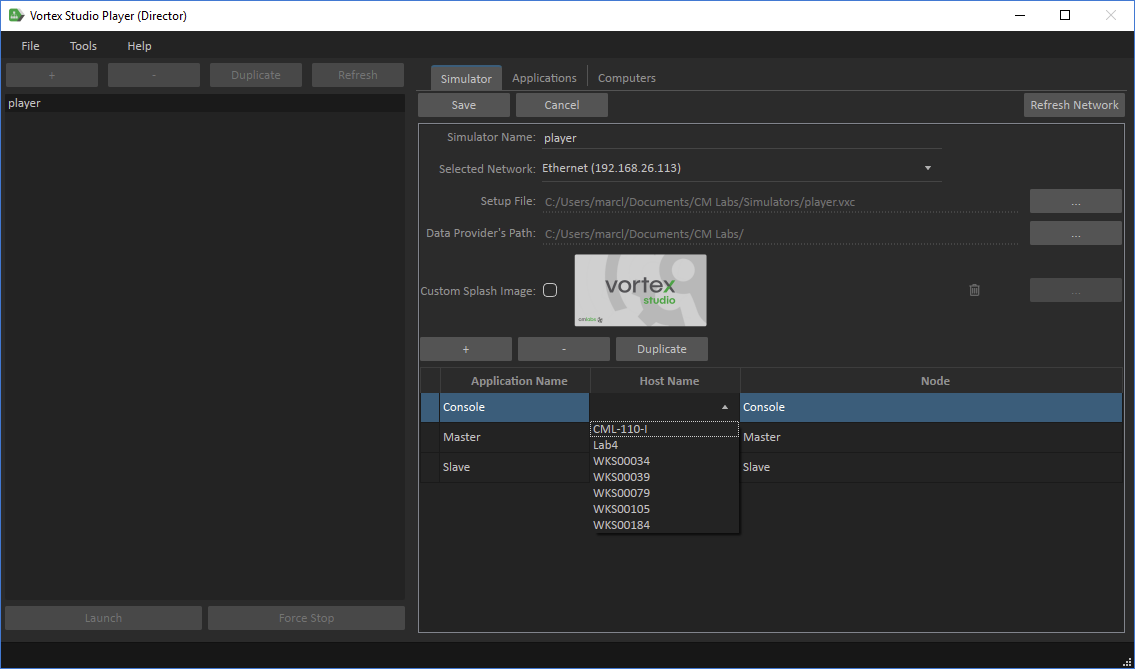
Vortex Studio Director User Interface
The following properties are configurable in a simulator:
- Simulator Name: Name of the file defining a simulation.
- Selected Network: Network adapter used to communicate to the remote machines.
- Setup File: File containing the setup of the application, i.e., modules and extensions used in the different nodes.
- Data Provider Path: Local path used by the node elected to be the data provider.
- Custom Splash Image: Splash image used when starting a simulation.
The Director has the following interface:
- On the left, a list of available simulators can be managed and selected, then started or stopped.
- On the right, the selected simulator can be edited in order to, for example, add more applications, select nodes in the setup file, and modify the network adapter.
- Computers of a given network are also discovered and errors are validated when editing (indicated by a check mark).
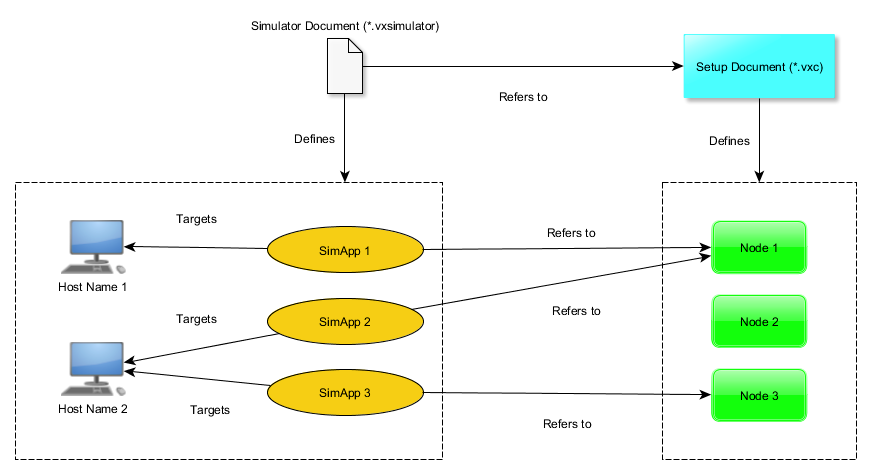
Defining a Simulator with Vortex Studio Director
A simulator file contains the description of simulation applications distributed over a network of computers.
Configure a Simulator
- Creating a new simulator
To create a new simulator, press the + button and Edit in the Simulator tab on the right. - Selecting a network
Select the most appropriate network, e.g., Ethernet for a LAN distributed simulator or loopback (127.0.0.1) for a local simulator. - Selecting the setup file
Select the setup document describing the nodes of your simulator. The setup document has been created using Vortex Studio. - Defining the data provider path
Optionally, you can modify the path where simulator files and other distributed simulation data will be stored. - Add a custom splash image
Optionally, you can modify the splash image. - Add simulation applications
Add as many simulation applications (also known as nodes) as needed using the + button.
For each node, you need to fill the following fields:
- Application Name: Name of your application. It will show up in logs. and help identify your node while debugging. If you leave it to the default value, it will rename itself to the Node you will select
- Host Name: The host name of the computer on which the node will be run. It can be chosen from the list of the recognized machines. Use Refresh Network to update the list if needed. For inspection purpose, the Computers tab lists all the computers found using the selected network.
- Node: Name of the node in the Setup document. The selection will rename the Application Name it that filed was left to its default value.
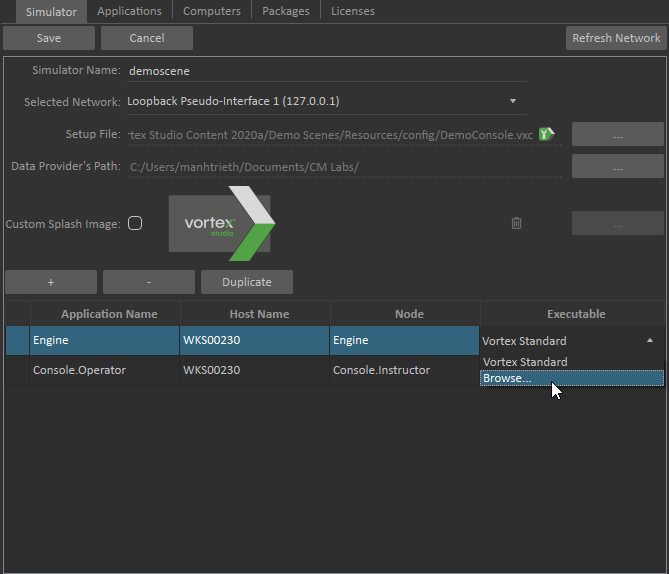
- Executable: Unless you are developing your own custom application, you should leave it as Vortex standard application (also known as SimApp.exe). Not any application can be launched, the executable must be a valid Vortex Application
6.1. Adding a Custom application
A Custom Application is an application that embeds a VxApplication object. For more info on how to develop your own application, refer to Vortex Studio SDK: Creating an Application
If you develop your own custom application (not using the Vortex Standard application), the custom application can be selected for a specific simulation node as follow:
On the right pane of the Vortex Director, select the Simulator tab.
Click the Edit button to edit the simulator's settings.
- In the application list, click on the desired Executable cell to browse to the custom application to be used.
- (optional) if you have command-line arguments, such as a script for python, you can edit the selected executable.
- Click in the box, you can add the arguments or edit the path manually. Vortex Studio command line arguments (see Vortex Studio SDK: Creating an Application for details) will automatically be sent and do not need to be provided. For example, if you want to launch python.exe you would need to provide the script to launch. The Python tutorial Simapp.py shows how to handle the arguments; it can be found in the Vortex Studio installation in tutorials/Python/Vortex/PYSimApp.
- Save to apply your changes
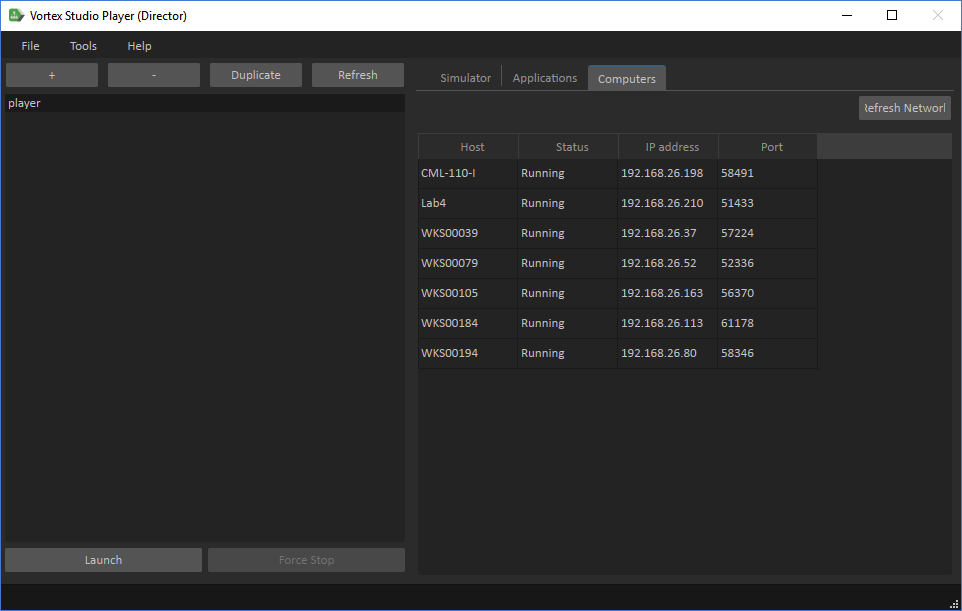
Computers on the Network
The Director can discover computers present on the selected network. This can be useful to verify whether the service is running on the expected machines.
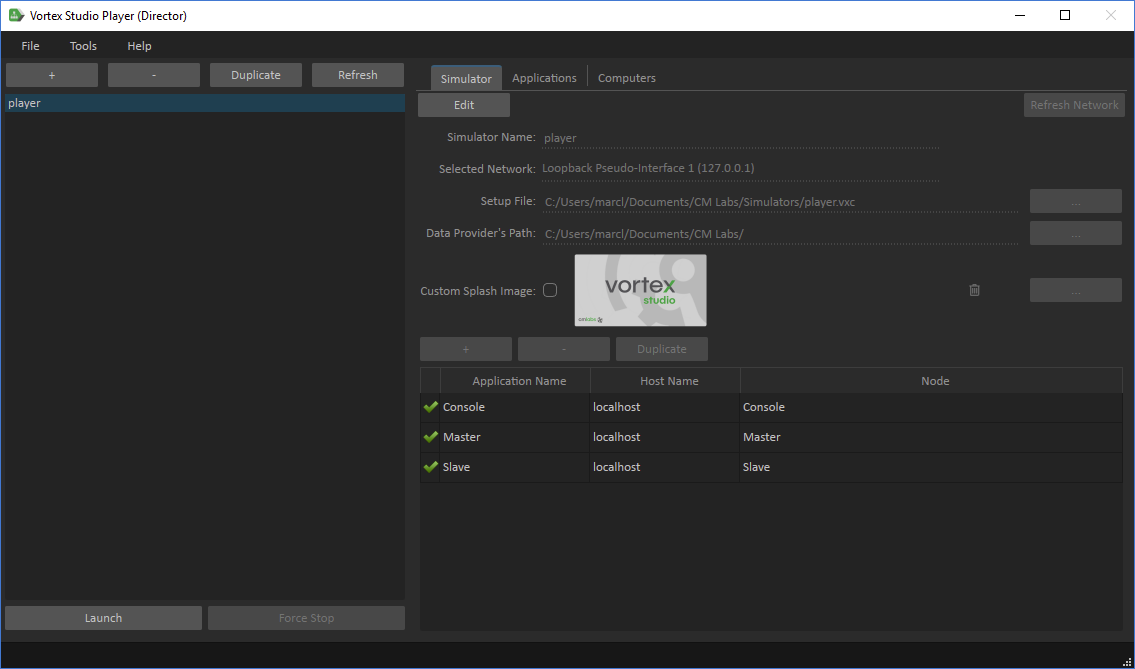
Launch and Monitor the Status of Simulation Applications
Director Launch and Force Stop
To launch a simulator, select its name in the list and press Launch Simulator.
The director can also stop the running applications using the Force Stop button: a soft close will be sent to the running applications and a hard kill will be applied if they are not responding after that.
Warning Force Stop Using Force Stop can be useful to guarantee that all simulation applications are shut down.However, this should not be the standard way of closing a simulator. The proper way to shut down a simulator is to use the console interface, either the Quit button or the Windows close icon.
The launch function can also be called in the command line interface so that deployed turn key simulators used by operators will not have to go through the Director user interface to start their simulation.
When using the launch command line, the data store is automatically deduced relatively to the simulator file.
| Launching a simulator from the command line or a shortcut |
|---|
VortexDirector.exe --launch mydatastorepath\Simulators\mysimulatorfile.simulator |
Quitting the Director
The Director window can be minimized and will continue to monitor the simulator.
In order to properly quit the Director, select File>Quit' must be used.
If the simulator is still running, you will be asked whether all applications must be force stopped.
Director Monitoring
Once the simulator has started, the usual simulation windows and user interface will appear either on the local or remote machines.
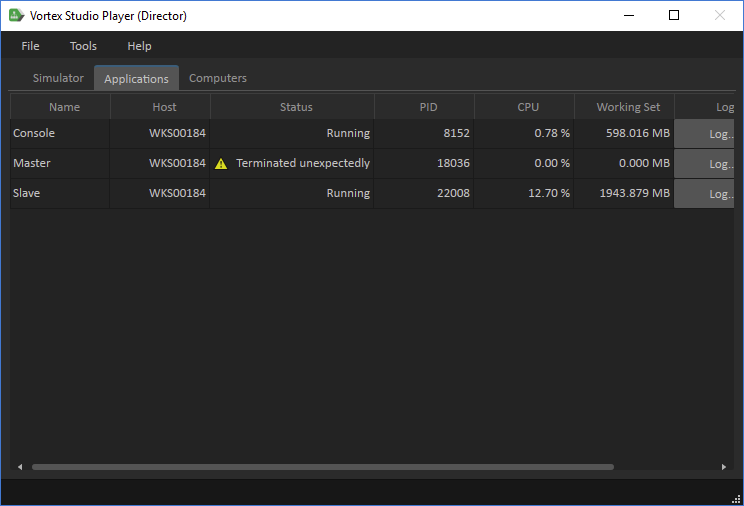
Monitoring of the remote applications can be performed using the Applications tab.
The screenshot below shows the monitoring panel opened using the Director tray icon after locally launching Vortex Studio Player.
It reports the following information that might help when troubleshooting the simulator:
- Actual machine and process ID
- Status and errors
- CPU consumption
- Memory consumption
- Log files of the remote running application

When one simulation application stops unexpectedly, the Director reports it with a warning icon.
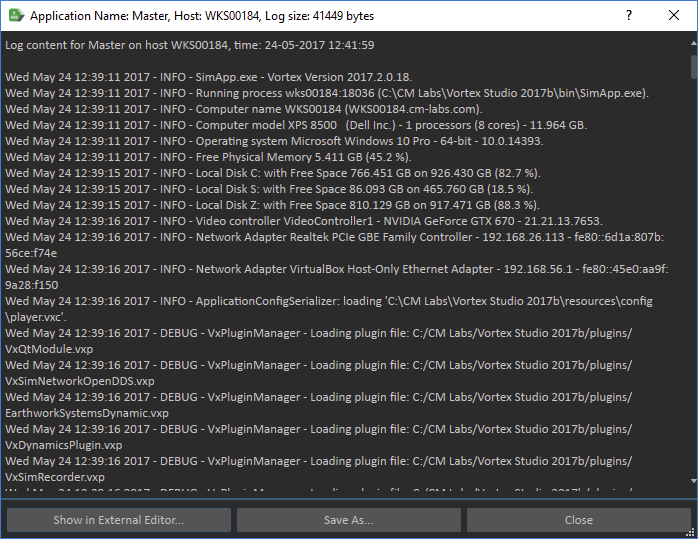
Users can locally open the log of the remote application on their workstation to investigate the cause of the issue.
Simulator Data Store Path
All simulator files created and modified by the Director are stored under the data store path.
The default path is User Document\CM Labs\Simulator on the machine starting the Director.
Each simulator has its own file. They can be manipulated with the file explorer and will be detected and monitored by the Director.
The data store path can be globally modified in the Director interface under Tools>Settings.