Integrating Vortex Studio using Python 3
Vortex Studio SDK in Python
Vortex Studio SDK is partially available in Python scripting.
Python scripting can be used
- As a dedicated Python application that loads, renders, or interacts with Vortex assets during a simulation
- Within Vortex, as a dynamics script extension to change the behavior of a scene, mechanism, or assembly.
In the following paragraphs, the reader is expected to be familiar with Python 3 scripting language.
Python Usage and Environment Configuration
You can use your preferred integrated development environment (IDE) to work with Python.
Please note that due to the way the Vortex Python module is generated from C++, automatic completion features of IDEs may not always work with some Vortex Objects.
Python 3 Environment Parameters
Interpreter
You can select which Python 3 environment you want to use on your system from the Setup document. Please note that these settings are only available on the root item of your Setup document.
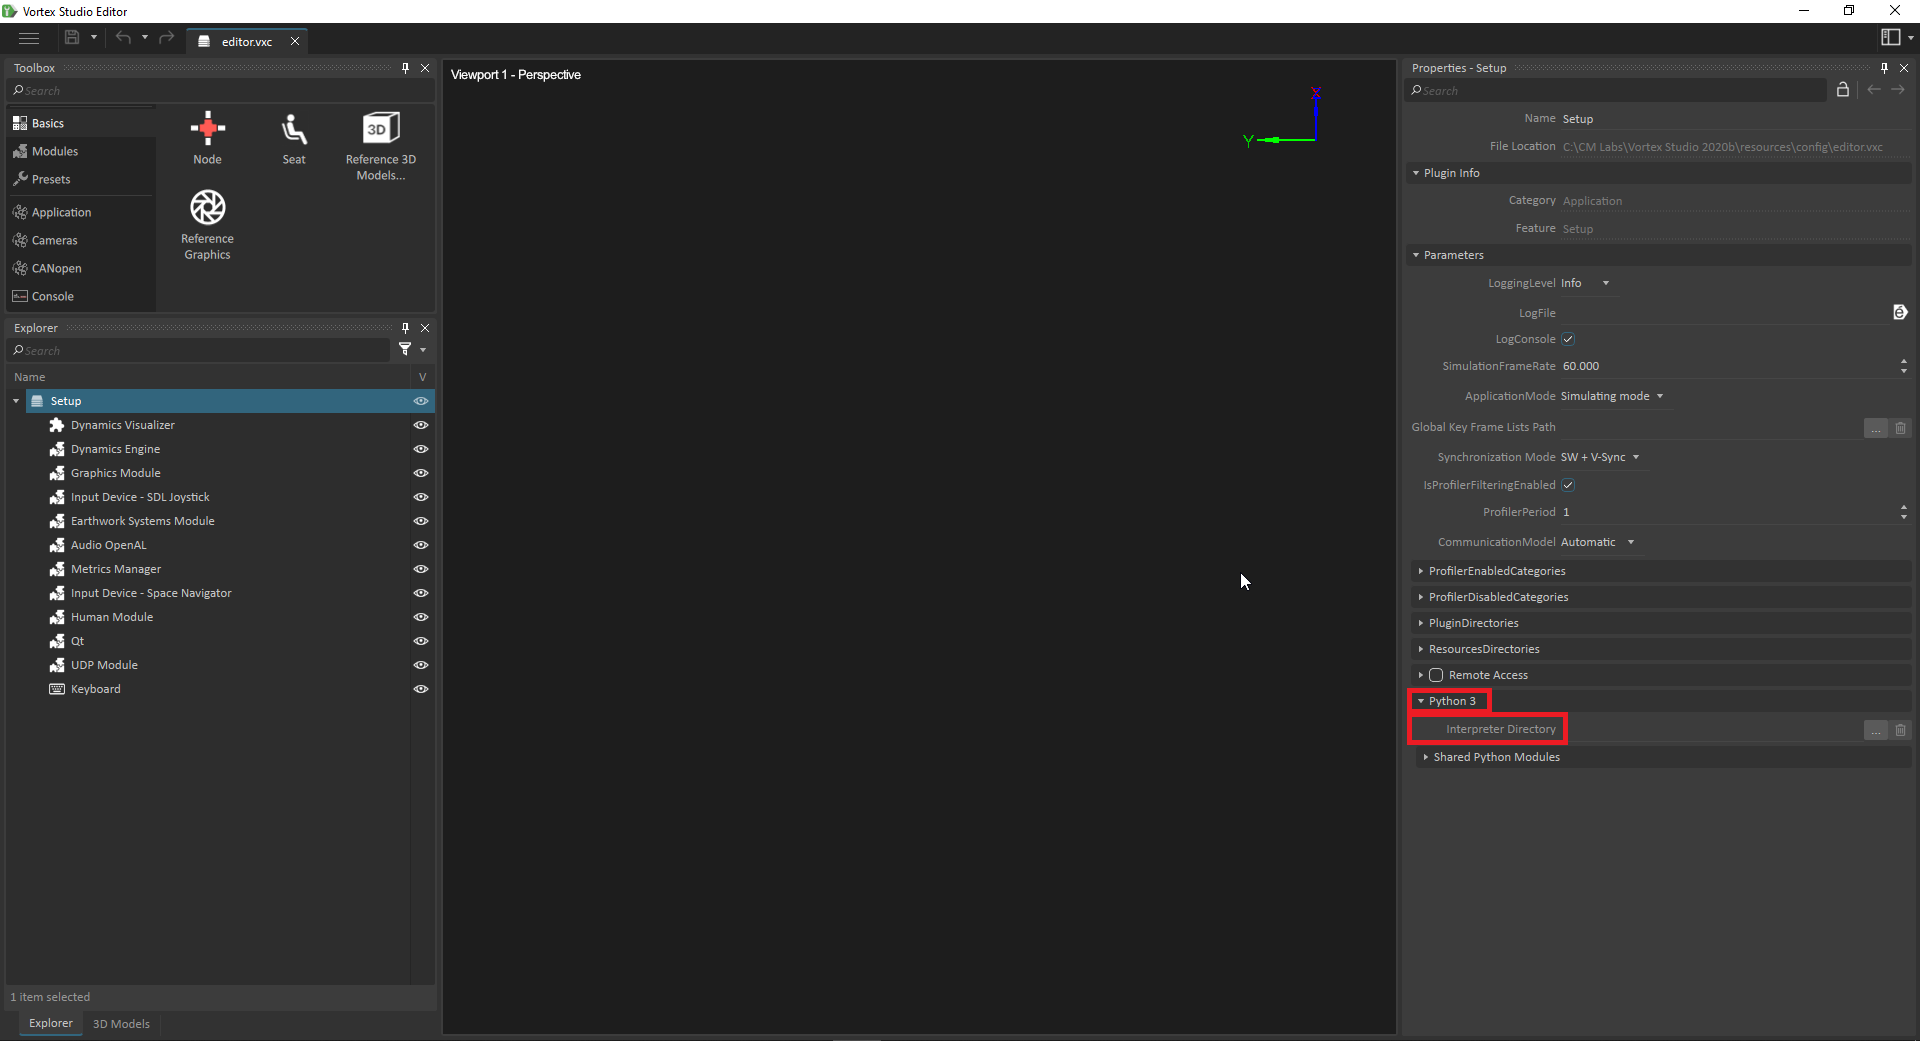
By default, the "Interpreter Directory" parameter is not specified. In this case, a version of Python 3 packaged with Vortex Studio will be used(you can find it under "C:\CM Labs\Vortex Studio 2020b\resources\Python3DefaultInterpreter").
If a directory is specified, Vortex Studio will use the Python 3 environment in this directory. Please note that the given directory must point to the directory where "python.exe" can be found.
The current recommended Python 3 interpreter is Python 3.8.6 64-bit, as Vortex Studio provides. Any distribution should be compatible as long as it uses Python 3.8 64-bit.
![]() However, there may be incompatibilities between Vortex Studio and some Python modules present in your Python distribution.
However, there may be incompatibilities between Vortex Studio and some Python modules present in your Python distribution.
When using a VxApplication within a Python process and that application will be loading content that contains Dynamics Script Extension, the Interpreter Directory must be the same as the starting Python process.
import sys
import Vortex

myApp = Vortex.VxApplication()

# Create a setup
setup = Vortex.ApplicationConfig.create()

#Set the interpreterDirectory to the same that launched this script
setup.parameterPython3.interpreterDirectory.value = sys.exec_prefix

# add other modules to setup
...
setup.apply(myApp)
Shared Python Modules
After specifying your preferred Python 3 environment, you can also specify Python modules that you want to share between all Python 3 scripts running in Vortex Studio. This can be done by using the "Shared Python Modules" parameter.
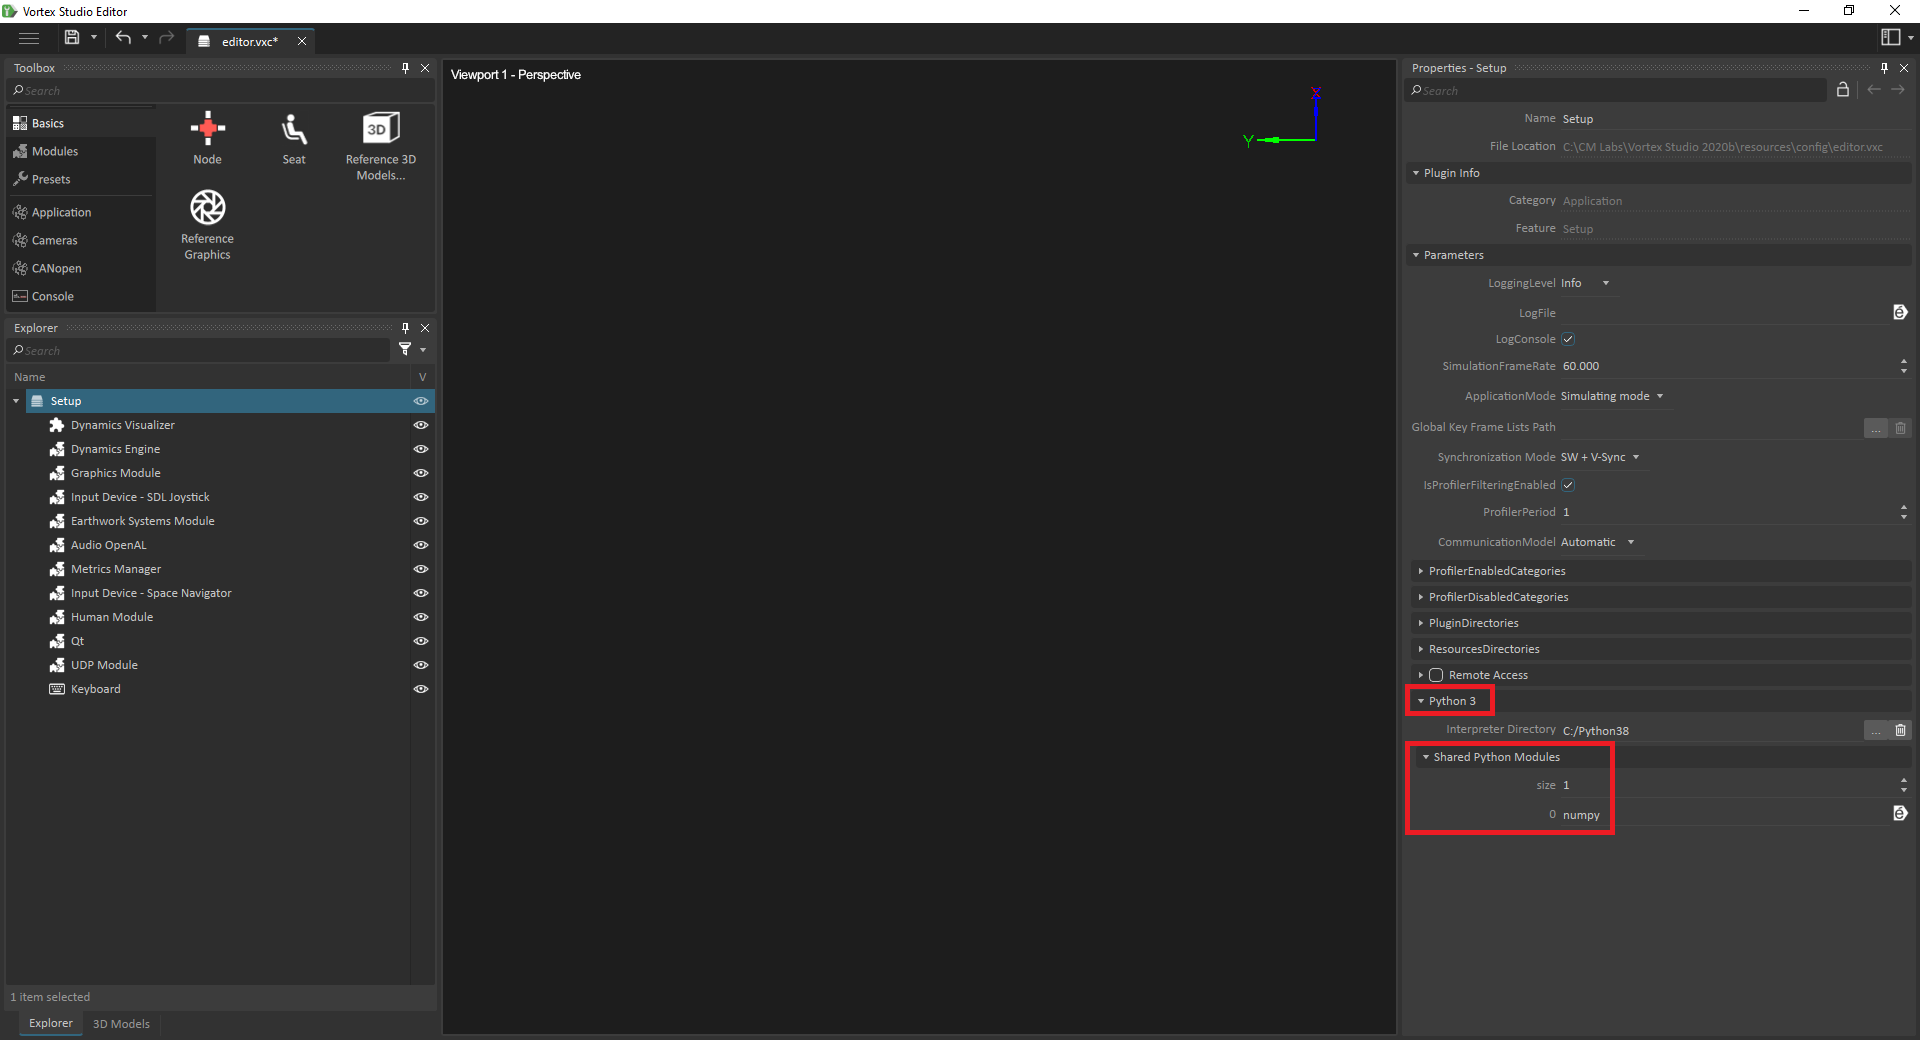
Vortex module is always shared, but additional user modules can be added to the list.
Adding modules to this list can save memory for heavy modules. It also provides a unique initialization entry point for some modules. For most Python modules, it is not necessary to add them in this "Shared Python Modules" parameter.
However, some Python modules cannot be imported, or cannot be imported for multiple Python sub-interpreters. It can result in a freeze of the application or even a crash. This is a limitation for some Python modules. In this case, it is needed to add this Python module in the "Shared Python Modules" parameter.
Here is a list of known Python 3 modules that must be added to the Shared Python Modules list before they can be used:
- numpy
- asyncio
- doctest (relies on asyncio)
- unittest (relies on asyncio)
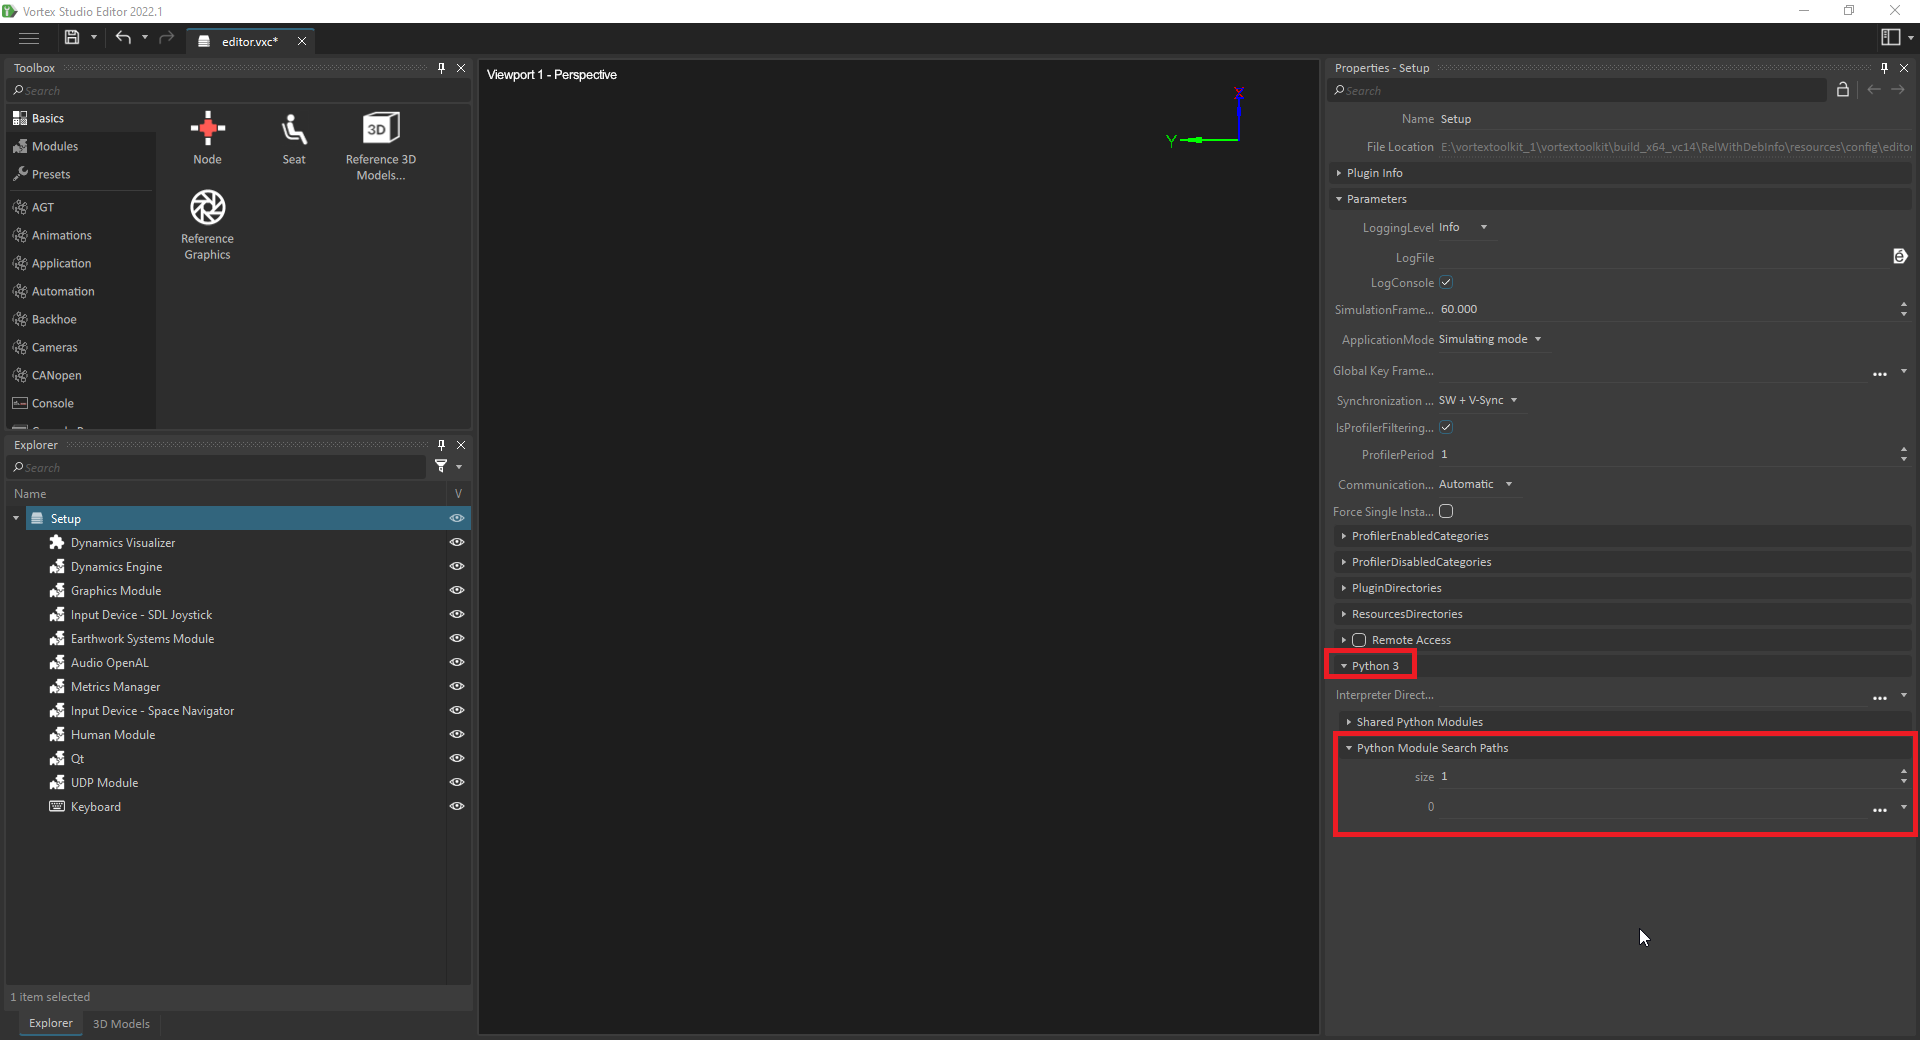
Python Module Search Paths
By default, the Python 3 integration in Vortex Studio will look in the following directories when importing Python modules:
- default sub-directories in the selected Python 3 interpreter's installation folder
- Vortex Studio's "bin" directory
When developing content with Vortex Studio, it can be useful to share Python code between scripts. In this case, it is recommended to create a custom Python module where this reusable code can be defined. Here is an example of such a Python module:
- custom_module
- __init__.py
- helpers.py
This folder structure represents a Python module named "custom_module" having a "helpers" script. This Python module can be packaged alongside the Vortex Studio content using it. Here is an example of DynamicsScript using "myTestFunction" defined in helpers.py:
from custom_module import helpers

def on_simulation_start(extension):
    helpers.myTestFunction()
The path to the "custom_module" can be specified in the Setup document under the "Python 3" section under the field named "Python Module Search Paths":
The provided search path must point to the parent directory of your custom Python module. In the example above, the specified path should point to the parent directory of the "custom_module" directory.
Unless the saved search paths are saved as an absolute path using the filename option, they will be saved relative to the location of the Setup document. In that case, the custom Python modules should always be packaged at the same relative path from the Setup document where they are referred.
Embedded Dynamics Scripts
Dynamics script extensions can be added to the content to modify dynamics behavior and will use the Python modules available in the Python 3 distribution specified in your Setup document.
External Modules
In order to use Python modules that are not included with the default version of Python installed with Vortex (for example, NumPy), you can install and use those modules from your system's Python interpreter instead. To do so, follow these steps:
- Install the new module to your system's Python interpreter
- Follow the instructions on this page under "3233333303" to change the version of Python that Vortex will use to your system's Python interpreter
- Check the list of modules on this page that must be added to the Shared Python Modules. If your module requires it, add it to the list. Failing to do so will result in Vortex freezing or even crashing.
Scripting Vortex Application
Python can also be used to script an external application that loads and simulates content.
Content could have been created by the Vortex Studio Editor or by code, be it C++ or even Python
To use Vortex SDK in Python, there is only one Python module: Vortex.py. The developer simply needs to import the Vortex library.
- Everything is Vortex in Python e.g. C++
VxContent::ScenebecomesVortex.Scene,VxMath::Matrix44 becomesVortex.Matrix44etc... - The command
dir() ordir(object) will list the module content and the object methods. Help(object) will provide more information on one object in particular.Python HTML doc generation using
pydoc:python -m pydoc -w Vortex wrote Vortex.htmlVortex Studio SDK container-like classes support
len()andoperator[]
import Vortex

s = Vortex.Scene.create()

m = Vortex.Matrix44()
r = len(m) # r = 4
c = len(m[0]) # c = 4
Vortex SDK - Python specificities
Property .value
In extensions, the inputs, outputs, and parameters are known as fields.
Fields can be accessed in several ways:
- In a generic way, via methods
getInput/getOutput/getParameterof anyVxExtension. e.g. extension.getInput('Int').value - In a specific way via the interface. e.g part.inputControlType.value
- In a specific way within a dynamics script extension, using
extension. e.g. extension.inputs.myInt.value
The value of a Field can be read or written using the Python property "value", a generic accessor that implicitly performs type conversion, which was added in the Vortex Python API.
If the field is an integer, the property "value" will be an integer. If the field is a reference to an Interface e.g Field<Assembly> interface, the property "value" will return that interface e.g. AssemblyInterface.
# The input is an int
extension.getInput('Int').value = 8

# The output is a VxVector3, extract x from VxVector3
x = extension.getOutput('Vector3').value.x

# The Parameter is an Field<Assembly>
extension.getParameter('Assembly').value.addPart(part)
Section Set/Get Values on Inputs, Outputs, and Parameters of a dynamics script extension below contains additional examples.
Setting value on vector using accessors
.value cannot be used in combination with any accessor to assigned a value. E.g., input.value.x = 1 won't work, one should use input.value = VxVector3(1,1,1)
Object Interfaces
The Vortex API exposes each Content Objects in Python using either their base type or their specialized types:
- Base Content type objects:
- Scene ->
SceneInterface Configuration ->ConfigurationInterface- ConnectionContainer->
ConnectionContainerInterface - VxVHLInterface ->
VxVHLInterfaceInterface - Mechanism ->
MechanismInterface Assembly -> AssemblyInterface
- Part ->
PartInterface - Constraint ->
ConstraintInterface - CollisionGeometry ->
CollisionGeometryInterface
- Scene ->
- Specialized Content objects that inherit from one of the base content types:
- prismatic constraint ->
PrismaticInterface - hinge constraint ->
HingeInterface - sphere cg ->
SphereInterface
- prismatic constraint ->
Converting Interfaces
Interface conversion is explicit. Base class objects can be converted to specialized objects using the right interface constructor.
# Getting the HingeInterface from a ConstraintInterface
hinge = Vortex.HingeInterface(constraint.getExtension())  #constraint is a ConstraintInterface of an hinge.
- Base Constraints Interface (or
VxExtensionof constraints) can also be converted to the right Interface usingConstraint.getConstraintInterface(constraint) - Base Collision Geometry (or
VxExtensionof collision geometry) can also be converted to the right Interface usingCollisionGeometry.getCollisionGeometryInterface(cg)
Most content objects have an interface version in Python. When they are not available, just use the VxExtensionFactory and work with the VxExtension in a generic way.
Custom Interfaces developed by clients will not have Python Interface objects.
from Vortex import *
...
# Create and setup the application
...
# using create function from the Part class
part= Part.create() # part type is PartInterface
part.setName(partName)

# update partDef
box = Box.create() # box type is BoxInterface

# Part.addCollisionGeometry accepts BoxInterfaces
part.addCollisionGeometry(box) #part.addCollisionGeometry accepts CollisionGeometryInterface as well as all <cg>Interface objects

# Contrary to C++, Python VxApplication.add() accepts VxExtension rather than Interfaces. Use getExtension() on the interface object to get it
application.add(part.getExtension())

...
# Working with CGs
# Part.getCollisionGeometries() returns an array of CollisionGeometryInterface, getting the proper cg type require a conversion
cg_0 = part.getCollisionGeometries()[0]

# To use the cg_0 as a Box, convert to a BoxInterface with getCollisionGeometryInterface using the VxExtension of the CollisionGeometryInterface
box = CollisionGeometry.getCollisionGeometryInterface( cg_0 ) # Since cgs_0 is a box, getCollisionGeometryInterface() returns a BoxInterface

# This is equivalent of doing
# box = BoxInterface( cg_0.getExtension() )
IMobile and transformation Matrix
Content objects that can be moved are derived from the IMobile interface. IMobileInterface objects can be moved with using method setLocalTransform, which takes Vortex.Matrix44 object describing the transformation in terms of scale, rotation and translation.
# get the output transform from a PartInterface object
output_transform = part.outputWorldTransform.value

# get position and orientation of the part as Vortex.VxVector3
position = Vortex.getTranslation(output_transform.value)
orientation = Vortex.getRotation(output_transform.value)

# move the part
# set the input local transform
new_position = Vortex.VxVector3(1,1,1)
part.setLocalTransform( Vortex.translateTo(output_transform.value, new_position) ) # prefer using setLocalTransform over Field inputLocalTransform.value
VxMath::Transformation
A series of global helpers exist at the Vortex level to simplify matrix computation. They are the equivalent of the C++ Global helpers in the namespace VxMath::Transformation.
# Scale, Rotation and Translation Matrix Constructor
m = Vortex.createScale(x,y,z) # Create a scale matrix.
m = Vortex.createScale(scale) # Create a scale matrix from VxVector3.
m = Vortex.createRotation(rx, ry, rz) # Creates a rotation matrix. rx, ry and rz are Euler angles given in radian, using the default Euler order
m = Vortex.createRotation(axis, angle) # Creates a rotation matrix from an axis (VxVector3) and angle (radian).
m = Vortex.createRotation(quat) # Creates a rotation matrix from a quaternion
m = Vortex.createRotationFromOuterProduct(v, w) # Creates a rotation matrix from the outer product of two 3 dimensions vectors.
m = Vortex.createTranslation(tx, ty, tz) # Creates a translation matrix.
m = Vortex.createTranslation(translation) # Creates a translation matrix from VxVector3.

# Creates a transform matrix with a position sets to the eye and oriented to the center.
# The first component of the matrix is the forward vector, the second one is the side vector and the third is the up.
m = Vortex.createObjectLookAt(eye, center, up)

# The first component of the matrix is the side-way vector, the second one is the up vector and the third is pointing backward to the center.
m = Vortex.createCameraLookAt(eye, center, up)

# Creates an orthographic projection matrix.
m = Vortex.createOrthographic(left, right, bottom, top, zNear, zFar)

# Creates a non-regular projection frustum.
m = Vortex.createFrustum(left, right, bottom, top, zNear, zFar)

# Creates a regular perspective projection frustum.
m = Vortex.createPerspective(fovy, aspectRatio, zNear, zFar)

# Extraction helpers
s = Vortex.getScale(m) # Get Scale VxVector3 from Matrix44
r = Vortex.getRotation(m) # Get Rotation VxVector3 from Matrix44
t = Vortex.getTranslation(m) # Get Translation VxVector3 from Matrix44

# Checks whether this matrix includes a perspective projection.
b = Vortex.isPerspectiveProjection(m)

# Affine Matrix operation
mt = Vortex.translateTo(m, translation) # Sets translation VxVector3 on m
mr = Vortex.rotateTo(m, rotation) # Sets rotation VxVector3 on m
ms = Vortex.scaleTo(m, scale) # Sets scale VxVector3 on m
m = Vortex.compose(scale, rotation, translation, flip) # Creates a matrix by composition with a VxVector3 scaling, then a VxVector3 rotation and a VxVector3 translation.
scale, rotation, translation, flip = Vortex.decompose(m) # Decomposes the affine matrix m into a scale, rotation and translation matrix. Rotation are given in the range [-pi, pi] for x, [-pi/2, pi/2] for y, [-pi, pi] for z.
Accessing Application Context
To get information relative to the application context, use getApplicationContext(). The method is available via any VxExtension or extension in the case of a dynamics script extension. Application context API is relatively simple and can be used for time/frame-based related logic. Application context methods are also available directly from the VxApplication . e.g. <application_obj>.getSimulationFrameRate(), although the context itself can otherwise be accessed from a VxApplication using method getContext().
<obj>.getApplicationContext().getSimulationFrameRate() # Frame rate e.g. 60 means 60 fps
<obj>.getApplicationContext().getSimulationTimeStep() # Time of a step. Is the inverse of frame rate e.g. Frame Rate = 60, Time Step = 1/60 = 0.016666
<obj>.getApplicationContext().getSimulationTime() # Current Time of the simulation. Time increases by Time step every frame.
<obj>.getApplicationContext().getFrame() # Current Frame of the simulation
<obj>.getApplicationContext().getApplicationMode() # Current Simulation mode i.e. KEditingMode, kSimulatingMode or kPlaybackMode
<obj>.getApplicationContext().isPaused() # Indicates if the simulation is paused
<obj>.getApplicationContext().isSimulationRunning() # Indicates if the Simulation is running i.e. ApplicationMode is kSimulatingMode And isPaused == False
Application Scripting
Python can be used for prototyping, tests (some of Vortex internal tests are written with Python), or a complete Vortex Application. The concept is no different than what is described in sections Integrating the Application and Creating an Application. The difference is that the application is started in Python.
Creating a VxApplication
The first step is to create an application and set it up. Use the Vortex Studio Editor to create its Application Setup. Then it is simply a matter of loading the setup to apply it.
from Vortex import *
application = VxApplication()
serializer = ApplicationConfigSerializer()

serializer.load('myconfig.vxc')

# Extract the ApplicationConfig
config = serializer.getApplicationConfig()

# Apply it
config.apply(application)
...
# Load Content
...
# Run the application
...
# Unload Content
...
# Cleanup
application = None
Note that like in C++, it is possible to insert and remove modules and extensions manually to the application as well as set up some application parameters.
Likewise, it is possible to create an ApplicationConfig object in Python. However, not all modules and extensions factory keys and the VxID to its parameters are exposed in Python.
Although it is technically possible to create a valid application setup in Python, the user is encouraged to use the Vortex Studio Editor to create its Application Setup.
Good Practices
When you are done with the application, it is preferable to set it to None before the end of the program.
Application Modes
Application mode is part of the application context and is used by Modules and Extensions to make some decisions. Modules and extensions are aware of what the application is doing and can adapt their behavior.
There are 3 application modes in Vortex :
- Editing mode: The simulation is not computed at every step. That's when a user usually changes an object's parameters, move objects, add or remove objects, activate a configuration, load content, etc.
- Simulating mode: The simulation is computed at every step, objects parameters should not be modified. The simulation can be paused and resumed.
- Playback mode: The simulation is not computed, objects are moved from the playback source so that content is replayed “graphically”.
The Editor starts in editing mode. The user edits his content. When the user hits the play button, it goes in simulating mode. On stops, it goes back to editing.
The Player also starts in editing mode. The user selects his content. When the user hits the play button, it goes in simulating mode. On stop, it goes back to editing. If the user loads a recording, the player goes in playback mode.
The default mode for a Vortex Application is simulating, it can be set to editing in the Application Setup.
Changing the mode is not instantaneous and usually requires at least 1 application update.
To change the mode manually, the best way is to use the vxatp helper VxATPUtils.requestApplicationModeChangeAndWait(application, mode), where mode is either kModeEditing or kModeSimulating.
...
application = VxApplication()
...
# Setup the application
...
vxatp3.VxATPUtils.requestApplicationModeChangeAndWait(self.application, Vortex.kModeEditing)

# Load mechanism file and get the mechanism interface
self.vxmechanism = self.application.getSimulationFileManager().loadObject(self.content_file)
self.mechanism = Vortex.MechanismInterface(self.vxmechanism)

# Get the RL Interface VHL
self.interface = self.mechanism.findExtensionByName('RL Interface')

# Switch to Simulation Mode
vxatp3.VxATPUtils.requestApplicationModeChangeAndWait(self.application, Vortex.kModeSimulating)
Pausing the simulation
If the mode is set to simulation, the user can pause the simulation by calling pause().
Simulation can be resumed be calling resume().
Loading Content
Loading content created using the Vortex Studio Editor should be done with the VxSimulationFileManager provided by the VxApplication. The object loaded is distributed across the network. Object loaded this way is not meant to be edited, most changes will not be distributed. Content should be loaded while the application is in editing mode.
To edit content using Python, see section Content Creation.
Content gets unloaded on its own when the application is destroyed, but should you need to remove content, the simulation file manager can also be used to remove content via unloadObject().
...
application = VxApplication()
...
# Setup the application
...
# Get the file manager to load content
fileManager = application.getSimulationFileManager()

# Load the file, the object returned is the root object, in this case, a scene. The Reference should be kept to inspect the content during the simulation
# The object loaded is already added to the application
scene = SceneInterface( fileManager.loadObject("myScene.vxscene") )
if (scene.valid()):
	# Work with scene
	...
	# run application
	...
	# Done with content
	fileManager.unloadObject("myScene.vxscene")
	...
	# Load new content and continue...
Good Practices
When you are done with content, it should be unloaded using the method unloadObject().
Running the Application
Once the application has some content loaded or created, it can be updated.
If you only need to run the application until it ends, use the function run(). Function run() on the application is basically a loop that calls update() continuously. It could be replaced with the code below.
run = True
while(run):
	run = application.update()
Depending on the mode, the physics will be simulated or not when there is an update.
For example, in the Vortex Editor, the default mode is editing. Once the user clicks on the start button, the application goes to simulating. On clicking the stop buttons, it goes back to editing. There are always calls to update().
Function update() must be called once per frame, no matter the simulation mode and also when the simulation is paused, as modules require updates no matter the simulation mode or the pause state. The application context is available like in C++ and the mode should be set properly depending on what you are doing,
If you need to perform things outside the update, such as inspecting content, or run a specific number of frames, rather than call run(), call update().
run = True
startFrame = application.getContext().getFrame()
currentFrame = startFrame
while(run and (currentFrame - startFrame) < 100):
	run = application.update()
	currentFrame = application.getContext().getFrame()
Inspecting and updating content
To look into content, a user can browse from the VxObject returned by the simulation file manager. It is possible to use <content_object>Interface to get to the object of interest, as explained in the Content Creation in Python section above.
The following is an example of how to use a hinge constraint retrieved from a scene object in Python:
...
# Create and setup the application
...
#Load content
# loadObject returns a VxObject type, it needs to be converted to a SceneInterface (C++ equivalent of VxSmartInterface<Scene>)
scene = SceneInterface( fileManager.loadObject("myScene.vxscene") )
if scene.valid():
	# Browse to my hinge
    # scene.getMechanisms returns an array of MechanismInterface, no conversion needed
    mechanism = scene.getMechanisms()[0]
	# mechanism.getExtensions returns an array of IExtensionInterface
	iextension = mechanism.getExtensions()[0]
	connectionContainer = ConnectionContainerInterface(iextension.getExtension())

    # mechanism.getAssemblies returns an array of AssemblyInterface, no conversion needed
	assembly = mechanism.getAssemblies()[0]
    # assembly.getConstraints() returns an array of ConstraintInterface, getting the proper constraint type require a conversion
    constraint = assembly.getConstraints[0]

    # To use the constraint as a hinge, create the HingeInterface using the VxObject of the ContraintInterface
    hinge = ConstraintInterface.getConstraintInterface(constraint) #since contraint is an Hinge, getConstraintInterface() returns an HingeInterface
	# this is the equivalent of doing
	# hinge = HingeInterface(constraint.getExtension())
Once the references to the required objects have been established, the external application basically need to update the inputs, execute an update and read the values from the outputs. Data should not be written into outputs. Parameters value should not change during simulation. In Python, when you have access to the interface API, it is preferable to use it to get access to the fields rather than using function getInput()/getOutput()/getParameter() on the VxExtension, as the second option requires knowledge of the field's VxID and is less efficient.
...
# Create and setup the application
...
#Load content
...
# Set the input Velocity, with is a Field<VxVector3>, property value is a VxVector3
part.inputLinearVelocity.value = Vortex.VxVector3(1,1,1)

# Updates the application's modules
application.update()

# Get the mechanism position from an custom extension with a field<Mechanism>, using getParameter since the Interface is not available in Python
# property value is a MechanismInterface
mechanism = myCustomExtension.getParameter('Mechanism').value
mechPos = Vortex.getTranslation( mechanism.outputWorldTranform.value )
...
Using Keyframes to restore the initial positions
Keyframes can be used to restore the values of content objects taken at some point in time, e.g. when starting the simulation.
The first thing to do is to create a keyframe list and then use it to save and restore keyframes.
The following provides an example of saving one keyframe and restoring it later.
        # init key frame
        application.update()
        keyFrameList = application.getContext().getKeyFrameManager().createKeyFrameList("KeyFrameList", False)
        application.update()
        key_frames_array = keyFrameList.getKeyFrames()
        # len(key_frames_array) should be 0

        # first key frame
        frameId1 = keyFrameList.saveKeyFrame()
        waitForNbKeyFrames(1, application, keyFrameList)
        key_frames_array = keyFrameList.getKeyFrames()
        # len(key_frames_array) should be 1
        # key_frames_array[0] should not be None

        # wait a bit, do something...
        counter = 0
        while(self.application.update() and counter < 60):
            counter += 1

        # restore first key frame
        keyFrameList.restore(key_frames_array[0])
        self.application.update()
In contrary to the C++ implementation, there is no callback implemented to know when a keyframe is ready, therefore a small pull function must be implemented
def waitForNbKeyFrames(expectedNbKeyFrames, application, keyFrameList):
    maxNbIter = 100
    nbIter = 0
    while len(keyFrameList.getKeyFrames()) != expectedNbKeyFrames and nbIter < maxNbIter:
        if not application.update():
            break
        ++nbIter
Content Creation
Content can also be created, or updated after being loaded.
Please read Creating Content for the fundamentals of content creation. The concepts described in that section apply in Python as well and will not be repeated here.
About Extensions and factory keys
Not all extensions and module factory keys are exposed directly via the python API, only the most commonly used. Should you need to invoke the extension factory with a specific factory key that you don't know, it is possible to invoke the extension factory to get the list of all the available factory keys.
The following provides an example of how to access the information of a Factory Key from the list fetched.
# loading all plugins, not that is typically not necessay, this is only to fill the Extension Factory
pluginMngr = VxPluginManager.instance()
pluginMngr.loadAllVxp() #loadAllVxp() loads all the plugins, this ensure that all the factory keys will be available

#Access extensions' Factory Key
FactoryKeyList = VxExtensionFactory.getAvailableTypes()
for FactoryKey in FactoryKeyList:
    print(FactoryKey.getUuid())
    print(FactoryKey.getCategoryName())
    print(FactoryKey.getFeatureName())
    print(FactoryKey.getVxpName())		#If available
...

#copy the desired factory key e.g. Application Joystock extension factory key
myKey = VxFactoryKey(VxUuid("78E37E89-3FF6-4C58-8EE1-999E02049F3B"), 'Input Devices', 'Application Joystick', 'VxSimDevicesJoystick')
applicationJoystick = VxExtensionFactory.create(myKey)
application.add(applicationJoystick)
Good Practices
In normal circumstances, it is not necessary to invoke the plugin manager to load all plugins. Only the plugins you need will be loaded when appropriate, loading all plugins will increase the memory footprint of your python process for no reason.
You should use the code above to find the factory key you need, then copy it.
Then in your program, invoke the extension factory with the proper factory key as shown above.
Working with definitions and instances
Use the VxObjectSerializer to load and save your document definition. Children in documents are instances and must be instantiated like in C++.
# loading a definition
serializer = VxObjectSerializer()
serializer.load(fileName)
assemblyDef = AssemblyInterface(serializer.getObject()) #getObject() returns a VxObject so the AssemblyInterface must be created

...
#Modify the definition
...
#saving a definition
serializer = VxObjectSerializer(assemblyDef)
serializer.save(fileName)
Clone, instantiate and sync
The C++ global functions to perform those operations are not available in Python. However, all Python Smart Interfaces have additional functions that their C++ counterparts do not have: clone, instantiate and sync
#
mechanism = Mechanism.create()

# Load an assembly definition, let's say this assembly has a box CG part only.
serializer = VxObjectSerializer()
serializer.load(fileName)
assemblyDef = AssemblyInterface(serializer.getObject()) #getObject() returns a VxObject so the AssemblyInterface must be created

# INSTATIATE - Instantiate a definition
assemblyInstance = assemblyDef.instantiate()
mechanism.add(assemblyInstance)

# Add a part to the assembly, which is a sphere and is lighter but otherwise has the same data.
part0 = assemblyDef.getParts()[0]

# CLONE - Make a clone of the part
partDefClone = part0.clone()

# add it to assembly definition
assemblyDef.addPart(partDefClone)

# Modify partDefClone by changing the mass and adding a sphere in place of a box
partDefClone.parameterMassPropertiesContainer.mass.value = lighter
partDefClone.removeCollisionGeometry(box)
sphere = Sphere.create()
partDefClone.addCollisionGeometry(sphere)
...
# SYNC - Sync the assembly to get the definition data i.e. the part cloned
assemblyInstance.sync()
# After the sync, the assembly instance has 2 parts
Content Creation examples
These examples reproduce the C++ examples found in Creating Content.
See Python tutorial Content Creation for additional examples.
The following code snippets are not intended to produce a complete, runnable example when combined as-is.
Collision Geometries
# create a box
box = Vortex.Box.create()

# Set the box dimensions (x,y,z) to (1 meters, 2 meters, 3 meters)
box.parameterDimension.value = Vortex.VxVector3(1.0,2.0,3.0)
Parts
# create a part
part = Vortex.Part.create()
# set the mass
part.parameterMassPropertiesContainer.mass.value = 1.0
 # Adding a CG
part.addCollisionGeometry(box)
Assemblies
# create an assembly
assembly = Vortex.Assembly.create()

# create a part for the assembly
part = part.create()

# Sets Position and Control type
part .setLocalTransform( Vortex.createTranslation(1.0,2.0,3.0) )
part .inputControlType.value = Vortex.Part.kControlDynamic

#Add the part to the assembly
assembly.addPart(part )
Constraints
# create an hinge
hinge = Vortex.Hinge.create()

# set the attachment parts
hinge.inputAttachment1.part.value = part1
hinge.inputAttachment1.part.value = part2

# set the attachment positions
hinge.inputAttachment1.position.value = Vortex.VxVector3(1.0,0.0,0.0)
hinge.inputAttachment2.position.value = Vortex.VxVector3(1.0,0.0,0.0)

# set the attachment primary axis
hinge.inputAttachment1.primaryAxis = primaryAxis
hinge.inputAttachment2.primaryAxis = primaryAxis

# Add the hinge to the assembly
assembly.addConstraint(hinge)
Attachments
# create a first attachment point
attPt1 = Vortex.AttachmentPoint.create()
attPt1.parameterParentPart.value = part1
assembly.addAttachmentPoint(attPt1)

# create a second attachment point and add it
attPt2 = Vortex.AttachmentPoint.create()
attPt2.parameterParentPart.value = part2
assembly.addAttachmentPoint(attPt2)

# create an attachment using both attachment points
attachment = Vortex.Attachment.create()
attachment.setAttachmentPoints(attPt1, attPt2)

# add the attachment to the assembly
assembly.addAttachment(attachment)

# attach
attachment.inputAttach = True
Mechanisms
# create a mechanism
mechanism = Vortex.Mechanism.create()

# create an instance from the assembly definition
assemblyInstance = assembly.instantiate()

# Position
assemblyInstance.setLocalTransform( Vortex.createTranslation(1.0,2.0,3.0) )

# Add the assembly instance to the mechanism
mechanism.addAssembly(assemblyInstance)
Scenes
scene = Vortex.Scene.create()

# create an instance from the mechanism definition
mechanismInstance = mechanism.instantiate()

# Position
mechanismInstance.setLocalTransform( Vortex.createTranslation(1.0,2.0,3.0) )

# Add the mechanism instance to the scene
scene.addMechanism(mechanismInstance)
VHL Interface
# Create the VHL extension
vhlInterface = Vortex.VxVHLInterface.create()

# Add a hinge control field as input of VHL. Make sure to use the correct hinge extension (i.e. from the assembly instance)
vhlInterface.addInput('Input Value', hingeFromAssemblyInstance.inputAngularCoordinate.control)

# Add the VHL extension to the mechanism
mechanism.addExtension(vhlInterface.getExtension())
Connection Container
# Create the connection container extension
connectionContainer = Vortex.ConnectionContainerExtension.create()

# Add a connection between two fields : my custom extension output and a part input control
# Types have to be compatible for the connection creation to succeed
connectionIndex = connectionContainer.create(myCustomExt.getOutput('CustomOutput'), part.inputControlType)

# Add the connection container to the mechanism
mechanism.addExtension(connectionContainer.getExtension())
Dynamics Script Extension (Python 3)
Python extensions do not have a dedicated interface, so a VxExtension is used directly.
# Create the Python scripting extension
pythonExt = Vortex.VxExtensionFactory.create(Vortex.DynamicsScriptICD.kFactoryKey)

# Add the scripting file as parameter - the script can also be added as a string
pythonExt.getParameter(Vortex.DynamicsScriptICD.kScriptPath).value = '/mypythonscript.py'

# Add a parameter of type Part and set its reference
pythonExt.addParameter('ParamPart', Vortex.Types.Type_Part)
pythonExt.getParameter('ParamPart').value = part

# Add an input of type boolean and set its value
pythonExt.addInput('Switch', Vortex.Types.Type_Bool)
pythonExt.getInput('Switch').value = False

# Add an output of type integer and set its value
pythonExt.addOutput('Control Mode', Vortex.Types.Type_Int)
pythonExt.getOutput('Control Mode').value = 0

# Add the connection container to the mechanism
mechanism.addExtension(pythonExt)
Configuration
Configuration can also be edited in Python, but it is preferable to use the Vortex Studio Editor, as it is easy to make mistakes in code. Configurations can only be activated while the application is in editing mode,
...
# Add 4 extensions to mechanism
myExtension1 = Vortex.VxExtensionFactory.create(MyFactoryKey)
myExtension2 = Vortex.VxExtensionFactory.create(MyFactoryKey)
myExtension3 = Vortex.VxExtensionFactory.create(MyFactoryKey)
myExtension4 = Vortex.VxExtensionFactory.create(MyFactoryKey)

# Sets default value
myExtension1.parameterA.value = 1
myExtension1.parameterB.value = 2
myExtension1.parameterC.value = 3

myExtension2.parameterA.value = 4
myExtension2.parameterB.value = 5
myExtension2.parameterC.value = 6

myExtension3.parameterA.value = 7
myExtension3.parameterB.value = 8
myExtension3.parameterC.value = 9

myExtension4.parameterA.value = 10
myExtension4.parameterB.value = 11
myExtension4.parameterC.value = 12

mechanism.addExtension(myExtension1)
mechanism.addExtension(myExtension2)
mechanism.addExtension(myExtension3)
mechanism.addExtension(myExtension4)
...
# Create a configuration
configuration = Vortex.Configuration.create()
configuration.setName('Configuration1')
mechanism.addExtension(configuration.getExtension())

# Configuration will modify Extension 1, remove extension 2 and add extension 4
configuration.addReference(myExtension1, Vortex.kModify)
configuration.addReference(myExtension2, Vortex.kRemoveOnActivation)
configuration.addReference(myExtension4, Vortex.kAddOnActivation) # Because the flag is AddOnActivation, myExtension4 is immediately removed from the content. It still exist with mechanism but no module will received it.

# Start edition.
if(configuration.canActivate()[0]): # just to make sure there is no conflict, canActivate has 2 return values, the first being True are False, the second being the conflicts
{
	configuration.inputActivate.value = True # Activation will remove myExtension2 and add myExtension4.
    mApplication.update() # activation requires an application update

	if(configuration.outputActivated.value):
	{
		# Edit the extension 1 and 4
		myExtension1.parameterA.value = -1
		myExtension1.parameterC.value = -10

		myExtension4.parameterB.value = 42

        # Done editing
		mConfiguration.inputActivate.value = False
		mApplication.update() # deactivation requires an application update
	}
	else:
	{
		# Handles errors
		errors = mConfiguration.getRuntimeErrors()
	}
}

... # Continue edition

# Create a scene
scene = Vortex.Scene.create()
# instantiate a mechanism
mechInstance = mechanism.instantiate()

# myExtension1 is in the content, parameterA value is 1, parameterB is 2 and parameterC is 3
# myExtension2 is in the content, parameterA value is 4, parameterB is 5 and parameterC is 6
# myExtension3 is in the content, parameterA value is 7, parameterB is 8 and parameterC is 9
# myExtension4 is NOT in the content
scene.addMechanism(mechInstance)

# Activate the mechanism configuration in the scene
confInstance = Vortex.ConfigurationInterface( mechInstance.getObject().findExtensionByName('configuration1', False) )
confInstance.inputActivate.value = True
mApplication.update() # requires an application update

# myExtension1 is in the content, parameterA value is 11, parameterB is 2 and parameterC is -10
# myExtension2 is NOT in the content
# myExtension3 is in the content, parameterA value is 7, parameterB is 8 and parameterC is 9
# myExtension4 is in the content, parameterA value is 10, parameterB is 42 and parameterC is 12
Vortex Automated Test Platform
A module containing tools to write tests in Python with Vortex is made available in the binary directory.
This module is called vxatp3.
Another Python module called "vxatp" can be found in the same directory. This one MUST NOT be used with Python 3, since it is deprecated and is for use with Python 2.
Structure of vxatp3 folder
vxatp3 has the following directory structure:
- vortex \bin\vxatp3 : the Python package
- vortex \bin\vxatp3_*.bat : batch helpers to run tests from the command line
- vortex \resources\vxatp\ : resources used by vxatp3, e.g. setup documents
Setting the environment to run vxatp3
The batch command vxatp3_set_env.bat details how to properly set the environment when starting from the binary installation directory.
set VXTK=%~dp0..\
set PATH=%VXTK%\bin;%VXTK%\plugins;%PATH%
set PYTHONPATH=%VXTK%\bin;%PYTHONPATH%
Any IDE or Python interpreter would have to set up or inherit the same environment.
How to script a test
The vxatp3 test scripts are similar to standard scripts using the python package unittest: unittest#basic-example.
From the configuration given, a VxApplication can be created to perform operations on assets.
A helper is provided in VxATPConfig that return a setup application ready to be tested : VxATPConfig.createApplication(self, prefix_name, config_name).
In addition, VxATPConfig.createApplication sets to the test case a configuration member that contains useful information in the context of vxatp3.
The configuration can be accessed with self._config .
The configuration contains the following:
self._config.app_config_file: the setup file. It can be overridden by the test itself to add or remove specific vortex modules.self._config.app_log_prefix: the prefix for the log file. It can be overridden by the test to specify the name of the test case in it.self._config.output_directory: the output directory desired by the test suite. It should be used by the test to output data in a safe place (SVN and other versioned locations must be avoided).
Vortex Python module must also be imported in order to use the Vortex Python binding of the SDK.
import os
import unittest

from Vortex import *
from vxatp3 import *

class TestMethods(unittest.TestCase):

  directory = os.path.dirname(os.path.realpath(__file__))

  def test_upper(self):
     self.assertEqual('foo'.upper(), 'FOO')

  def test_isupper(self):
     self.assertTrue('FOO'.isupper())
     self.assertFalse('Foo'.isupper())

  def test_loading(self):
     # create a VxApplication while applying a setup file contained in the test directory
     application = VxATPConfig.createApplication(self, setup='%s/config.vxc' % self.directory)

     # load content and verify it has been correctly loaded
     file = '%s/MyAsset.vxscene' % self.directory
     object = application.getSimulationFileManager().loadObject(file)
     self.assertIsNotNone(object)

if __name__ == '__main__':
    vxatp_run_thisfile('my_vxatp_output_directory')
Helpers for default setups
VxATPConfig provides optional helpers to get default predefined setup of the application :
VxATPConfig.getAppConfigWithoutGraphics()return absolute path to default config not containing graphics moduleVxATPConfig.getAppConfigWithGraphics()return absolute path to default config containing graphics module
Helper to change application mode
VxATPUtils.requestApplicationModeChangeAndWait(self.application, Vortex.kModeEditing)Sets the new mode and wait for the change to be effective. Use to switch between kModeEditing and kModeSimulating.
Helper for tests parametrization
vxatp3 provides a decorator that allow tests to be parametrized.
The following gives an example of its usage.
import os
import unittest

from Vortex import *
from vxatp3 import *

class TestMutipleDiff(unittest.TestCase):

  directory = os.path.dirname(os.path.realpath(__file__))

  @VxATPUtils.parametrized([['diff_one', 3, 5, -2], ['diff_two', 13, 8, 6], ['diff_three', 13, 8, 5]])
  def test_diff(self, test_name, a, b, expected):
     self.assertTrue(a-b == expected, '%d-%d does not match expected value %d.' % (a,b,expected))

if __name__ == '__main__':
    vxatp_run_thisfile('.\\results\\')
The following is the output generated by the test.
How to call a vxatp3 test from the command line
There are two ways a vxatp3 test can be called from the command line :
Calling a vxatp3 test like any unittest.TestCase
See unittest#command-line-interface (e.g. python -m unittest test_my_test.py).
A convenience batch file is also provided to set up all Vortex required environment variables.
vxatp3_run_onetest.bat my_test.py
Calling vxatp3 test using vxatp_launcher
vxatp_launcher can be used to run all tests in a given directory or recursively or interactively
vxatp_launcher.py -p my_test_directory -o my_output_directory_for_results_and_logs
vxatp_launcher.py -p my_test_directory -o my_output_directory_for_results_and_logs -r
vxatp_launcher.py -p my_test_directory -o my_output_directory_for_results_and_logs -i -r
vxatp_launcher.py -p my_test_directory -o my_output_directory_for_results_and_logs -g -r
Naming Convention
To be found by discovery, test scripts must follow the default pattern of the unittest package : "test*.py".
"test_my_test_name.py" is the recommended syntax.
In addition to running all test cases, the runner outputs xml formatted logs that can be used by any JUnit compatible parser.
More batch helpers
As a convenience, the following batch files are provided in the bin directory
vxatp3_set_env.bat
vxatp3_run_onetest.bat my_test.py
vxatp3_run_tests.bat test_directory output_directory
vxatp3_run_tests_interactive.bat test_directory output_directory
vxatp3_run_tests_interactive.bat test_directory output_directory
How to use vxatp3 in Visual Studio 2015
Visual Studio has Python tools available as an add-on.
It includes among others functionalities an editor and a debugger.
To use it with vxatp3, you need first to configure your Python environment to be compatible with Vortex.
Next, in your Python project properties the 'Working Directory' must be the binary directory of your Vortex installation.
To be able to run and debug, the 'Search Paths' of the 'Debug' property tab must contain the binary directory of your Vortex installation, the vxatp3 path of your binary installation, and optionally the path containing your test scripts.
The settings should be enough to run and debug your vxatp3 based verification scripts in Visual Studio.
Dynamics Script Extension
The Dynamics Script Extension - Python3
Using Python scripting, a user can change the behavior of dynamics objects by adding a DynamicsScript extension. For example, if a mechanism consists of two parts that are constrained by a hinge, adding tension to that mechanism will not cause it to break. However, a simple script that reads the tension and disables the constraint if it reaches a certain threshold is easy to add. The execution of the script will accurately simulate breaking the hinge. The script is part of the content.
Vortex Studio will use the Python3DefaultInterpreter or the Python 3 installation you select, allowing you to use external libraries within your scripts.
Python Tutorials
See Python Tutorials for the list of tutorials
Advanced
C++ Smart Interface vs. Python
Most of the C++ interfaces have their equivalent in the Vortex Python API.
C++ Smart Interfaces are IExtension's implementation with their VxExtension underneath, wrapped into a nice template class and is the preferred way of working with Vortex objects, rather than using VxExtension in a generic way, which requires the user to know every fields' Id.
In Python, it is still possible to work with VxExtension, like in C++. They can be created via the VxExtensionFactory as usual and still requires the knowledge of the field's id.
In order to use an equivalent of a C++ smart interface in Python, the Python API has objects named <content_object>Interface, where <content_object> is the name of the C++ interface. e.g. PartInterface Python object is the C++ equivalent of VxSmartInterface<Part>.
To use content objects in Python:
- Methods are accessed via
<content_object>Interface.<interface_methods>, e.g.mechanism.getExtensions() where mechanism is a MechanismInterface Python object (C++ equivalent of VxSmartInterface<Mechanism>). <content_object>Interface.getObject()returns aVxObjecttyped instance,noneis returned if it is not aVxObject.<content_object>Interface.getExtension()returns theVxExtensiontyped instance- Can be created by calling
<content_object>Interface.create(), or by constructing an<content_object>Interfacefrom aVxExtension.
from Vortex import *

# create a VxDynamics::Part
part = Part.create()
# This is the equivalent of doing
extension = VxExtensionFactory.create(PartICD.kFactoryKey)
part = PartInterface(extension)

part.addCollisionGeometry(cg) # using it has an interface
Since all objects are IExtension or IObject, all objects in Python are IExtensionInterface and IObjectInterface. However, passing from one to another, requires an explicit conversion.
Given object a of type <content_object>InterfaceA, to get an object b of type <content_object>InterfaceB :
- b = <content_object>InterfaceB ( a.getExtension() ) e.g.,
ConstraintInterfacetoHingeInterfaceorIExtensionInterfaceobject toConnectionContainerInterface.
# mechanism.getExtensions returns an array of IExtensionInterface
iextension_0 = mechanism.getExtensions ()[0]
connectionContainer = ConnectionContainerInterface(iextension_0.getExtension())
Note that while in C++ many functions (such as VxApplication::add() ) that take VxSmartInterface in a generic way work, because in C++ the conversion is implicit, it won't work in Python because conversion is explicit. Some of the Python API was extended to accept VxExtension to simplify general usage. The user simply needs to call getExtension() on the object interface when working in Python.
import Vortex

application = Vortex.VxApplication() # VxApplication is not a Smart Interface. Just call the constructor
part = Vortex.Part.create()
# Contrary to C++, Python VxApplication.add() accepts VxExtension rather than Smart Interface. Use getExtension() on the interface object
application.add(part.getExtension())

# addExtension on a VxDynamics::Mechanism was modified to accept VxExtension
connectionContainer = ConnectionContainer.create()
mechanism.addExtension( connectionContainer.getExtension() )