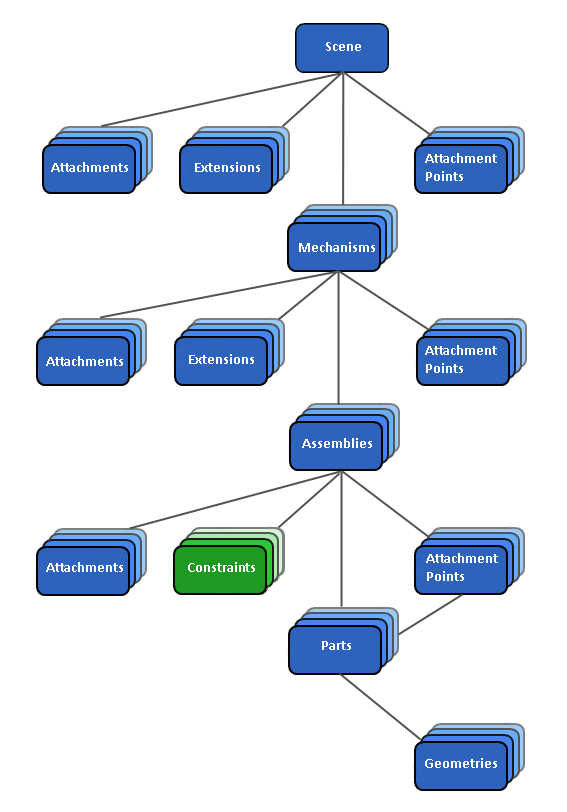
Constraints
Depending on the type of constraint, there may only be one coordinate that can be controlled (for example, the Hinge joint); or there are multiple controllable coordinates (for example, the Angular 1 Position 3 constraint).
For an exhaustive list of all available constraints, please refer to Constraint Types.
Between each pair of parts, there are three degrees of freedom for position and three for orientation. A constraint removes some of the degrees of freedom between the attached parts. A hinge constraint, for example, which is a two-part constraint, removes five out of the six degrees of freedom between the two attached parts. Depending on the constraint, the remaining degrees of freedom (also called "constraint coordinates") can be controlled either by setting limits, locking, or motorizing.
Basic Constraint Concepts
The way in which a given constraint restricts the motion between the attached parts depends not only on the type of constraint, but also on user-provided constraint axes and positions. The latter represent reference frames which are attached to the constrained parts. These reference frames are called Part Attachments, each of which is defined by a set of three orthonormal axes and a position, specified relative to the attached part. The primary and secondary axes of each attachment can be set in the constraint's Attachments tab. The third axis (or tertiary axis) is automatically computed as the cross product between primary and secondary axes, in this order.
The geometric meaning of the attachment axes and positions differs from constraint to constraint. For example in a constraint which has an angular controllable coordinate, such as a hinge, the primary axis would define the axis of rotation for this coordinate. For a linear coordinate, as in a prismatic joint, the axis defines the direction of motion.
In many constraints, the positions of the part attachment are used to maintain a common point in space between the attached parts. Take as an example the ball and socket joint. The positions of the ball and the socket, relative to the attached parts, would be represented by the positions given in the two part attachments. The specific meaning of the part attachments in the context of an individual constraint, and how they define the behavior of the constraint is explained in the respective constraint's detailed description.
In general, the part attachments are used to calculate the constraint violations and constraint coordinate positions. The violations and coordinate positions, in turn, define the reaction forces and torques applied by the constraint to the attached parts. As an example, a hinge constraint which has its controllable coordinate locked at angle zero is not violated if the world space positions of both its art attachments overlap and the three axes in both attachments are aligned in world space.
Controlling a Constraint Coordinate
Some constraints offer controllable coordinates, which represent relative linear or angular movements between the attached parts. This movement can be controlled in one of three ways:
- Free: The rigid bodies can move freely along the coordinate.
- Motorized: Allows you to specify a desired velocity for the coordinate, indicating a motion along or about the coordinate. The constraint will try to achieve this velocity by applying a force to the constrained bodies. The maximum force the motor can apply, as well as the motor loss (inverse of the damping coefficient), can be specified.
A motorized coordinate acts like a proportional controller on the velocity level, applying a viscous force, , which is proportional to the velocity error Verror and the specified damping coefficient c, representing the proportional gain. The proportional gain is equivalent to the inverse of the user-provided motor loss. - Lock: This mode locks the coordinate to a specified position or angle and restricts the parts' relative movement accordingly. A locked coordinate exhibits viscoelastic characteristics when undergoing deformations. The amount of viscoelasticity can be specified via stiffness and damping coefficients, k and c, yielding the following constraint force:
Here, the position and velocity error in the coordinate are denoted by xerror and verror respectively.
A lock can also be set to behave plastically, allowing irreversible plastic deformations in the coordinate position when the maximum force of the lock is overcome. In this mode, the target lock coordinate position will be displaced as soon as the yield point in the lock force is reached. Until this point, the lock acts elastically and the deformations are reversible. This allows modeling elastoplastic constraint characteristics.
It is also possible to make the locked coordinate move at a given speed, specified by the lock velocity. This way the lock control can be used to actuate the attached parts similar to a motor. Combining the lock velocity with the plastic lock mode, a position-based motor can be modelled, which, as opposed to the ordinary velocity-based motor control, never experiences any slip.
Limiting Constraint Coordinates
Coordinate range limits can be defined for all controllable constraint coordinates. By default, limits are not enabled and the coordinate range is unrestricted. Enabling limits allows the range of controllable coordinates to be restricted to a provided minimum and maximum, which can also be set to +/- infinity. Coordinate limits are modelled as unilateral spring-dampers, which can only apply reaction forces towards the admissible range of the coordinate, meaning they cannot act sticky. This is comparable to the way contacts are modelled. As such, when a coordinate hits a limit, a viscoelastic reaction force is applied which can be configured through stiffness and damping coefficients. The applied force can be capped via minimum and maximum limit force parameters.
A limit can also be moved kinematically, via the limit velocity parameter, thus changing the admissible range of the coordinate over time. This is comparable to the lock velocity in a controllable and locked coordinate which makes the equilibrium position of the coordinate move over time according to the provided velocity.
Relaxing a Constraint
Intuitively speaking, relaxing a constraint introduces compliance in the corresponding relaxed coordinates, which manifests itself as slack in the joint bearings when the constrained parts are subject to external forces.
Controllable coordinates cannot be relaxed but most constraints allow their non-controllable coordinates to be relaxed. A hinge constraint for example, which has one controllable angular coordinate, has five remaining non-controllable coordinates (three linear and two angular) which can all be relaxed.
Relaxing a positional constraint (i.e., a constraint which has a target position) puts the constraint into a mode in which it responds with a viscoelastic force to a constraint violation, identical to the reaction force of a spring-damper. The spring-damper can be parametrized via stiffness and damping coefficients. An example of such a constraint is a hinge.
Relaxing a velocity constraint (i.e., a constraint which has a target velocity) leads to a viscous force response upon constraint violation. The force response is parametrized via a kinetic loss parameter (inverse of a damping coefficient). An example of such a constraint is a gear ratio.
Constraint Friction
Most controllable coordinates offer the option of enabling friction forces. Constraint friction applies a dissipative force which intends to remove any relative motion in the corresponding coordinate. For example, a hinge with its controllable angular coordinate in the free control mode can apply a friction force (or torque in this case) to the constrained parts about the hinge axis. The friction force can be set to a fixed maximum value or be chosen to be linearly proportional to the forces applied in the non-controllable coordinates of the joint. For a hinge, this means that the friction force would increase with the loads felt in the hinge bearing (that is, in the remaining five non-controllable coordinates).
Adding Constraints
Once you have loaded the parts in the Assembly and modified their position, you can add a constraint between two or more parts.
Select the parts that you want to use. (You can use the
CtrlorShiftkeys to select multiple parts.)Select either Common Constraints or Advanced Constraints from the Toolbox, then double-click the desired constraint.
Note that you can also add a constraint without first selecting the parts. You would later add the parts via the constraint's Properties panel.Make sure you selected the correct constraint type and that the participating parts are attached correctly before clicking Ok. Once you commit these changes, the type cannot be modified.
Select the Constraint in the Explorer panel. Enter a Name for the constraint.
To alter the default part assignments, you can change the assigned part.
Click Ok when you are finished setting up the constraint. Vortex has already calculated the Offset values and displays them on the constraint's Property panel.
Changing the Constrained Parts
You can use this procedure if you want to change the currently constrained parts:
In the constraint's Properties panel, click the Browse button next to the part's name , then .
If a part is connected, its name appears in the Select Part pop-up window.In the Explorer panel or 3D View, select the part that you want to assign.
Click to accept the assignment and close the box.
The name of the part you chose now appears as the part.You can now finish setting up the constraint.
Editing Constraint Properties
In the Vortex® Studio Editor, you can define how the attached parts will react in the simulation environment by defining the constraint's properties:
Note In order to verify proper functioning of a constraint after it has been modified, you should run the simulation to see the behavior of the relationship between the part and the constraint in motion. When a simulation is running, the physics engine is activated and the parts and constraints behave accordingly based on the environmental settings.
Editing Basic Constraint Properties
Select the constraint from the Explorer panel of the Assembly editor.
The constraint properties appear in the Property panel. On the Attachments tab you can see that Vortex Studio has already calculated and is displaying the offsets.
You can modify the following values:
- Reference Object
- Position
- Primary Axis
- Secondary Axis
Click the Orthonormalize button to recalculate the axis dimensions, based on the primary axis being dominant. The secondary axis direction will be set orthogonal to the primary axis.
The primary axis' dimensions will be normalized, and the orthonormal vector nearest to the specified secondary axis (and in the same plane) will be assigned to the secondary axis.
If you click the Orthonormalize button and Vortex cannot perform the computation (for example if you enter [0,0,0]), the following message appears:
Setting Limits on the Constraint
There are two really important things to consider when setting constraint limits:
- By default, a new constraint does not have limits, so you may need to set the lower and upper limit properties to ensure the correct behavior.
- You must make sure you explicitly activate limits for the constraint; otherwise, any limit values you set will be ignored.
Follow this procedure to set limits on a constraint:
Select the constraint in the Explorer panel of the Part editor.
In the Property panel, select the Controlled Axes tab.
Enable the limits by selecting the box next to Limits.
Set the values under Lower Limits and the Upper Limits sections (you may need to scroll down to find them).
Depending on the mode of your controllable coordinate, you may also need to set one of the following values:
- In Motorized mode, edit the
Desired VelocityandLossvalues on the Motor tab. - In Lock mode, edit the
Damping,Position, andStiffnessvalues on the Lock tab.
- In Motorized mode, edit the
If the Control is set to Lock, you can enable the Plastic parameter to enable deformation.
Setting the plastic option results in the part, when the maximum force is reached, to stay in the position that the force applied to the part, even when the force is removed.
Changing the Mode of the Controllable Coordinates
You can modify the mode of a controllable degree of freedom before and during simulation.
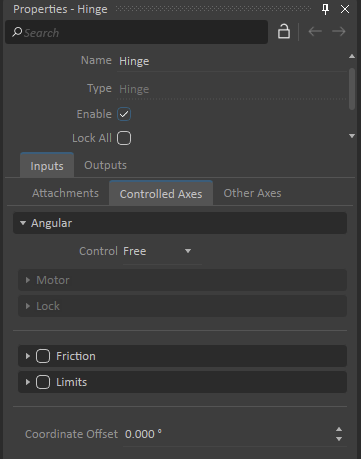
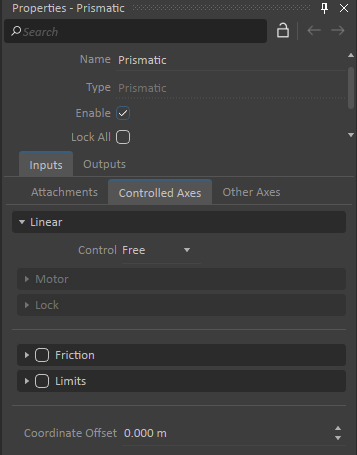
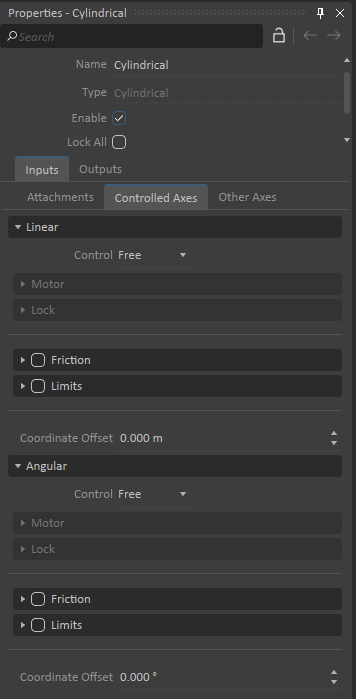
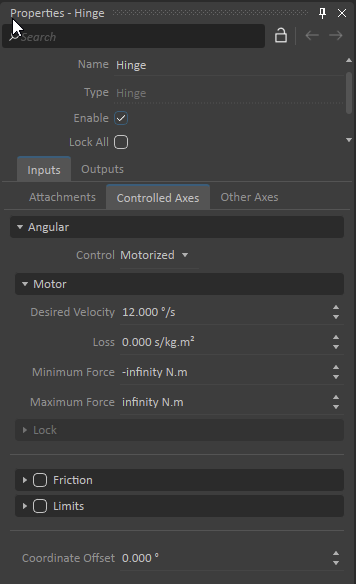
The type and number of Controlled Axes will depend on the constraint and its numbers of degrees of freedom (DoF). For example, a Hinge will only have an Angular controllable DoF, a Prismatic constraint will have a Linear controllable DoF, a Cylindrical will have a Linear and Angular DoF (see images below).
| Controllable Axes for a Hinge | Controllable Axes for a Prismatic | Controllable Axes for a Cylindrical |
|---|
Select the constraint in the Explorer panel.
In the Properties panel, select the Controlled Axes tab.
Under the Angular or Linear section, choose one of the options from the Control drop-down list.
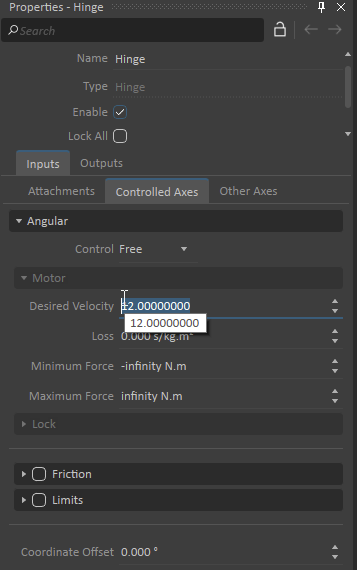
By default the Control is set to Free and the values associates with the other modes are grayed out. The grayed-out container can still be expanded and the values changed but they will not be used by the simulation until the mode changes to the related control. This enables you to set proper values beforehand to be ready once the mode is switched.Changing the value of a grayed-out Control Depending on the mode of your controllable coordinate, you may also need to set one of the following values:
- In Motorized mode, edit the
Desired VelocityandLossvalues on the Motor tab. - In Lock mode, edit the
Damping,Position, andStiffnessvalues on the Lock tab.
When the Motor or the Lock is selected, the corresponding container is un-grayed and expanded to make it obvious to the user that some properties need to be defined for this control type.
Control mode selected with expanded parameters - In Motorized mode, edit the
In the Lock options, you can select Plastic to enable deformation if the maximum force is reached.
Selecting the Plastic option results in the part, when the maximum force is reached, to maintain the position that the force applied to the part, even when the force is removed. Plastic deformation is done in a Plastic Lock by internally updating the lock position. This is done by monitoring the Lock Stiffness, Lock Position, Lock Maximum and Lock Minimum, and the coordinate current force properties of the Locked Coordinate. When using the Plastic mode, you must carefully set the Maximum and Minimum Forces, stiffness of the lock, and apply a proper damping value. Leaving these fields to their default values will not work with this mode of the constraint.
Note You must set the Lock Velocity property of a non-drifting motor after you select the control mode to Locked and select Plastic.
Customizing Part Attachments
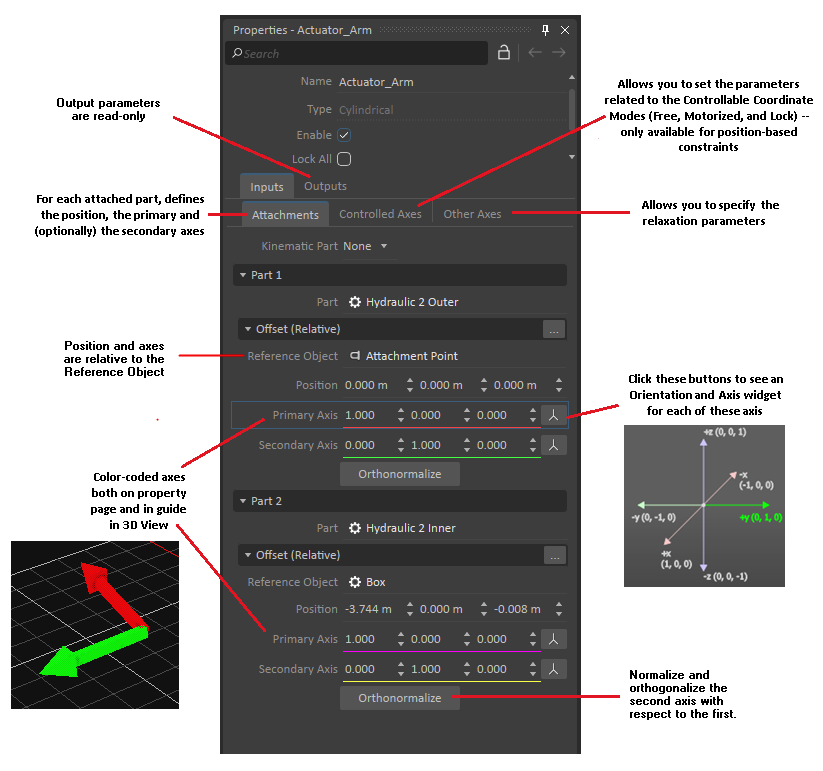
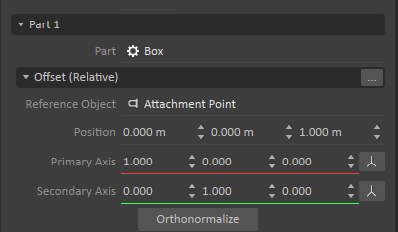
The part attachment (via Position, Primary Axis and Secondary Axis) is set as an offset in the local frame to the given Reference Object. By default (when the field is empty), the Reference Object is the part used for the attachment. However, it can be set to any other object that defines a World Transform property, such as another part, an attachment point, or a Graphics Node from a gallery, for example.
| Attachments tab |
|---|
The above image shows the properties for the attachment of Part 1 of a constraint. Here, the Reference Object uses an Attachment Point.
The Reference Object and the relative Position, Primary Axis and Secondary Axis can be set directly by their respective fields. During editing, the attachments are updated in real-time in the 3D View. Another useful approach to edit attachments is to use the Attachment Offset Window described in the following section.
Using the Attachment Offset Window
This section describes the functionalities found in the Attachment Offset Window.
Editing the Attachment
The Attachment Offset window is launched by clicking on the Browse button beside the Offsets (Relative) row heading.
Its title recalls which attachment you are currently working on (i.e., Part 1, Part 2, Part 3).
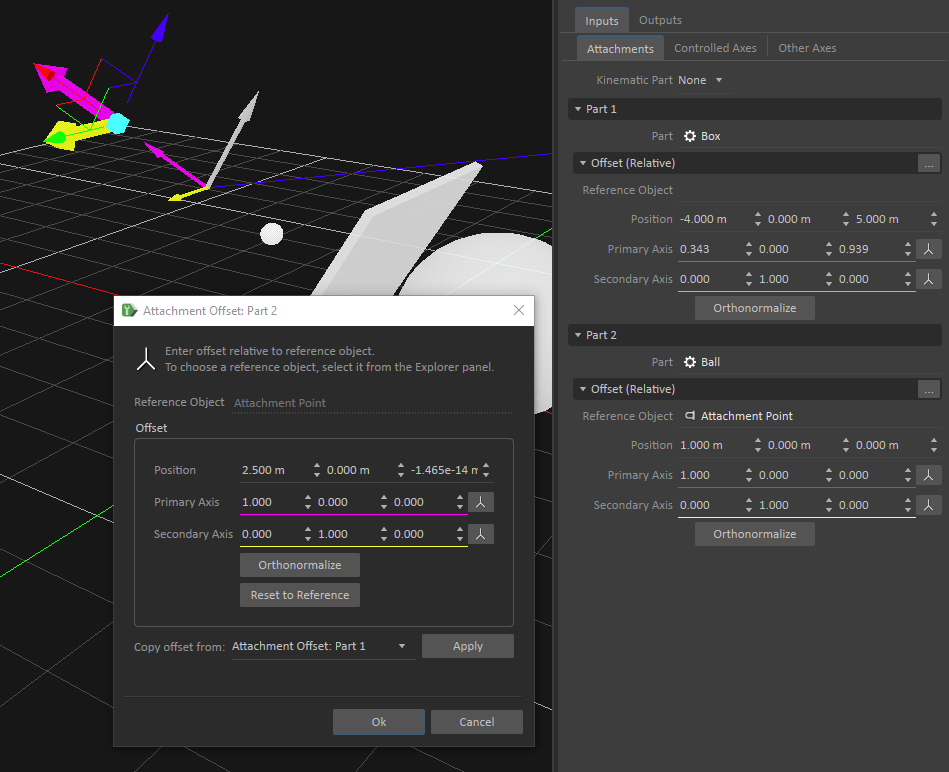
At first, the fields are initialized with the current values of the attachment. The Attachment Widget appears in the 3D View representing the current state of the attachment. The Move or the Rotate tools can be attached to the Attachment Widget to manipulate it. The Attachment Offset window shows the changes. Notice that the original attachment remains as it was at time the window was opened for reference. To change the Reference Object, pick one from the 3D View or chose one from the Explorer panel.
The following image shows an example of editing the second part attachment of a typical constraint. In the 3D View, we see the Attachment Point as a little white sphere representing the current Reference Object. The state of the attachment when the window was launched is seen in the 3D View (as a thin reference frame), and its values are seen in the Properties panel. The Attachment Widget appears (as the thick reference frame) in the 3D View, having been moved with the Transform tools 2.5 m. Note that using the Rotate tool in the Attachment Widget simplifies changing the desired orientation of the constraint's primary and secondary axes.
The Attachment Offset window features other functionality, as well. The Orthonormalize button quickly recomputes the axes to make sure that they are orthogonal unit vectors. The Reset to Reference button allows the removal of any offset from the current Reference Object.
Attachments and Constraint Violation
When authoring the part attachments, often there is a need to have the attachments have the same transform. Otherwise, the constraint might be violated and an instability can appear at the start of the simulation. What specifically make the attachment violate a constraint depends upon many things, among them the constraint type, the relaxation, and its control type.
In order to help to construct the attachments of a constraint in such a way that their transforms are equal, use the Copy offset from: field in the Attachment Offset window. In this field, chose one of the other attachments from the drop-down menu and press Apply.
Using Reference Objects to specify Part Attachments
- The Reference Object is used to specify part attachments, giving a world space transform with an offset.
- Any object that defines a World Transform property can be used as a Reference Object.
- This world space coordinate system is converted into the local space of the part of the constraint. Conversion happens at start of the simulation, or during simulation at the point in time where the constraint gets enabled.
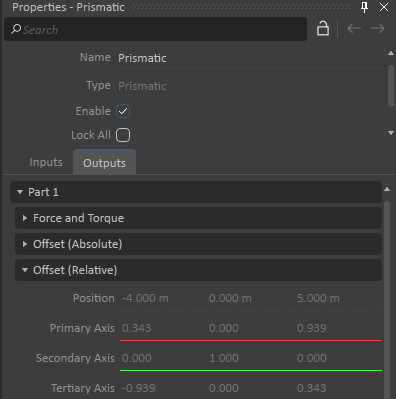
- The relative transform with respect to the part used in the constraint can be seen in the Outputs tab.
- Not setting the Reference Object is equivalent to using the part itself as a reference.
- Although optional, using a Reference Object to specify a part attachment makes it easier to maintain the equality between the attachments in a constraint.
- The Reference Object allows the definition of a part attachment in cases where a part of a constraint is not specified.
Advanced Constraint Concepts
Constraints in Vortex are viewed as a collection of Proportional Derivative (PD) controllers.
For example, a motorized hinge constraint consists of six PD controllers. The first five correspond to the constraint equations: three that maintain the relative position of the two parts and two that maintain the relative axle orientation. In addition, corresponding to the motor or lock, a last optional controller is velocity-based or position-based, depending on whether the hinge is free, motorized, or locked. The Vortex solver computes a force that minimizes the constraint violation for each responsible PD controller. If a soft limit is hit, another controller is activated.
The force for a given PD controller corresponds, in standard notation, to:
In the case of a position-based control, Kp and Kd correspond respectively to stiffness and damping. e(t) is a relative position or orientation and v(t), the time derivative of e(t), the linear or angular velocity. The controller's behavior will be typically a spring damper system ruled by the choice of the stiffness and damping versus the parts' masses and the other controllers acting on the same parts.
In the case of a velocity-based control, Kp is 0 and Kd correspond to the inverse of the constraint loss parameter. The violation of the velocity which is the offset between the current velocity Vc and the desired velocity Vd will evolve according to the equation,
where t is the time and T the mean lifetime of the initial violation. This corresponds to critical damping of the violation. In the case of a cylindrical wheel attached to a infinite mass chassis, we have,
More generally, the mass term should be replaced by the reduced mass of the parts. This means that the mean lifetime depends on the system's masses and the constraint loss and cannot be smaller than the time step. The wheel velocity is then,
and the torque applied by the motor will be approximately,
Torque applied by the motor in Vortex is an approximation because:
- The Vortex integrator uses a leap frog type of integration scheme instead of the Euler stepping scheme.
- Other controllers or external forces may affect the system and have influence on the evolution of the violation.
- The motor may be assigned a maximum force or torque, in which motorTorque(t) < maxForce.
