Importing Models from 3ds Max
- DEVOPS
 This section explains how to prepare your models for export in 3ds Max specifically, as it is the recommended DCC software for use with Vortex Studio.
Importing models from digital content creation (DCC) software is the first step in using the Graphics Gallery.
However, before bringing models into Vortex® Studio, they must be properly prepared for export in the original software.
Preparing Assets
In 3ds Max, the separate geometric parts of a model are linked together in a hierarchy consisting of Degrees of Freedom (DOFs). DOFs act as a type of skeleton that tie the parts together and define movements, such as rotations, pivot axis or constraints. They can also be used to define camera positions and light sources.
Creating Pivot Points
A pivot point is the origin of a node or object. This point determines where the object moves, rotates and scales, therefore proper placement of the pivot point is critical to the correct behavior of an object. For example, two objects that may appear outwardly identical will act differently if their pivot points are not the same.
There are three methods of creating a pivot point. Which you choose depends on personal preference.
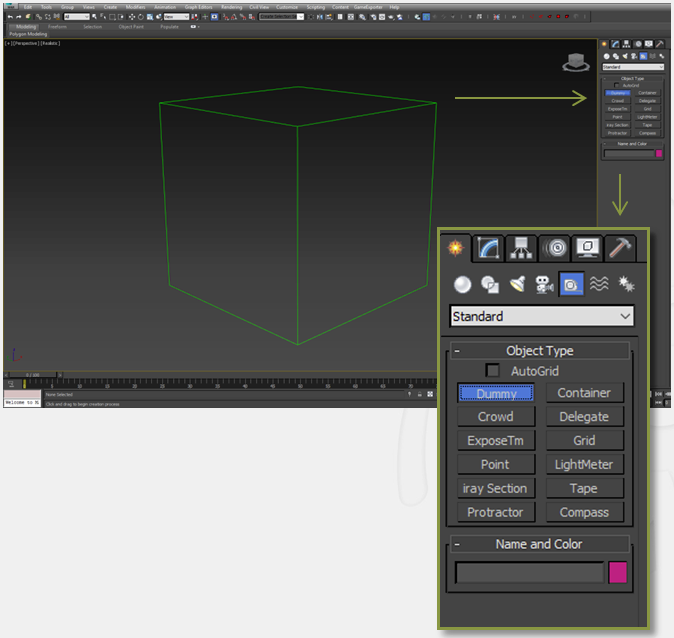
Method 1: Creating a Dummy Node
- In 3ds Max, in the Command Panel, select the Create tab.
- Select Helpers.
- Select Dummy, and click and drag it to the viewport to create a dummy node.
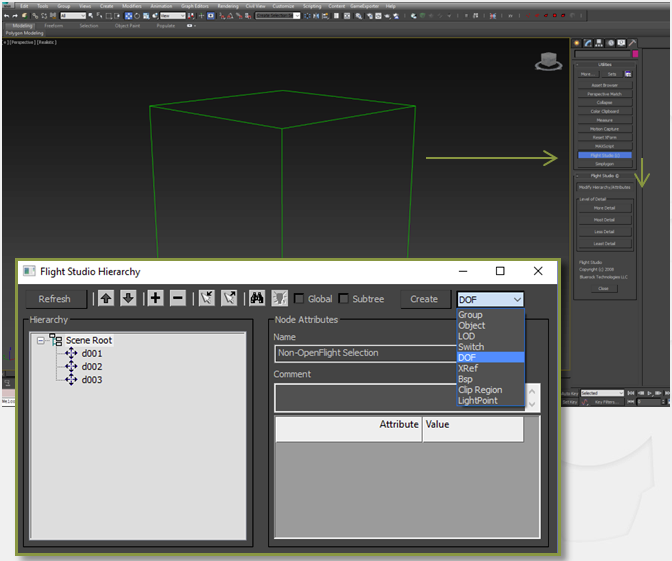
Method 2: Creating a DOF
- In 3ds Max, in the Command Panel, select the Utilities tab.
- Select Flight Studio.
- Select Modify Hierarchy/Attributes.
- In the resulting window, select the Scene Root.
- Open the drop-down menu next to the Create button and select DOF.
- Click Create.
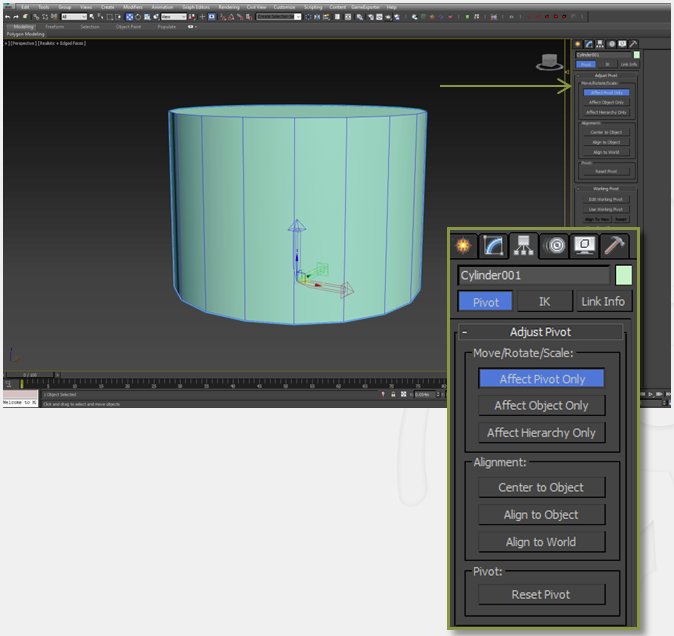
Method 3: Using the Geometry
By default, the pivot point is in the center of the object's base, but this can be modified.
- Select the object in 3ds Max.
- In the Command Panel, select Hierachy.
- Click Affect Pivot Only.
Performing these steps allows you to move or rotate the pivot point to another location without affecting the actual geometry.
Scene Explorer
Use the Scene Explorer to reorder the hierarchy and set parts as children of nodes. If the hierarchy is not set up correctly, the model may not behave properly in Vortex Studio Editor.
It's usually best to do this step with the help of the mechanical engineer who will create the simulation.
The Scene Explorer in 3ds Max is found under Tools > Scene Explorer.

Requirements for Creation and Exporting
Before any type of export can happen, it is very important that the transform history on all geometry be removed using Reset XForm (this will also reset any orientation the pivots might have had). This should always be done before setting up pivots. If you only need to reset the geometry's scale and not the pivot information, use Hierarchy > Reset Scale.
Also, any scaling on the DOFs must be reset to 100%. If any DOFs have scale other than 100%, the geometry must be unlinked before resetting the scaling.
Observe these requirements:
- Merge all static parts in a unique mesh inside the 3D model.
- Name all parts in a logical way (chassis, wheels, etc.).
- Ensure the front of the model is oriented in the +X-axis.
- Ensure the model is at the center of the world.
- Ensure the model is symmetrical and parts are equidistant from the center (e.g., wheels on a car are at -2 and +2 on the Y-axis).
- The model needs to be on the ground (+Z-axis).
Supported Functionality of 3ds Max Assets in Vortex Studio
- Nodes:
- Groups and mesh nodes are supported.
- Contents of Object Properties > User Defined are exported.
- Models:
- The asset must be in quads or triangles.
- All meshes are supported.
- All modifiers will be collapsed on export.
- Materials:
- Material ID from 3ds Max is supported.
- Each ID will have its own UV map, so it must have its own material.
- Custom UVs are possible.
- Standard MTL is supported.
- Use of Phong shading to approximate desired lighting.
- Emissive, Albedo/Diffuse, Normal, and Specular/Gloss maps are supported, up to 16 per material.
- Albedo or Diffuse maps must be assigned to the first texture coordinate (uv1).
- Multi/Sub-Objects are supported.
- Multiple UVs are supported, up to four.
- Material ID from 3ds Max is supported.
Unsupported Functionality of 3ds Max Assets in Vortex Studio
- Nodes:
- Animation controllers/curves/clips are not supported.
- Scales are supported but only on objects that will not be physicalized/simulated.
- Models:
- Skins are collapsed on export.
- Bones become ordinary nodes in the hierarchy.
- Mirroring is not recommended as it causes issues when creating dynamic parts.
Export Settings
The recommended method for exporting a model from 3ds Max is the Filmbox (FBX) file format, but OpenCOLLADA and OpenSceneGraph (OSG) are also supported. If you want to export using the full feature set of the COLLADA file format, use the OpenCOLLADA exporter.
For a list of all supported file types, see Graphics Gallery.
Recommended Settings for FBX
Select the following settings when exporting in the FBX file format:
- Animation: Unsupported
- Cameras: Unsupported
- Lights: Unsupported. If present, Vortex will interpret lights as nodes.
- Embed Media: Unsupported
- Advanced Options:
- Units
- Automatic: Unchecked
- Scene units converted to: Meters
- Axis Conversion
- Up Axis: Z-up
- UI: Not available
- FBX File Format
- Type: Binary
- FBX 2013
- Units
- Level of Detail (LoD) group: You must export animation data for LoD information to be exported, as well. To do so, make sure to select Animation in the FBX Export dialog options.
- The values associated with the LoD do not get exported ("Pixels" and "% of Target Image"). These values have to be edited inside Vortex Studio Editor. For additional information, see Autodesk's 3DS Max "Level of Detail Utility" help page.
Recommended Settings for OpenCOLLADA
Check the following boxes in the OpenCOLLADA Export window:
- Standard Options
- Bake Matrices
- Relative Paths
- Copy Images
- Geometry
- Normals
- Triangulate
- Tangents/Binormals
Recommended Settings for OSG
Check the following boxes in the OSG Exporter window:
- Output
- Save File
- Save Texture Images
- Export Objects
- Geometry
- Materials
- Textures
- Helpers
- Geometry State
- Texture Coordinates
- Vertex Normals
- Maps
- Diffuse
- Material State
- Export Material Description
- Miscellaneous
- Show Error Messages