USB Devices User Guide
- DEVOPS
Note Plugging in a USB device (such as a mouse or gamepad) to the computer does not require you to restart the Editor or Player. This action is sometimes referred to as hot swapping or hot plugging.
Some devices require extensions to be added either in the content or in the application setup. In some cases, the extensions are added in the application without any user intervention.
Vortex Studio supports USB gamepads that use the Microsoft DirectInput or XInput interfaces.
Setup
In the setup document, a simulator can be configured to use USB Controllers.
Vortex Studio supports USB Controllers by adding the SDL Joystick Module and Application Joystick Extensions on the node that where the device will be physically connected to. If you have multiples machines with USB devices, see Tandem Simulators
Each extension is given an index, which is the index of the devices as enumerated by the internal implementation.
However, the Windows OS does not guarantee that indexes will stay the same on a different system, or even on a local system. To avoid updating the setup file every time the indexes do not matches the system configuration, users can overwrite the indexes of the extension using the USB Devices settings Page.
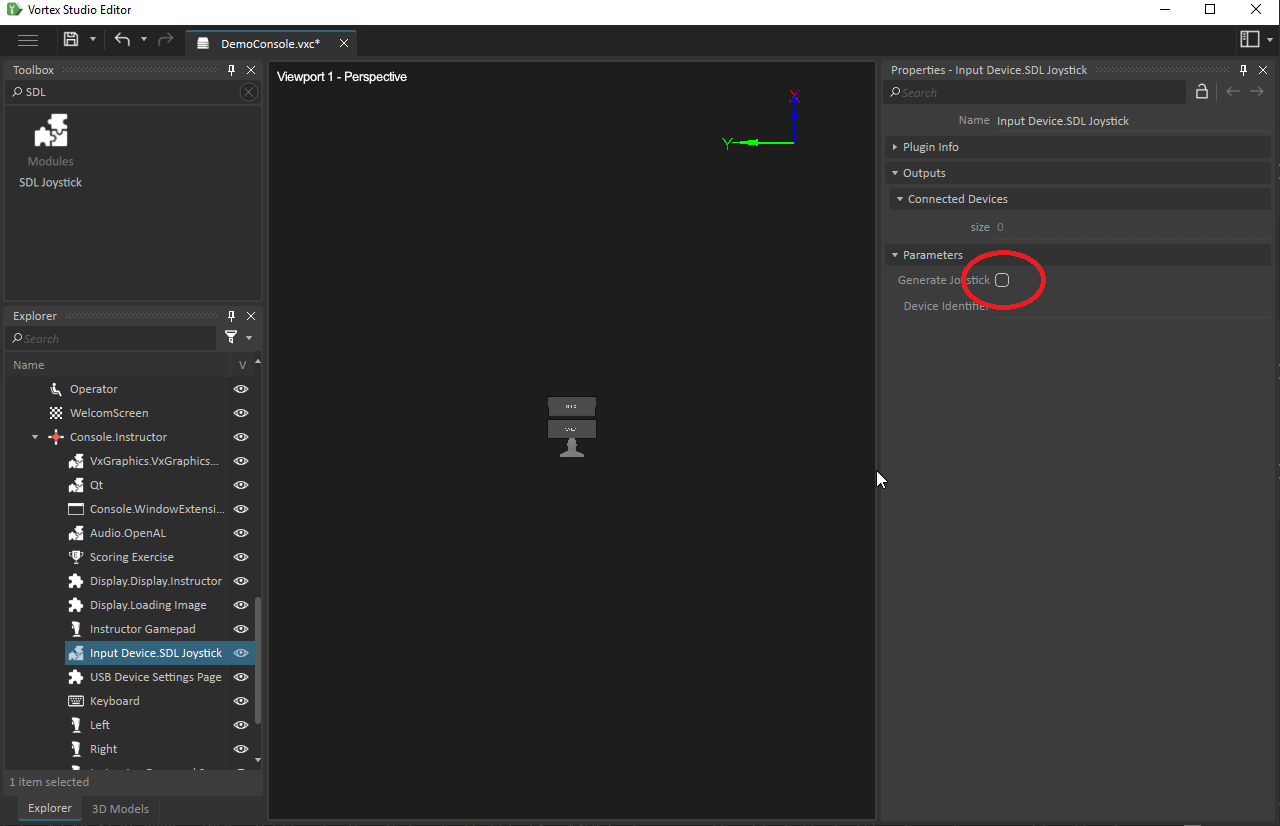
Modules
Make sure that the Generate Joystick option is checked off. The option allows the generation of devices but because the extensions are recreated every time, what is saved in the USB Devices Settings page will be lost.
There cannot be more than 1 node with an SDL Joystick module running on a given computer of the simulator or they will conflict.
Extensions
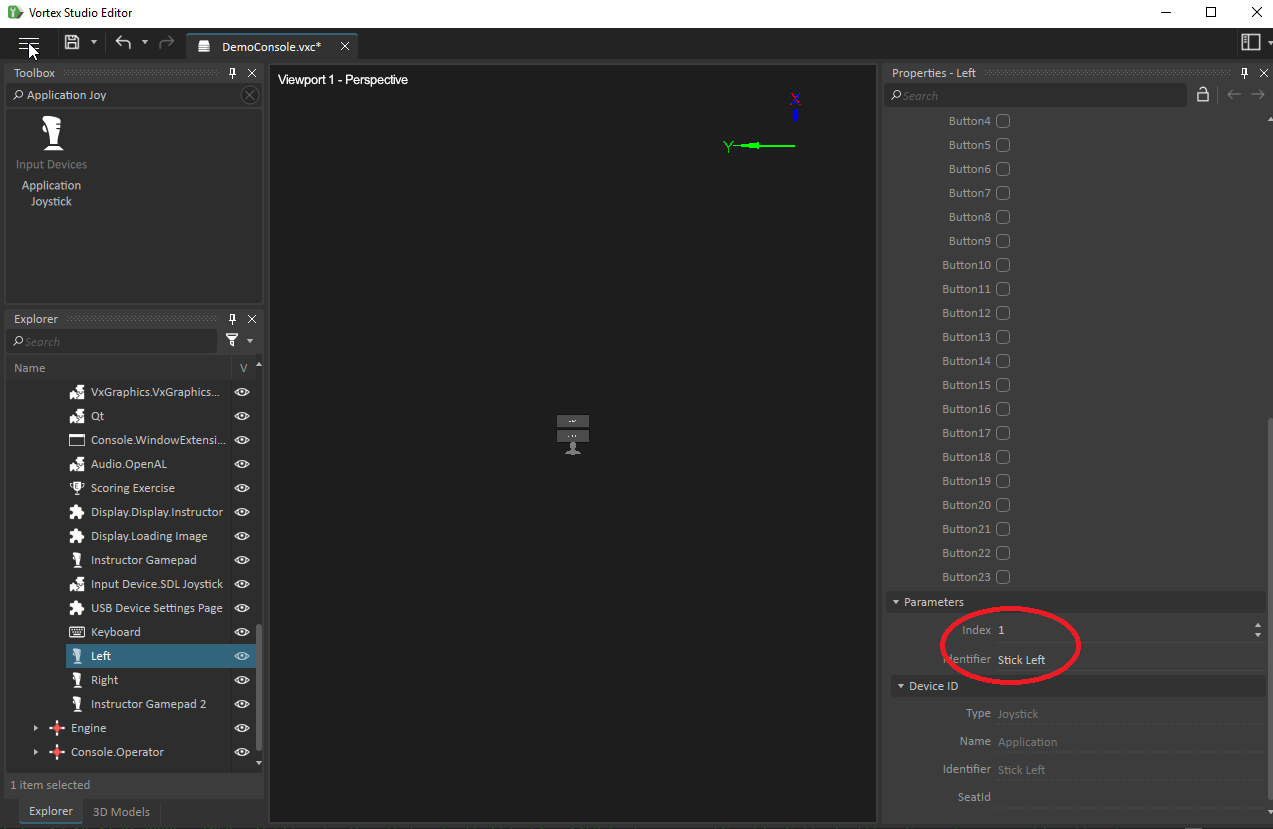
You will need to add an Application Joystick extension per USB Controller that you will have in your simulator.
Make sure you give your extension an index (starting from 0); note that in the editor there is no way to know which indexes correspond to which device, but the index will be different for different devices. You will be able to re-assign indexes from the Console using the USB Device Settings Page.
Make sure you give your extension a unique Identifier; the identifier will be shown on the USB Device Setting page. The identifier must be different per Vortex extension. Application Joystick extensions with the same identifier will be ignored and a warning will be shown in the log.
To reassign device indexes, you will also need to the USB Device Settings Page.
In order to show up in the "settings.control" section, the page category must be set to Settings_Controls.
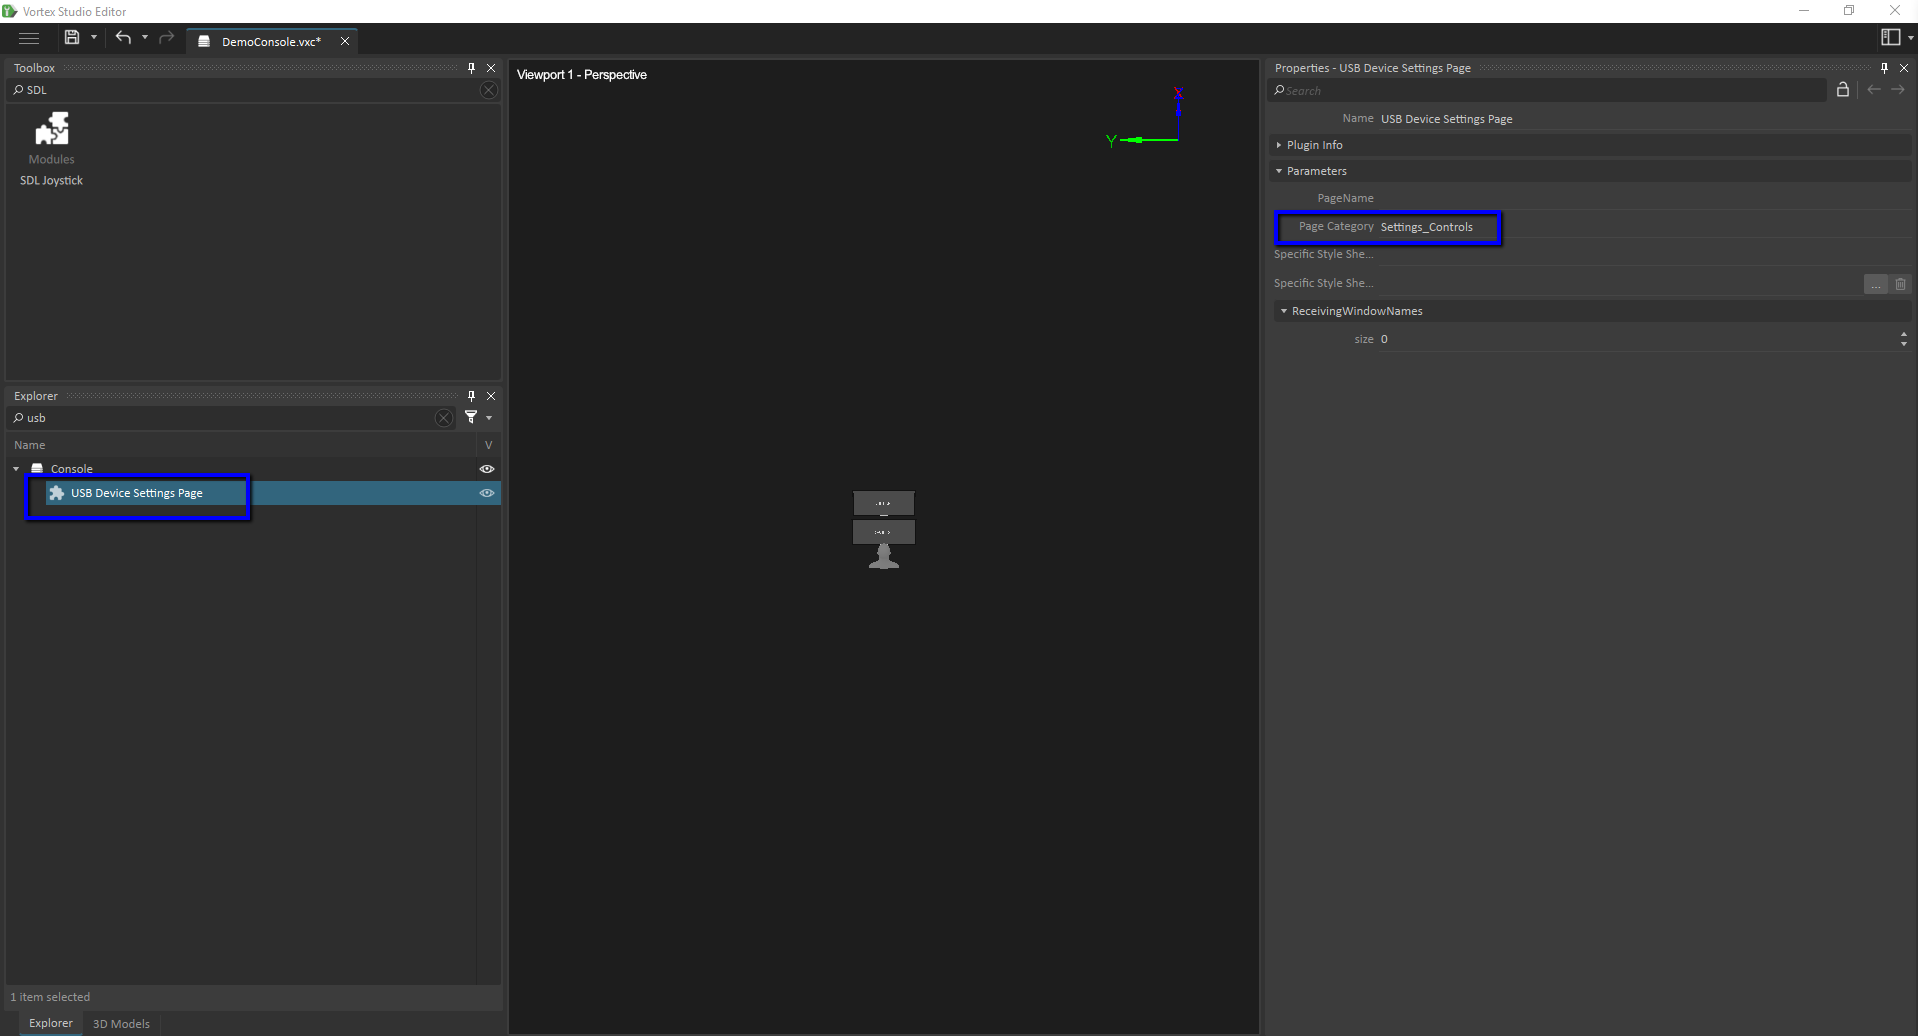
When set that way, the page will appear as a tab in the Settings/Controls section.
Device Mapping
Mapping the devices to the content needs to be done within the Vortex Studio Player or Console, using the Control Presets tab.
Console
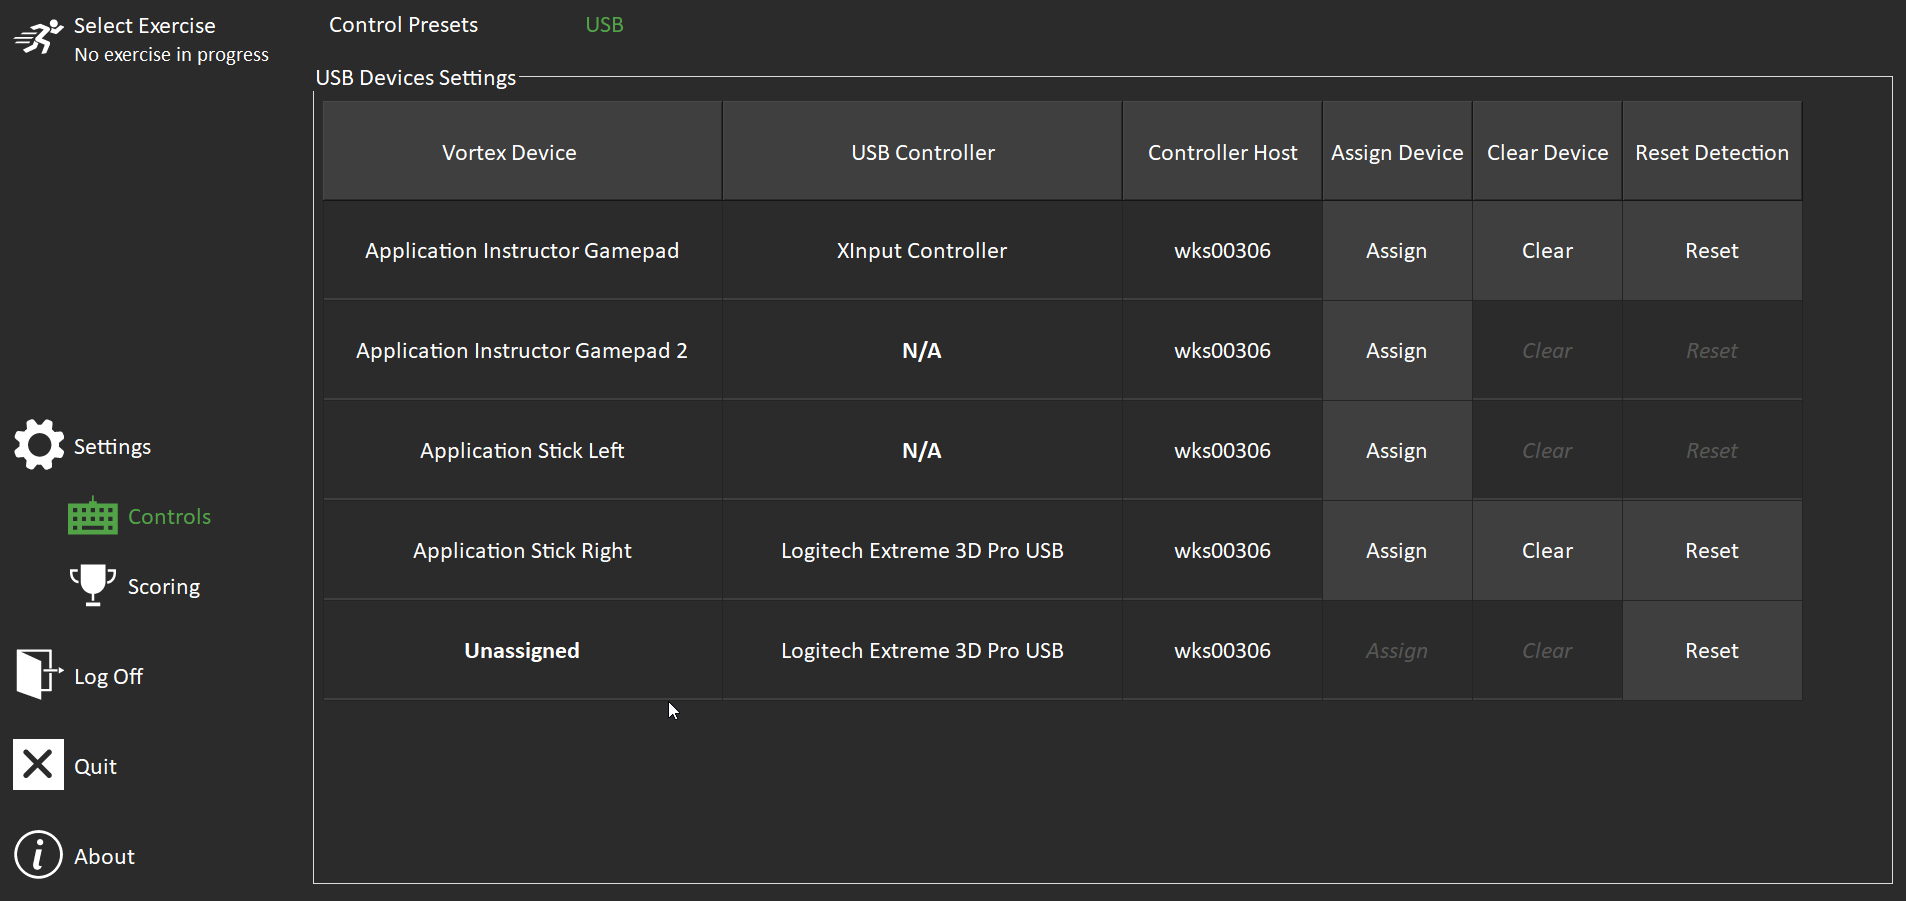
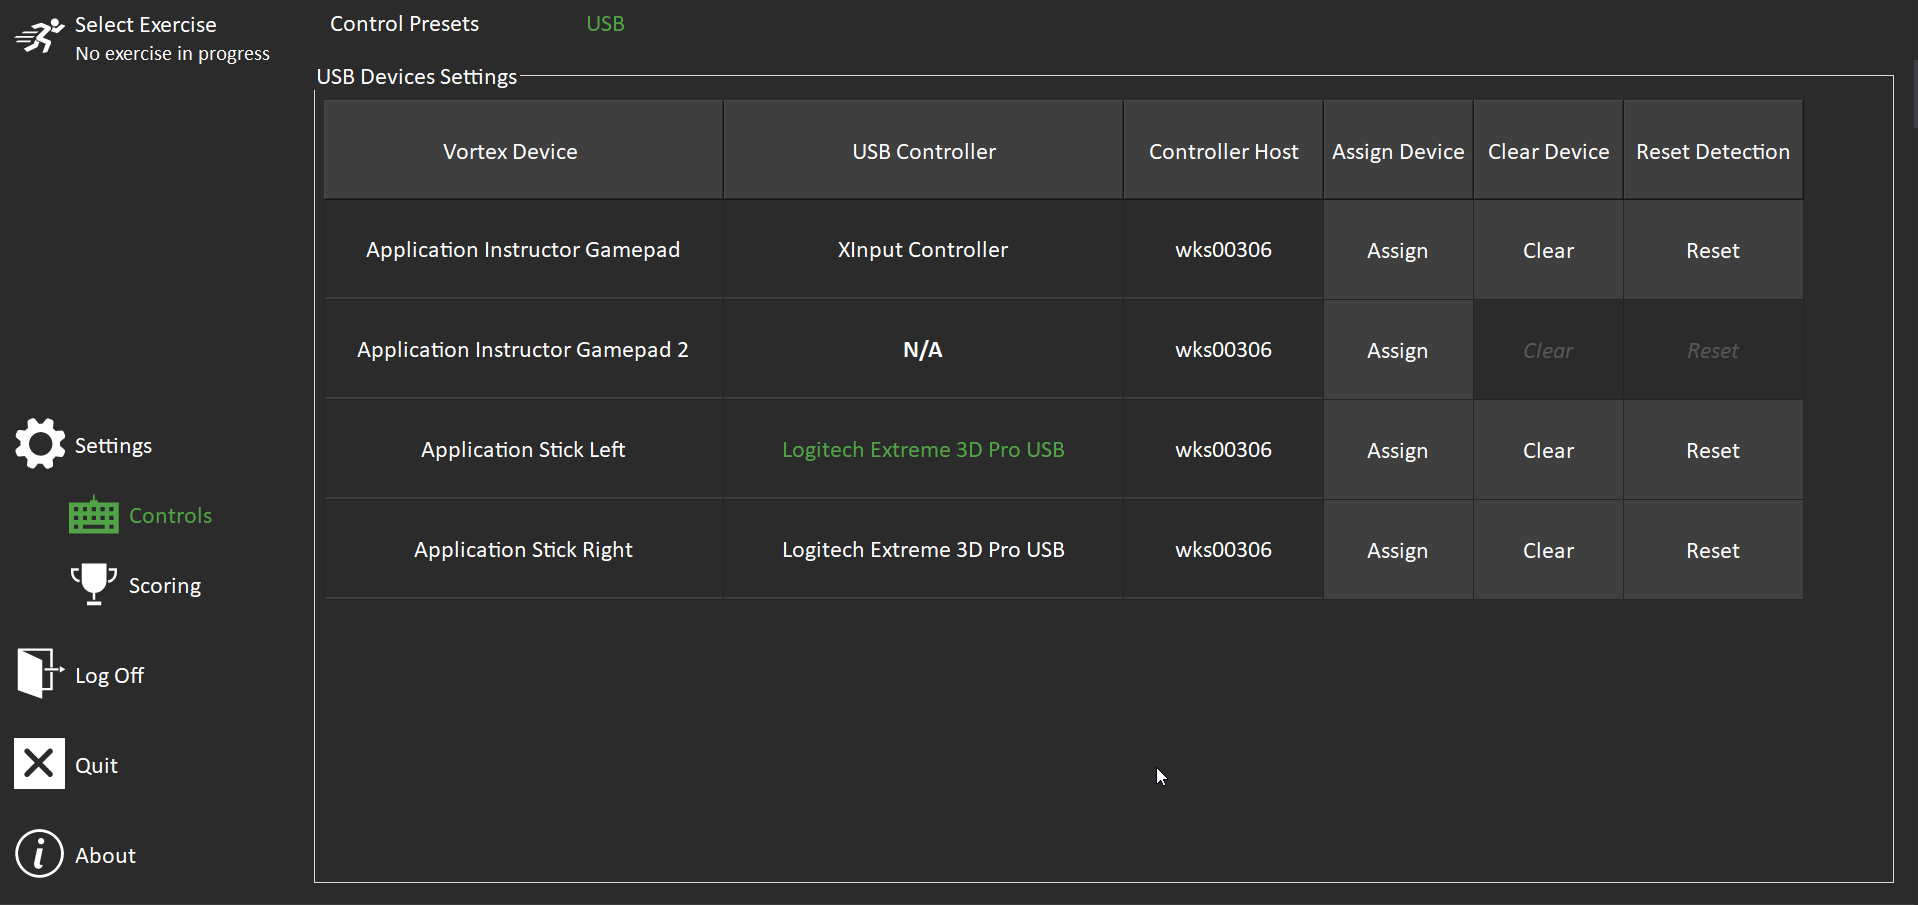
When running a simulator, the device settings can be looked at at any time. In the main Console Page, select Settings → Controls and select the tab USB.

The page gives an overview of the current device mapping.
- The first column shows the Vortex Device. It relates to Application Joystick extensions. The name will be Application with the Identifier that was given in the setup.
- If the ID is unassigned, this means there is a USB Controller on the system that is currently not assigned to any application joystick extension.
- The second column gives the name of the controller as seen by the module.
- It is possible that there will be duplicates if you have more than a controller with the same name or that the same device is assigned to 2 different Vortex Devices. To identify a controller, simply use it and the controller's name will be highlighted in green.
- If it says N/A, it means that the Vortex Device is not associated with any USB Controller.
- The third column indicates the machine in which the controller is plugged into.
- The last 3 columns are actions that can be done to modify the current assignment. See below.
Using the page
To identify each controller, simply press a button or move it and its name will be highlighted in green.
Assignment
To change assign a USB Controller to a given Vortex Device, click on the Assign Button of the Vortex Device to change.
The console will ask you to use the device to complete the assignment. Use the desired USB controller by pressing a button or moving it and the assignment will be done.

The assignment can also be removed, by clicking on the Clear button.
In some situations, a USB Controller will stay highlighted even if the user is touching it. This can happen when entering the page while the device is being used or something in the software prevent it to properly detect the changes. In this case, make sure the device is not being used and press the Reset button.
Those settings will be saved. Note that it does not change the indexes assignation in the setup file, it simply creates a setting that will overwrite what is in the setup file. The assignment may need to be re-done on a different simulator.
DirectInput Devices
DirectInput is a device protocol supported by Microsoft. When such a device is detected, an extension will be created for it.
The extension name will reflect the name seen in the Devices and Printers page in Windows, with an index starting at 0, incrementing per similar devices.
The following example shows a Microsoft Windows Devices and Printers page against the Vortex Studio Player's Content Debugger. No asset was loaded, however the module detected the following devices:
- Two Logitech F310 gamepads with their switch set to DirectInput (showing up as Logitech Dual Action),
- One Logitech F710 gamepad set to DirectInput (showing up as Logitech Cordless RumblePad 2)
- One Microsoft Xbox 360 Controller.
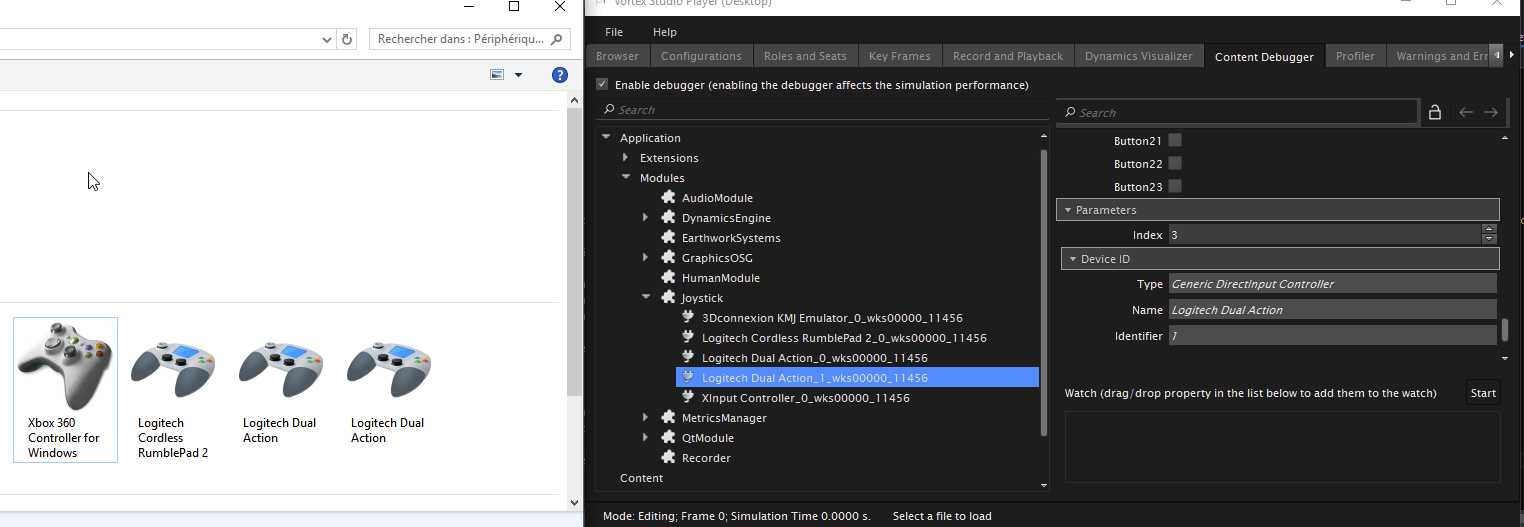
The DeviceID information is displayed in the Content Debugger tab, with the following format: device name + index + hostname + PID.
XInput Devices
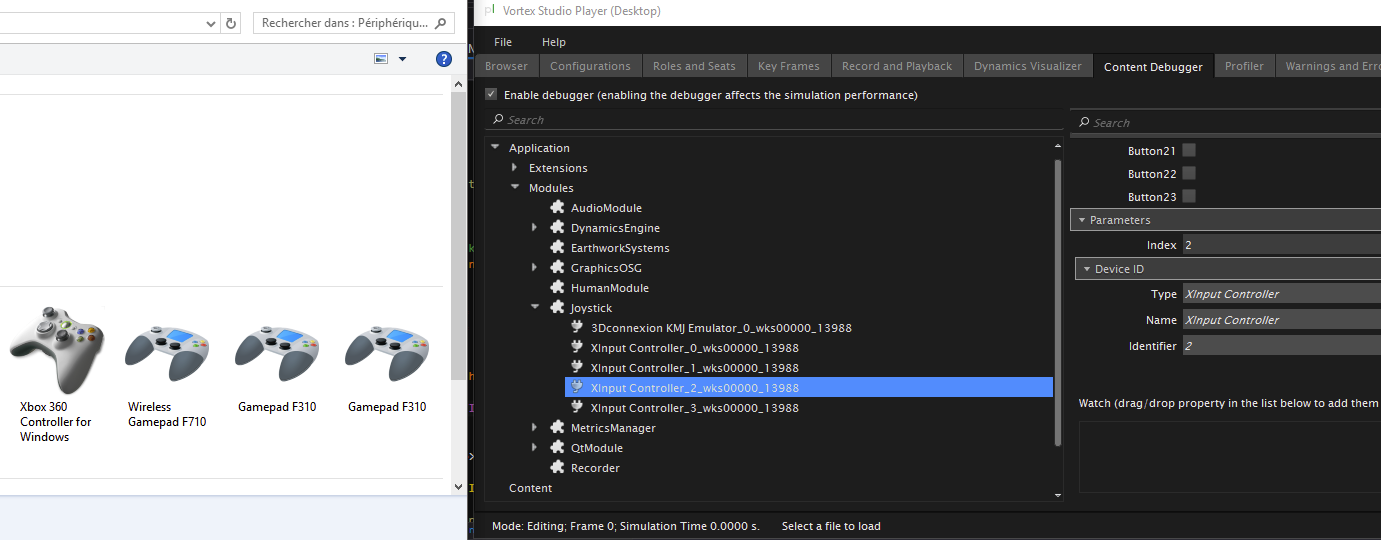
XInput is another device protocol supported by Microsoft, with more gameplay features than DirectInput. When such a device is detected, an extension will be created for it.
Since the XInput Protocol provides less information than DirectInput, the device will not contain the names seen in Windows; devices are described as "XInput Controller" followed by an index.
If the device is a wheel, it will show up as "XInput Wheel"; the name is based on the XInput subtype.
In the example below, the same gamepads as above were used, but their switch was set to XInput.
Upgrading Joysticks from Content to Control Presets
Vortex Studio supports using USB joysticks by adding the joystick extension to your scene or mechanism. With the introduction of the control presets, users now have the option to remove the joystick extension from their content.
One control interface can be used with multiple different devices including a USB joystick device. The mapping between control interface and devices is done from the Vortex Studio Player Control Presets tab.
To replace a joystick in your content with a joystick in a Vortex Studio Player control preset:
- Create a Control Interface document in Vortex Studio Editor. It should match the inputs present on your VxJoystickExtension.
- If you were using any 'ToggleButton', it must be replaced with the actual button combined with a script to hold the button state changes in your mechanism. Refer to Python Scripting documentation.
- Add the newly created control interface to your current mechanism containing the VxJoystickExtension.
- Right-click on the control interface entry in the Explorer panel and select Link from the context menu.
- Link the inputs of the control interface with the fields that your current joystick was connected to. Save your mechanism.
- Follow the instructions for creating preset mappings for your control interface document in Vortex Studio Player.
3Dconnexion SpaceNavigator Mouse Integration
Vortex Studio supports 3Dconnexion's SpaceNavigator 3D mouse as a manipulator.
To use a SpaceNavigator 3D mouse:
- Download and install the drivers from the 3Dconnexion's web site.
- Add the "Space Navigator Manipulator" extension to the desired application node (should have a graphics module) in the setup document.
- Start your simulator with the modified setup.
See also 3Dconnexion SpaceNavigator Mouse Mappings
Joystick Controlled Point
A Joystick Controlled Point is a content extension that handles joystick (gamepad) events, and outputs a world transform matrix. It allows you to move a point in 3D space through gamepad controls.
A common use case for this extension is to control a viewpoint or a camera.
Note To function properly, this extension requires the gamepad to be in DirectInput interface.
To add the extension in the Vortex Studio Editor and connect it to a camera:
- In the Toolbox, select Input Devices. Double-click Joystick Controlled to add it to your scene or mechanism.
- In a Connection Editor, connect the Joystick Controlled Point's Outputs > World Transform to the Inputs > Parent Transform of a Cameras Extensions.
The extension exposes four parameters which allow you to pre-select four movement speeds (Very Low Speed, Low Speed, Default Speed, High Speed) which are mapped to the four basic buttons on the gamepad. Each parameter include a linear speed (in meters per second) used for the move controls and an angular speed in (degrees per second) used for the tilt and pan.
Pressing the corresponding button on the gamepad will change the linear and angular speeds while moving the point with the other gamepad controls.
The Joystick Controlled Point can be controlled using the following gamepad mapping in DirectInput mode.
|
|
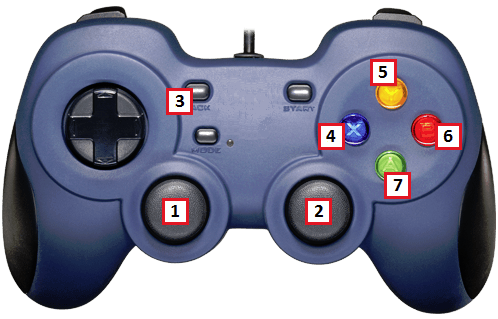
1 | Up and down: Move forward/back Left and right: Move sideways |
2 | Up and down: Tilt Left and right: Pan |
3 | Reset button: Switches to Default Speed while resetting the yaw to 0.0 and the pitch to its initial value. It will also move the point back to the origin. |
4 | Left button (X): Very Low Speed |
5 | Top button (Y): High Speed |
6 | Right button (B): Default Speed |
7 | Bottom button (A): Low Speed |
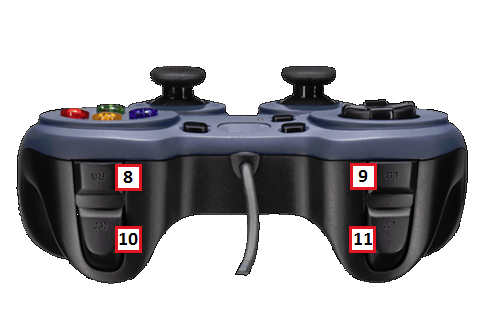
8 | Right blade (RB): Move up |
9 | Left blade (LB): Move up |
10 | Right trigger (RT): Move down |
11 | Left trigger (LT): Move down |
Note Keyframes and the Joystick Controlled Point When an application saves and subsequently restores a key frame, traditionally all extensions gets their "state" (all of its inputs, outputs and parameters) restored to the values saved in the key frame.The Joystick Controlled Point is an exception to this. It will not be restored and will keep its current position and speed settings.