How to Display Soil Particles in Unity
- DEVOPS
Soil Particles, dynamically simulated in Vortex Studio, can be rendered in Unity during simulation. When Soil Particles are loaded, a soil particles prefab is loaded from an asset bundle file located in the same directory as the Vortex file that contains the Soil Particles.
Manually creating prefabs and Asset Bundles
To manually create assets for the Soil Particles, a Unity project with the Vortex Integration Package is needed (such as VortexUnityTools or your own project), some soil particles prefabs must be added and the assets must be packaged in asset bundles.
For an overview of the assets workflow, refer to Workflow for Preparing and Using Assets for a Vortex Simulation with Unity Graphics.
Soil Particles Prefabs
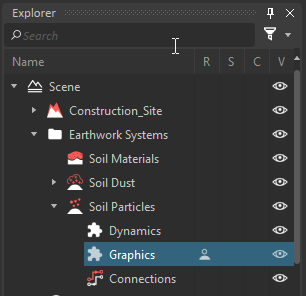
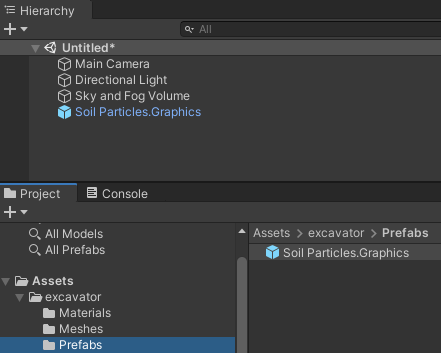
At simulation time, when a Soil Particles instance is added, the Vortex Integration will look for a soil particles prefab with a specific name. The prefab name must contain the Graphics Soil Mesh hierarchy with the Graphics Soil Mesh name from the Vortex Editor explorer without the parent element that is contained in a Vortex file. The hierarchy levels are separated with period characters. Folders are omitted from the hierarchy. The name and hierarchy are case sensitive.
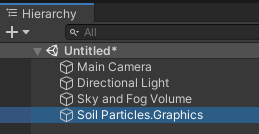
For example, for the following hierarchy, the prefab name would be Soil Particles.Graphics.
Creating a Soil Particles Prefab
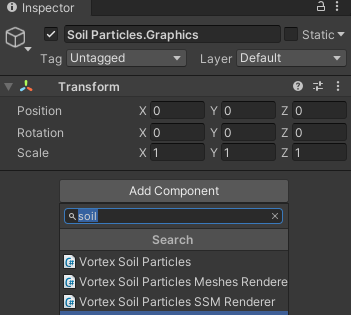
The soil particles prefab must have a Vortex Soil Particles component, a Vortex Soil Particles Meshes Renderer component and a Vortex Soil Particles SSM Renderer component.
- Create an empty GameObject

- Rename it with the proper name (see the Soil Particles Prefabs section introduction)
- Select the created GameObject and add the VortexSoilParticles, the VortexSoilParticlesMeshesRenderer and the VortexSoilParticlesSSMRenderer components in the inspector
- Import meshes and models in the asset folder that will be assigned to soil particles
- In the VortexSoilParticlesMeshesRenderer component properties, expend the Meshes and Materials property and change the size.
Expend the elements and assign mesh and materials. Note: the material must have GPU instancing enabled.
- Create a material based on the SoilParticlesSSMLitShader shader
- On the soil particles game object, in the VortexSoilParticlesMeshesRenderer component properties, assign the created material to the SSM Material Field
- Drag and drop the GameObject somewhere in the asset bundle folder in the project pane to create the prefab
In the following section, we present in great detail the required components that compose a soil particles prefab.
The VortexSoilParticles Component
The VortexSoilParticles component is in charge of managing the soil particles data and to updating the renderer.
The VortexSoilParticlesMeshesRenderer Component
This component is used to render the mesh instances in the soil.
These public fields can be configured through the inspector:
Field | Description |
|---|---|
| Mesh Visibility Percent | This value reduces the amount of particles rendered within the soil mesh |
| Meshes And Materials | These are the visual particle models and materials which will be associated with the dynamics soil particles. Note: the material must have GPU instancing enabled. |
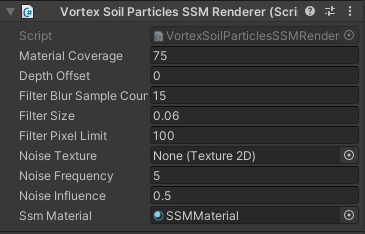
The VortexSoilParticlesSSMRenderer Component
Screen Space Soil Mesh (SSM) is a feature that renders a soil material between particles in order to create a smooth and consistent look for soil while keeping computations to a minimum.
These public fields can be configured through the inspector:
Field | Description |
|---|---|
| Material Coverage | When applying the SSM Material (see below) to the Screen Space Soil Mesh (SSM), this value (in meters) represents the amount of coverage before repeating the material. |
| Depth Offset | Shifts the SSM Particles towards the camera (positive value) or away from the camera (negative value). The value controls how much of the triangle meshes will be visible through the SSM soil. |
| Filter Blur Sample Count | Specifies the number of samples the blurring kernel will use. |
| Filter Size | Specify the sizes of the blurring kernel. |
| Filter Pixel Limit | Sets the maximum size of the kernel in pixels. |
| Noise Texture | The noise functions are baked into a texture. If no noise texture is supplied, a default Perlin noise texture will be assigned. Otherwise, you can supply a custom noise texture. |
| Noise Frequency | Controls the amount of detail as a result of the noise offset. |
| Noise Influence | Controls the amplitude of the noise offset. Increasing the influence increases the potential sampling area of the depth blurring kernel. |
| SSM Material | Material for the final SSM rendering |
The SSM Material
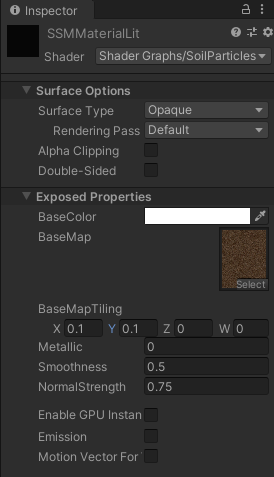
The SSM material must be based on the SoilParticlesSSMLitShader shader.
These public fields can be configured through the inspector:
Field | Description |
|---|---|
| BaseColor | The material base color |
| BaseMap | Albedo texture |
| BaseMapTiling | Base map texture tiling x y factors |
| Metallic/Smoothness | Unity's PBR parameters |
Creating an Asset Bundle
Once the soil particles prefabs are created, they can be packaged in asset bundles so that they can be loaded by VortexUnityApp, or your own similar Unity application with Vortex Integration.
The process for generating an asset bundle is described in this section. In short, you can use the Export Asset Bundle... command from the context menu when selecting the folder containing the prefab's assets.
Then, select the file's destination and name to create the file.
In order to get VortexUnityApp to load the asset bundles properly, the asset bundles files should be placed in the same folders where are stored the Vortex file that contains the Soil Particles.