/
Adding a Splash Controller
Adding a Splash Controller
- DEVOPS
Owned by DEVOPS
Oct 05, 2021
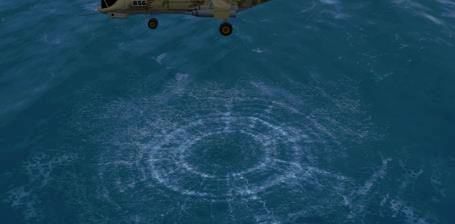 In marine scenarios, you can add a controller that drives multiple decals to simulate a splash effect.
Through a connection, you can associate the splash controller's outputs to the decals' inputs. Thus, every time a splash is triggered, the current position of the controller is used to position the decal and its animation (fade in, hold, fade out) starts. If the controller moves, the next splash is triggered at the new location.
To add a splash controller:
- Select Marine in the Toolbox.
- Double-click Splash to add it, or drag it to the desired location in the Explorer panel.
In the Properties panel, configure the following fields:
- Splash enabled: When this box is selected, the controller triggers a splash at the rate defined by the delay property (see below). The splashes continue until this box is deselected.
- Impact strength: The interpolated Strength vs Opacity curve (see "Strength/Opacity" below) uses the specified impact strength here to determine the opacity of a splash.
- Disturbed area: Specifies the size of the initial splash (in meters).
- Fade-in duration: Specifies the amount of time (in seconds) for the splash to go from an alpha (transparency) value of 0 to that determined by the impact strength.
- Fade-out duration: Specifies the amount of time (in seconds) for the splash to go from its alpha value (as determined by the impact strength) back to 0.
- Hold duration: Specifies amount of time the splash will hold its alpha value.
- Delay duration: Specifies the amount of time (in seconds) between splashes.
- Wave speed: Specifies the speed at which the splash scales (in m/s).
- Random decal rotation: Selecting this box ensures that each subsequent splash will be rotated in a random way so that the animation does not appear repetitive.
- Number of splashes: The amount of decal splashes shown after a splash is triggered. Note that once a decal animation is triggered, it cannot reappear again until its animation cycle is completed so make sure you stagger them accordingly.
- Strength/Opacity: Increasing the Size field adds more data points. For each data point, you must specific a pair of Strength and Opacity values. The Splash controller uses all the supplied data points to internally interpolate a Strength vs Opacity curve which is then used in conjunction with the Impact Strength field.
, multiple selections available,
Related content
Adding a Splash Controller
Adding a Splash Controller
More like this
Adding a Splash Controller
Adding a Splash Controller
More like this
Adding a Splash Controller
Adding a Splash Controller
More like this
Adding a Splash Controller
Adding a Splash Controller
More like this
Adding a Splash Controller
Adding a Splash Controller
More like this
Adding a Splash Controller
Adding a Splash Controller
More like this