Adding an Ocean Object
- DEVOPS
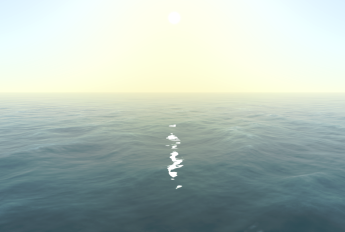 In Vortex® Studio Editor, you can add an ocean to your scene which contains the dynamics and graphical extensions.
To add an ocean:
- If you are not already in the Scene editor, either open an existing scene or create a new one.
- Select Marine from the Toolbox, and then double-click Ocean to add it.
The Ocean Dynamics folder appears in the Explorer tree containing the Ocean Graphics extensions, and the Ocean Dynamics extension's parameters appear in the Properties panel.
In the Properties panel, configure the following fields:
- Quality Level: Choose one of the values from the drop-down list (see Setting the Ocean Quality Level for details).
- Sea Level: Enter the surface level of the sea in meters.
- Sea Depth: Enter the depth of the sea in meters.
- Sea Floor Normal: The surface normal of the sea floor at the camera position. The point defined by the depth parameter under the camera position together with this normal defines a plane that approximates the position of the sea floor surrounding the current location.
- Sea Scale Type: Choose one of the values from the drop-down list (see Setting the Ocean Sea Scale for details).
- Wind Direction: Specify the angle of the wind, in degrees.
- Sea current velocity: Enter the speed of the water current in meters per second. This will displace objects in water at the speed indicated.
- Sea current direction: Enter the direction of the water current in degrees.
List of Wakes: You can add a list of wakes for this Ocean component. As you increase the size value, a new set of wake parameters appears under a numbered section.
These parameters are for advanced marine users only.- List of Swells: You can add a list of swells for this Ocean component (see Adding Swells for details).
- ExactWaves: Select this box to enable exact wave calculations, at a higher computational cost. This input's Scale parameter is a global scaling factor applied to all its wave components. Press the + button to add a wave component, then customize the following:
- Amplitude of the wave (in meter)
- Frequency of the wave (w, in rad/sec)
- Vector of the wave in the x and y directions (k)
- Phase of the wave (in rad)Click on the Ocean Dynamics extension to set any of the following parameters:
The Ocean Dynamics extension pushes these values to the Ocean Graphics extension, so you only have to enter them on the dynamics side; however, if you enter them on the graphics side only, only the visual is updated and pressing play or stop reverts all values to the dynamics outputs.- In the Parameters section, set the following fields:
- Sampling Resolution: Resolution of the sampling of the ocean (in meters).
- Water Density: Sets the density of the water, in kg/m3.
- Expand the Advanced Parameters to set the following fields:
- fft-grid-dimension-x and fft-grid-dimension-y: The dimensions of the tileable 2D array of wave points simulated. As FFT's are expensive, you don't want to make this too high - and there's no point in computing a grid that exceeds the resolution of the ocean's projected grid geometry in screen space anyhow. Larger grid dimensions can let you create larger grid sizes that reduce tiling, but we overlay some noise to hide tiling artifacts anyhow. Must be a power of 2.
- fft-grid-size-x and fft-grid-size-y: The size the FFT grid covers in world units. Larger values will reduce tiling, but stretching out the grid such that it's below the resolution of the underlying ocean geometry will interfere with your ability to render higher frequency waves. With these default settings where the size matches the FFT dimensions, we have a maximum resolution of 1 meter in the wave simulation. Note that many cards will not support mip-mapping on floating point textures larger than 256, so artifacts may result from increasing this. These values should match.
- fft-displacement-damping-distance: The distance (in meters) at which we start to dampen wave displacement (but not normals and the lighting) in order to avoid shimmering artifacts when rolling.
- swell-height-multiplier: Factor used to exaggerate or dampen sea swells.
- swell-phase-offset: Phase offset added to swell waves (in radians). Adjust this parameter if you need to match some other model that starts from a different point.
- maximum-wave-period: Sets a wave period in the simulated wave spectra, irrespective of the wind conditions requested.
- fft-phillips-constant: Sets a value that influences the height of waves as a function of wind speed. This value is only used when employing the Tessendorf model.
- fft-phillips-constant-jonswap: Like the parameter above, this value influences wave height, but only when using the JONSWAP model.
- fft-phillips-constant-pierson-moskowitz: Similar to the parameter above, this value influences wave height, but only when using the Pierson-Moskowitz model.
- In the Explorer panel, click Ocean Graphics.
- In the Properties panel, you can modify the look of the ocean. You can add underwater fog and reflection to the ocean simulation.
- Visible: Select this to have the ocean graphics displayed.
- Underwater Fog Distance: Sets the distance of the underwater fog, in meters.
- Water Transparency: Sets the transparency of the water. Values can range from 0.000 (full transparency) to 1.000 (no transparency).
- Fog Underwater Color: Sets the color (RGB) and transparency (alpha) of the fog under water.
- Refraction Color: Set the color (RGB) and transparency (alpha) of the refracted light under water.
- Horizon Distance: Sets the distance at which the horizon appears in the distance.
- Underwater Fog: Select this box to enable underwater fog.
- Reflection: Enable to see reflections of objects and sky on the ocean.
- Reflection Quality: Enter a value to produce the desired quality of the reflection. A lower value produces a lower quality reflection.
- Reflection Height Bias: Enter a height for the reflection to be rendered.
- Reflection Intensity: Defines how much gets reflected on the ocean surface. Valid values are between 0.000 (no reflection at all) and 1.000 (fully reflected, like a mirror). The images below show examples of reflection intensity.
- Reflection Planar Intensity: Specifies the degree to which objects (i.e., boats) are reflected in the ocean.
- Specular Factor: Adjusts the mirror-like reflection of the ocean's surface.
- Silt Depth Range: Specifies the range under the ocean where silt will appear. The first value is the depth where silt begins to appear (in meters) and the second value is the depth beyond which silt will no longer appear (in meters).
You can set the performance of the ocean reflection via the Adaptive Feature Controller extension's Ocean Reflection > Quality Level field
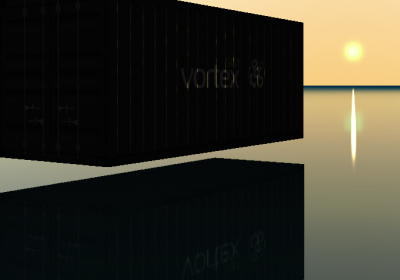
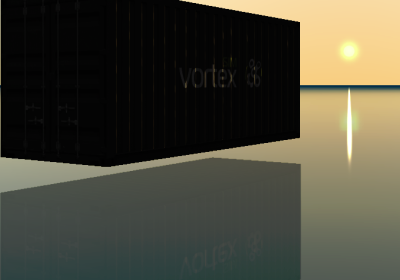
Reflect intensity set to 1.000 Reflection intensity set to 0.500
- In the Advanced Parameters section, in addition to the settings specified above, configure these parameters, as well:
- fft-noise-amplitude: Controls the amount of Perlin noise blended with the FFT patch to avoid tiling.
- fft-noise-distance: The distance (in meters) at which noise gets blended in to the wave displacements to hide tiling.
- num-detail-octaves: The number of octaves of detail applied to the surface normals. A higher value means more detail and more small waves but at the cost of additional texture lookups in the fragment shaders.
- foam-scale: The size of the projected foam texture (in meters). This value needs to be big enough such that tiling is not obvious.
- foam-blend: This value determines the prominence of foam. A value of zero means the foam is invisible.
- Visible: Toggle this box to turn the visibility of the silt on or off.
- Cast Shadow: Check this box to have the silt cast shadows.
- Receive Shadow: Check this box to have the silt receive shadows.
- Graphics Material: Selects the graphics material used for the silt.
- Particle Lifetime: Determines how long the particle lasts before disappearing.
- Particle Size: Sets the size of the sediment suspended in the water.
- Particle Color: Sets the color (RGB) and transparency of the silt.
- Wave Amplitude: Sets the amplitude of the silt particles' motion through the water.
- Wave Period: Sets the time for the silt particles to complete one cycle.
- Emission Enabled: Determines how much silt is emitted. The higher the value, the more silt.
- Emission Box Dimension: Sets the size of the imaginary box from which silt is emitted.
- Spray Cone Theta Range: Determines the range of angles from the +X-axis that the spray cone can take (in degrees).
- Spray Cone Phi Range: Determines the range of angles from the +Z-axis that the spray cone can take (in degrees).
- Spray Linear Speed Range: Determines the range of linear speeds the particles can travel (in meters per second).
- Particle Angle Start Range: Determines the range of angles from the which the particles can begin emitting (in degrees).
- Spray Angular Speed Range: Determines the range of angular speeds the particles can rotate (in degrees per second).
- Near Clip Distances: Sets the distance that is used to hide silt that would appear between the viewer and the first value set here. Silt then gradually reappears in the space between the first value and the value in the second field.
- Plane Near Clip Distances: Sets the distance that is used to hide silt that would appear between clip plane and the first value set here. Silt then gradually reappears in the space between the first value and the value in the second field.
- Direction Rotation: Select this field to have the particle's rotation affected by its direction.Under Ocean Graphics in the Explorer panel, select the Silt Particle Precipitation extension to edit the following silt effects. Note that the silt effect is disabled as soon as the camera exits the water.
Setting the Ocean Quality Level
The Quality Level setting found in the Ocean Dynamics extension supports the following different models:
| Level | Description |
|---|---|
Tessendorf | This the fastest model but the least accurate. Use this one if you anticipate a change in wind direction and/or speed every frame. |
Pierson-Moskowitz | This simulates a fully developed sea. That is, a sea produced by winds blowing steadily over hundreds of miles for several days. |
JONSWAP | This extends the Pierson-Moskowitz setting with an added artificial factor that makes waves less linear. It is however the slowest. Use this one if you are building a maritime training application or you need realistic ship motions. |
Setting the Ocean Sea Scale
You can set the Sea Scale Type setting found in the Ocean Dynamics extension in one of the following ways:
- Beaufort Scale
- Douglas Scale
- Manual
Beaufort Scale
The Beaufort Scale is an empirical measure that scales sea conditions based on wind speed.
To use this scale, set the Sea Scale parameter which determines the height of the waves as specified in the following table:
| Sea Scale | Height (in meters) | Sea conditions |
|---|---|---|
| 0 | no wave | Flat |
| 1 | 0-0.20 | Ripples without crests |
| 2 | 0.20 - 0.50 | Small wavelets |
| 3 | 0.50 - 1.00 | Large wavelets |
| 4 | 1.00 - 2.00 | Small waves with breaking crests |
| 5 | 2.00 - 3.00 | Moderate waves with breaking crests |
| 6 | 3.00 - 4.00 | Long waves |
| 7 | 4.00 - 5.50 | Sea heaps up |
| 8 | 5.50 - 7.50 | Moderately high waves with breaking crests forming spindrift |
| 9 | 7.00 - 10.00 | High waves whose crests sometimes roll over. |
| 10 | 9.00 - 12.50 | Very high waves with overhanging crests |
| 11 | 11.50 - 16.00 | Exceptionally high waves |
| 12 | 14.00+ | Huges waves |
Douglas Scale
The Douglas Scale measures the height of the waves as well as the swell of the sea.
To use this scale, set the Sea Scale and Swell Scale parameters which are described by the following tables.
To determine the height of the waves:
| Sea Scale | Height of the Waves (in meters) | Description |
|---|---|---|
| 0 | no wave | Calm (Glassy) |
| 1 | 0 - 0.10 | Calm (Rippled) |
| 2 | 0.10 - 0.50 | Smooth |
| 3 | 0.50 - 1.25 | Slight |
| 4 | 1.25 - 2.50 | Moderate |
| 5 | 2.50 - 4.00 | Rough |
| 6 | 4.00 - 6.00 | Very Rough |
| 7 | 6.00 - 9.00 | High |
| 8 | 9.00 - 14.00 | Very High |
| 9 | 14.00+ | Phenomenal |
To determine the state of the sea:
| Swell Scale | Description |
|---|---|
| 0 | No Swell |
| 1 | Very Low (short and low wave) |
| 2 | Low (long and low wave) |
| 3 | Light (short and moderate wave) |
| 4 | Moderate (average and moderate wave) |
| 5 | Moderate rough (long and moderate wave) |
| 6 | Rough (short and heavy wave) |
| 7 | High (average and heavy wave) |
| 8 | Very high (long and heavy wave) |
| 9 | Confused (wavelength and height indefinable) |
Manual
This scale type allows you to manually determine the wind velocity:
- Set the Wind Velocity parameter value to the speed of the wind in meters per second.
Adding Swells
Follow this procedure to add a list of swells to your ocean component.
- In the Ocean Dynamics extension Properties panel, set the number of swells you want to use in your scene in the size parameter under the Swells section.
As you increase the size value, a new set of four Swell parameters appears under a numbered section. - For each new set of parameters, you can set the following values:
- Wave Length: Set the length of the swell wave, from peak to peak, in meters. Swells are generally around 100-200 m. (Default value: 100 m.)
- Wave Phase: Phase of the swell wave, in radians, from
-Pito+Pi. (Default value is 0.) - Wave Height: Swell wave height, from peak to trough, in meters. Swells are generally around 2-4 m. (Default value is 2 m.)
- Wave Direction: Direction of the swell wave from the X axis, in radians, from
-Pito+Pi. (Default value is 0.)