/
The Browser Tab
The Browser Tab
- DEVOPS
Owned by DEVOPS
Oct 05, 2021
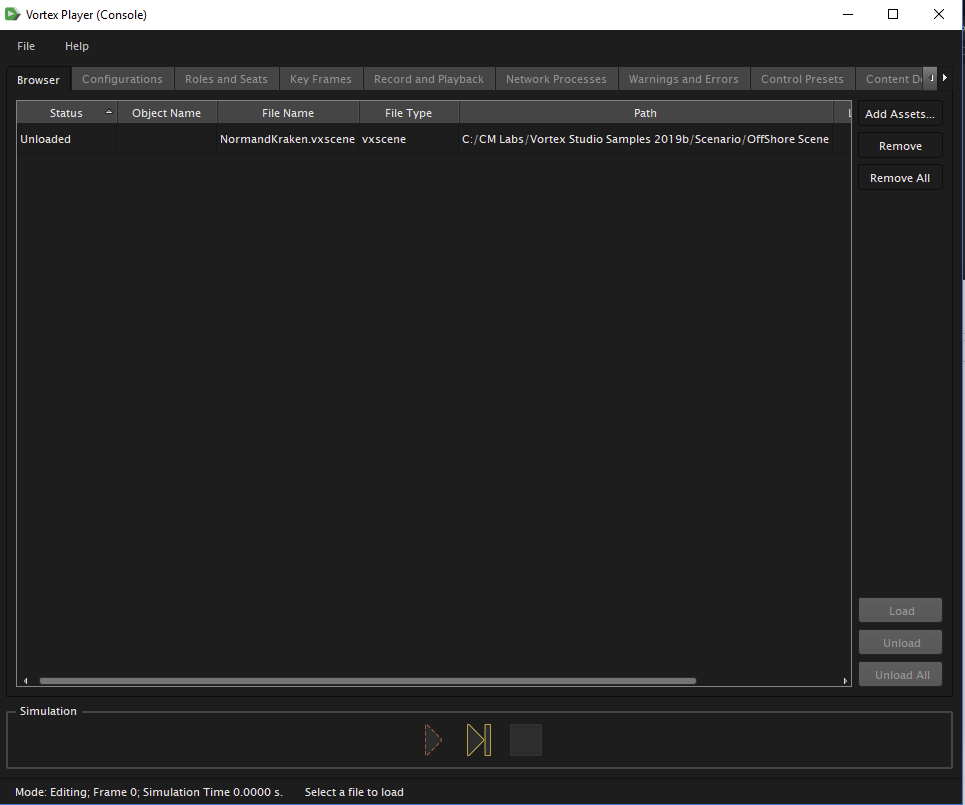
The buttons on the screen perform the following actions:
- Add Assets...: Adds assets one at a time. In the resulting dialog box, navigate to the desired file to load it into the Player's browser. Files can also be added via drag and drop from Windows File Explorer.
- Remove: Removes the selected asset from the list.
- Remove All: Removes all assets from the list.
- Load: Loads a selected asset from the list. You must load an asset before you can play it.
- Unload: Unloads a selected asset. You cannot play this asset again until you reload it.
- Unload All: Unloads all loaded assets.
Simulation Controls
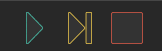
The Player's application mode is set to Editing upon loading. While in Editing mode, you are able to load assets. Once you load an asset in the browser (using the Load button), use the simulation controls to interact with it. The controls behave in the following ways:
- Play: Launches/resumes the simulation. The application mode is set to Simulating and is running. While playing, the Play button turns into a Pause button.
- Pause: Pauses the simulation. The application mode stays in Simulating but is paused. The button is visible only when simulation is running.
- Step: Launches/resumes the simulation for one frame then pauses. The application mode is set to Simulating and is paused between frames.
- Stop: Stops the loaded simulation that is currently playing. The frame and simulation time are reset to zero. The asset is restored to its initial state and the application mode is set to Editing.
Keyboard Help
When you are running a simulation in the Main Window, you have access to many features with keyboard shortcuts. For example, if you press the F1 key, the following help shortcuts appears overlaid on the simulation:
- F2: Cycle polygon fill mode
- F3: Toggles the Graphics Information Display
- Alt-Enter: Toggle full-screen
- Alt-O: Write passes to file (saved_scene.osg)
- Alt-P: Debug next render pass
- Shift-Alt-E: Toggle shadows
- Shift-Alt-P: Debug previous render pass
- Shift-Alt-R: Reload all shaders
- Alt-Ctrl-P: Deactivate render pass debugging
Press F1 again and the second page appears:
- F7: Toggle pause/run the simulation
- F8: Step the simulation once
- Shift-C: Toggle contact display
- Shift-G: Toggle collision geometry (CG) display
- Shift-I: Toggle inertia tensor display
- Shift-J: Toggle constraint display
- Shift-M: Toggle center of mass (COM) display
- Shift-O: Toggle the graphics node origin
- Shift-P: Print universe content (universe.txt)
- Alt-C: Cycle between contact display types
- Alt-G: Toggle attachment point display
- Alt-P: Print contact pairs
- Alt-X: Halve the length of the lines in the contact display
- Alt-Z: Double the length of the lines in the contact display
- Shift-Alt-D: Verify dynamics
- Shift-Alt-M: Toggle part origin display
- Shift-Alt-P: Print contact property pairs
Press F1 again to see the third page:
- C: Cycle through all cameras
- R: Cycle through all roles
- Ctrl-Shift-D: Dump the current application configuration and content
When you press F1 just one more time, the keyboard help disappears.
, multiple selections available,
Related content
The Browser Tab
The Browser Tab
More like this
The Browser Tab
The Browser Tab
More like this
The Browser Tab
The Browser Tab
More like this
The Browser Tab
The Browser Tab
More like this
The Key Frames Tab
The Key Frames Tab
More like this
The Key Frames Tab
The Key Frames Tab
More like this