The Explorer Panel
- DEVOPS
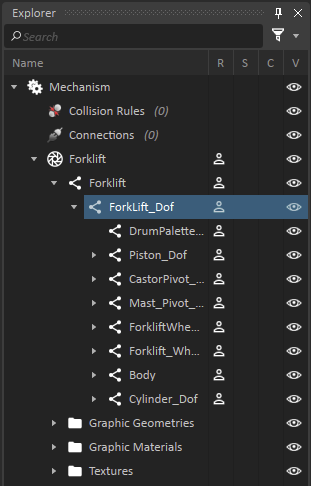
The Explorer panel displays the elements of the scene, mechanism, assembly, part, or graphics material, and 3D model assets arranged according to the element's hierarchy. The root of the tree contains all dynamics objects that are in the simulation as well as their properties. When an element in the Explorer is selected, its properties appear in the Property panel.
Along the right-hand side of the Explorer panel, there appear four columns, described below.
- R: Role Status; displays the role icon if the there is a role associated with this element.
- S: Skin Status; displays a paint bucket icon if there is a graphic associated with this element.
- C: Configuration Status; displays a configuration icon if there is a configuration associated with this element.
- V: Visibility Toggle; displays an eye icon with or without a bar through it depending on the visibility status of this element. You can toggle the status by clicking the eye icon, or right-click the icon for more options.
Note If an extension appears grayed out and in italics, this means that the extension is unmanaged. An extension can be unmanaged for the following reasons:The associated plugin/module is not installed or configured properly. This can happen when an extension is configured outside Vortex Studio Editor using the Vortex Studio SDK.The extension is not available under the current license.
Changing the Visibility of Objects in the 3D View
Each entry in the Explorer panels has an eye icon on the right side of the panel.
When a diagonal line appears over the eye, that indicates the entry does not appear in the 3D View. Some elements are hidden by default: for example.
You can toggle an element's visibility by performing any of these actions:
- Click the eye icon beside the element you want to hide/display.
- Right-click the element in the Explorer panel and then select Show Selected or Hide Selected from the context menu.
- Right-click the eye icon to view and change the status of hidden elements.
In addition, the context menu also provides some convenient features:
| Menu Item | Shortcuts | When A Single Element Is Selected... | When Multiple Elements Are Selected... |
|---|---|---|---|
| Show/Hide Selected | Ctrl+K | Shows/Hides only the element. Does not toggle deselected items. | Shows/Hides only selected elements and hides all deselected elements. Affects the visibility of all objects. |
| Show Only Selected | Ctrl+H | Hides deselected elements and shows selected elements, regardless of their previous selection state. Affects the visibility of all objects. | Hides deselected elements and shows selected elements, regardless of their previous selection state. Affects the visibility of all objects. |
| Show Only Deselected | Ctrl+Shift+H | Shows deselected elements and hides selected elements, regardless of their previous selection state. Affects the visibility of all objects. | Shows deselected elements and hides selected elements, regardless of their previous selection state . Affects the visibility of all objects. |
| Show All | Shift+H | Shows everything. | Shows everything. |
| Hide All | Alt+Shift+H | Hides everything. | Hides everything. |
Working with Folders in the Explorer
Unlike a scene graph in a 3D asset content creation tool or Vortex® v5.x, most of the hierarchy presented in the Explorer is not significant.
That is, if you prefer to impose a different hierarchy or order on the folders and elements displayed, you can do so.
There are some restrictions as to what you can do. For example, if you are working on a vehicle in the Mechanism editor and want to keep the assembly and the vehicle preset in the same folder, you can create a new folder at the root level, move the assembly specific to the vehicle into it, and then move the Vehicles folder into you new folder. However, you cannot move only the Chassis part out of the assembly and into the new folder because the internal Assembly structure is controlled by the assembly and must only be modified there. Similarly, you cannot move just the vehicle preset out of the Vehicles folder into the new folder.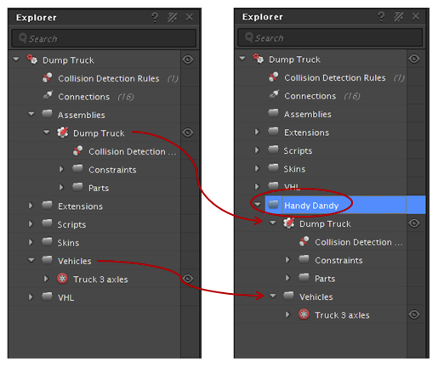
The following are some basic procedures for reorganizing the Explorer tree.
 Renaming an Explorer Item
You can select the item in the Explorer and then type the new name in the Name box on the property panel.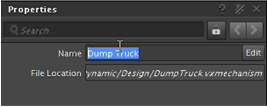
Note Alternatively, you can click on a file or folder twice in the Explorer panel and type a new name.
Creating a New Folder
You can create new folders either at the top of the tree or under another folder:
Right-click on the folder and select Insert > Folder from the context menu.
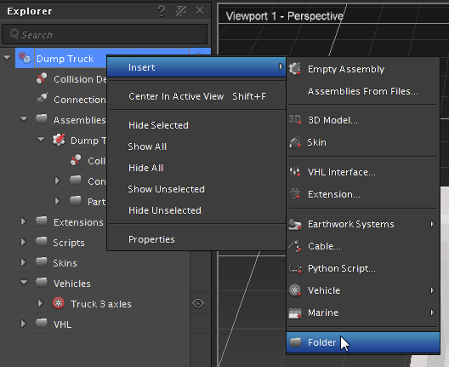
The new folder appears in the Explorer, named Folder by default.
Type the new name and press Enter.
Moving an Item in the Explorer Tree
Drag and drop the item onto the folder to move an item to a new location.
If you try to move an item to an invalid location it will snap back to its previous location.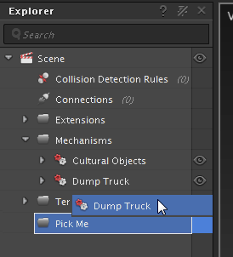
Filtering Elements by Name
When the tree in the Explorer panel becomes overpopulated with elements, you can reduce the elements that appear to include only those whose names match a filter string:
- Type a string in the textbox at the top of the Explorer panel. Only those items with the filter string in the name remain visible in the Explorer tree.
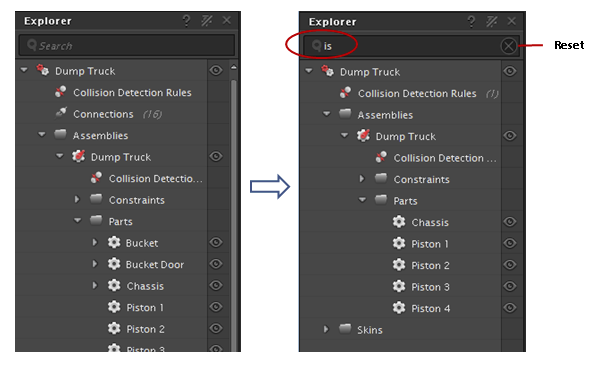
Note If you want to reset the filter string (clear the textbox), click the Reset button at the top right corner of the Explorer Panel.
Filtering Elements by Category
A drop-down menu appears when the funnel icon is clicked.
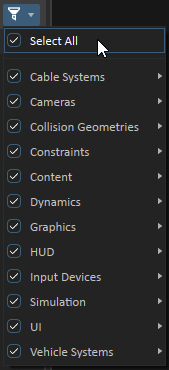
Its content is dynamically adjusted to the content of the document currently examined. This filter is available in every document type, and it only affects the Explorer (the 3D Viewport remains unchanged). Note that the filtering menu and the text filter at the top of the panel are additive.
When active, the filter will expand the hierarchy to reflect your choice(s); when the filtering is removed, the hierarchy returns to its previous state. You can apply a filter selection independently to different documents; it is not cleared when changing tabs, but neither is it saved when the Editor or a file is closed.
Once the desired objects are listed in the Explorer window, you can select one or more of them. To multi-select, press Shift in addition to the mouse button for a consecutive list of objects, or press Ctrl in addition to the mouse button for individual selections. You can then apply changes in the Properties panel. If the selected parameter is shared by all selected objects, it will change for all of them.