Working with Documents
- DEVOPS
Apart from these standard file operations, you can insert documents into a document parent. These documents may be already created (that is, a file already exists) or they can be created on the fly by Vortex® (that is, an empty component). The only restriction on these types of operations is which type of document is supported for a given parent (see Toolbox for details).
While a file is open in Vortex Studio Editor, that file locks on disk, meaning it cannot be deleted. You must close the file if you want to delete it.
If an open file has any sub-documents, those sub-documents are also locked, even if they are then removed from the parent file. You would have to close the parent file in order to unlock the sub-document. For example, if you have an assembly in a mechanism, the assembly is locked on disk until the mechanism itself is closed, even if you removed the assembly first.
Creating a New Document
You can create a new document:
by following these steps:
- Do one of the following:
- Open Vortex® Studio Editor, landing at the Home page.
- Click
 to go to the Home page.
 - From any open document, press the Ctrl+N key combination to go to the Home page.
- Click the document type of your choice (for example, Mechanism).
A new tab opens for your selected document.
Note While a file is open in Vortex Studio Editor, that file locks on disk, meaning it cannot be deleted. You must close the file if you want to delete it. If an open file has any sub-components, those sub-components are also locked, even if they are then removed from the parent file. You would have to close the parent file in order to unlock the sub-component. For example, if you have an assembly in a mechanism, the assembly is locked on disk until the mechanism itself is closed, even if you removed the assembly first.
Naming Convention
A convention for file and object names should be defined and followed so that every user is on the same page.
This is our suggested naming convention to determine the names of objects inside the Editor.
Mechanism, Assembly, and Part
- Names should be reasonably descriptive and useful.
- Spaces are acceptable, using Title Capitalization.
- Names should not be so long that they run off the edge of the Editor Explorer windows.
Gallery Nodes
Gallery node names and part names should match. The galleries will generally be created with reasonable names that already follow these conventions, so parts can be created directly from these.
If there are any that need to be changed, the mechanical engineer can rename the nodes in the gallery.
Constraints
For most constraints, names should be composed of the connecting parts, using a code for the constraint type in between.
For example, the following name is a hinge connecting This Part and That Part:
This Part [H] That Part
The constraint codes are as follows:
- Hinge: H
- Prismatic: P
- Ball and Socket: B
- Universal: U
- Cylindrical: C
This convention doesn't make sense for constraints that are not the common two-part variety, so some other constraint names could be used.
Constraints that have a clear purpose that is more meaningful than the connected parts (such as actuators and winches) should be named to reflect their use. For example, a winch constraint might be called:
Forward Winch
Optionally, the connected parts could be added to the end of the name:
Forward Winch - Winch Drum [H] Boom
Attachment Points
Attachment point names should include the reference part, then [AP], then a description of the attachment point.
For example, and attachment point on the chassis of a vehicle that is used for the driver motion could be:
Chassis [AP] Driver Position
Collision Geometries
Collision geometries only appear inside parts and are rarely seen, so it's less critical to use a formal convention besides the default used in the Editor.
However, if there is anything slightly complicated, names should be descriptive, e.g., if certain bodies have fluid states, collision sensors, or composite geometries.
Folders
- Folders should be used to logically organize objects in the Explorer panel.
- Folders should be created for functional groups of objects since these are things that are likely to be worked on at the same time.
- In an assembly, this would mean parts and constraints from one mechanical structure are grouped together.
- In a mechanism, this could mean there is one folder for each particular actuator or subsystem, another folder for sounds, and another for lighting.
File Names
The following convention should be used to determine the names of the files on disk. The names here should reflect the Object Names in the previous section.
Mechanism and Assembly
File names should be determined by the name of the object (as the names appear inside the Editor), using the standard formatting done by the Editor.
- Mechanism:
[mechanism name].vxmechanism - Assembly:
[mechanism name]_[assembly name].vxassembly
This is the default naming already created by the Editor, however, it only creates them if the objects are created and named in the right order:
- From the mechanism, create a new assembly.
- Rename the assembly.
- Click Save.
If the assembly is created by creating a new document, it will not inherit the name from its parent.
If the assembly is not renamed before saving the document, it will be called "Assembly" instead of the proper name.
It is easier to get the names right initially, but it is possible to rename the files the Save As function.
Gallery
- If there is only one gallery for a mechanism, it can have the file name:
[mechanism name].vxgallery - If there are multiple galleries, they should have names:
[mechanism_name]_[gallery name].vxgallery - If there are galleries that are re-used between projects (such as rigging fittings), the names could be:
[gallery name].vxgallery
Script Field Names
Script Field names (inputs, outputs, parameters) should be descriptive, include spaces, and be in Title Capitalization. This matches the other field names that appear in the Editor. For example, a name could be "Winch Speed", which would internally be accessed as self.inputs.Winch_Speed.
In order to make it easier to quickly search for field variables, the variable name could be included after the corresponding field definition.
For example:
CreateInput(self, 'Tow Line Length', Types.Type_VxReal) #Tow_Line_Length
In this case, the field name appears in the Editor as Tow Line Length, and the corresponding variable inside the script is Tow_Line_Length.
Saving a File
Each document type (assembly, mechanism, scene, or Graphics Gallery) can be saved to one of the native Vortex® formats: *.vxassembly, *.vxmechanism, *.vxscene, and *.vxgraphicgallery.
Saving the File
To save a single component to a file:
- Do one of the following:
- Click
 then select Save.
 - Right-click on the File Tabs and choose Save from the context menu.

- Press the Ctrl+S key combination.
- Click
- Select the location and type the name you want to give the file in the browser.
- Click the Save button.
To copy a saved component under a different filename:
- Click
 then select Save As. A file browser opens allowing you to specify where you want to save the file.
 - Select the location and type the name you want to give the file in the browser.
- Click the Save button.
To save a copy of a component:
- Click
 then select Save As Copy. A file browser opens allowing you to specify where you want to save the file.
 - Select the location and type the name you want to give the file in the browser.
- Click the Save button.
Saving All Files
To save all components currently loaded in Vortex Studio Editor, do one of the following:
- Click
 then select Save All.
 - Press the Ctrl+Shift+S key combination.
Loading an Existing Document
You can load existing assembly, mechanism, scene, or Graphics Gallery files by following these instructions:
- Do one of the following:
- From the Home page, click the Open button.
- Press the Ctrl+O key combination.
- If the application is open, drag and drop a file into it.
- Select the
.vxscene,.vxmechanism,.vxassembly, or.vxgraphicgalleryfile and click Open (or double-click the file). The editor matching the document file you selected opens in a new tab.
Note While a file is open in Vortex Studio Editor, that file locks on disk, meaning it cannot be deleted. You must close the file if you want to delete it. If an open file has any sub-documents, those sub-documents are also locked, even if they are then removed from the parent file. You would have to close the parent file in order to unlock the sub-document. For example, if you have an assembly in a mechanism, the assembly is locked on disk until the mechanism itself is closed, even if you removed the assembly first.
Inserting Documents
Scenes, Mechanisms, and Assemblies all provide you with a way to insert a document (Mechanisms and Assemblies respectively), which can be empty or from an existing file.
Adding an Empty Document
To insert an empty sub-component, follow these instructions:
Find the required component in the Toolbox and add it (e.g., Empty Assembly).
The new component appears in the tree and its parameters appear on its Properties page indicating that it has not yet been saved to file:

Save the current component file.
Vortex® automatically saves the new sub-component file in the same directory as the original component file with a name that includes both the component and the subcomponent. For example, suppose you have a scene called
ForestGlen.vxsceneand you insert an empty mechanism, when you save the scene file, Vortex createsForestGlen_Mechanism.vxmechanism.Now you can right-click on the new sub-component and select Open <Component> from the context menu or use any of the methods for opening component files to set it up.
Adding an Existing Document
To insert an existing sub-component file, follow these instructions:
In the Toolbox, find the required <Component> From Files... item and add it.
The Add <Component> panel appears on the right side (in the Command Panel).
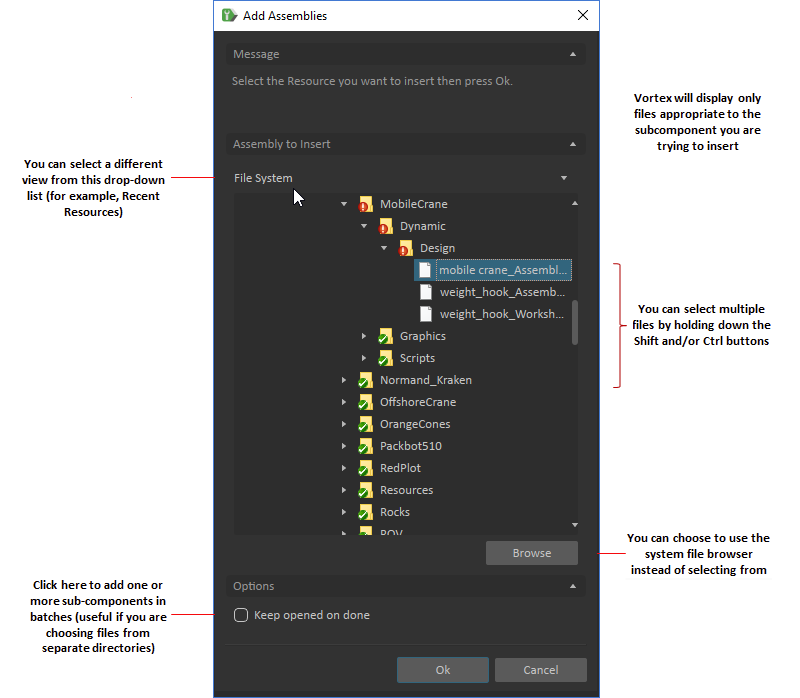
Do one of the following:
- Find the sub-component you want to use under the File System section and double-click it.
- Select multiple files from the File System section at once (for example, various parts of the same vehicle), and then click the checkmark on the top left of the Command panel.
- Click the Browse button to use your system's file browser to select the sub-component you want to use. If you click Cancel on your system's file browser, you return to the Add <Component> page in the Command Panel; but if you choose OK on the file browser or double-click something, both the file browser and the Command Panel close and your choice now appear in the Explorer.
- Enable the Keep opened on done option and then you can select one or more files, click the Commit button as many times as you like. Each time you click Commit, your selection is added until you either disable this option and click the Commit button again or just click the Cancel button.
You can add as many parts as required, and they will be visible in the 3D View.
Closing Files
You can close a single file, all files at once, or all files except the one that is in the currently active tab.
Closing a Single File
To close a single file, do one of the following:
- Right-click on the File tab and choose Close from the context menu.
- Click the Close Tab button (X) on the file tab.
- Press the Ctrl+W key combination.
Closing All Files
To close all open files at once, do one of the following:
- From the Home page, click the Close All button.
- Press the Ctrl+Shift+W key combination.
Closing All but the Current File
To keep the file in the active tab open but close every other file:
- Right-click on the file tab you want to keep open and choose Close All But This from the context menu.