Manipulating Objects in the 3D View
- DEVOPS
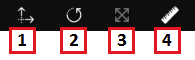
You must first select the object before you can use the buttons in the Transform toolbar as shown below.
where
- Move
- Rotate
- Resize
- Measure
Clicking the Move and Rotate buttons reveals a Coordinates panel (see below). The first row shows the translation or rotation from the origin, while the second row shows the difference in translation or rotation from the objects previous position.

The button to the right toggles between local transform and world.
When manipulating objects in the 3D View, an axis will be displayed to indicate that the object can be manipulated. This axis may be different depending on the action, such as rotating or moving.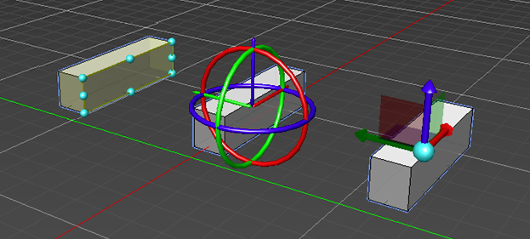
Tip To help you identify objects more quickly, you can view collisions geometries in color. To show CGs in color, navigate to the Options menu > Display tab > Collision Geometries and then click to select Enable Color Display.
 Moving an Object
- Select the object in the 3D View.
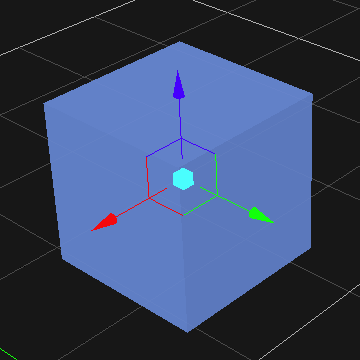
A bounding box or sphere indicates that the object is selected. - From the Transform toolbar, select the Move button.
The axis is displayed on the object. - Do one of the following:
- Click the X, Y, or Z axis and move the object along the axis.
- Click the small plane in between any two axes to move the object along two axes at once. Note that the color of the plane matches the axis that will be ignored.
- Click the small sphere at the origin of the axes on the Move control to move the object on all planes at once.
Snap to Grid
When you enable the Snap to Grid button ![]() , objects move in horizontal and vertical increments as defined in the Grid Options.
, objects move in horizontal and vertical increments as defined in the Grid Options.
If you move an object away from the grid, press the arrow next to Snap to Grid, then Snap to Closest Grid Point. The object will automatically move to the closest grid point.
Snap to Surface
Enabling the Snap to Surface button ![]() allows you to quickly align objects with surfaces.
allows you to quickly align objects with surfaces.
To use Snap to Surface:
- Select the object to be snapped.
- Click the Move transform button.
- Click the Snap to Surface button to activate the feature.
- Click the drop-down arrow in the Snap to Surface button.
- Select Follow Surface Normal if you want the object to orient itself with the plane of the other object's surface.
- In the Axis to Align field, select the directional axis of the object that you want to snap to another object. Use the axes indicators to help you determine the orientation of your object:
- Red points in the +X direction
- Green points in the +Y direction
- Blue points in the +Z direction
Select an Offset (in meters) if necessary.
By default, the center of the object will snap to another object's surface. In some instances, e.g., stacking boxes, you would have to set an offset to have the surface of one object snap to another.- Click and drag on the point of origin at the center of the axes to move the object close to the target object to snap them together.
Optionally, there is also a Snap to Floor button in the drop-down menu to snap the selected object to the default floor of the 3D View space.
Rotating an Object
- Select the object in the 3D View.
A bounding box or sphere indicates that the object is selected. - From the Transform toolbar, select the Rotate button.
The axis is displayed on the object. - Select the axis (it appears yellow while selected) and rotate the object around it.
Snap to Angle
While you can enter an object's rotation directly in the object's Properties panel, enabling the Snap to Angle button ![]() allows you to rotate an object in a more controlled way.
allows you to rotate an object in a more controlled way.
To use Snap to Angle:
- Select the object to be snapped.
- Click the Rotate transform button.
- Click the Snap to Angle button to activate the feature.
- Click the drop-down arrow in the Snap to Angle button.
- Specify the increment (in degrees) that you want the object to rotate.
When you rotate the object with this feature enabled, the object will turn in the increment that you specified.
Resizing an Object
- Select the object in the 3D View.
A bounding box or sphere indicates that the object is selected. - From the Transform toolbar, select the Resize button.
- Select the area in the object that you want to resize:
- For rectangles, select a face with the edges you want to resize.
- For spheres, you can only resize the diameter.
- For cylinders and capsules, you can resize the diameter and the height.
- Select the area and pull it along one axis or diagonally if you want to resize in two axes at once.
Measuring an Object
You can use the Measure tool to find the distance between two objects, or two points on the same object.
- Select the Measure button in the Transform toolbar to activate the measuring function.
- With the cross-hairs active, click an object.
- Move the cursor to the point whose distance you want to measure from the initial position. The measuring line will change from red to white when you hover over an eligible object.
- Click once you have settled on an eligible object.
A line now appears, displaying the distance (in meters) between the two selected points. Under the toolbar itself, there is additional information concerning the difference in position between the two points along the three axes.